- Android — Sending SMS
- Example
- Using Built-in Intent to send SMS
- Intent Object — Action to send SMS
- Intent Object — Data/Type to send SMS
- Intent Object — Extra to send SMS
- Example
- 2.2: Part 2 — Sending and Receiving SMS Messages
- Task 3. Receive SMS messages with a broadcast receiver
- 3.1 Add permission and create a broadcast receiver
- 3.2 Register the broadcast receiver
- 3.3 Implement the onReceive() method
- 3.4 Run the app and send a message
- Solution Code
- Coding challenge
- Android — отправка смс
- пример
- Использование встроенного намерения для отправки SMS
- Intent Object — Действие для отправки SMS
- Intent Object — Данные / Тип для отправки SMS
- Intent Object — Дополнительно для отправки SMS
- пример
Android — Sending SMS
In Android, you can use SmsManager API or devices Built-in SMS application to send SMS’s. In this tutorial, we shows you two basic examples to send SMS message −
Built-in SMS application
Of course, both need SEND_SMS permission.
Apart from the above method, there are few other important functions available in SmsManager class. These methods are listed below −
| Sr.No. | Method & Description | ||||||||||||||||||||||||||||||||||||||||||||||||||||||||||
|---|---|---|---|---|---|---|---|---|---|---|---|---|---|---|---|---|---|---|---|---|---|---|---|---|---|---|---|---|---|---|---|---|---|---|---|---|---|---|---|---|---|---|---|---|---|---|---|---|---|---|---|---|---|---|---|---|---|---|---|
| 1 |
| Step | Description |
|---|---|
| 1 | You will use Android Studio IDE to create an Android application and name it as tutorialspoint under a package com.example.tutorialspoint. |
| 2 | Modify src/MainActivity.java file and add required code to take care of sending sms. |
| 3 | Modify layout XML file res/layout/activity_main.xml add any GUI component if required. I’m adding a simple GUI to take mobile number and SMS text to be sent and a simple button to send SMS. |
| 4 | No need to define default string constants at res/values/strings.xml. Android studio takes care of default constants. |
| 5 | Modify AndroidManifest.xml as shown below |
| 6 | Run the application to launch Android emulator and verify the result of the changes done in the application. |
Following is the content of the modified main activity file src/com.example.tutorialspoint/MainActivity.java.
Following will be the content of res/layout/activity_main.xml file −
Here abc indicates about tutorialspoint logo
Following will be the content of res/values/strings.xml to define two new constants −
Following is the default content of AndroidManifest.xml −
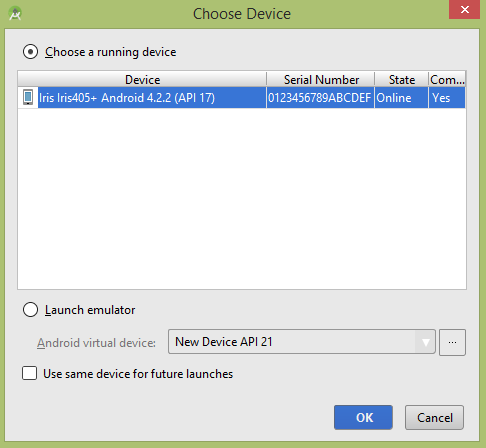
Let’s try to run your tutorialspoint application. I assume you have connected your actual Android Mobile device with your computer. To run the app from Android studio, open one of your project’s activity files and click Run  icon from the toolbar. Before starting your application, Android studio installer will display following window to select an option where you want to run your Android application.

Now you can enter a desired mobile number and a text message to be sent on that number. Finally click on Send SMS button to send your SMS. Make sure your GSM/CDMA connection is working fine to deliver your SMS to its recipient.
You can take a number of SMS separated by comma and then inside your program you will have to parse them into an array string and finally you can use a loop to send message to all the given numbers. That’s how you can write your own SMS client. Next section will show you how to use existing SMS client to send SMS.
Using Built-in Intent to send SMS
You can use Android Intent to send SMS by calling built-in SMS functionality of the Android. Following section explains different parts of our Intent object required to send an SMS.
Intent Object — Action to send SMS
You will use ACTION_VIEW action to launch an SMS client installed on your Android device. Following is simple syntax to create an intent with ACTION_VIEW action.
Intent Object — Data/Type to send SMS
To send an SMS you need to specify smsto: as URI using setData() method and data type will be to vnd.android-dir/mms-sms using setType() method as follows −
Intent Object — Extra to send SMS
Android has built-in support to add phone number and text message to send an SMS as follows −
Here address and sms_body are case sensitive and should be specified in small characters only. You can specify more than one number in single string but separated by semi-colon (;).
Example
Following example shows you in practical how to use Intent object to launch SMS client to send an SMS to the given recipients.
To experiment with this example, you will need actual Mobile device equipped with latest Android OS, otherwise you will have to struggle with emulator which may not work.
| Step | Description |
|---|---|
| 1 | You will use Android studio IDE to create an Android application and name it as tutorialspoint under a package com.example.tutorialspoint. |
| 2 | Modify src/MainActivity.java file and add required code to take care of sending SMS. |
| 3 | Modify layout XML file res/layout/activity_main.xml add any GUI component if required. I’m adding a simple button to launch SMS Client. |
| 4 | No need to define default constants.Android studio takes care of default constants. |
| 5 | Modify AndroidManifest.xml as shown below |
| 6 | Run the application to launch Android emulator and verify the result of the changes done in the application. |
Following is the content of the modified main activity file src/com.example.tutorialspoint/MainActivity.java.
Following will be the content of res/layout/activity_main.xml file −
Here abc indicates about tutorialspoint logo
Following will be the content of res/values/strings.xml to define two new constants −
Following is the default content of AndroidManifest.xml −
Let’s try to run your tutorialspoint application. I assume you have connected your actual Android Mobile device with your computer. To run the app from Android studio, open one of your project’s activity files and click Run icon from the toolbar. Before starting your application, Android studio will display following window to select an option where you want to run your Android application.

Select your mobile device as an option and then check your mobile device which will display following screen −
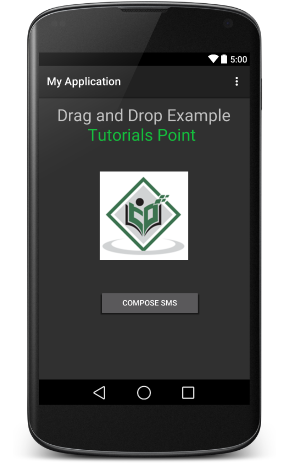
Now use Compose SMS button to launch Android built-in SMS clients which is shown below −
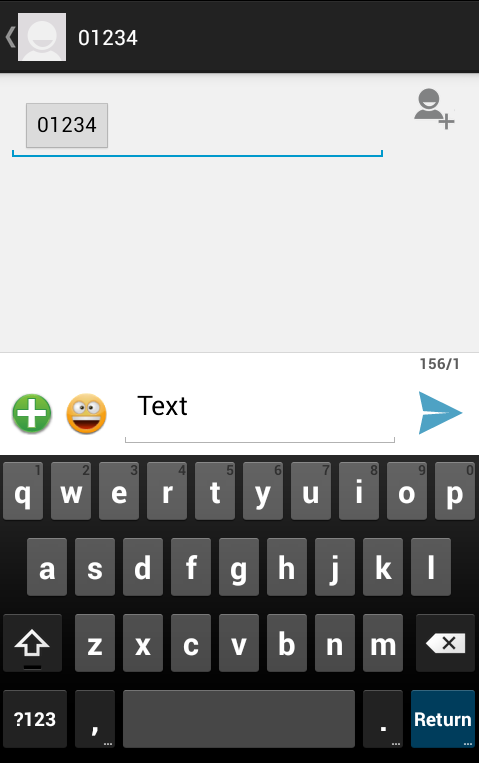
You can modify either of the given default fields and finally use send SMS button to send your SMS to the mentioned recipient.
Источник
2.2: Part 2 — Sending and Receiving SMS Messages
Contents:
Task 3. Receive SMS messages with a broadcast receiver
To receive SMS messages, use the onReceive() method of the BroadcastReceiver class. The Android framework sends out system broadcasts of events such as receiving an SMS message, containing intents that are meant to be received using a BroadcastReceiver. You need to add the RECEIVE_SMS permission to your app’s AndroidManifest.xml file.
3.1 Add permission and create a broadcast receiver
To add RECEIVE_SMS permission and create a broadcast receiver, follow these steps:
Open the AndroidManifest.xml file and add the android.permission.RECEIVE_SMS permission below the other permission for SMS use:
Receiving an SMS message is permission-protected. Your app can’t receive SMS messages without the RECEIVE_SMS permission line in AndroidManifest.xml.
Name the class «MySmsReceiver» and make sure «Exported» and «Enabled» are checked.
The «Exported» option allows your app to respond to outside broadcasts, while «Enabled» allows it to be instantiated by the system.
3.2 Register the broadcast receiver
In order to receive any broadcasts, you must register for specific broadcast intents. In the Intent documentation, under «Standard Broadcast Actions», you can find some of the common broadcast intents sent by the system. In this app, you use the android.provider.Telephony.SMS_RECEIVED intent.
Add the following inside the tags to register your receiver:
3.3 Implement the onReceive() method
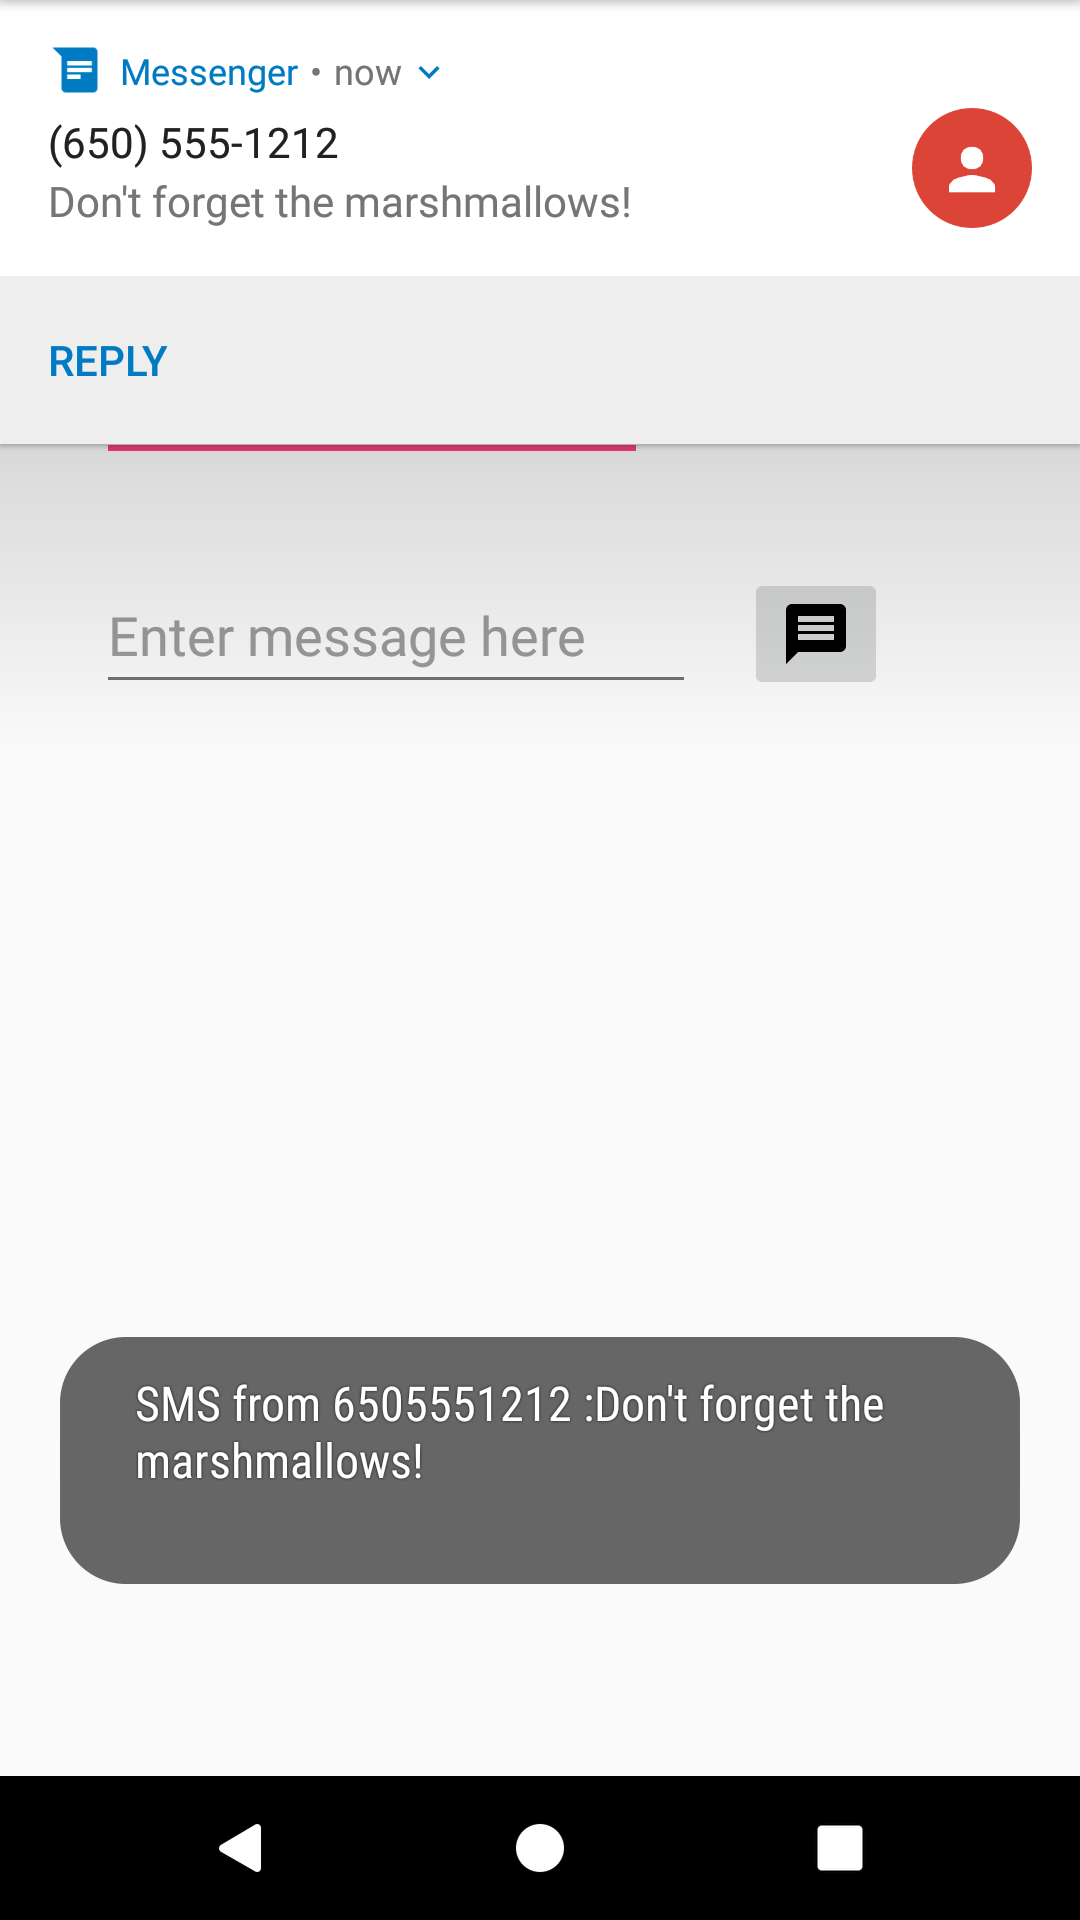
Once the BroadcastReceiver intercepts a broadcast for which it is registered ( SMS_RECEIVED ), the intent is delivered to the receiver’s onReceive() method, along with the context in which the receiver is running.
- Open MySmsReceiver and add under the class declaration a string constant TAG for log messages and a string constant pdu_type for identifying PDUs in a bundle:
- Delete the default implementation inside the supplied onReceive() method.
In the blank onReceive() method:
Add the @TargetAPI annotation for the method, because it performs a different action depending on the build version.
Retrieve a map of extended data from the intent to a bundle .
Define the msgs array and strMessage string.
Get the format for the message from the bundle .
As you enter SmsMessage[] , Android Studio automatically imports android.telephony.SmsMessage .
Initialize the msgs array, and use its length in the for loop:
Use createFromPdu(byte[] pdu, String format) to fill the msgs array for Android version 6.0 (Marshmallow) and newer versions. For earlier versions of Android, use the deprecated signature createFromPdu(byte[] pdu).
Build the strMessage to show in a toast message:
Get the originating address using the getOriginatingAddress() method.
Get the message body using the getMessageBody() method.
Add an ending character for an end-of-line.
The complete onReceive() method is shown below:
3.4 Run the app and send a message
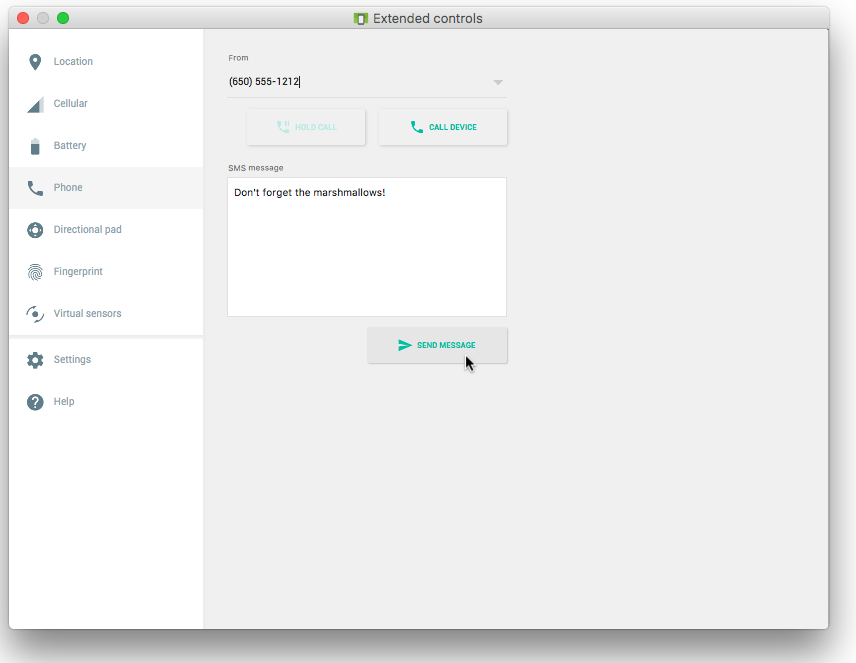
Run the app on a device. If possible, have someone send you an SMS message from a different device.
You can also receive an SMS text message when testing on an emulator. Follow these steps:
- Run the app on an emulator.
Click the … (More) icon at the bottom of the emulator’s toolbar on the right side, as shown in the figure below:

Solution Code
Android Studio project: SmsMessaging
Coding challenge
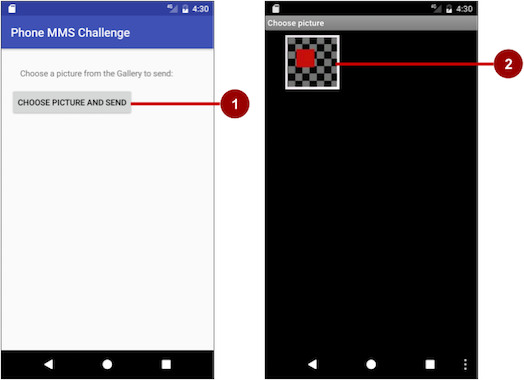
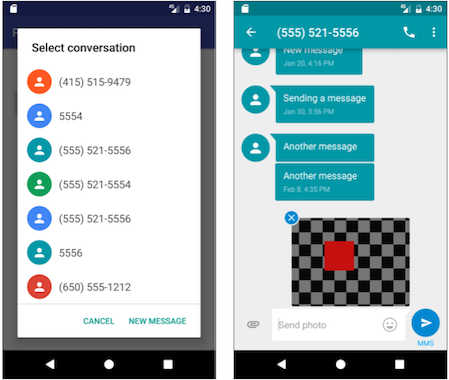
Challenge: Create a simple app with one button, Choose Picture and Send, that enables the user to select an image from the Gallery and send it as a Multimedia Messaging Service (MMS) message. After tapping the button, a choice of apps may appear, including the Messenger app. The user can select the Messenger app, and select an existing conversation or create a new conversation, and then send the image as a message.
The following are hints:
- To access and share an image from the Gallery, you need the following permission in the AndroidManifest.xml file:
- To enable the above permission, follow the model shown previously in this chapter to check for the READ_EXTERNAL_STORAGE permission, and request permission if necessary.
- Use the following intent for picking an image:
- Override the onActivityResult method to retrieve the intent result, and use getData() to get the Uri of the image in the result:
- Set the image’s Uri, and use an intent with ACTION_SEND , putExtra() , and setType() :
- Android Studio emulators can’t pass MMS messages to and from each other. You must test this app on real Android devices.
- For more information about sending multimedia messages, see Sending MMS with Android.
Android Studio project: MMSChallenge
Источник
Android — отправка смс
В Android вы можете использовать API-интерфейс SmsManager или встроенное приложение SMS для отправки SMS. В этом уроке мы покажем вам два основных примера отправки SMS-сообщения:
Конечно, обоим нужно разрешение SEND_SMS .
Помимо описанного выше метода, в классе SmsManager есть еще несколько важных функций. Эти методы перечислены ниже —
| Sr.No. | Метод и описание | |||||||||||||||||||||||||||
|---|---|---|---|---|---|---|---|---|---|---|---|---|---|---|---|---|---|---|---|---|---|---|---|---|---|---|---|---|
| 1 |
| шаг | Описание |
|---|---|
| 1 | Вы будете использовать Android Studio IDE для создания приложения Android и назовите его как tutorialspoint в пакете com.example.tutorialspoint . |
| 2 | Измените файл src / MainActivity.java и добавьте необходимый код для отправки смс. |
| 3 | Измените XML-файл макета. Res / layout / activity_main.xml добавьте любой компонент GUI, если это необходимо. Я добавляю простой графический интерфейс, чтобы взять номер мобильного телефона и текст SMS для отправки и простую кнопку для отправки SMS. |
| 4 | Нет необходимости определять строковые константы по умолчанию в res / values / strings.xml. Android студия заботится о константах по умолчанию. |
| 5 | Измените AndroidManifest.xml, как показано ниже |
| 6 | Запустите приложение, чтобы запустить эмулятор Android, и проверьте результат изменений, внесенных в приложение. |
Ниже приведено содержимое измененного основного файла активности src / com.example.tutorialspoint / MainActivity.java .
Ниже будет содержание файла res / layout / activity_main.xml —
Здесь abc указывает на логотип tutorialspoint
Ниже будет содержимое файла res / values / strings.xml для определения двух новых констант:
Ниже приводится содержимое по умолчанию для AndroidManifest.xml —
Давайте попробуем запустить ваше приложение tutorialspoint . Я предполагаю, что вы подключили свое фактическое мобильное устройство Android к компьютеру. Чтобы запустить приложение из студии Android, откройте один из файлов деятельности вашего проекта и нажмите «Выполнить».  значок с панели инструментов. Перед запуском приложения установщик Android-студии отобразит следующее окно, чтобы выбрать вариант, в котором вы хотите запустить приложение Android.

Теперь вы можете ввести нужный номер мобильного телефона и текстовое сообщение, которое будет отправлено на этот номер. Наконец, нажмите кнопку « Отправить SMS» , чтобы отправить SMS. Убедитесь, что ваше соединение GSM / CDMA работает нормально, чтобы доставить ваше SMS получателю.
Вы можете взять несколько SMS, разделенных запятой, а затем внутри вашей программы вам придется анализировать их в строку массива, и, наконец, вы можете использовать цикл для отправки сообщения на все заданные номера. Вот как вы можете написать свой собственный клиент SMS. Следующий раздел покажет вам, как использовать существующий клиент для отправки SMS.
Использование встроенного намерения для отправки SMS
Вы можете использовать Android Intent для отправки SMS, вызывая встроенную функцию SMS в Android. В следующем разделе описываются различные части нашего объекта Intent, необходимые для отправки SMS.
Intent Object — Действие для отправки SMS
Вы будете использовать действие ACTION_VIEW, чтобы запустить клиент SMS, установленный на вашем устройстве Android. Ниже приведен простой синтаксис для создания намерения с действием ACTION_VIEW.
Intent Object — Данные / Тип для отправки SMS
Для отправки SMS необходимо указать smsto: в качестве URI с помощью метода setData () и тип данных будет vnd.android-dir / mms-sms с помощью метода setType () следующим образом:
Intent Object — Дополнительно для отправки SMS
Android имеет встроенную поддержку для добавления номера телефона и текстового сообщения для отправки SMS следующим образом:
Здесь address и sms_body чувствительны к регистру и должны указываться только маленькими символами. Вы можете указать более одного числа в одной строке, но разделяя их точкой с запятой (;).
пример
В следующем примере показано, как с помощью объекта Intent запустить клиент SMS для отправки SMS получателям.
Чтобы поэкспериментировать с этим примером, вам понадобится настоящее мобильное устройство с новейшей ОС Android, в противном случае вам придется бороться с эмулятором, который может не работать.
| шаг | Описание |
|---|---|
| 1 | Вы будете использовать IDE Android Studio для создания приложения Android и назовите его как tutorialspoint в пакете com.example.tutorialspoint . |
| 2 | Измените файл src / MainActivity.java и добавьте необходимый код для отправки SMS. |
| 3 | Измените XML-файл макета. Res / layout / activity_main.xml добавьте любой компонент GUI, если это необходимо. Я добавляю простую кнопку для запуска SMS-клиента. |
| 4 | Нет необходимости определять константы по умолчанию. Android-студия заботится о константах по умолчанию. |
| 5 | Измените AndroidManifest.xml, как показано ниже |
| 6 | Запустите приложение, чтобы запустить эмулятор Android, и проверьте результат изменений, внесенных в приложение. |
Ниже приведено содержимое измененного основного файла активности src / com.example.tutorialspoint / MainActivity.java .
Ниже будет содержание файла res / layout / activity_main.xml —
Здесь abc указывает на логотип tutorialspoint
Ниже будет содержимое файла res / values / strings.xml для определения двух новых констант:
Ниже приводится содержимое по умолчанию для AndroidManifest.xml —
Давайте попробуем запустить ваше приложение tutorialspoint . Я предполагаю, что вы подключили свое фактическое мобильное устройство Android к компьютеру. Чтобы запустить приложение из студии Android, откройте один из файлов деятельности вашего проекта и нажмите «Выполнить».  значок с панели инструментов. Перед запуском приложения Android Studio отобразит следующее окно, чтобы выбрать опцию, в которой вы хотите запустить приложение Android.
Выберите мобильное устройство в качестве опции, а затем проверьте свое мобильное устройство, которое отобразит следующий экран —

Теперь используйте кнопку « Создать SMS» для запуска встроенных в Android клиентов SMS, как показано ниже:

Вы можете изменить любое из указанных полей по умолчанию и, наконец, использовать кнопку «Отправить SMS», чтобы отправить свое SMS указанному получателю.
Источник


