- Android Snackbar Example
- Difference between Toast and Snackbar
- Let’s Getting into Snackbar Android Example
- Create Simple Android Snackbar
- Android Snackbar with Action Callback
- Customizing the Android Snackbar
- Theming snackbars
- Implementing snackbar theming
- Android snackbar example
- Kotlin Android Snackbar – Change Text Color, Background Color, Action Button Color
- Android Snackbar – Change Text Color, Background Color, Action Button Color
- Example – Snackbar Change Background and Text Color
- Conclusion
- jakubkinst / ThemedSnackbar.java
- This comment has been minimized.
- ignaciotcrespo commented Aug 7, 2017
- Android Snackbar(Java/Kotlin)
- Snackbar
- Simple Snackbar
- Snackbar with Action
- Snackbar with Custom View
- Creating New Project
- Complete code in Java
- Android studio snackbar background color
- Advantages of Using Snackbar over Toast:
- Using Snackbar In Android Studio:
- Creating a Snackbar Without An ActionButton in Android Studio:
- Creating A Snackbar With An Action Button In Android Studio:
- Creating A Custom Snackbar With An Action Button:
- Styling The Color, Background, Size And More In Snackbar:
- Snackbar Example In Android Studio:
- Quick Recap About Snackbar:
Android Snackbar Example

Android Snackbar is an interesting component introduced by Material Design. Snackbars are just like Toast messages except they provide action to interact with. Snackbar will be displayed at the bottom of the screen and can be swiped off in order to dismiss them.

Difference between Toast and Snackbar
- Toast messages can be customized and printed anywhere on the screen, but a Snackbar can be only shown in the bottom of the screen.
- A Toast message doesn’t have action button, but Snackbar may have action button optionally.
- Toast message cannot be off until the time limit finish, but Snackbar can be swiped off before the time limit.
You can set how long the message will be shown using this three different values.
- Snackbar.LENGTH_LONG
- Snackbar.LENGTH_SHORT
- Snackbar.LENGTH_INDEFINITE
Let’s Getting into Snackbar Android Example
In Android Studio, Create New Project and fill all the details required to create a new project.
Open build.gradle and add Material Design dependency.
By using material dependency, you can also create components like Recyclerview, Cardview and snackbar etc. If you want to know more about other material components check below links.
Also, setup the application theme as theme.MaterialComponents.
Now, done with the project setup.
Create Simple Android Snackbar
Below is the syntax of a simple snackbar. The make function accepts three parameters. View, display message and duration of the message to be displayed.

Android Snackbar with Action Callback
You can also mention a callback interaction method using setAction() method. This allows us to take certain action when the user interacts with the snackbar.
Customizing the Android Snackbar
Snackbar comes with default white color text and #323232 background color. You can override these colors.
Theming snackbars
Snackbars support Material Theming and can be customized in terms of color and typography.
Implementing snackbar theming
Using theme attributes in res/values/styles.xml
or in code (affects only this snackbar):
Android snackbar example
Download the example from github.
Thanks for reading this post. Material design having lot of useful components like Material Button , Cardview etc. I will write more about material design in my future post.
Источник
Kotlin Android Snackbar – Change Text Color, Background Color, Action Button Color
Android Snackbar – Change Text Color, Background Color, Action Button Color
Snackbar’s Text Color, Background Color, Action Button Color could be changed using view.setBackgroundColor(), snack.view.snackbar_text.setTextColor() and setActionTextColor() respectively.
1. To change Snackbar’s Text Color

2. To change Snackbar’s Background Color
3. To change Snackbar’s Action Button Color
The Snackbar’s look and feel would change to as shown in the following screenshot.
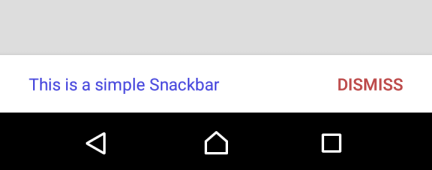
You may change the colors as per your requirement.
Example – Snackbar Change Background and Text Color
In this example, we shall display a Snackbar when button in the activity is clicked. Snackbar’s background color, Snackbar’s text color, Snackbar’s Action button text color are changed from their default values.
Create an Android Application with Kotlin Support and find the code for activity_main.xml layout file and MainActivity.kt provided below.
activity_main.xml
MainActivity.kt
Run this Android Application, and you get an Android screen display as shown in the following, with a button. Click on this button. Snackbar with modified colors will slide up from the bottom of the screen.
Conclusion
In this Kotlin Android Tutorial, we have learnt to change Snackbar’s text color, background color, action button text color.
Источник
jakubkinst / ThemedSnackbar.java
This file contains bidirectional Unicode text that may be interpreted or compiled differently than what appears below. To review, open the file in an editor that reveals hidden Unicode characters. Learn more about bidirectional Unicode characters
| package cz.kinst.jakub.themedsnackbar ; |
| import android.content.Context ; |
| import android.support.design.widget.Snackbar ; |
| import android.util.TypedValue ; |
| import android.view.View ; |
| /** |
| * Created by jakubkinst on 25/06/15. |
| */ |
| public class ThemedSnackbar < |
| public static Snackbar make ( View view , CharSequence text , int duration ) < |
| Snackbar snackbar = Snackbar . make(view, text, duration); |
| snackbar . getView() . setBackgroundColor(getAttribute(view . getContext(), R . attr . colorAccent)); |
| return snackbar; |
| > |
| public static Snackbar make ( View view , int resId , int duration ) < |
| return make(view, view . getResources() . getText(resId), duration); |
| > |
| private static int getAttribute ( Context context , int resId ) < |
| TypedValue typedValue = new TypedValue (); |
| context . getTheme() . resolveAttribute(resId, typedValue, true ); |
| return typedValue . data; |
| > |
| > |
This comment has been minimized.
Copy link Quote reply
ignaciotcrespo commented Aug 7, 2017
Worked perfect, thanks! 👍
I needed to setup the action text color also using snackbar.setActionTextColor(getAttribute(view.getContext(), android.R.attr.textColorPrimary));
You can’t perform that action at this time.
You signed in with another tab or window. Reload to refresh your session. You signed out in another tab or window. Reload to refresh your session.
Источник
Android Snackbar(Java/Kotlin)
This article is about Android Snackbar and how to use it in android application with simple examples in Java and Kotlin.
Snackbar
Snackbar is an Android Material Design component . It provide lightweight response about an operation by showing a short message at the bottom of the screen on mobile and lower left on larger devices.
A Snackbar can contain an optional action button to perform action, such as undoing an action or retrying an action.
Only one snackbar will be shown at a time.
Snackbar disappear either after a timeout or after a user interaction elsewhere on the screen (particularly after interactions that invites a new surface or activity), but can also be swiped off the screen.
Note: Snackbars work best if they are displayed inside of a CoordinatorLayout. CoordinatorLayout allows the snackbar to enable behavior like swipe-to-dismiss, as well as automatically moving widgets like FloatingActionButton.
Simple Snackbar
The below code snippet is an example of Simple Snackbar
The make function accepts three parameters:
View : Used to find a parent view to hold Snackbar’s view.
CharSequence : The text to show on snackbar.
Duration : How long to display the message. It can be LENGTH_SHORT, LENGTH_LONG, LENGTH_INDEFINITE or a custom duration in milliseconds.
- LENGTH_SHORT : Show the Snackbar for a short period of time.
- LENGTH_LONG : Show the Snackbar for a long period of time.
- LENGTH_INDEFINITE : Show the snackbar until it’s either dismissed or another snackbar is shown.
show() : Used to display the Snackbar on the screen.
Snackbar with Action
You can add an action to a Snackbar , allowing the user to respond to your message.
To add an action, use the setAction method on the object returned from make. Snackbars are automatically dismissed when the action is clicked.
setAction() : Set the action to be displayed in the Snackbar. It takes two parameters:
- text : Text to display for the action
- listener : callback to be invoked when the action is clicked.
The below code snippet is an example of how to show a snackbar with a message and an action:
Snackbar with Custom View
Android Snackbar allows you to create a customized layout for your snackbar.
To create a custom layout, define a View layout, in XML. The following snippet contains a customized layout for snackbar (saved as layout/custom_snackbar.xml):
You must use the ID of the ConstraintLayout element ( “custom_snackbar_container“) and the ID of the XML layout file “custom_snackbar.xml” to inflate the layout, as shown here:
Now pass this View object (created using custom layout) to the addView() method.
Creating New Project
1. In Android Studio , go to File ⇒ New Project , fill all the details required to create a new project and then click on finish .
2. Open build.gradle (app level), add the material dependency as shown below and then sync your project:
build.gradle
3. Rename the layout file activity_main.xml as activity_snackbar.xml and add the below code. This layout file consist of three buttons, SIMPLE SNACKBAR (To show Android standard snackbar), SNACKBAR WITH ACTION (To show snackbar with action), SNACKBAR WITH CUSTOM VIEW (To show snackbar with custom view).
activity_snackbar.xml
4. Create a new layout file custom_snackbar.xml (layout->New->Layout Resource File) and add the below code. This layout file represents the custom layout of snackbar.
custom_snackbar.xml
Complete code in Java
Create a new activity SnackbarActivityJava.java This activity contains three buttons with click listener to show the different ways of implementing the Snackbar in Java.
SnackbarActivityJava.java
When you run the application it will look like this:
Источник
Android studio snackbar background color
A Snackbar is a widget that looks like a small banner that pops up at the bottom of the user’s phone screen. It might be very useful for indicating to a user any type of form errors, confirming to users that an action was taken, or alerting them to take some action. In addition, a Snackbar can also offer a button for a custom action such as “dismiss,” “retry,” “undo,” or “override” etc.

Android Snackbar is just like a Toast in Android except that it can provide the user with the action button to interact with. You may call the Snackbar a toast widget with an optional action button. I call the action button optional because you may choose to include it or you may just ignore it for it to look similar to a toast (which has no action button).
Generally, the Snackbar is used when instantaneous feedback is required from the user after an action is performed.
There are already many libraries on the internet for making Snackbar in Android; but in this tutorial, we will be using the official Android Material Design Support Library.
Table Of Contents
Advantages of Using Snackbar over Toast:
Below are the few advantages of using Snackbar over Toast:
1. It can be programmed to undo or reverse an action performed by a user not quite long. For example, restoring a recently deleted file, or even reopening a browser tab that has just been closed.
2. User can manually swipe a Snackbar right or left to quickly dismiss it; unlike toast that must remain until the end of the time scheduled for it.
3. Snackbar only display on the bottom of the screen, unlike toast that may obstruct an important part of the screen.
Using Snackbar In Android Studio:
To make use of Snackbar in your project, you must first include the Android Design Support Library. And to do this you can add the below code to your build.gradle (Module app) file:
Creating a Snackbar Without An ActionButton in Android Studio:
This kind of Snackbar is very similar to a toast except that it has all the qualities of a Snackbar save for the action button.
In the code above:
make() – make() method accepts three (3) arguments: the first is the root layout of the activity where the Snackbar will be displayed, the second argument is the message to display in the Snackbar, and the third is the duration for the Snackbar to display.
show() – show() method display the Snackbar
Important Note: If you forget to call the show() method for the Snackbar, it will never be displayed.
Creating A Snackbar With An Action Button In Android Studio:
The below code will display a Snackbar with the message “Message is deleted” together with an action button “UNDO”; when the UNDO button is clicked, the message “Message is restored” will be displayed in another Snackbar.
Creating A Custom Snackbar With An Action Button:
The below code will create a Snackbar with a yellow text color and a red action button color.
Styling The Color, Background, Size And More In Snackbar:
You may use the below to style the Snackbar or even its action button.
Snackbar Example In Android Studio:
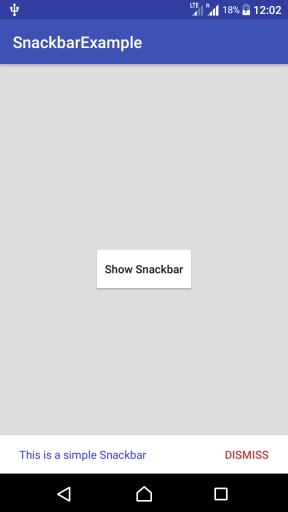
The below example shows the sample code of a project which implements the Snackbar widgets. When a user will tap on the button then a Snackbar will be displayed on the screen with a message.
Below you can download code, see final output and step by step explanation of Snackbar example in Android Studio.
Download Code
Step 1: Create a new project and name is SnackbarExample
Step 2: Open build.gradle (Module: app) and add the below design support library for your project. This will allow support for Snackbar.
Step 3: Now open activity_main.xml and enter the below code:
Here we design the layout for SnackBar example using Linear Layout, TextView and Button. On tap of Button, we will display the SnackBar message.
Step 4: Open MainActivity.java and add the below code:
Here we enable the SnackBar message on the tap of Button. showSnacbar function is used to display the SnackBar message on screen.
Output:
Now run the App and you will see a button on the screen. Now tap on the button to display the Snackbar message.
Quick Recap About Snackbar:
1. To use the Snackbar, ensure you have included the Android Design Support Library in your project.
2. You must call the show() method before the Snackbar will be displayed.
3. The Snackbar action button should be used for lightweight user interaction. i.e. instantaneous actions.
In conclusion, Snackbar is very handy and useful for alerting the user over an action recently performed, and providing an option for reversal of recently performed action.
Источник


