- Spinner
- Общая информация
- Используем адаптер
- В закрытом состоянии
- В раскрытом состоянии
- За честные выборы! — что выбрал пользователь
- Предупредить компонент об изменении пунктов
- Найти позицию по слову
- Тонкая настройка — своя разметка для Spinner
- spinner.xml
- spinner_dropdown_item.xml
- Программная настройка цвета и размера текста для первой строчки
- Не выбирать элемент при запуске
- CustomAdapter.java
- Режим android:spinnerMode=»dialog»
- Android: Spinner customizations
- Custom Spinner
- Adjusting the Spinner widget
- Adapter
- Drawbacks
- Custom Spinner implementation
- Android Custom Spinner | Disable Dropdown, Text, Divider, Border, Image
- 1. Android Spinner Custom Adapter Example Tutorial
- Looks of Android Custom Spinner Custom Adapter
- Step 1. Layout Files
- Step 2. Preparing Custom Adapter
- Going Deep
- Step 3. Final Changes
- 2. Android Spinner Disable Item Dropdown Selecetd Item | Close Dropdown
- View Disable Item
- Step 1. Closing or Hiding Dropdown Menu Programmatically
- Step 2. Disable particular Item in Dropdown
- Drawable files
- Adapter Class
- Step 3. Ending Updates
- 3. Android Spinner Text Color Size Programmatically Selected Item & Dropdown
- The Ending Scenes
- Step 1. Same Text For Spinner and Drop down
- Step 2. Spinner With Custom Adapter
- 4. Android Spinner Divider Color Style Size Programmatically
- Last Output View
- Step 1. Using Drop down View Resource
- Step 2. Give style to spinner
- Step 3. Divider with Custom Adapter
- 5. Android Custom Spinner Dropdown Arrow Background Border Icon Color
- View Custom Dropdown Icon And Background Color
- Step 1. Inserting Images
- Step 2. Drawable XML files
- Shape of the Spinner
- Padding
- Background Color Effects
- Border Color And Width
- Corners of Spinner
- Custom Drop down Arrow
- Size And Color Of Drop Down Arrow
- Step 3. Adding Spinner in Main File
- 6. Android Custom Spinner With Image And Text | Custom Adapter
- Look And Feel
- Step 1. Custom Layout
- Step 2. Add Fruit Images
- Step 3. Custom Adapter
- Step 4. Last Writings
- Explanation of Above Code
- 3 thoughts on “Android Custom Spinner | Disable Dropdown, Text, Divider, Border, Image”
Spinner
Общая информация
Компонент Spinner из раздела Containers (раньше был в разделе Widgets) похож на выпадающий список (ComboBox), используемый в OC Windows (не путать с игрушкой Fidget Spinner). В закрытом состоянии компонент показывает одну строчку, при раскрытии выводит список в виде диалогового окна с переключателями.
Сначала покажу быстрый способ использования элемента. При добавлении элемента на экран отображается просто полоска со строкой Item1. В основном настройка происходит программным путём. Но можно и через XML. Добавим в строковый файл ресурсов strings.xml несколько элементов массива:
Теперь осталось в атрибуте android:entries указать на созданный массив и компонент Spinner будет заполнен данными. Запустите проект и проверьте.
Цвет компонента можно задать в атрибуте android:background=»@color/colorAccent».
Внешний вид компонента в разных версиях Android менялся.
Если нужно из программы узнать, какой пункт из выпадающего списка выбран в Spinner, то можно использовать такой код, например, при нажатии кнопки:
Если нужен не текст, а номер позиции, то вызывайте метод getSelectedItemPosition()
Если вам нужно получить выбранный элемент сразу в момент выбора, то используйте метод setOnItemSelectedListener(), который описан ниже.
Используем адаптер
Как и в случае с компонентом ListView, Spinner использует адаптер данных для связывания содержимого из набора данных с каждым пунктом в списке. Для загрузки данных нужно:
- Получить экземпляр компонента Spinner
- Настроить адаптер данных для связывания
- Вызвать метод setAdapter()
В закрытом состоянии

В раскрытом состоянии

Данные в закрытом и раскрытом состоянии Spinner отображает по разному. Поэтому необходимо создавать макеты шаблонов для обоих состояний. Android предоставляет несколько своих собственных ресурсов для Spinner для простых задач. Например, есть ресурс android.R.layout.simple_spinner_item для создания представления для каждого элемента списка. Ресурс android.R.layout.simple_spinner_dropdown_item служит шаблоном для раскрывающего списка.
Создадим строковый массив в файле strings.xml:
Загрузим строковый массив с именем animals в экземпляр класса ArrayAdapter при помощи метода createFromResource():
Запустив программу, вы увидите работающий пример, как на картинках, представленных выше.
По умолчанию выводится первый элемент списка. С помощью метода setSelection() можно установить нужный элемент по умолчанию, указав индекс из строкового ресурса.
За честные выборы! — что выбрал пользователь
Нам интересно узнать, что именно выбрал пользователь из списка и обработать эту информацию.
Нам нужно получить выбранный пользователем пункт в компоненте Spinner при помощи метода setOnItemSelectedListener() и реализовать метод onItemSelected() класса AdapterView.OnItemSelectedListener:
Теперь при выборе любого пункта вы получите всплывающее сообщение о выбранном пункте. Обратите внимание, что нам также пришлось реализовать вызов обратного вызова onNothingSelected().
В начале статьи показывался более простой способ с использованием метода getSelectedItem(), который достаточен для большинства случаев.
Предупредить компонент об изменении пунктов
Если в приложении вы изменили состав выпадающего списка, то необходимо сообщить компоненту Spinner, чтобы он показывал обновлённый список. Сделать это можно при помощи метода адаптера notifyDataSetChanged().
Найти позицию по слову
Если мы хотим узнать, в какой позиции находится то или иное слово, то нужно получить адаптер через метод getAdapter(), а затем уже и позицию.
Тонкая настройка — своя разметка для Spinner
Вы можете установить собственный фон, но не можете установить, к примеру, цвет и размер текста в настройках свойств. В предыдущих примерах мы видели, что при подключении к адаптеру используются системные разметки android.R.layout.simple_spinner_item и android.R.layout.simple_spinner_dropdown_item. Ничто не мешает вам посмотреть исходники данных файлов и создать файлы для собственной разметки, которые потом можно подключить к адаптеру.
Давайте создадим собственную разметку с значками. В папке res/layout создаём файл row.xml:
Осталось в коде заменить две строки на одну:

В примере использовался один общий файл, но можете создать два отдельных шаблона для закрытого и раскрытого вида элемента. Например, так (простейший вариант):
spinner.xml
spinner_dropdown_item.xml
В принципе, вы можете установить свой значок для каждого пункта, вам нужно создать свой адаптер под свои нужды. Создадим новый класс на основе ArrayAdapter и реализуем задачу. Теперь у двух любимых дней недели будет выводиться лапочка.

Программная настройка цвета и размера текста для первой строчки
В сети нашёл пример программной установки цвета и размера текста для первой строчки элемента в закрытом состоянии. Может кому пригодится.

Не выбирать элемент при запуске
Иногда хочется, что при запуске не выбирался первый элемент списка, как это происходит по умолчанию. Решение в лоб — добавить первым элементом пустую строку или текст «Выберите. » не слишком красив, так как при раскрытии списка мы увидим эти элементы, которые только портят картину. В сети нашёл вариант, использующий собственный адаптер.
CustomAdapter.java
Попробуйте этот вариант, может он подойдёт вам.
Режим android:spinnerMode=»dialog»
У компонента есть атрибут android:spinnerMode, у которого можно установить значение dialog. В этом случае при раскрытии списка задняя активность затемняется. Это хорошо заметно на белом фоне. Проверьте самостоятельно.
В этом режиме диалога для компонента Spinner можно вывести заголовок с помощью методов setPrompt() или setPromptId(). Заголовок выводится при раскрытии списка.
Источник
Android: Spinner customizations
Implement Android dropdown just the way you want.
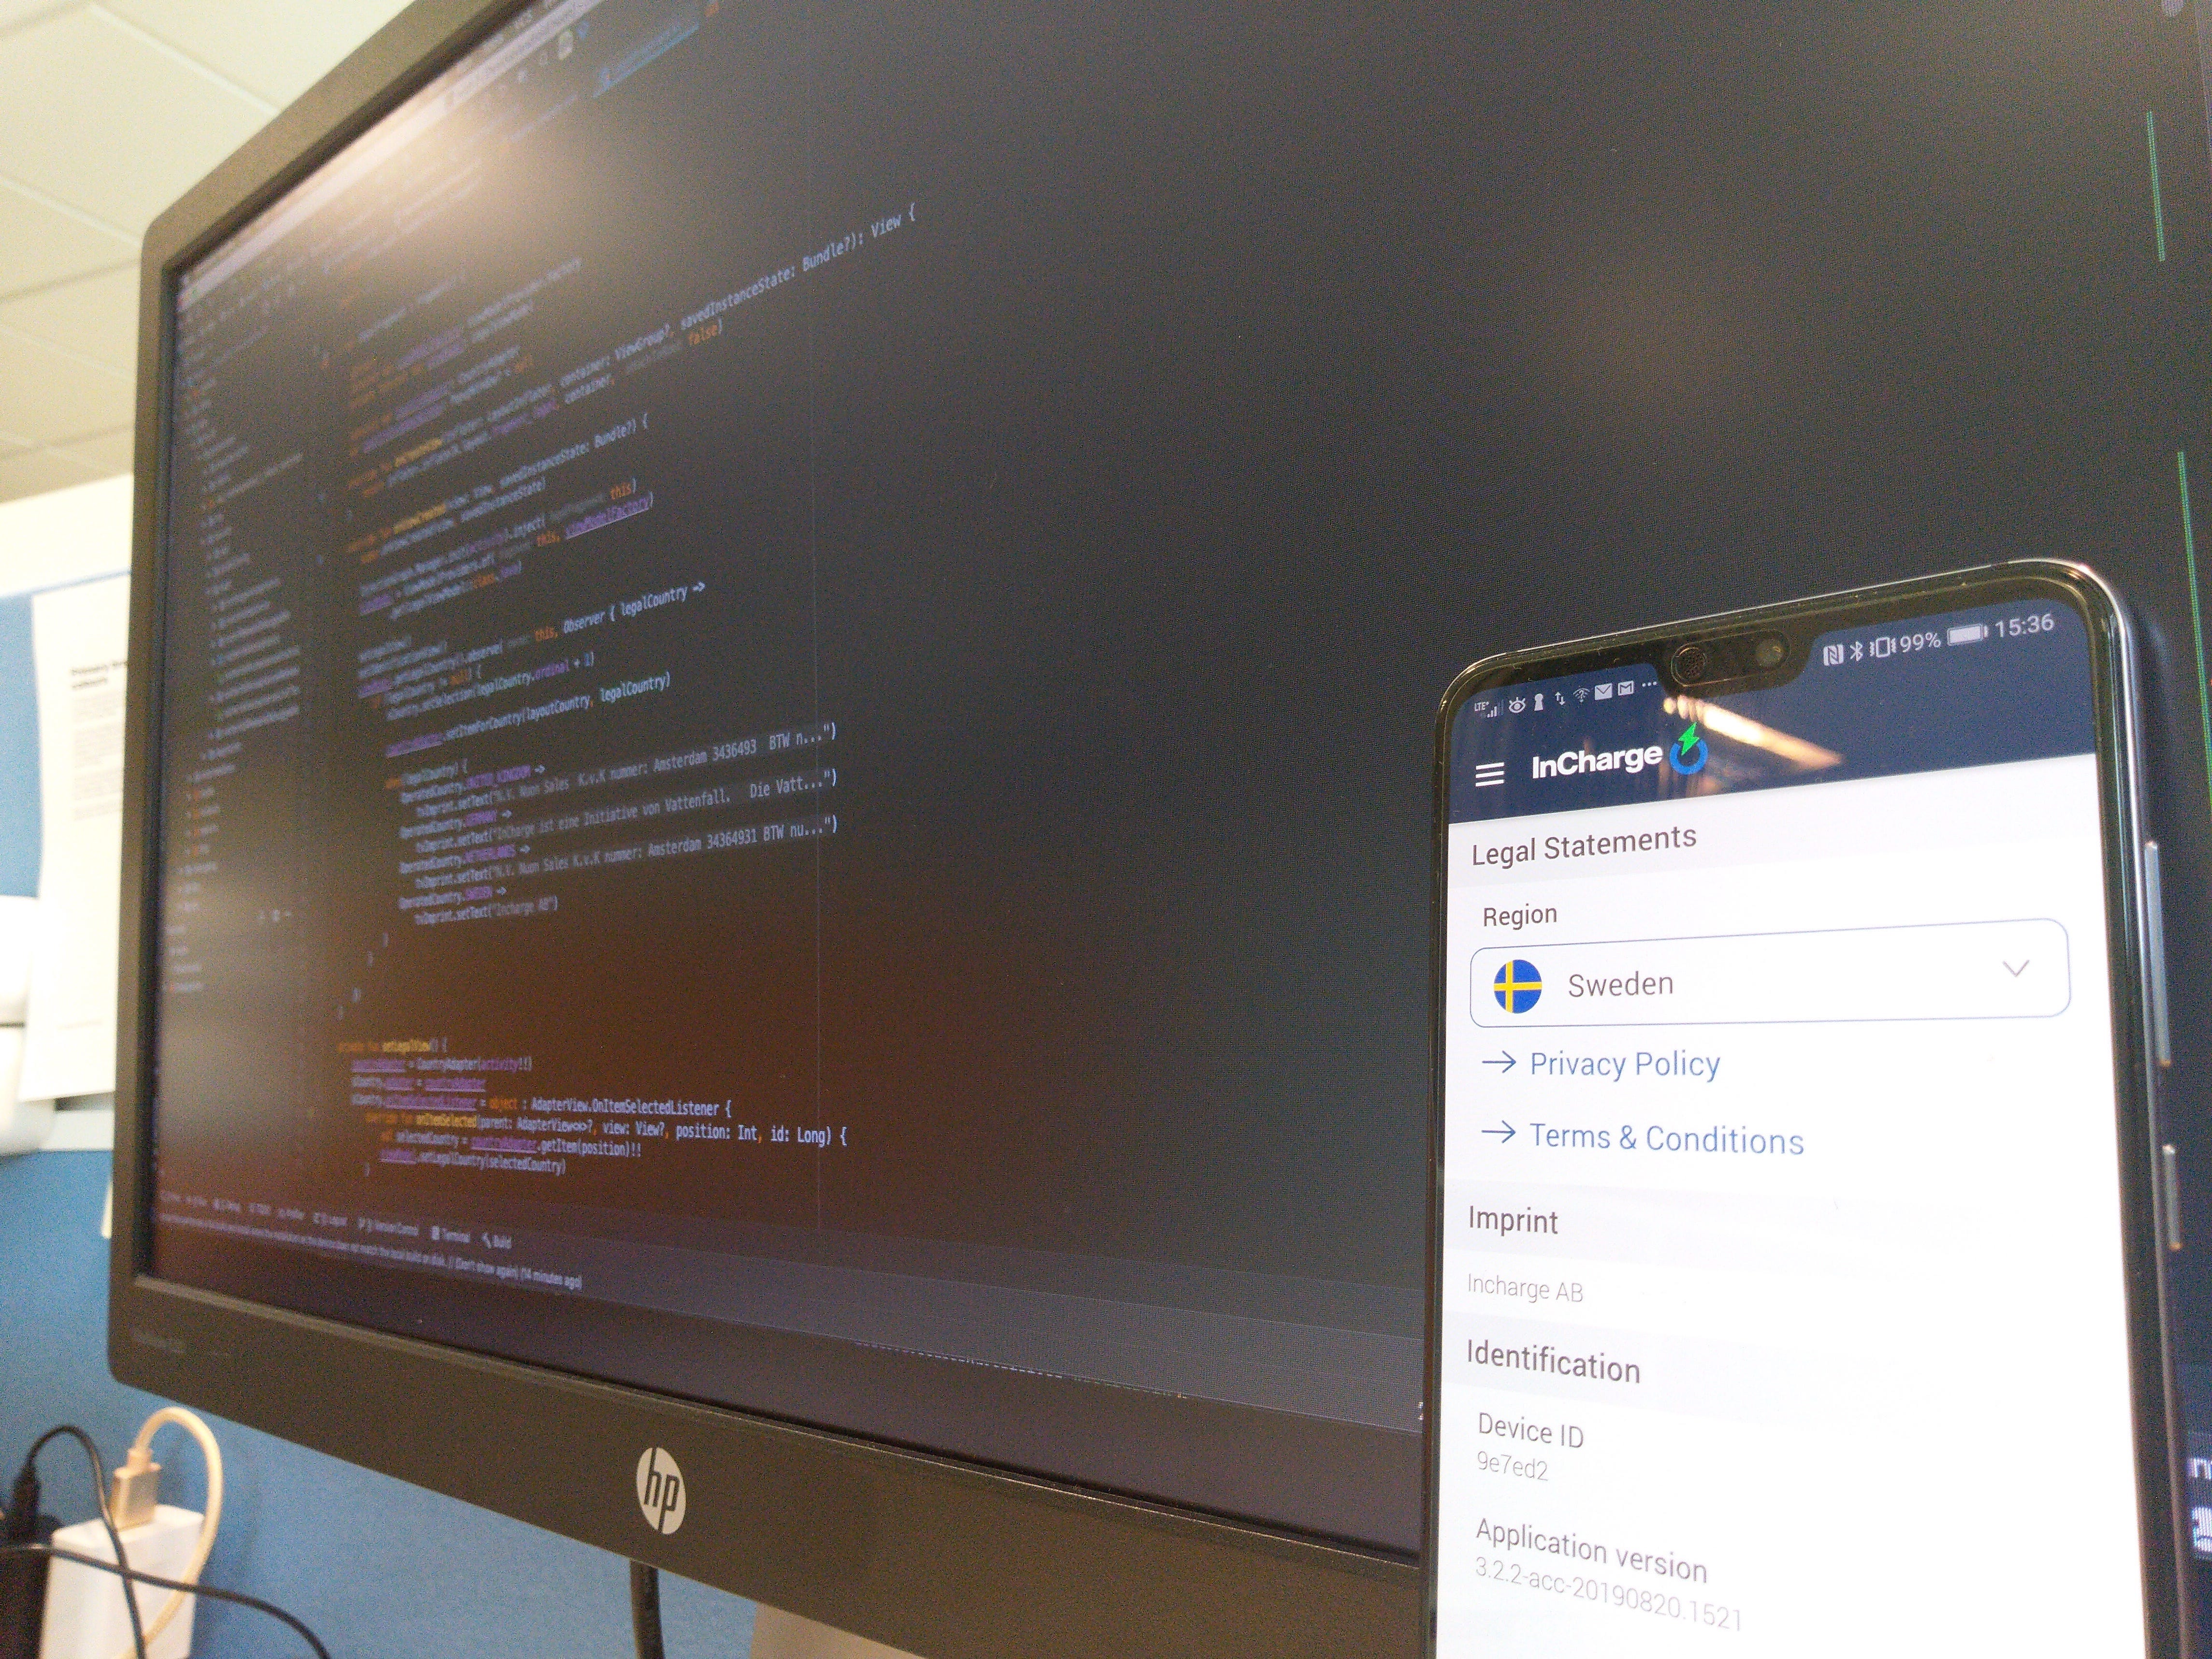
Custom Spinner
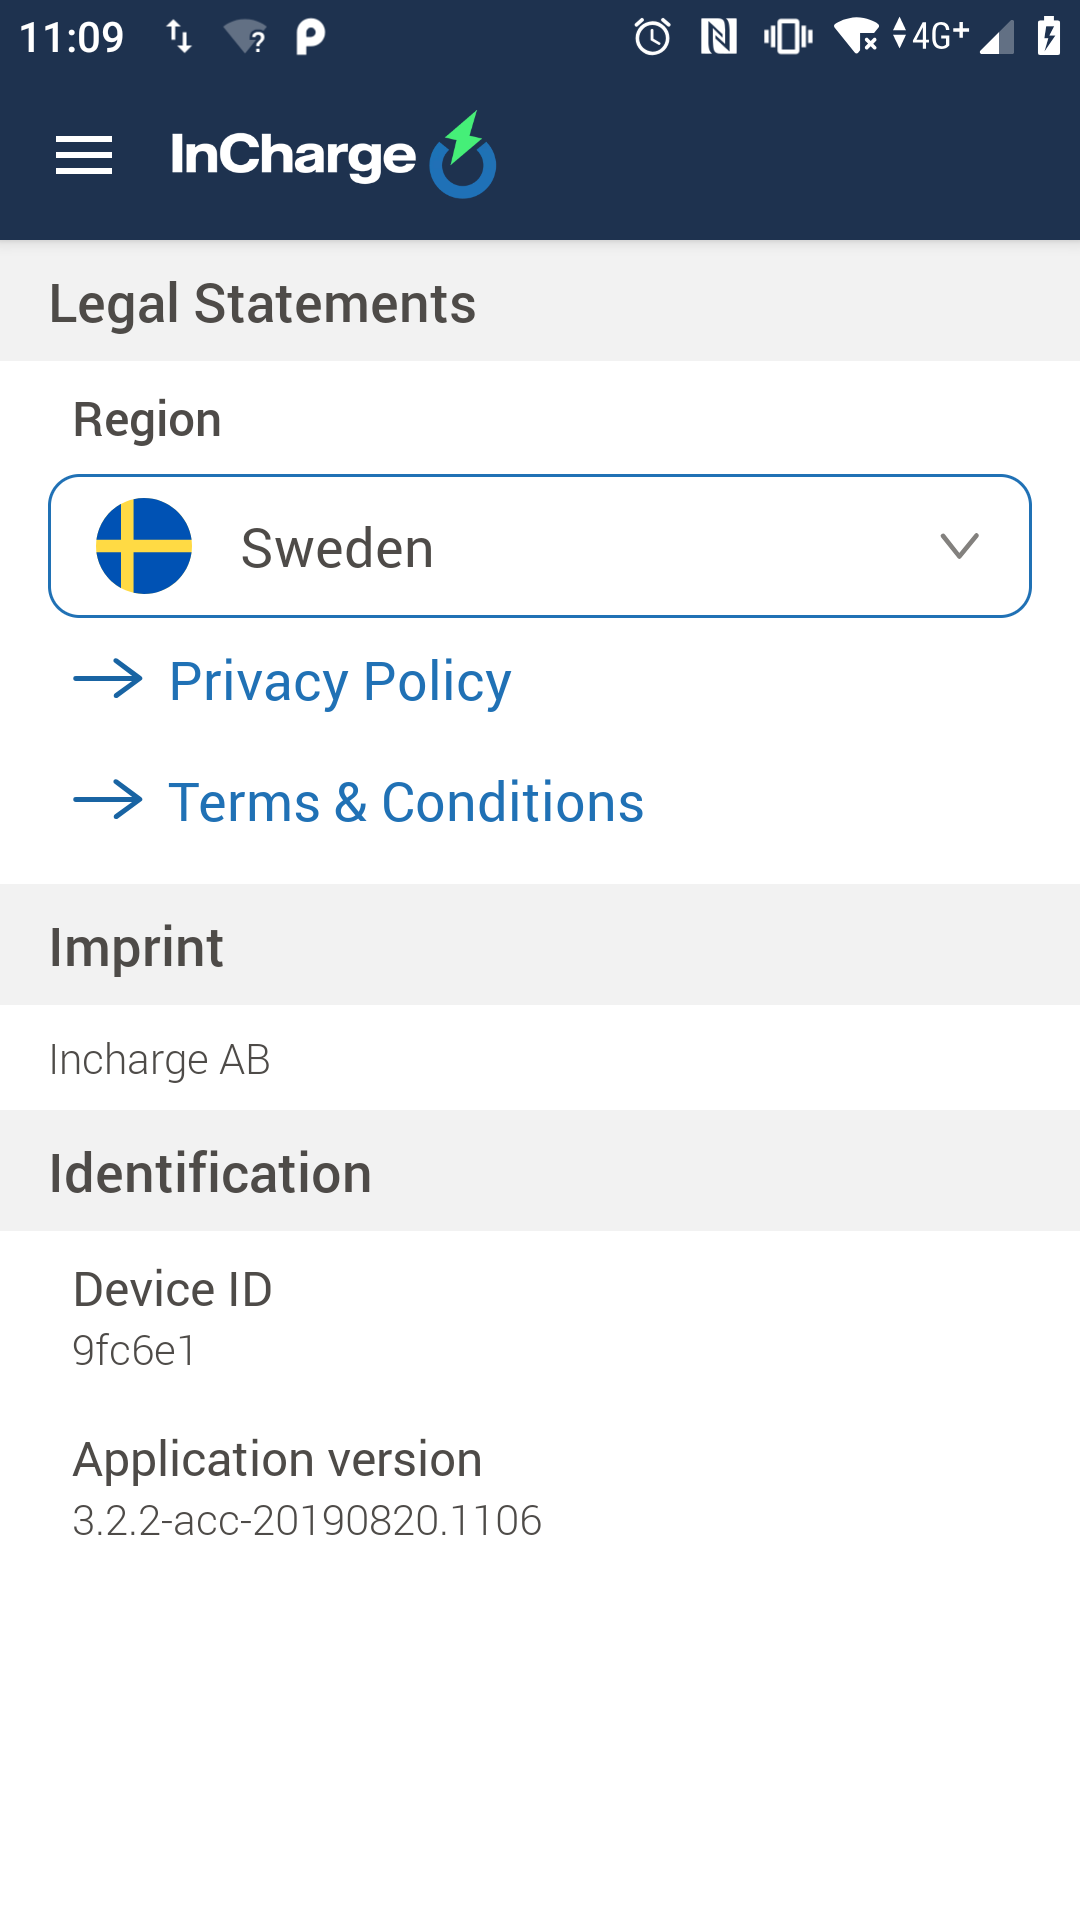
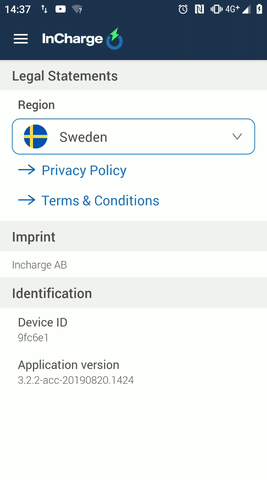
In this article, I’ll describe two ways to achieve custom spinner for country selection that I had to implement at InCharge app. We officially support now 4 countries with charging stations, each country has specific legal rules, terms & conditions, etc.
The screen mockups I received from our designer were exactly these:
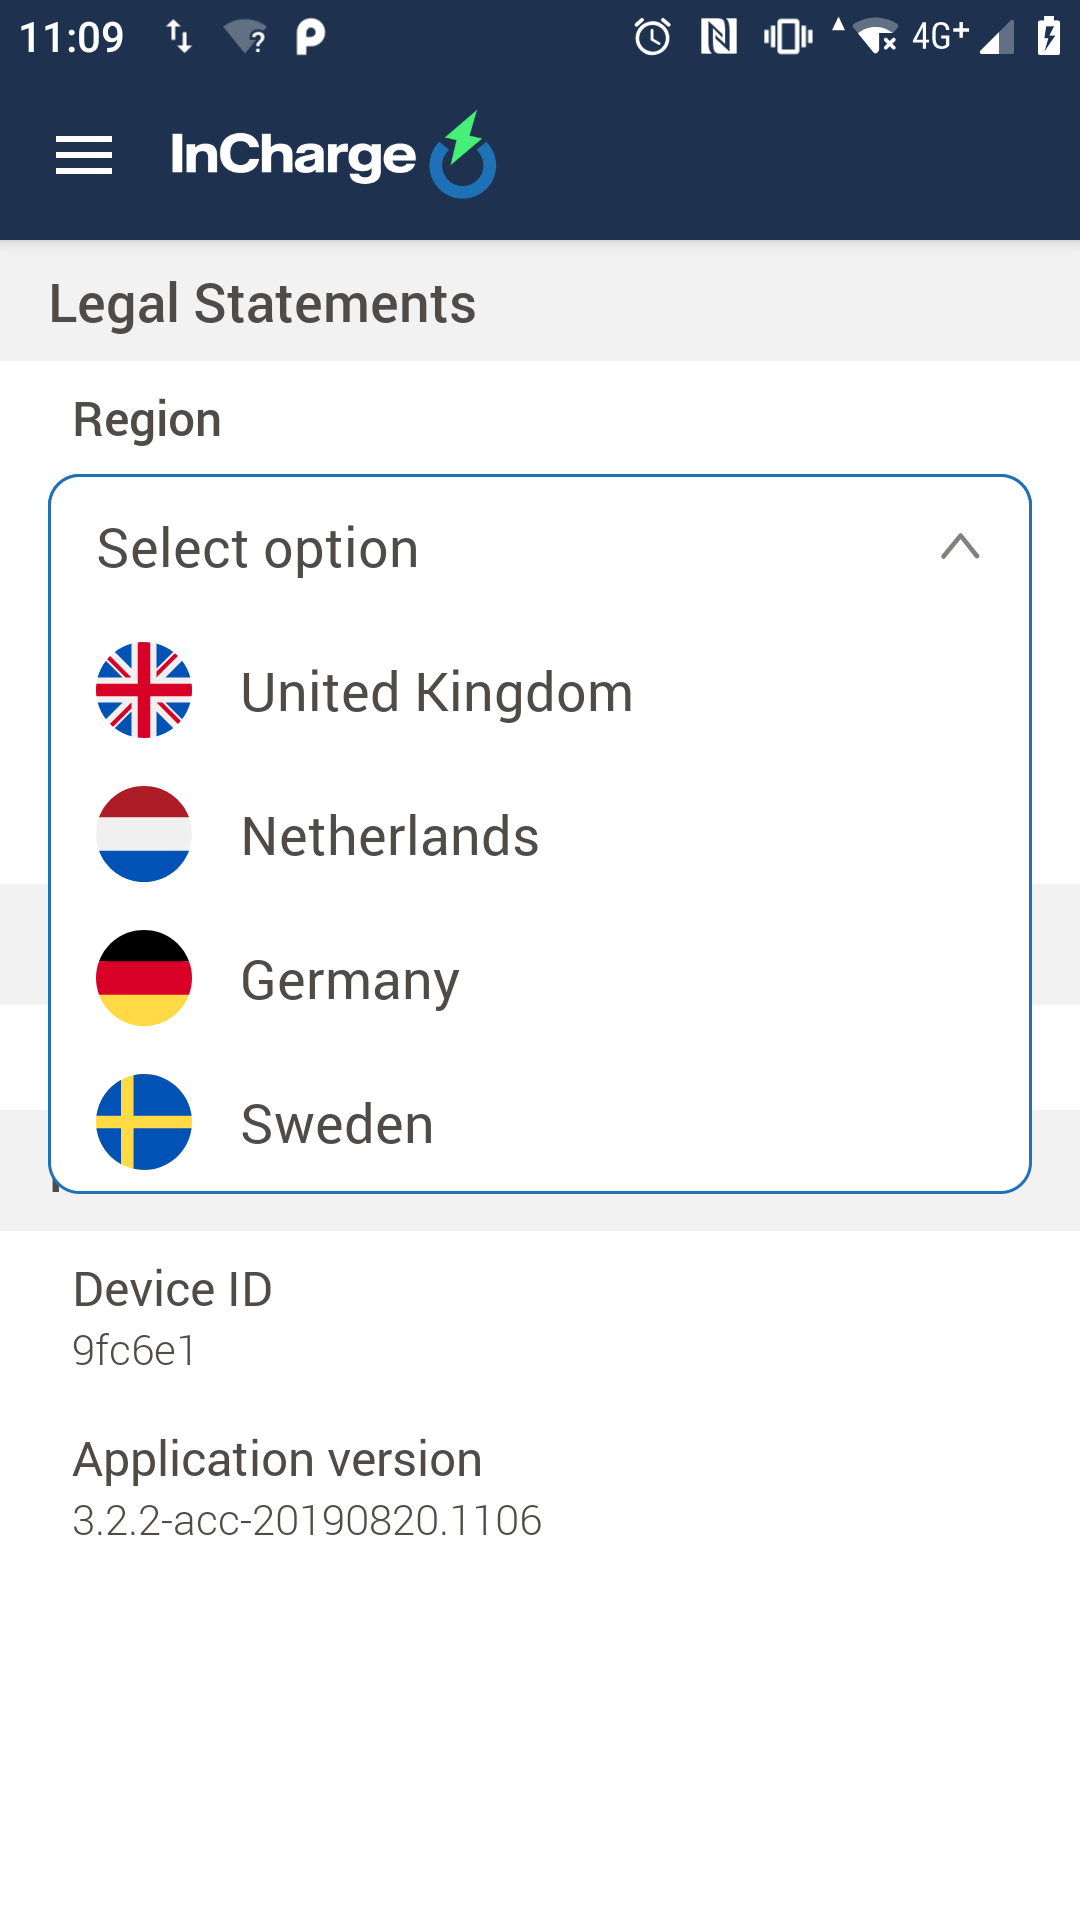
So the design for selection was not looking as a default Android Spinner as it had a header included when going to dropdown mode. Is it possible to implement using Spinner Widget? Let’s see.
Adjusting the Spinner widget
OK, so let’s begin with implementing layout:
And add a Spinner widget:
In this way, we’ve just built a Spinner widget on our UI. Thanks to tools:listitem=»@layout/item_country» we can see in Android Studio Designer how the Spinner will look like and adjust paddings/margins properly 🙂
With property android:background we can add a blue outline when Spinner is in the selected state and with android:popupBackground the background of dropdown view — easy so far.
Adapter
The magic of adding header will be done in our CountryAdapter class:
And an enum for supported countries is realized like this:
There are several parts that need to be explained…
Firstly, let’s see that getView() method will build UI when Spinner is in idle state and getDropDownView() will build particular items when Spinner dropdown gets opened. This is a place where we need to expect position == 0 to build a header with «Select option».
Unfortunately, there is no Spinner public method to programmatically close the dropdown. So how could we close it, when the header item gets clicked? There are couples of hacks to overcome this problem and here is one of them:
so we pretend as if the BACK button got clicked. Yeah, hacky…
Also to prevent selections for header view and not trigger its Spinner behavior we override isEnabled method to return false in this case.
Drawbacks
So we were able to implement the expected design somehow. But is it an ultimate solution? We had to use a hack with closing dropdown and make code dirty. Also, what if the designer suddenly changes his mind and wants to apply some animation for example arrow rotation? Built-in popup has entered animation which might interrupt these animations.
Technically android:popupAnimationStyle is applicable to Spinner style but it’s from SDK 24, quite high, right?
Would there be another solution?
Custom Spinner implementation
If we look into the Android source code of Spinner, we will see that underneath a PopupWindow is used to render the dropdown. Implementing classes are private so we cannot use them. But how much work could that be to make it yourself? Let’s try!
Let’s replace Spinner widget with anything else that could include item_country.xml Now, in setOnClickListener < . >part (trying to override OnClickListener on Spinner would result in RuntimeException).
So here we handle dropdown view by ourselves. We have full control of its UI! I chose ListView, could be anything else! All rendered by layout_country_dropdown.xml .
Note that you can use the very same CountryAdapter but rename the getDropDownView() method to getView() , and get rid of existing getView() .
Thus… Not a lot of work was required to transition 8) That’s what we all love. This solution seems way cleaner, with no dirty hacks — just add popupWindow?.dismiss() when header clicked. How does it look like?
What about animation management? It’s easy. We could set custom animation for a PopupWindow or simply disable it with a parameter:
then in CountryAdapter on header item creating add something like:
And the result is:

Try writing rotation animation on dropdown close by yourself 😉
Источник
Android Custom Spinner | Disable Dropdown, Text, Divider, Border, Image

You will look in Android Custom Spinner Tutorial With multiple Examples today.
1. Android Spinner Custom Adapter Example Tutorial
Learn to make android custom adapter for spinner in this tutorial with example.
Spinner is the basic and in-built UI widget of the android system. It is used to show some options among which user has to select only one.
Generally, spinner contains only option names in terms of text format. We use arrayadapter in most of the cases to populate the spinner.
With arrayadapter you can set only text items in the dropdown menu.
But what if you want to have different color or size for each dropdown? What if you want to change the background color of dropdown item?
Here, arrayadapter can not help us. We have to create our own custom adapter and need to make separate XML layout files for user interface of dropdown.
So follow all the steps to learn about custom adapter of android spinner.
Looks of Android Custom Spinner Custom Adapter
Step 1. Layout Files
In this case, we need to prepare couple of XML layout files.
These two files will help us to create custom layout and view structure for dropdown items as well as for main layout of spinner.
Make new XML file in res->layout directory. Give it a name as company_main.xml
Write the below code in company_main.xml
This file will create a view for main layout of spinner.
I have taken only one textview in this file. You can also add other UI widgets like Image.
You can also change the color and size of the text from above code.
Now make another XML file under same directory. This time set the name as company_dropdown.xml
Coding lines for company_dropdown.xml are as following
This file contains one textview and one simple view.
Textview will represent the dropdown texts. You can change size, color, style of dropdown texts using this textview.
You change the Background of dropdown row by changing background of this textview itself.
After textview, there is one simple view with some color as it’s background.
This view draws a divider between two rows of dropdown.
Step 2. Preparing Custom Adapter
Now it is time to make a custom adapter.
Create a new JAVA class named CustomAdapter.java
Write down the following lines in CustomAdapter.java
Going Deep
Checkout the below code
It is making objects of some string array variables and context.
colors and colorsback contains the text which represents the various colors.
We will use both of these string variables later in this class only.
Read the following getView() method
This method is creating the view for the main spinner layout.
Compiler will first inflate the company_main.xml file.
Than you can customize the textview of this file as per your requirements.
Attend the getDropDownView() method.
This method will create the view for dropdown items.
It will inflate the company_dropdown.xml file.
Compiler will set text color and background color for every row.
Here we are using those colors and colorsback named string arrays.
Step 3. Final Changes
At last, we need to add some code in main files.
Copy down the following source code in activity_main.xml file.
- I have taken one spinner in this layout.
- You do not need to change anything in this file. You should do all the changes in adapter class only to customize the things like color, size etc.
Now add the following code structure in MainActivity.java
First of all, compiler will create one string array called “company.”
This string array contains the names of the companies.
Then compiler will create the object of the CustomAdapter class.
At last, just set this object to the spinner and your spinner with custom adapter is ready to take off.
2. Android Spinner Disable Item Dropdown Selecetd Item | Close Dropdown
You are reading Android Custom Spinner Disable Item Dropdown example tutorial.
Learn to hide/close android spinner dropdown programmatically in this example.
Disable an item which is currently selected, from the dropdown menu or pop up.
Generally, we use spinner to allow user to select any one item among multiple options.
Sometimes, developer wants to disable the current selected item in the dropdown menu. In this scenario user will not be able to click on that item from dropdown.
There are some occasions when there is only one option in the spinner. Here, we do not need to show dropdown.
You will learn how to handle all these tricky things about spinner in today’s tutorial.
View Disable Item
Step 1. Closing or Hiding Dropdown Menu Programmatically
You need to close or hide the whole dropdown menu when you have only one item in your spinner.
Let us achieve this goal. First, create a new project in android studio.
Add the below source code in activity_main.xml file
- I have taken one button and one spinner in above layout file.
- Button is just saying that below spinner have single value so it has no dropdown menu.
Now write the following code in MainActivity.java file
First of all, compiler will create one string array variable named “heaven”.
This variable have only one item.
Then an object of spinner is defined.
In onCreate() method, we will find the spinner from layout file using it’s unique ID.
After this, compiler will create the array adapter using string array variable. (heaven).
And then it will set the adapter to our spinner.
Now read the following code block.
Compiler will execute above code when the user touches the spinner.
I do not have set any code for this method. It simply means that we are telling the compiler to do nothing when the user touches the spinner.
Generally, when the user touches the spinner, system will open the dropdown. But in this case, we are overriding this general approach via above code structure.
So we have handle the scenario with only one item in the spinner.
Now let us disable the selected item in dropdown.
Step 2. Disable particular Item in Dropdown
First of all, add the below code in activity_main.xml file
Same as we have added earlier. One button and one spinner.
Button is telling that selected item will be disabled in dropdown of the below spinner.
To handle the complex scenario of disabling a particular item in dropdown, we need to create custom adapter.
Drawable files
- Before adapter first create a XML file under res->drawable directory.
- Name of this file should be color_main.xml
Add the below code structure in color_main.xml file
- Above will create the view for main layout of the spinner.
- To change the background color of spinner or text color and size of spinner, you can change these properties in the above textview.
- Make another XML file in res->drawable directory.
- Give it a name as color_dropdown.xml
Code block for color_dropdown.xml is as the following
This code will generate user interface for dropdown menu.
Every item of dropdown will inflate their text color and size from the above textview.
We can change text color and size for every spinner item via adapter class.
So let us prepare an adapter class.
Adapter Class
Create a new JAVA class named “ColorAdapter.java”
Write the following lines in “ColorAdapter.java” file
Look at the method named hideSpinnerDropDown() method in above code.
This method will help us to hide the dropdown when user selects the item.
getView() method will create the view for the spinner’s main layout.
We will use color_main.xml file in getView() method.
getDropDownView() method will help us to make the layout of every single item of the dropdown.
Below code will change the color of the selected item
Following code will disable the current selected item.
Step 3. Ending Updates
Now copy the below code in MainActivity.java
- You should add the three lines before the onCreate() method.
- integer variable called selectedColor will maintain the current selected position of the spinner.
Write down the following source code in side the onCreate() method.
First compiler will find the ID of the spinner.
Then it will create the object of ColorAdapter class and will set it to the adapter.
When the user selects the spinner item, compiler will update the value of the selectedColor variable.
3. Android Spinner Text Color Size Programmatically Selected Item & Dropdown
Read about Android Custom Spinner Text Color Size Programmatically tutorial example here.
In this tutorial, you will learn to change the text color and size of android spinner Programmatically.
You will also learn to change the text color and size of selected item of spinner.
We will also see how to change the text color and size of dropdown text and change color size of selected item in dropdown of spinner.
For this whole purpose we will implement custom adapter to our spinner.
The Ending Scenes
Step 1. Same Text For Spinner and Drop down
In this tutorial, I will make two spinners.
In one spinner, we will set same text color and size of spinner main text and drop down text.
Another second spinner will have different color and size for spinner and drop down text.
Let us first create first spinner.
Make a new layout file in res->layout directory. Name of file should be brand_dropdown.xml
Code for brand_dropdown.xml is as below
- This file creates a view for spinner and drop down text items.
- You can change the text color and size of the text in the above file only.
- Now we will see how to implement above file in java class.
Add the following code in MainActivity.java file
- As you can see in above code, we have set brand_dropdown.xml using setDropDownViewResource() method.
Step 2. Spinner With Custom Adapter
For making a spinner with custom adapter first add the below code in activity_main.xml
Write down the below source code in MainActivity.java
Add the above code before the onCreate() method.
I have created one integer variable which will hold the current selected position of spinner options.
Then a string array will contain names of the cars as a spinner options.
After the onCreate() method, add the following code
In this code, we will create an object of the adapter class. (We will create adapter class after two minutes)
Then compiler will set the object of adapter with the spinner.
When the user selects specific option from the spinner, compiler will call the setOnItemSelectedListener() method.
In this method selectedCar variable will get the position of the selected option.
Then compiler will change the text color of spinner.
Now we need to create couple of layout files in res->layout directory.
Make a new file named cars_main.xml and write the below code in it
- This file will give text color and size to the spinner main layout.
- Prepare a new file and give it a name cars_dropdown.xml
Copy the following code in cars_dropdown.xml
Textview of above file will represent the text lauout of the drop down elements.
Change the text color and size from this file to reflect them in drop down pop menu.
Now let us make an custom adapter class.
Adapter class enable us to make a custom view for dropdown as well as for main layout of the spinner.
Prepare a new java class and give it a name CarsAdapter.java
Code structure for CarsAdapter.java may look like the following
getView() method from the above code will create the view for spinner’s main layout.
getView() method will inflate the brand_dropdown.xml file to create the user interface of spinner’s main view.
getDropDownView() method is responsible for drop down user interface.
In this method, cars_dropdown.xml is inflated and dropdown will have view like this file.
Compiler will check one if condition. It will check whether position is selected or not.
If selected then it will change the text color.
You can Programmatically set the color and size of drop down texts in both methods.
4. Android Spinner Divider Color Style Size Programmatically
Android Custom Spinner Divider Color Style Size Programmatically Tutorial is the topic of the day.
Spinner is a UI widget using which you can fetch the selection of the user among different options.
You can set options in spinner by two methods : In drop down manner and in pop up dialog manner.
In this tutorial, I will explain three methods using which you can set divider between two spinner options.
Generally, divider is a line with different colors which separates two options from each other.
You can set the height and color of the divider as per your requirements.
One can also use gradient effect using multi color to make attractive dividers.
Let is make three spinners with three different colored dividers.
Last Output View
Step 1. Using Drop down View Resource
Make a new project in android studio. I recommend to make project with “Empty activity.”
Then add the below lines in your activity_main.xml file
- You have one spinner in layout file.
- Now create a new XML file under res->drawable directory.
- Set the name of this file as games_border.xml
Write down the following source code in games_border.xml
Above file will create one view which we will use in our spinner. This view contains a divider like strip at the bottom.
Prepare a new file in res->layout directory with name games_dropdown.xml.
Add the below code in games_dropdown.xml
- This file represents the main view for the spinner.
- The background of this file is referencing the games_border.xml
- We will use this file in the java file.
Now write the below code in MainActivity.java
In the above code, we have first define the object of the spinner.
I have also defined a string array which holds the names of the games which are the options of the spinner.
Now first we will create the object of the ArrayAdapter (spinnerArrayAdapter).
We will use setDropDownViewResource() method to set the layout file games_dropdown.xml as a main view file.
Step 2. Give style to spinner
Second method to customize divider is using the style method.
Write the following code in res->values->styles.xml file
- You can set the divider height and divider color in this file.
Add the below code in activity_main.xml
To set the adapter of this spinner, add the below code in MainActivity.java file
Write the above code before the onCreate() method.
Adapter related lines are as below.
- Add the above lines after onCreate() method.
Step 3. Divider with Custom Adapter
Last method is to create an adapter with custom views.
You can change views and colors easily using this method.
Add the below code in activity_main.xml
- Make a new file under res->drawable directory.
- Set the name of the file as gradient_divider.xml
Write down the below coding lines in gradient_divider.xml
Above file will create a view with gradient effect.
You can use three different colors to make attractive gradient colors view.
Now in the res->layout directory, prepare a new file named brand_main.xml
Source code lines for brand_main.xml file is as follow
Make another file in the same directory.
This time, name of this file should be brand_dropdown.xml
Let us create adapter class. For this, make a new java class named Spinner_Adapter.java
Code snippet for Spinner_Adapter.java is as following
In the above code, getView() method creates a view for the spinner main layout.
getView() method uses brand_main.xml file making new view.
getDropDownView() method will prepare a view for the drop down options.
It will use brand_dropdown.xml file to make a view for options of the spinner.
Now in MainActivity.java file, add below lines before onCreate() method.
Add the below lines inside the onCreate() method.
I have just created an object for the adapter class and have set this object to the spinner.
So the final code for activity_main.xml is
And for all the code of MainActivity.java is as below
5. Android Custom Spinner Dropdown Arrow Background Border Icon Color
Android Custom Spinner Dropdown Arrow Background Border Icon Color example is today’s topic.
In this tutorial, we will add custom dropdown icon or image in the spinner.
You will also learn how to set the background color, border color and arrow icon in spinner in android.
Customizing dropdown icon, image color, background color, border color etc. in spinner is not complex if you do it in the proper manner.
View Custom Dropdown Icon And Background Color
Step 1. Inserting Images
For making custom dropdown image, we need to insert images in the res->drawable directory.
Download images by using the following link
[sociallocker]Download Dropdown_Image[/sociallocker]
When you successfully download arrow images, add them in res->drawable directory.
Step 2. Drawable XML files
We want to customize border color, background color, border width, dropdown arrow image and it’s color.
- For this purpose, we need to create one xml file drawable folder.
- In this file, we will add some coding lines which will help us to achieve our goal.
- So create a new xml file under res->drawable directory. Give it a name “spinner_cars.xml”
Write down the following lines in “spinner_cars.xml”
Now let us understand one by one what above lines will generate.
Shape of the Spinner
First of all, check the below line
- This line will suggest compiler to create a rectangular shape. By default, spinner also have rectangular shape so it is ideal situation.
Padding
Now see the following source code
It will write any text in the spinner with giving the space of 4dp to each four sides. (left, right, top and bottom)
You should set the value of padding as per the original size of your spinner (Height and Width of the spinner).
For smaller spinner it should have lower value and for bigger spinner it should have higher value.
Background Color Effects
Consider the following coding lines
This line is responsible for filling the background of the spinner with various colors.
Gradient will add some attractive effect using two colors (startColor and endColor).
angle will decide how to mix up the to colors (vertically, horizontally or as per the angle size)
If you do not want to mix two colors then give same value to both startColor and endColor properties.
For making transparent background, give transparent colors (colors with 0 Opecity) in startColor and endColor properties.
Border Color And Width
For customizing the border of the spinner read the below code
have two properties : width and color.
If you want to increase the width of the border of your spinner than increase the value of android:width property.
And simply, give a color value to set the color of the border of the spinner.
Corners of Spinner
Below line will set the four corners (upper and lower left, upper and lower right) of the spinner.
- It is giving a radius value of the corners. Higher value will create more rounded corners.
Custom Drop down Arrow
Now it is time to customize our drop down arrow which is really important thing in customizing the spinner.
Read the following coding line
You can set any image as a drop down arrow by setting it as a value of the android:src property.
Then using android:gravity property, you can set the place of the arrow.
In most common case, we set the drop down arrow at the right side which I have set in above line.
But you can set it as per your requirement by changing the value of android:gravity property
Size And Color Of Drop Down Arrow
Unfortunately, we can not set the size and color of the arrow using this current method.(method to create a drawable file and set it as a background of the spinner)
For this, you need to directly change the whole image.
You can use the image editor like photoshop to increase or decrease the size of the dropdown image or to change the color of the image.
I have set the drop down arrow image with the height and width as 40 (40 * 40 image)
Size of your image should increase or decrease with respective to the original size of the spinner.
So till now, we created a file “spinner_cars.xml” in drawable.
Again make a new xml file named spinner.xml in drawable.
Code block for spinner.xml is as below structure
It is quite similar to the code of that spinner_cars.xml file.
Both file have same properties. I have just change the values.
Step 3. Adding Spinner in Main File
Now we need to change the activity_main.xml and MainActivity.java file.
Add the below lines in activity_main.xml
- I have taken two spinners in main layout. Nothing else.
Code structure for MainActivity.java is as the following
- In the above main activity file, I have created two string array variables.
- First is country and second is cars. Country holds the names of three countries and cars includes the names of three cars.
Then, compiler will simply create a two objects of spinner and then it will set the adapter to those spinners.
6. Android Custom Spinner With Image And Text | Custom Adapter
Android custom spinner with image And Text is a good idea for better user experience.
This tutorial will guide you to make custom spinner with custom adapter.
At the end of the tutorial, you will be able to make fully customize view for the spinner.
Adapter will inflate the custom view for the spinner and for the dropdown menu also.
You can showcase brief information about the items of the spinner using it’s image.
If you want to enhance the quality then spinner with image will give an extra delight to the user.
Look And Feel
Following images shows us how our spinner will look with images and texts.
Step 1. Custom Layout
In this step, we will create layout file that will represent the spinner’s view.
So, make a new layout resource file named spinner_custom_layout.xml
Add below source code in it
As you can see that the above layout file is purely custom and it does not include any default code or UI item.
You can set any UI widget like TextView, ImageView etc. as per your requirements.
Step 2. Add Fruit Images
Because we are making spinners with images, we need to add some images in the drawable folder.
Actually, you should add number of images which is equals to the number of items in the spinners.
Download the fruit images by clicking the below link
[sociallocker] Download Fruit Images [/sociallocker]
Now add these images into res-> drawable folder.
Step 3. Custom Adapter
We need to write custom adapter that will accept our custom layout file.
This adapter will create the custom view for our spinner using that spinner_custom_layout.xml file.
Following source code is for CustomAdapter.java file.
Let us dive deep into this adapter class.
In the Main Activity of this example I have defined two arrays as below
First one is the string array which defines the names of the fruits.
Second contains the resource id of the drawable images.
In the constructor of the adapter, we will pass these two arrays as a parameter.
So we will receive them here at the execution of the adapter class.
getView() method from adapter is the most important part of this class. Below is the code for it.
- getView() method will create a custom view for our spinner.
- It will inflate the spinner_custom_layout.xml file to create a particular view for the spinner.
After that, compiler will set the name and image of the fruit by using the string (fruit[i]) and integer (images[i]) array respectively.
Step 4. Last Writings
In this last step, you should update the code of your activity_main.xml and MainActivity.java file code
Replace the code of activity_main.xml with the below one
I have taken one spinner in this file.
Copy following code into MainActivity.java file
Explanation of Above Code
Look at the below two lines
- First line defines the string array. This string array includes the names of the fruits.
- Second line defines the integer array which includes the resource id of the images which we have inserted in the drawable folder.
- Above code will first define the object of the adapter class and then compiler will set the adapter to the spinner.
- We have to pass out string and integer arrays as a parameter when defining the object of the adapter.
After this, our spinner will be populated with images and texts.
To track the on click method of the spinner, read below code
- Here, I have set the code when the user will select any particular item from the spinner.
- A toast will be popped up when user selects the item.
This toast contains the position of the item in the spinner and also the name of the selected item.
3 thoughts on “Android Custom Spinner | Disable Dropdown, Text, Divider, Border, Image”
Hi Hardik,
Thanks for sharing your creation. I noticed that your getView() method returns the textView instead of the view itself. You might want to fix that to avoid confusion, cheers.
Hello, how to select item and show fragment?
Hello, how to select item and show fragment? Please help
Источник


