- Android studio git с использованием закрытого ключа
- 5 ответов
- What to do if its not working?
- How to Execute Commands Remotely via SSH in Android?
- Step by Step Implementation
- How to push to a remote Git repository over SSH with private/public key authentication using Android Studio
- Android-Studio git через ssh
- 3 ответа
Android studio git с использованием закрытого ключа
У A есть адрес репозитория git.
Также у меня есть закрытый ключ в формате open-ssh.
Может ли git в Android Studio использовать его?
Я попытался найти информацию, но на данный момент безуспешно.
Спасибо за любую полезную информацию!
Изменить. Мои действия:
1. Я помещаю свой закрытый ключ в папку .ssh (Пользователи / пользователь).
2. В Android Studio я запускаю: Файл — Настройки — Контроль версий — Git и указываю путь к исполняемому файлу Git.
3. Затем VCS — Checkout from vesrion control — Git. Я поместил туда адрес репозитория.
Если я продолжу здесь, есть:
Но у меня нет имени пользователя и пароля, только ключ.
Если я попробую:
получил следующее:
А как Android Studio узнает, что она должна принимать мой закрытый ключ вместо стандартного файла id_rsa?
5 ответов
Хорошо, наконец-то все заработало!
Что я сделал — переключился в папку .ssh, затем заменил содержимое ключа id_rsa (как я понимаю, это ключ ssh по умолчанию для Android Studio) содержимым моего ssh key .
Все еще не знаю, как я могу указать Android Studio на мой ssh key , но таким образом он работает.
Вам просто нужно добавить ключ на свой сервер.
Студия Android использует ОС git, а не Egit, как в Eclipse, у которого есть собственная реализация git.
Никакой специальной настройки делать не нужно.
убедитесь, что все работает из bash / терминала, и оно также будет работать в Android Studio.
What to do if its not working?
Если вы не можете получить доступ к своему репозиторию из Studio, используйте следующий формат в качестве URL-адреса ваших подключений
Это будет использовать прямое соединение с использованием ключей ssh.
Чтобы добавить еще один ответ. Android Studio поставляется со встроенным клиентом SSH. Вы должны переключиться со встроенного на родной. Это будет использовать ключи из папки .ssh
Файл -> Настройки -> Контроль версий -> Git -> Исполняемый файл SSH -> Собственный
Как упоминал @CodeWizard, Android Studio получала ключ от ОС, поэтому использование ssh-add для добавления ключей к ssh-agent сработало для меня.
Как заставить его работать с помощью Android Studio в Windows и PuttyGen для генерации ключа — для чайников:
Экспортируйте свой закрытый ключ с помощью PuttyGen в файл Конверсии & gt; Экспорт OpenSSHKey
На компьютере с Windows, на котором установлена Android Studio, перейдите в каталог% USER% /. Ssh.
Скопируйте файл, экспортированный на шаге 1, в эту папку и измените имя файла на «id_rsa».
В меню Android Studio выберите VCS & gt; Checkout from Version Control & gt; Git.
Вставьте URL-адрес Git (как указано в других ответах) и нажмите «Клонировать».
Он должен запросить у вас пароль для ключевого файла (если он используется) вместо пароля для Git.
Источник
How to Execute Commands Remotely via SSH in Android?
The SSH protocol uses encryption to secure the connection between a client and a server. All user authentication, commands, output, and file transfers are encrypted to protect against attacks in the network. More often than not you would need to SSH into your cloud Virtual Machines or a remote shell. Usually, we need an SSH client to establish an SSH connection. For Windows, the free (libre) GUI client PuTTY is used for this purpose. Here is how it looks like accessing a remote Linux shell in PuTTY:

The following tutorial illustrates how the same can be achieved in android. Note that we are going to implement this project using the Java language. Library: Apache MINA SSHD
Step by Step Implementation
Step 1: Create a New Project
To create a new project in Android Studio please refer to How to Create/Start a New Project in Android Studio. Note that select Java as the programming language.
Step 2: Adding dependencies
Now we need to add the required dependencies in order to use the apache mina sshd library. Open app/src/build.gradle file in your project directory and add the following under dependencies:
// Adding implementations required for apache mina library
Источник
How to push to a remote Git repository over SSH with private/public key authentication using Android Studio
Android Studio is currently in Beta phase. However given that it is most likely to supercede Eclipse as the next Android IDE, I thought it would be a good idea to start using it now to develop my apps.
Like many software engineers, I use Git as my source control software. I have a set of Git repositories that I keep on a Digital Ocean cloud virtual machine. This serves as a central place to store my code as well as a backup in-case my hard disk fails or someone comes and steals my computer (knock on wood).
When I first started using Android Studio, it took me some time to figure out how to work from a remote Git repository over SSH using private/public key authentication. As a result, I wrote this guide on how to do it.
At the time of writing this guide, I am using the following on my development machine:
How to push to a remote git repository in Android Studio
Open explorer, browse to c:\users\[your username]\ and create a directory called .ssh (if I doesn’t already exist).
 Windows Explorer .ssh Directory
This is where Android Studio will look for the configuration of your remote servers when you try and push/pull your repository.
Next create a new file inside your newly created .ssh folder and name it config.
Open the file with a text editor (I use Notepad++) and add the following:
The contents of this file is as follows:
- Host– this is the name of your host. This can be anything but I think it’s best to use the fully qualified domain name of your remote server.
- HostName– this is the FQDN of your host (in my case its always the same as the host).
- Port– this is your port which your ssh deamon accepts connection on. The default is 22.
- IdentityFile – this is the path of your private key in open SSH format. This is important if you use private/public key as its the only way Android Studio knows which key to use to authenticate you.
Now load up Android Studio and create or open a project.
Once you have a project open, navigate to VCS (from the top menu) > Import into Version Control > Create Git Repository.
 Selecting ‘Create Git Repository in Android Studio’
On the Select directory for git init screen, choose where to initialize your local git repository (I usually leave the default select which is in the project directory) and click OK.
 Selecting Git repository location in Android Studio
Next, navigate to the projects location in explorer, right click the background and select Git Bash
 Location of project files in Windows Explorer
The git bash prompt will appear.
 Git Bash in Windows
Add a new git remote by typing:
This will create a git remote named origin. Each part is broken down below:
- The [user] should be replaced by a user on the server that has read and write access to the git repo.
- The [server_address] is the FQDN of the server hosting your git repo.
- The[git_repo_url]is the location of the git repo on the server.
An example of the command could be ssh://mark@londonappdeveloper.com/usr/repo/my_android_project.git.
Now add a file to the git repository by typing:
I do this is because we need to add any file to our git repo to make our first commit (and this is created automatically by Android Studio when you initialize the git repo). After this, we will add the rest of the files using the Android Studio interface.
Now commit the changes to the git repository using the comment “Initial Commit”:
Next, push to the remote using the flag –set-upstream to tell git that the destination repository will be the upstream one.
The output will look something like this:
 Git bash commands complete
Press enter and then close the box.
In Android Studio right click your projects name(in the top left corner), then select Git and choose Add.
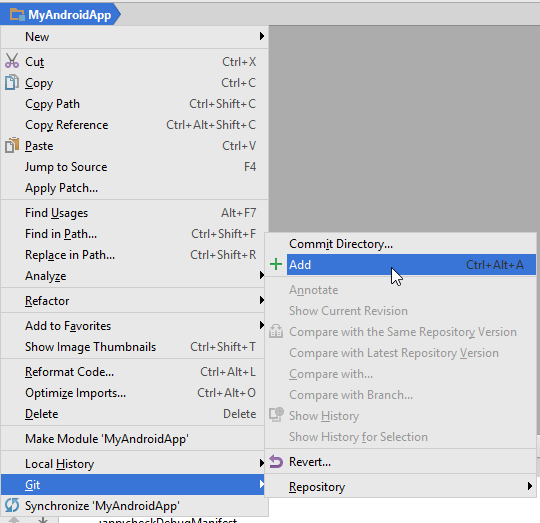 Adding all project files to git in Android Studio
This will add all the files from the root of the project to your Git repository (the same as when we typing git add previously).
Next, right click the projects name again, select Git and choose Commit Directory.
 Commit Directory option in Android Studio.
In the Commit Changes screen, confirm all your project files are selected by default, type a commit message and click Commit.
 Selecting location for Git repository in Commit Changes screen
Next right click your project’s root directory (top left corner), and navigate to Git > Repository > Push.
 Selecting Git push in Android Studio
The Git Push screen will appear. This will display the last commit that you are about to push. Click the Push button to send your changes to the remote git repository.
 Git push screen in Android Studio.
If all goes well, you should see this screen success message:
 Message for a successful push in Android Studio.
And that’s it. Every time you make changes you commit and push the updates to the remote Git repository.
As always, please leave comments below if you have any questions or ideas on how to improve this article.
Источник
Android-Studio git через ssh
У меня есть git-сервер на моем Raspberry Pi с gitweb в качестве веб-интерфейса.
Пока он работает.
Теперь я хочу подключиться через Android Studio со встроенным к нему ssh.
Мой каталог проекта:
Я подключусь с помощью этой команды из Android Studio:
Android Studio дает мне это, когда я проверяю соединение:
Я использую для этого пароль аутентификации. Я могу получить доступ из инструментов командной строки к моему репо .
Почему Android Studio не может?
3 ответа
Я могу получить доступ из инструментов командной строки к моему репо .
Почему Android Studio не может?
Ваша ошибка заключается в том, что вы пытаетесь получить доступ к 192.168.178.21:/straff, который является / straff на этой машине. Либо укажите полный путь, как показано ниже, либо используйте этот
Вы можете попробовать указать полный путь к Android Studio:
Я использую для этого пароль аутентификации.
Это означает, что соединение ssh не использует закрытый / открытый (
Хм, URL должен быть таким: ssh: //git@192.168.178.21/straff
У меня возникли проблемы с установкой ключа ssh. Я решил это, создав файл с названием id_rsa -titled в .ssh-каталоге (в домашнем каталоге пользователя) и поместив в него свой RSA-материал.
Если у вас уже есть удаленный репозиторий git, который вы хотите проверить, и у вас есть закрытый ключ, тогда инструкции на https://www.londonappdeveloper.com/how-to-push-to -a-remote-git-repository-over-ssh-with-privatepublic-key-authentication-using-android-studio / может в некоторой степени помочь, но они предназначены для более старой версии Android Studio, и они тоже сложный.
Что вам нужно сделать (особенно если вы начинаете с нуля):
Убедитесь, что ваш ключ является ключом OpenSSH и что это закрытый ключ (а не открытый ключ). Вот где вышеупомянутые инструкции вводят в заблуждение — они указывают на ключ якобы в формате Putty (файл .ppk), и это не работает. Если у вас есть ключ Putty, используйте инструмент Puttygen.exe для экспорта закрытого ключа в формат OpenSSH.
Создайте файл config , как описано в этих инструкциях. Т.е.
- создайте текстовый файл с именем config в подкаталоге .ssh вашего пользовательского каталога. В моем случае путь будет C: \ Users \ Eugene.ssh \ config.
- Поместите в этот файл следующее:
IdentityFile C: \ Users \ Eugene.ssh \ my-private-key-for-my-host.openssh
(исходные инструкции включают отступы строк 2–4, но я не мог добавить здесь отступы).
- Используйте пункт меню Checkout Project From Version Control на экране приветствия Android Studio, чтобы начать проверку GIT.
- При оформлении заказа используйте следующие настройки (в фигурных скобках указаны значения, которые вы заменяете своими):
Родительский каталог: например. «z: \ Projects» Путь, который должен существовать и в котором создается новый проект.
Каталог проекта: например. «мой проект». Каталог с этим именем будет создан в родительском каталоге, поэтому файлы будут извлечены в родительский_каталог \ Project_directory, например. «z: \ Projects \ myproject».
Источник


