- SwipeRefreshLayout
- Пример на Kotlin
- Устаревший пример для Java
- Обновляем список
- Android Listview Swipe To Delete Example Tutorial Step By Step
- Step 1. Make a new project.
- Step 2. Adding dimens file
- Step 3. Updating colors.xml
- Step 4. Create listview row layout
- Step 5. Add Library to build.gradle(Module: app)
- Step 6. Adding Images
- Step 7. Making Model
- Step 8. Preparing Custom Adapter
- Step 9. Updating Main Activity
- Understanding the main logic
- Undo Execution
- Download Source Code For Android Listview Swipe To Delete
- Обработка свайпа в ListView
- Inbox Style Swipe ListView
- Design Layout
- ArrayAdapter
- Swipe Detector
- Final Steps
- Playing around with Android UI
- Android studio свайп listview
SwipeRefreshLayout
В марте 2014 года был представлен новый компонент android.support.v4.widget.SwipeRefreshLayout, который входил в состав библиотеки Support Library v4. Сейчас это отдельная библиотека в составе AndroidX.
Компонент позволяет отказаться от сторонних библиотек и собственных велосипедов для реализации шаблона «Pull to Refresh», когда пользователь сдвигает экран, чтобы обновить данные. Подобное поведение можно увидеть в клиентах для Твиттера, чтобы получить новую порцию твитов, не дожидаясь, когда список сообщений обновится самостоятельно.
Пример на Kotlin
В марте 2020 года обзавелась стабильной версией.
В методах setColorSchemeColors() или setColorSchemeResources() следует указать используемые цвета.
Компонент достаточно интересный с занимательной анимацией. Вначале анимация представляла собой цветные полоски под заголовком программы. Позже анимацию заменили в стиле Material Design, теперь это маленький кружочек, внутри которого крутятся цветные линии (или чёрная линия, если не использовать метод setColorSchemeResources() со цветами).
Запустите пример и потяните экран сверх вниз, чтобы увидеть эффект обновления данных.
Устаревший пример для Java
Обернём компоненты родительским элементом SwipeRefreshLayout. На панели инструментов данного компонента нет, поэтому придётся писать код вручную.
В примере реализуется интерфейс OnRefreshListener с методом onRefresh(), в котором следует обновить поступающие данные. В нашем случае просто генерируются случайные числа.
При первом появлении библиотеки использовался метод setColorScheme(), который объявлен устаревшим. Вместо него появились два новых метода setColorSchemeColors() и setColorSchemeResources(). Принцип остался тот же, вам нужно указать четыре цвета по константам Color.XXX или из ресурсов. Вы можете не использовать вызов метода с цветными линиями, тогда будет выводиться только чёрная линия по умолчанию.
Компонент достаточно интересный с занимательной анимацией. Вначале анимация представляла собой цветные полоски под заголовком программы, как представлено на видео.
Позже анимацию заменили в стиле Material Design, теперь это маленький кружочек, внутри которого крутятся цветные линии (или чёрная линия, если не использовать метод setColorSchemeResources() со цветами).
Обновляем список
По такому же принципу обновляем данные в списке.
При каждой попытке обновить список будет добавляться текущая дата и время.
Не забывайте, что обновление может занимать длительное время и использовать сеть для получения данных. Поэтому следует позаботиться о выполнении в другом потоке.
Источник
Android Listview Swipe To Delete Example Tutorial Step By Step

Android Listview Swipe To Delete Tutorial With Example is covered in this post.
You will learn how to make a listview swipe to show delete button.
We will make a listview in which listview row item will be deleted when the user swipes left or right.
At the end of this example, you will learn to make a listview feature of swipe to delete like in gmail app.
This swipe to remove listview item feature simplifies the deleting process for the user.
First checkout the output video, then we will develop the example step by step.
Step 1. Make a new project.
Create a new project in android studio with empty activity.
Step 2. Adding dimens file
Create a new xml file named dimens.xml under res -> values folder
Add following code in it
Step 3. Updating colors.xml
Update colors.xml file with below
Step 4. Create listview row layout
Make a new layout resource file and give it a name list_item.xml
Add below source code in it
This layout file represents the every single row item of the listview.
In this file, both the layouts are covered :
- A layout which is shown before the swipe action
- A layout which is shown after user swipes the row (undo and delete button)
Step 5. Add Library to build.gradle(Module: app)
Add below line into build.gradle(Module: app) file
We have used external library in this example.
The classes of this library will simplify our work and will save our time.
Visit library on github here.
Step 6. Adding Images
Now put these images in the drawable folder.
You can learn how to add items to the drawable folder here in step 2. (No need to create xml file in drawable, just copy and paste images in drawable).
Step 7. Making Model
Create a new java class named Model.java and add below code
Step 8. Preparing Custom Adapter
Make a new java class with name CustomAdapter.java
Add following into it
This adapter class contains remove() method. This method will get position as a parameter. It is the same position (a number of row item) which is swiped by the user.
remove() method will delete the row which it has got as a parameter.
Step 9. Updating Main Activity
Update activity_main.xml as below
Update MainActivity.java file as below
Understanding the main logic
Look closely at following snippet from Main Activity
Above code is the heart of this example. When the user swipes left or right, the compiler will execute the above code lines.
Row item of listview is removed when the user swipes left or right. onDismiss() method will be executed when user swipes.
onDismiss() method will call the remove() method from the adapter class.
A position of the listview row item, which is swiped by the user will be sent as a parameter in the remove() method.
You can add your code as per your requirements in this method.
Undo Execution
When user swipes the row, undo option is shown to him. If user changes his mind after swiping the row, he can undo his task by clicking the undo button.
Read below code
When the user clicks on undo text, above code will be executed.
Download Source Code For Android Listview Swipe To Delete
Click on below link to get android studio source code.
[sociallocker] Download Listview Swipe to delete [/sociallocker]
So that is all for android listview swipe to delete tutorial with example.
You can ask your queries in comment without any hesitation.
Источник
Обработка свайпа в ListView
Обработка свайпа
Добрый вечор. Подскажите как реализовать обработку свайпа. Чтобы при свайпе(например) вверх.
Данные из SQlite в ListView, обработка события ListView
Ребят, есть БД, ListView. Надо при нажатии на строчку ListView вытащить данные int из БД. .
Направление свайпа (up, right, left, down)
Нужно определить направление свайпа. Как я это делаю: Заранее напишу вопрос: Хороший ли этот.
 Обработка объектов в listview
Такая проблема. Хочу создать 50 строк в listview, в каждой строке по textview и button. Вопрос в.
Severomor1, мне кажется проще использовать библиотеку для этого.
Добавлено через 1 минуту
Или же так:
Некорректная работа свайпа
При свайпе на android по х объект проходит лишь где то 5-10 пикселей, хотя в коде указано, 80 -80 и.
Действие после свайпа по спрайту
Как сделать ,чтобы после проведения по фигуре (спрайту) произошло действие, например появился.
Обработка кнопок в ListView
Доброго времени суток! WPF пользуюсь совсем ещё недавно, поэтому не совсем понимаю как мне.
Верстка свайпа и замены блока картинкой
Всем привет ребят! Помогите сверстать такой свайт списка, не могу понять, как можно убрать.
Источник
Inbox Style Swipe ListView
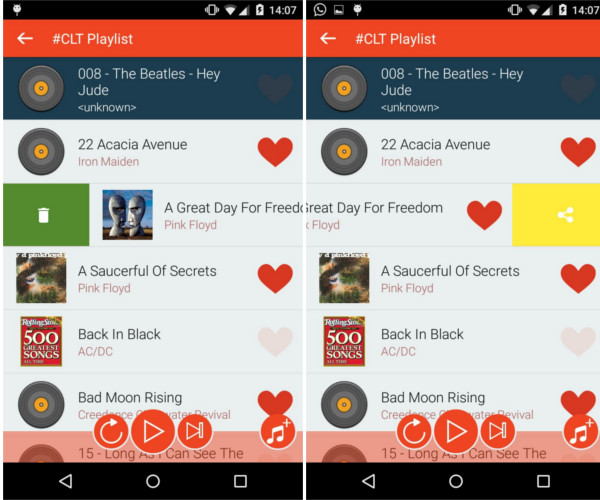
Google’s Inbox application has a really nice ListView where user could swipe right to mark the email done and swipe left to snooze the notification. I implemented something very similar to that using ListView and ArrayAdapter .
The method that I used here is quite simple. I created a RelativeLayout which would be used to display each item of the listview. This RelativeLayout has three different layouts. Top layout is the one that you would want to show. Each layers are stacked. The second layer shows delete option. Third layer shows share option.
When the user swipes right, the second layer starts showing from the left. But when the user swipes left, it should show the third layer, so we need to make second layer invisible. That’s about it. Just a simple trick.
Design Layout
As I said, we would create three different layers and add them to a RelativeLayout.
ArrayAdapter
Now, we need to create a class which extends ArrayAdapter. Here, we will create a holder for each entry. We will also create a swipe detector which would be helpful in swiping the list items.
Swipe Detector
Dectcting swipe movement is an important part here. We create a class which extends View.onTouchListener and attach it to the top most view of the layout. Now, all we need to do is animate the view as the user swipes it. It is not that difficult. As I have shown previously, that you can do this by changing left and right margin of the view by the same amount.
When it receives ACTION_DOWN event, we will store the x co-ordinate of the touch. And after which whenever it will receive ACTION_MOVE event, we will store the new x co-ordinate and calculate the difference between current co-ordinate and the initial touch co-ordinate. Based on this difference, we will change the margins of the top view, and hide second view (if swipe is in left direction).
One might wonder why I have added something like requestDisallowInterceptTouchEvent in this code. I had not added it before. It was just simple code — swipe and be done with it. But I faced a problem. There was no issue if I swiped it properly, but if my finger accidentally swiped the item in vertical direction, the ListView would intercept that touch event and take control of it. So onTouchListener would give ACTION_CANCEL as the event. Here is a good stackoverflow answer which explains why this happens.
When reqeustDisallowInterceptTouchEvent(true) is called on the ListView, it doesn’t intercept the vertical swipe gesture and the horizontal swipe works well.
Why have I used MIN_LOCK_DISTANCE ?
If I don’t use that and just disallow intercepting the events, even ACTION_DOWN would disallow intercepting the event and hence disabling the vertical scrolling. You would never be able to scroll your list. Hence, if you keep a threshold of say, 20, then if you have swiped the list horizontally by a distance 20px, listview will stop intercepting the events and you’d get proper swipe interaction.
Final Steps
One last step would be to set up the ListView and Adapter.
And the final result looks something like this.
P.S. Working on UI is fun, but sometimes becomes a headache.
Playing around with Android UI
Articles focusing on Android UI — playing around with ViewPagers, CoordinatorLayout, meaningful motions and animations, implementing difficult customized views, etc.
Источник
Android studio свайп listview
ListView Swipe to Delete Library
ListView Swipe to Delete is an Android library which offers a list view navigation mode similar to Any.do application.
- swipe from left to right to mark list item as completed (completed items are moved to the bottom of the list)
- swipe from right to left to undo completing
- press «X» button to remove completed list item from a list
- shake device to remove all completed list items from a list
- tap upon list item to reveal a context menu.
The library supports both ListView and ExpandableListView navigations. See /demo folder for example how to use.
Create own XML layout for a list view item. The library will later attach it to its XML templates for:
- item with hidden context menu
- completed item.
Define item’s context menu if needed. It can be edit or share item’s content, for instance. Menu is initially hidden and is shown if item is tapped. For every menu item you need to specify icon and action:
Received collection of menu items descriptions will later be used to create menu ImageViews.
- In activity’s onCreate() method get a reference to a list view:
- Then, you need to create a class to handle menu items actions and pass a list view reference to it:
- Create list adapter. You need to pass:
- an ID of your list item’s content XML layout
- a list of menu items descriptions
- a list handler
Then you need to override adapter’s getView() method to set list item’s data:
Источник


