- Android ListView проведите пальцем вправо и влево, чтобы принять и отклонить
- Drag и Swipe в RecyclerView. Часть 2: контроллеры перетаскивания, сетки и пользовательские анимации
- Контроллеры перетаскивания
- Выделение элемента списка
- Сетки
- Пользовательские анимации смахивания
- Заключение
- Исходный код
- How to create Swipe Navigation in an Android App
- Haider Mushtaq
- Oh Lord, Make me Brave and Make my Path Easy for me !
- Tutorial for Creating Android Swiping Application using Tabbed Activity on Android Studio
- Why make this Tutorial?
- Setting it Up!
- Understanding how it works !
- Modifying the code to our Will !
- 31 Comments
Android ListView проведите пальцем вправо и влево, чтобы принять и отклонить
Я хочу разработать вид списка в том, что я хочу, когда я проведите пальцем слева направо, в левом углу дисплея один принять ( true ) значок (не кликабельный — показать только изменение цвета, когда проведите пальцем слева направо), как следующий снимок экрана,
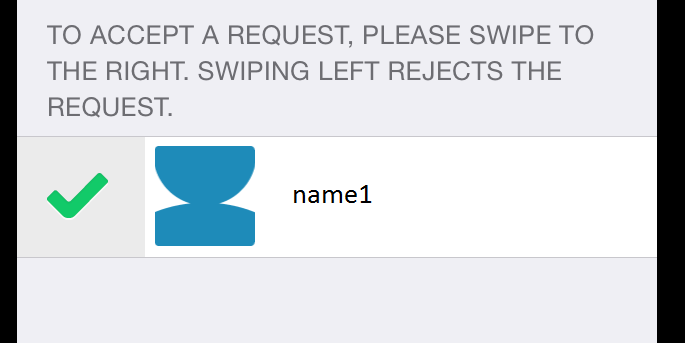
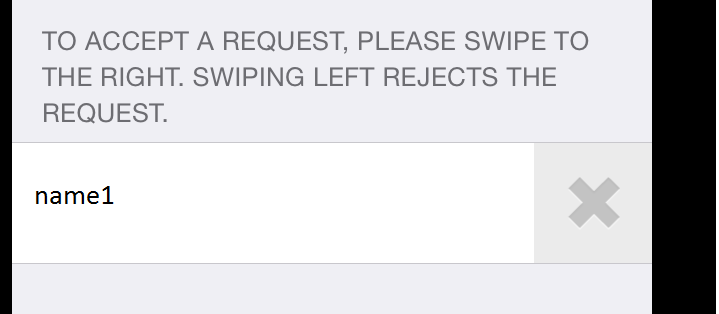
когда я провожу все слева направо, он принимает (в том, что я назвал accept api ) , и когда я провожу справа налево, он будет отображаться следующим образом:
Это сделано в iphone , но я не совсем понимаю, как для этого в Android , я так много гуглить, но не найти именно то, что я хочу,
но в том, что когда я провожу слева направо и справа налево же onOpened(..) метод называется так, что он запутывает : когда вызывать accept и reject api, потому что тот же метод вызывается при любом типе салфетки.
и я также хочу, когда я просто проведите влево-вправо или вправо-влево только в этот раз принять изображение ( левая сторона) и отклонить ( отклонить изображение правой стороны ) дисплей, когда я беру палец вверх, он должен отображать весь listview (не оба изображения стороны ).
поэтому любой, пожалуйста, помогите мне, как это сделать.
мой вопрос немного запутан, а также с некоторой низкой грамматикой, но я не знаю, как объяснить всю анимацию, поэтому я пытаюсь написать, как указано выше,
Если кто-нибудь мне поможет, это очень ценится.
Источник
Drag и Swipe в RecyclerView. Часть 2: контроллеры перетаскивания, сетки и пользовательские анимации

В первой части мы рассмотрели ItemTouchHelper и реализацию ItemTouchHelper.Callback, которая добавляет базовые функции drag & drop и swipe-to-dismiss в RecyclerView . В этой статье мы продолжим то, что было сделано в предыдущей, добавив поддержку расположения элементов в виде сетки, контроллеры перетаскивания, выделение элемента списка и пользовательские анимации смахивания (англ. swipe).

Контроллеры перетаскивания
При создании списка, поддерживающего drag & drop, обычно реализуют возможность перетаскивания элементов по касанию. Это способствует понятности и удобству использования списка в «режиме редактирования», а также рекомендуется material-гайдлайнами. Добавить контроллеры перетаскивания в наш пример сказочно легко.

Сперва обновим layout элемента (item_main.xml).
Изображение, используемое для контроллера перетаскивания, можно найти в Material Design иконках и добавить в проект с помощью удобного плагина генератора иконок в Android Studio.
Как кратко упоминалось в прошлой статье, вы можете использовать ItemTouchHelper.startDrag(ViewHolder) , чтобы программно запустить перетаскивание. Итак, всё, что нам нужно сделать, это обновить ViewHolder , добавив контроллер перетаскивания, и настроить простой обработчик касаний, который будет вызывать startDrag() .
Нам понадобится интерфейс для передачи события по цепочке:
Затем определите ImageView для контроллера перетаскивания в ItemViewHolder :
и обновите RecyclerListAdapter :
RecyclerListAdapter теперь должен выглядеть примерно так.
Всё, что осталось сделать, это добавить OnStartDragListener во фрагмент:
RecyclerListFragment теперь должен выглядеть следующим образом. Теперь, когда вы запустите приложение, то сможете начать перетаскивание, коснувшись контроллера.
Выделение элемента списка
Сейчас в нашем примере нет никакой визуальной индикации элемента, который перетаскивается. Очевидно, так быть не должно, но это легко исправить. С помощью ItemTouchHelper можно использовать стандартные эффекты подсветки элемента. На Lollipop и более поздних версиях Android, подсветка «расплывается» по элементу в процессе взаимодействия с ним; на более ранних версиях элемент просто меняет свой цвет на затемнённый.
Чтобы реализовать это в нашем примере, просто добавьте фон (свойство background ) в корневой FrameLayout элемента item_main.xml или установите его в конструкторе RecyclerListAdapter.ItemViewHolder. Это будет выглядеть примерно так:
Выглядит круто, но, возможно, вы захотите контролировать ещё больше. Один из способов сделать это — позволить ViewHolder обрабатывать изменения состояния элемента. Для этого ItemTouchHelper.Callback предоставляет ещё два метода:
- onSelectedChanged(ViewHolder, int) вызывается каждый раз, когда состояние элемента меняется на drag (ACTION_STATE_DRAG) или swipe (ACTION_STATE_SWIPE). Это идеальное место, чтобы изменить состояние view -компонента на активное.
- clearView(RecyclerView, ViewHolder) вызывается при окончании перетаскивания view -компонента, а также при завершении смахивания (ACTION_STATE_IDLE). Здесь обычно восстанавливается изначальное состояние вашего view -компонента.
А теперь давайте просто соберём всё это вместе.
Сперва создайте интерфейс, который будут реализовывать ViewHolders :
Затем в SimpleItemTouchHelperCallback реализуйте соотвутствующие методы:
Теперь осталось только, чтобы RecyclerListAdapter.ItemViewHolder реализовал ItemTouchHelperViewHolder :
В этом примере мы просто добавляем серый фон во время активности элемента, а затем его удаляем. Если ваш ItemTouchHelper и адаптер тесно связаны, вы можете легко отказаться от этой настройки и переключать состояние view -компонента прямо в ItemTouchHelper.Callback .
Сетки
Если теперь вы попытаетесь использовать GridLayoutManager , вы увидите, что он работает неправильно. Причина и решение проблемы просты: мы должны сообщить нашему ItemTouchHelper , что мы хотим поддерживать перетаскивание элементов влево и вправо. Ранее в SimpleItemTouchHelperCallback мы уже указывали:
Единственное изменение, необходимое для поддержки сеток, заключается в добавлении соответствующих флагов:
Тем не менее, swipe-to-dismiss не очень естественное поведение для элементов в виде сетки, поэтому swipeFlags разумнее всего обнулить:
Чтобы увидеть рабочий пример GridLayoutManager , смотрите RecyclerGridFragment. Вот как это выглядит при запуске:
Пользовательские анимации смахивания
ItemTouchHelper.Callback предоставляет действительно удобный способ для полного контроля анимации во время перетаскивания или смахивания. Поскольку ItemTouchHelper — это RecyclerView.ItemDecoration, мы можем вмешаться в процесс отрисовки view -компонента похожим образом. В следующей части мы разберём этот вопрос подробнее, а пока посмотрим на простой пример переопределения анимации смахивания по умолчанию, чтобы показать линейное исчезновение.
Параметры dX и dY — это текущий сдвиг относительно выделенного view -компонента, где:
- -1.0f — это полное смахивание справа налево (от ItemTouchHelper.END к ItemTouchHelper.START )
- 1.0f — это полное смахивание слева направо (от ItemTouchHelper.START к ItemTouchHelper.END )
Важно вызывать super для любого actionState , который вы не обрабатываете, для того, чтобы запускалась анимация по умолчанию.
В следующей части мы рассмотрим пример, в котором будем контролировать отрисовку элемента в момент перетаскивания.
Заключение
На самом деле, настройка ItemTouchHelper — это довольно весело. Чтобы не увеличивать объём этой статьи, я разделил её на несколько.
Исходный код
Весь код этой серии статей смотрите на GitHub-репозитории Android-ItemTouchHelper-Demo. Эта статья охватывает коммиты от ef8f149 до d164fba.
Источник
How to create Swipe Navigation in an Android App
When talking about Android Apps, the first thing that comes to mind is variety. There are so many varieties of Android apps providing the user with beautiful dynamic UI. One such feature is to navigate in our Android Apps using left and right swipes as opposed to clicking on buttons. Not only does it look more simple and elegant but also provides ease of access to the user. There are many apps which use this swipe feature to swipe through different activities in the app. For example, the popular chatting app, Snapchat, uses it to swipe through lenses, chats and stories. Here, we will learn how to implement swipe views in our own Android app.
We can implement this by use of two features:
Attention reader! Don’t stop learning now. Get hold of all the important Java Foundation and Collections concepts with the Fundamentals of Java and Java Collections Course at a student-friendly price and become industry ready. To complete your preparation from learning a language to DS Algo and many more, please refer Complete Interview Preparation Course.
- Fragments A fragment is just a part of an activity. We can have a fragment that takes up part of a screen or a whole screen. Or we can show multiple fragments at the same time to make up a whole screen. Within an activity, we can also swap out different fragments with each other.
- ViewPager ViewPager is a class in Java which is used in conjunction with Fragments. It is mostly used for designing the UI of the app.
How does it work?
First we need to set an adapter on the ViewPager using the setAdapter() method. The adapter which we set is called FragmentPagerAdapter which is an abstract class in Java. Hence, we create our own SampleFragmentPagerAdapter which extends from FragmentPagerAdapter and displays our Fragments on the screen. When we launch the app in our device, the ViewPager asks the SampleFragmentPagerAdapter how many pages are there to swipe through. The getCount() method of the adapter returns this answer to the ViewPager. Then the ViewPager asks for the Fragment which is at the 0th position and the adapter returns that particular fragment which is then displayed by ViewPager on our screen. When we swipe left, ViewPager asks adapter for the Fragment at 1st position and similarly, it is displayed on the screen and it continues so on.
Step by step implementation:
We will be creating three fragments that is three screens that the user can swipe through. Then we will add these fragments to our FragmentPagerAdapter and finally set it on ViewPager.
Note: To run these codes, you need to copy and paste them in Android Studio as it won’t run on the IDE!
Step1: Creating Fragments:
To create a fragment, click on app > Java > com.example.android(Right Click) > New > Fragment > Fragment(Blank)

We can create as many Fragments as we want but since we will be displaying only three screens, hence we will create three Fragments.
Now we will open our Fragments and copy this code over there:
Источник
Haider Mushtaq
Oh Lord, Make me Brave and Make my Path Easy for me !
Tutorial for Creating Android Swiping Application using Tabbed Activity on Android Studio
Why make this Tutorial?
The reason I am making this tutorial is that I wanted to make an application in which the user could swipe through different images. When I decided to create a new application, I came across this “Tabbed Activity” icon. I thought that this could help guide me. Once I opened it up and wanted to make it work, I got stuck. I decide to get help from the internet but unfortunately discovered that there was little or no material concerning Tabbed Activity on the Internet. I then went through the code, line by line trying to understand how it works and finally got it to work. I thought that I should write a tutorial to help someone like me who is also stuck with Tabbed Activity.
NOTE: If you have ideas about what should I add or how to further make this tutorial complete, do inform me. Thanks for your consideration.
Setting it Up!
Start by creating a new Project in Android Studio:

Enter the Application name and press Next:

Choose the Platform i.e Phone and Tablet then press Next:

Now the wizard would ask you to Add and activity to Mobile, you have to select Tabbed Activity which in my case was located in the end. Press Next after selecting it.

This window allows us to Choose options for your new file, we will let it stay as is and press Finish. A thing to note here is that you can choose to change Navigation Style of your tabbed activity but we will stick with the default which in our case is Swipe View (ViewPager).
After you press Finish, it will take some time to set things up. If it pops up some error, something similar to the one I encountered, it means that you either need to update your Android Studio or need to install missing components, or both.
To upgrade, go to Toolbar’s: Help > Check for Updates…
Choose to update and Restart when the dialog appears.

Next, you can install the missing components by clicking on the blue: “Install Repository and sync project“. This is written next to the Error message.

It will show you a licence, just accept and press install:

Now that everything is in order, Just give it a test run. In order to actually see what is happening, we need to add something to the fragment_main.xml file because it is empty by default.
Open fragment_main.xml, located in app > res > layout > fragment_main.xml
Now add a TextView with “Hello World”:

You can do this by dragging Text View and changing text to “Hello World” or what ever you want:

Now try doing a test Run:

Understanding how it works !
Look at the code in
app > java > yourPakage > MainActivity.java
The code that follows is the one we are really interested in :
The SectionsPagerAdapter class is a sub class of MainActivity class.
The getItem() is the most important method, that needs to be configured in order for it to display the fragments that you need to display.
Simply put, the “Fragment” that this method will return would be the one displayed in the Activity. So you need to put all your “Fragment” classes here and return them in the order you want them displayed. If you are unable to understand this, no need to sweat, just follow this tutorial and you will, -God Willing- understand it all.
Just know this, that there are many ways you can do this, using if conditions etc… I will use switch(position) to return my desired Fragment. The default code is shown here, I will make the changes in the next section.
The getCount() method returns the Total number of pages or the “Tabs”. This is where you can set the number of tabs. In this case, its set to 3. This means that there will be 3 Tabs. If you need to increase or decrease the number of tabs – this method needs to return the total number of tabs – so you need to make appropriate change here. If for example you have 5 tabs, you will change the line:
return 3; to return 5;
I have extracted PlaceholderFragment class and made it a class on its own. I have placed it in app > java > yourPakage > PlaceholderFragment.java
This makes no difference it all, but it would help you understand to code much better.
We can use PlaceholderFragment class as a template for our Fragment classes, the things that we would need to replace, i have marked in blue
Modifying the code to our Will !
Alright, now lets make our own Fragment and integrate it with the Tabbed Activity.
Firs off we will start by making the layout for our fragment. Lets call it my_fragment.xml.
We will do this by creating a new xml file in the layouts folder. app > res > layout > my_fragment.xml
You can do this by right clicking the layouts folder and choosing to create new xml layout.
I threw in a Button and a TextView, and also changed the color or my background… You can make this as you like… Here is the XML code: (The code written in Blue needs to be the same as it is going to be used in our code.
To do this right click on your pakage, select new and choose create new Java Class. I made a new class in my java directory and named it MyFragment : app > java > yourPakage > MyFragment.java
The code is as follows, I have removed all the unnecessary lines of code…
The class needs to extend Fragment
The newInstance() method needs to return the correct reference to our fragment as follows:
The MyFragment is the constructor method of our class, let it stay empty and public.
Here I am creating two new variables, one of type Button, and the other of type TextView, I will need to link them to the Button and TextView in my layout for this fragment.
The following is the most important method of our fragment, this links the fragment to its layout and we can also connect our Button and TextViews here by using findViewById method as we used to do in Activity.
You can think of onCreateView() method as onCreate() method of an Activity except that it has to return a view in the end.
In this onCreateView method, we will connect our fragment to our layout, my_fragment as follows:
Now we will connect our Button and TextView to those in our layout as follows, keeping in mind that we can only use findViewById() method from rootView:
I have configured my OnClickListner with my button here as follows:
Finally we need to return our View, rootView in this case:
Now our Fragment is all set, Now we just need to set it up so that it can be called by our MainActivity.java
After you have opened the MainActivity.java located in app > java > yourPakage > MainActivity.java search for the SectionsPagerAdapter Class which is a subclass of MainActivity Class go to the method getItem() :
The position is provided by Android’s OS. The position is responsible for the fragment that shows up. The first position is 0, so the first page that you want to be displaced should be returned when position is 0. You should know that you need to return an instance of a fragment, you can do this in various ways, by using if-else conditions etc… I have used switch.
If you are wondering why are you using instance of fragments and not constructors. The problem is that if we do that, every time we swipe and then later come back to our fragment, it will be reset, which we do not want.
The next thing that we need to is to tell our Adapter how many pages in total are there… i.e set the Max Value of Position. To do this you need to edit your getCount() method:
Previously the getCount() method returned the value 3, since we only want 2 pages to appear in our activity, we would replace it by 2.
31 Comments
Hi, sorry for this question but from here, do you have any idea how to place the tab bar at the bottom of the screen?
Then you can specify the alignment of your TabWidget, to align it at the bottom:
I am a newbie too, but it looks like you can modify your look in mainActivity.xml. I think you can use design tab to modify your bar to be under your fragment placeholder (simple, drag&drop) or change ‘manually’ settings in Text tab.
Great tutorial got this fragments down now!
Great tutorial got this fragments down now!
Great tutorial bro! Keep up the good work!
Thanks for this great Tutorial, I worked through was happy that i understood everything but at the very end the Fragment getItem() does not accept the type “Myfragment” but does rather want a usual Fragment. Unfortuneately a cast i not possible. Any ideas?
misstype in “Myfragment”? if you have copied the code exactly then it should be “MyFragment”
Maybe you just imported the ‘android.app.Fragment’, but you need to import the ‘android.support.v4.app.Fragment’.
I had the same problem and with this it works, hope I could help you.
error showing can’t find symbol variable “pager” …what to do??
Very helpful….Thanks alot
Great tutorial! Thanks Haider 🙂
How to change the Title of Action Bar whenever the tab changed (for example the title of action bar for first tab is “A”, then second tab the action bar will be “B”)
Great tutorial. I’m getting an error, “could not resolve symbol”, for inflater, container and savedInstanceState. I have imported android.view.LayoutInflater;
What could possibly be the reason ?
Is it possible to get the whole project that you build at the end?
When will you upload your part-3 tutorial? I am not getting the Tab names. How can I get the Tab names?
Excellent article Haider. I have one query. Is there a way to perform some operation on the various tabs using the MainActivity class MenuItems? Lets say I have a ExpandableListView in each of the tabs and I want to expand or collapse the Groups from the MainActivity menu items. How do I do that?
Is there a way to find which tab we are in (which fragment tab is selected by the user) from the MainActivity class?
good tutorial thank you!
This is the best tutorial I’ve found regarding the swipe layout thx!
Good Job Bro,
Keep up the good work 🙂
Hi, I am inflating different 2 fragment_xml based on the Section No. inside onCreateView() method .
Good work bro , Go ahead !
Genial. Saludos desde Argentina.
Thanks. It helped me a lot.
Muchas gracias por el tutorial mi amigo, lo quiero aplicar en el siguiente caso -> la base de datos manda informacion a mi app, y esta debe ser repartida en “n” fragmentos, ..como generaria fragmentos automaticos?, hay alguna otra forma de hacerlo? , espero tu respuesta muchas gracias ¡¡
This was such a great help! I was stuck for a long time getting this to work. Thank you.
Thank you very much! I was stuck too. Un saludo desde México
Amazing tutorial. I was overthinking the functionality of the template but now I see your tutorial, it is a lot easier.
Great tutorial i’ve did all what you learned and it’s perfect except by one thing in one of the fragments i have a button and it doesn’t work
Источник


