- How to use Font Awesome Icons in Android
- 1. Font Awesome Android Library
- 2. How to use it?
- 2.1 Displaying Icon in TextView
- 2.2 Using FontDrawable
- 2.3 Using in Menus (Bottom Navigation, Navigation Drawer etc.,)
- Используем иконки из библиотеки Material Design
- Используем иконки из библиотеки Material Design : 1 комментарий
- Android TextView Tutorial, Variations and Customizations
- Creating TextView From XML Definition
- Creating TextView Programmatically as the ContentView of an Activity
- Hiding a TextView
- Using TextView in a Fragment
- Common TextView Methods and examples
- 2. Android TextView — Fill From StringBuilder
- Android AppCompatTextView
- Creating AppCompatTextView.
- How to detect links,hashtags,mention, phones etc in TextViews
- (a). AutoLinkTextViewV2
- Features
- How to copy TextView content into Clipboard
- (a). Use CopyButton
- Creating an EmailValidator
- Validating Email Address using Regex
- Oclemy
How to use Font Awesome Icons in Android
Font Awesome is very popular icon toolkit used across many websites. It has both free and pro collection of icons, but you can find most the icons in free collection itself. Each icon will represented by unicode (). We use this unicode to display the icon in TextView. As it’s a normal TextView, all the text styling attributes (color, size, paddings etc.,) can be applied.
For an example if you want to display android Robot logo, you can use unicode as TextView value.
1. Font Awesome Android Library
In order to use the font awesome icon collection, you have to add the font awesome font files to your assets directly and apply the appropriate fontFace on to TextView which is simpler task. But we want the icons to be displayed in other widgets also like in Buttons, Menus, Bottom Navigation and Navigation Drawer etc,. Displaying icon in non-textual views takes some effort. So I have written a library by incorporating all the necessary methods to render the icons in multiple widgets.
To get started, include the fontawesome in your build.gradle and sync your project.
2. How to use it?
2.1 Displaying Icon in TextView
The easiest way to display the font icon is, use the FontTextView text by setting the appropriate icon name as text value. This widget extends from AppCompatTextView, so all the text view attributes applies to this widget.
- solid_icon: To display solid icon, set this value as true.
- brand_icon: To display brand icon, set this value as true.
2.2 Using FontDrawable
Using the icon in xml layout is easy, but if you want to use the icon for other widget like button or menu, you can use the FontDrawable element to apply the icon.
For an example, if you want to use the font awesome icon to Floating Action Button, you can use the FontDrawable as shown below.
2.3 Using in Menus (Bottom Navigation, Navigation Drawer etc.,)
You can also use the font icons in the widgets that uses menu file to render the items like Toolbar icons, Bottom Navigation, Navigation Drawer etc., To render the icon in menus, you can use the FontDrawable to set the icons, but it needs few hacks through java code.
The below example shows rending the font awesome icons in Navigation Drawer menu. Full example can be found here.

I hope you like this library. If you have any suggestions, please let me know in the comment section below.
Hi there! I am Founder at androidhive and programming enthusiast. My skills includes Android, iOS, PHP, Ruby on Rails and lot more. If you have any idea that you would want me to develop? Let’s talk: [email protected]
Источник
Используем иконки из библиотеки Material Design
Во время разработки приложений часто возникает ситуация, когда нужно найти какие-либо изображения, например, иконки для кнопок. Для этого случая у Google есть своя библиотека Material Design Icons, содержащая различные иконки на все случаи жизни.
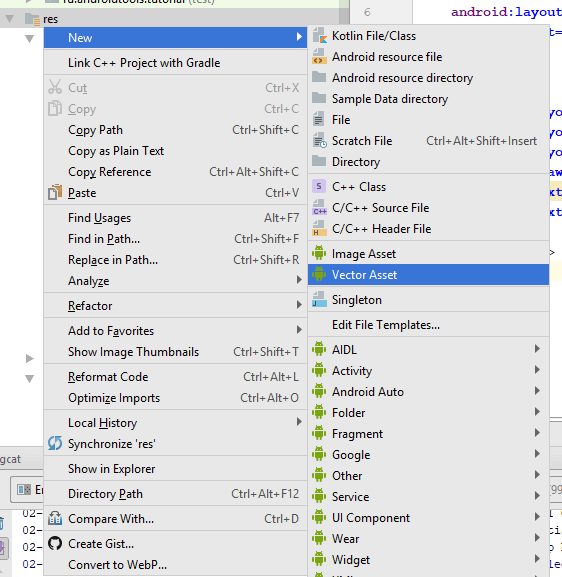
Хотя вы можете искать нужные иконки в исходнике на GitHub, Android Studio позволяет импортировать иконки, не заходя на сторонние сайты. Для этого вам достаточно кликнуть правой кнопкой на папку res и выбрать New — Image Asset.
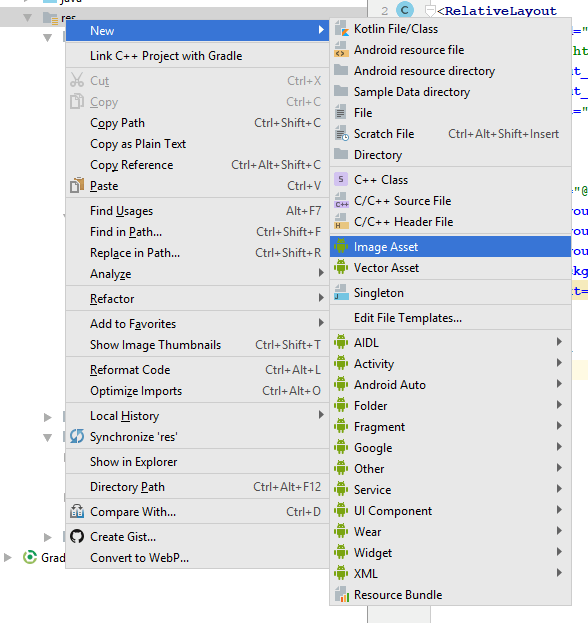
Откроется окно Asset Studio. Здесь вы можете настроить иконку своего приложения, иконки тулбара и уведомлений. В данном случае нам нужно выбрать Action Bar and Tab icons.
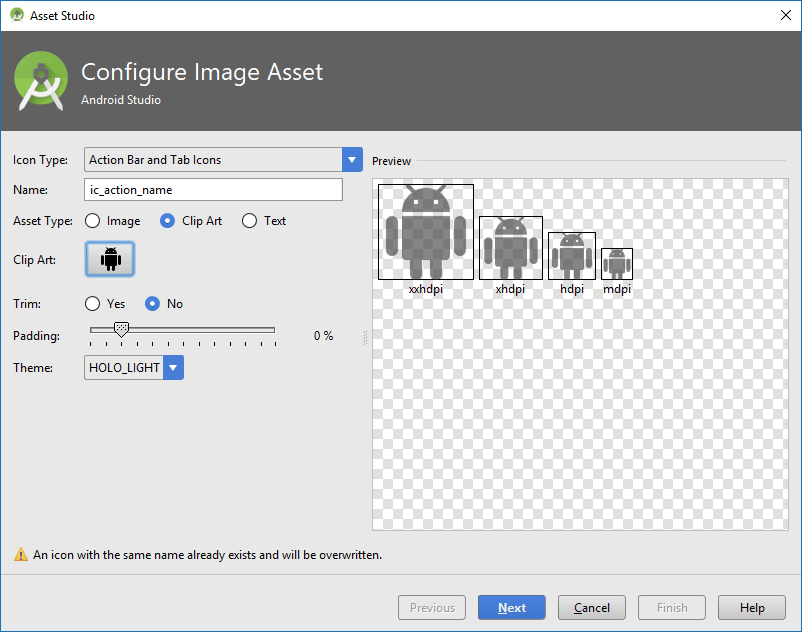
Здесь нужно выбрать тип Clip Art и нажать на иконку, после чего появится список всех доступных в библиотеке иконок.
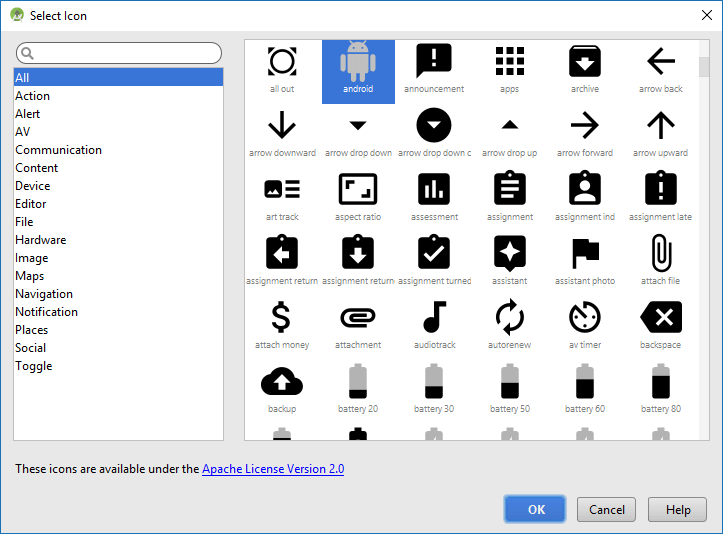
Для удобства они разбиты на категории, также вы можете ввести название иконки в поиске. После выбора иконки вы вернётесь на предыдущее окно, где можете при необходимости сменить тему (HOLO_DARK, HOLO_LIGHT или CUSTOM) для настройки цвета иконки, а также задать имя для иконки и отступы от границы. При регулировке отступов в окошке справа вы увидите, как иконки будет смотреться при разных разрешениях экрана.
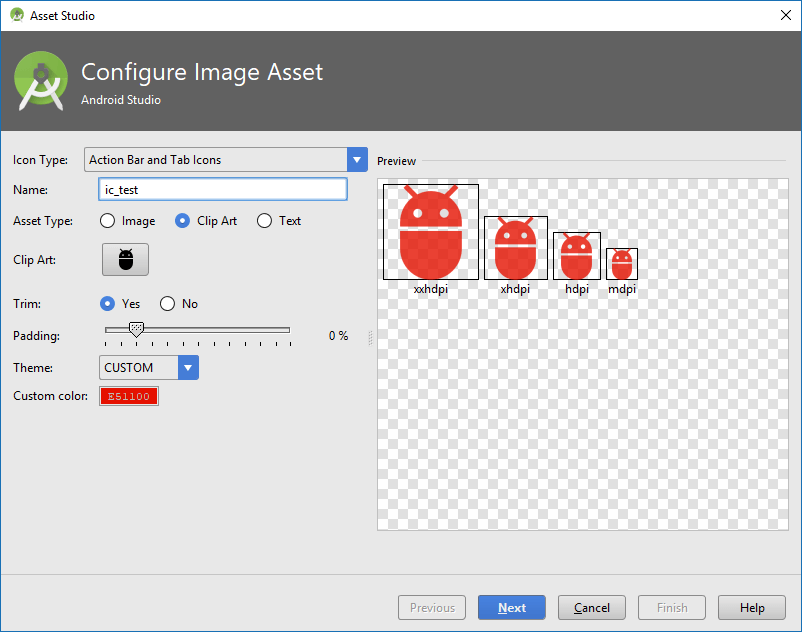
После нажатия на Next вы увидите, в каких папках будут созданы иконки, и, нажав Finish, завершите их создание. После этого вы можете применять добавленные иконки в своём приложении.

В случае, если под рукой нет Android Studio, вы можете зайти на сайт Android Asset Studio, где аналогично можете создавать иконки для приложений.
Кроме стандартных PNG изображений есть также возможность импортировать векторные изображения. Для этого вместо Image Asset нужно будет выбрать Vector Asset.
В открывшемся окне мы сможете импортировать своё векторное изображение, либо взять готовое из библиотеки.
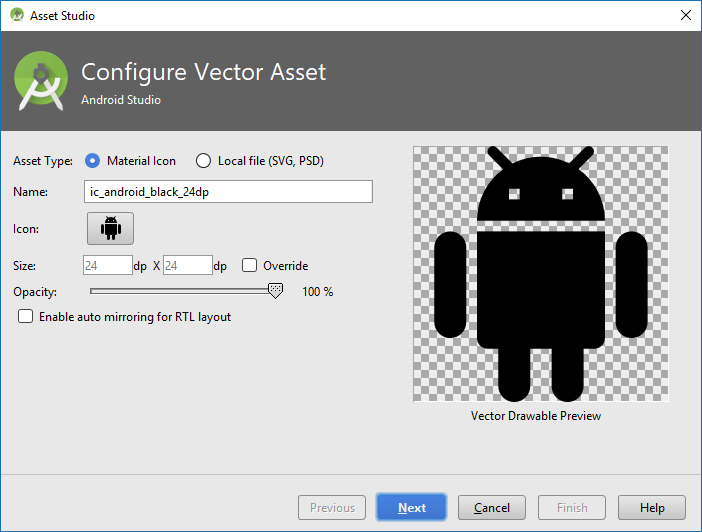
В результате в проект импортируется XML-файл, содержащий информацию о векторном изображении. Вы можете использовать его точно также, как и обычные PNG-изображения.
Однако в случае, если нужно показать векторное изображение на версии ниже Android 5.0 Lolipop, в файле build.gradle модуля приложения нужно дописать следующую строку.
Кроме того, при добавлении вектора через XML на старых версиях может возникнуть краш приложения, поэтому лучше всего добавлять их программно с помощью класса VectorDrawableCompat.
Используем иконки из библиотеки Material Design : 1 комментарий
Когда используешь Android Asset Studio скачивается архив с png файлами разных размеров, как их сразу все импортировать в android studio?
Источник
Android TextView Tutorial, Variations and Customizations
Android TextView Tutorial and Examples
Let’s discuss one of the most simple and commonly used android widgets, the TextView class.
Android TextView is a User interface widget that displays basic texts.
In almost every Graphical User Interface toolkit out there, a component or control for displaying text is there. Be it the Label in Windows Forms or the JLabel in Swing .
This is because we mostly communicate via texts and these texts have to be rendered. Well the textview renders them in Android.
TextViews and labels are normally considered basic and are easy to work with.
In android textviews are actually editable though by default this is disabled. Instead it’s subclass the EditText on the other hand allows for editing.
TextView as a class resides in the android.widget package.
TextView derives from android.view.View class and implements import android.view.ViewTreeObserver.OnPreDrawListener .
TextViews can be created either programmatically or via inflation of XML.
Here are the constructors to create a TextView object programmatically.
| No. | Constructor |
|---|---|
| 1. | public TextView(Context context) |
| 2. | public TextView(Context context, AttributeSet attrs) |
| 3. | public TextView(Context context, AttributeSet attrs, int defStyleAttr) |
| 4. | public TextView(Context context, AttributeSet attrs, int defStyleAttr, int defStyleRes) |
Let’s look at various TextView examples:
Creating TextView From XML Definition
Most of the time we define textviews via xml and inflate them in our activity.
Here’s a typical definition of android textview;
- First we specify a unique id for the textview using android:id=»» attribute that will be used to reference the textview from C# code.
- We then define the layout width( android:layout_width=»» ) and height( android:layout_height=»» ) of the textview.
- Next we specify the text via the android:text=»» attribute.
We then come to our MainActivity ‘s OnCreate() method. OnCreate() method is a lifecycle callback that gets called when the activity in android has been created.
Normally we make view initializations here since the activity has been created.
But first we make sure that the following method has been invoked:
The above method will inflate our `activity_main.axml` layout and set it as the layout of our activity. This layout has to be inflated first since it contains our `TextView`.
Then we come reference our `TextView`:
This will give us a textview reference which we can use to set text:
If we run the project we get:
Here’s the full source code:
activity_main.axml:
Creating TextView Programmatically as the ContentView of an Activity
It’s not mandatory that you set a layout as the content view of an activity.
You can use a view instead of inflating a layout. If anything the layouts do get inflated into a view object.
However this is only suitable for simple interfaces. if you need a complex interface with nested widgets, then you use the layout as it’s easier to write such declaratively.
First we instantiate a TextView programmatically, passing in the `Context` object:
Let’s then set the textview’s background color programmatically:
Then set the text:
And finally set the content view:
Here’s the full code. Note we don’t need an xml layout:
Here’s what we get:
Here’s another example of building a textview programmatically with several attributes being set:
Hiding a TextView
What about if you want to hide a textview. Well it’s a view so we can simply set it’s visibility to `View.GONE`:
Using TextView in a Fragment
Well just override the `onCreateView()` method of your Fragment, then first make sure the Fragment layout is inflated into a View object.
Then find the textview from that inflated view:
Then of course you can set it’s text property as you wish:
Common TextView Methods and examples
1. setText()
To set text to a textview you simply use the `setText()` method.
What about if you want to set text that has been sent from another activity:
2. setTextColor()
Let’s say we have the color in defined in the colors.xml resource, so we load the color from there using `getResources().getColor()` invokation.
You can also set color literal in hexadecimal notation(using the characters ‘0x’ followed by the hexadecimal number) like this;
This is the Opaque black color we’ve used.
However we can also set the color from the `android.Graphics.Color` class as follows:
3. setBackgroundColor()
Well we are also capable of setting the background color of a textview:
5. setGravity()
6. setTextSize()
7. setSingleLine()
8. setTypeface()
9. setId()
10. setLayoutParams()
11. How to add and Cancel Strike Through to TextView
These two methods show us how to add or cancel a strike through in a textview widget.
You just pass that textView as a parameter and we invoke the `setPaintFlags()` with the appropriate parameters. We utilize the `Paint` class, which normally holds the style and color information about how to draw geometries, text and bitmaps.
11. postDelayed()
12. How to create a Gradient TextView
2. Android TextView — Fill From StringBuilder
Android TextView and StringBuilder Example Tutorial.
How to populate a textview from a stringbuilder.
`android.widget.TextView` is a class used to render texts.
`java.lang.StringBuilder` on the other hand allows for creation of modifiable string of characters. StringBuilder is the replacemnet for `StringBuffer` class for non-concurrent use.
In this example we’ll see how to:
- Create a StringBuilder with multiple items.
- Render the StringBuilder items in a TextView line by line.
For this example we don’t need any XML layout. Instead we create and set an `android.view.View` object as our contentView for our activity.
Classes in Java are normally grouped into packages. So we first specify the package for our MainActivity class.
We then define the class:
We’ll then add several imports above the class:
Then make the class derive from `AppCompatActivity`.
AppCompatActivity makes your activity backword compatible with older devices.
To use it your app level build.gradle dependencies section must contain the following support library. Note the version can differ:
We then override the `onCreate()` method inside our class. This is a lifecycle callback for android that gets raised when the activity is created.
We’ll do our stuff right here.
Note that we have to call the super class onCreate() method as above and pass it the savedInstanceState.
Then we instantiate the StringBuilder class:
All these we do inside the `onCreate()` method.
Then append our data using method chaining. This is possible since each `append()` method returns an instance of the `StringBuilder`.
Then instantiate our TextView, passing in our Context object.
Then convert our StringBuilder to String using the `toString()` method so that we can display it in the TextView.
Lastly we call the `setContentView()` method of the AppCompatActivity class. This method will set our TextView as the main view of our activity.
Here’s the full source code. Note we don’t need an XML for this example.
Android AppCompatTextView
AppCompatTextView is basically a TextView which provides support to older version of the android platform with compatible features of a TextView.
Whenever you use a TextView, android may automatically use the AppCompatTextView.
This is if your project has the necessary support library dependencies.
AppCompatTextView resides in the `android.support.v7.widget` package.
This class derives from TextView:
Given that it derives from `android.widget.TextView`, this class inherits TextView’s XML attributes. Some of these attributes are inherited by TextView itself from the base View class.
Creating AppCompatTextView.
Not only can you create AppCompatTextView via the XML specifications, but you can also create them programmatically.
To do so you can use the provided public constructors.
Android does provide us three of those:
| No. | Constructor |
|---|---|
| 1. | AppCompatTextView(Context context) |
| 2. | AppCompatTextView(Context context, AttributeSet attrs) |
| 3. | AppCompatTextView(Context context, AttributeSet attrs, int defStyleAttr) |
As for the methods this class does inherit them from other classes like TextView, View and Object.
How to detect links,hashtags,mention, phones etc in TextViews
We mostly render labels and text data using textviews in android. By default textviews are pretty basic and usually you have to manually parse the text to detect hashtags, links, phone numbers, emails and mentions.
However there are a couple of solutions you can use for this capability.
(a). AutoLinkTextViewV2
AutoLinkTextViewV2 is the new version of the AutoLinkTextView.
The main differences between the old and new version are
- Fully migration to Kotlin
- Added several new features
- Some improvements and fixes
It supports automatic detection and click handling for
- Hashtags (#)
- Mentions (@)
- URLs (http://)
- Phone Numbers
- Emails
- Custom Regex
Features
- Default support for Hashtag, Mention, Link, Phone number and Email
- Support for custom types via regex
- Transform url to short clickable text
- Ability to apply multiple spans to any mode
- Ability to set specific text color
- Ability to set pressed state color
Step 1: Installation
This library is hosted in jcenter. The minimum API supported is API level 16.
Step 2: Layout
Then in the layout add:
Step 3: Code
Then in the code
Add one or multiple:
You can add URL transformations to transform URL into clickable texts:
Or attach a URL processor:
You can style the transformations:
You can listen to the link click event:
Setting text by the way is easy:
![]()
Read more or find full example here.
How to copy TextView content into Clipboard
In this short piece we want to look at several easy ways to copy textview content into the clipboard. For example, suppose you want to copy TextView content into an edittext for saving.
(a). Use CopyButton
CopyButton is a simple library created for just that purpose. It is free from boilerplate code and can be attached to a textview. For example you can listen to double click or long click events in a textview, then react by copying the text content of that textview.
Step 1: Installation
Install it from jitpack:
Step 2: Code
Then in the code:
Links
- Download the code here and follow the author here.
Creating an EmailValidator
Android AutoCompleteTextView Tutorial and Example
Validating Email Address using Regex
Oclemy
Thanks for stopping by. My name is Oclemy(Clement Ochieng) and we have selected you as a recipient of a GIFT you may like ! Together with Skillshare we are offering you PROJECTS and 1000s of PREMIUM COURSES at Skillshare for FREE for 1 MONTH. To be eligible all you need is by sign up right now using my profile .
Источник


