- TimePicker
- Методы
- Новый внешний вид в Android 21 Lollipop
- Как установить отображение TimePicker с форматом 24h
- Android TimePicker with Examples
- Create Android DatePicker in XML Layout File
- Android TimePicker with Clock Mode
- Android TimePicker with Spinner Mode
- Android TimePicker Control Attributes
- Android TimePicker Example
- activity_main.xml
- MainActivity.java
- Output of Android TimePicker Example
- Androd Show TimePicker on EditText Click Example
- activity_main.xml
- MainActivity.java
- Output of Androd Show TimePicker on EditText Click Example
TimePicker
Компонент TimePicker позволяет пользователю выбрать время (часы, минуты). Данный виджет используют как правило на отдельном экране. Также существует похожее по функционалу диалоговое окно TimePickerDialog.
TimePicker находился в разделе Date & Time в Android Studio 3.01. Сейчас на панели инструментов данного компонента нет, поэтому придётся добавлять вручную.
Добавим на экран текстовую метку, кнопку и компонент времени:
Пользователь может выбрать любое время на компонент, а обычный щелчок на кнопке позволит отобразить выбранное время в текстовой метке при помощи методов getHour()/getCurrentHour()) (устар. и getMinute()/getCurrentMinute() (устар.). Изменение времени можно наблюдать через слушатель OnTimeChangedListener(). Напишем пример, где программно установим время, будем отслеживать изменение времени пользователем и получать установленное время через нажатие кнопки.

Методы
Для установки и получения времени используются парные методы, которые использовались в примере:
- setIs24HourView()
- setCurrentHour()/getCurrentHour()
- setCurrentMinute()/getCurrentMinute
В API 23 методы признаны устаревшими и вместо них теперь используются аналогичные методы без слова Current:
- int getHour()
- int getMinute()
- void setHour(int)
- void setMinute(int)
Новый внешний вид в Android 21 Lollipop
В Android 21 внешний вид компонента изменился.

Интересно, что ещё в августе 2013 года я написал статью на Хабре Выбираем время с помощью нового TimePickerDialog, где рассказывал о новом диалоговом окне и выражал надежду, что подобный функционал будет доступен из коробки. Мечты сбываются (с).
В 2021 году в составе библиотеки Material Design появился компонент MaterialTimePicker
Источник
Как установить отображение TimePicker с форматом 24h
Я создал TimePicker в макете, и я хочу, чтобы он показывал время с форматом 24h.
Вы можете мне помочь? Благодарю.
TimePicker – это представление для выбора времени суток в режиме 24 часа или AM / PM. Вы можете использовать setIs24HourView(true) с помощью TimePicker.
Установка TimePicker по умолчанию на 24-часовой режим не всегда является хорошей идеей, так как многие страны имеют разные соглашения. Для этого случая используйте DateFormat.is24HourFormat(getActivity()) .
Ваш последний код migth выглядит как picker.setIs24HourView(DateFormat.is24HourFormat(this)); ,
Более подробная информация:
Если вы хотите, чтобы TimePicker был правильно инициализирован с текущим временем в формате 24h, используйте следующее:
В противном случае, из-за ошибки Android, сборщик начнет с неправильного часа (2 вместо 14 и т. Д.).
Вам просто нужно извлечь экземпляр TimePicker из представления после его раздувания, затем вы можете изменить виджет.
По умолчанию он отображает время в формате AM / PM. Если вы хотите изменить время в 24-часовом формате, вы можете использовать метод setIs24HourView (). См. Эту ссылку: http://www.androidaspect.com/2012/06/timepicker-view-tutorial.html
Вам просто нужно позвонить и отправить true функции setIs24HourView .
Как уже отмечалось, некоторые люди задали параметр true или false.
Вы можете найти полный пример с исходным кодом для загрузки здесь http://www.ahotbrew.com/android-timepicker-example/
Мне нужно то же самое, что и приложение, чтобы установить трафик продолжительности для выполнения задачи. Я обнаружил, что мне просто нужно расширить класс TimePickerDialog и передать True в последнем параметре конструктора boolean is24HourView.
Источник
Android TimePicker with Examples
In android, TimePicker is a widget for selecting the time of day, in either 24-hour or AM/PM mode.
If we use TimePicker in our application, it will ensure that the users will select a valid time for the day.
Following is the pictorial representation of using a timepicker control in android applications.

Generally, in android TimePicker available in two modes, one is to show the time in clock mode and another one is to show the time in spinner mode.
Create Android DatePicker in XML Layout File
In android, we can create a TimePicker in XML layout file using element with different attributes like as shown below
TimePicker android :id= «@+id/timePicker1»
android :layout_width= «wrap_content»
android :layout_height= «wrap_content»/>
In anroid, the TimePicker supports a two types of modes, those are Clock and Spinner to show the date details in our application.
Android TimePicker with Clock Mode
We can define android TimePicker to show time in clock format by using TimePicker android :timePickerMode attribute.
Following is the example of showing the TimePicker in Clock mode.
TimePicker android :id= «@+id/timePicker1»
android :layout_width= «wrap_content»
android :layout_height= «wrap_content»
android :timePickerMode= «clock»/>
The above code will return the TimePicker like as shown below.
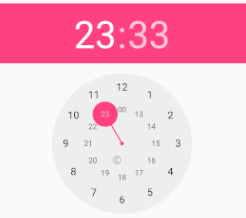
If you observe the above result we got the TimePicker in clock mode to select a time in Hours and Minutes based on our requirements.
Android TimePicker with Spinner Mode
If we want to show the TimePicker in spinner format like showing hours and minutes separately to select the time, then by using TimePicker android :timePickerMode attribute we can achieve this.
Following is the example of showing the TimePicker in spinner mode.
The above code will return the TimePicker like as shown below
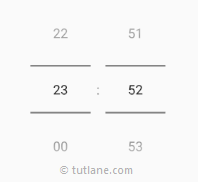
If you observe the above result we got the TimePicker in spinner mode to select the time in Hours and Minutes.
We can change the TimePicker in spinner mode to AM / PM format instead of 24 Hours format by using the setIs24HourView(true) method in Activity file like as shown below.
TimePicker picker=(TimePicker)findViewById(R.id. timePicker1 );
picker.setIs24HourView( true );
The above code will return the TimePicker like as shown below
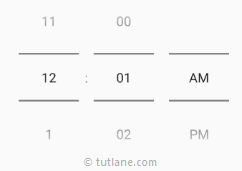
If you observe the above result we got the TimePicker with AM / PM format in spinner mode to select the time separately by hours, minutes and AM/PM.
This is how we can use TimePicker in different modes based on our requirements in android applications.
Android TimePicker Control Attributes
The following are some of the commonly used attributes related to TimePicker control in android applications.
| Attribute | Description |
|---|---|
| android:id | It is used to uniquely identify the control |
| android:timePickerMode | It is used to specify timepicker mode, either spinner or clock |
| android:background | It is used to set the background color for the date picker. |
| android:padding | It is used to set the padding for left, right, top or bottom of the date picker. |
Android TimePicker Example
Following is the example of defining one TimePicker control, one TextView control and one Button control in RelativeLayout to show the selected time in AM / PM format on Button click in the android application.
Create a new android application using android studio and give names as TimePickerExample. In case if you are not aware of creating an app in android studio check this article Android Hello World App.
Now open an activity_main.xml file from \res\layout path and write the code like as shown below
activity_main.xml
xml version= «1.0» encoding= «utf-8» ?>
RelativeLayout xmlns: android = «http://schemas.android.com/apk/res/android»
android :layout_width= «match_parent» android :layout_height= «match_parent» >
TimePicker
android :id= «@+id/timePicker1»
android :layout_width= «wrap_content»
android :layout_height= «wrap_content»
android :layout_centerHorizontal= «true»
android :layout_marginTop= «20dp»/>
Button
android :id= «@+id/button1»
android :layout_width= «wrap_content»
android :layout_height= «wrap_content»
android :layout_below= «@+id/timePicker1»
android :layout_marginTop= «10dp»
android :layout_marginLeft= «160dp»
android :text= «Get Date»/>
TextView
android :id= «@+id/textView1»
android :layout_width= «wrap_content»
android :layout_height= «wrap_content»
android :layout_below= «@+id/button1»
android :layout_marginLeft= «120dp»
android :layout_marginTop= «10dp»
android :textStyle= «bold»
android :textSize= «18dp»/>
RelativeLayout >
If you observe above code we created a one TimePicker control, one TextView control and one Button control in XML Layout file.
Once we are done with the creation of layout with required controls, we need to load the XML layout resource from our activity onCreate() callback method, for that open main activity file MainActivity.java from \java\com.tutlane.timepickerexample path and write the code like as shown below.
MainActivity.java
package com.tutlane.timepickerexample;
import android.os.Build;
import android.support.v7.app.AppCompatActivity;
import android.os.Bundle;
import android.view.View;
import android.widget.Button;
import android.widget.TextView;
import android.widget.TimePicker;
public class MainActivity extends AppCompatActivity <
TimePicker picker ;
Button btnGet ;
TextView tvw ;
@Override
protected void onCreate(Bundle savedInstanceState) <
super .onCreate(savedInstanceState);
setContentView(R.layout. activity_main );
tvw =(TextView)findViewById(R.id. textView1 );
picker =(TimePicker)findViewById(R.id. timePicker1 );
picker .setIs24HourView( true );
btnGet =(Button)findViewById(R.id. button1 );
btnGet .setOnClickListener( new View.OnClickListener() <
@Override
public void onClick(View v) <
int hour, minute;
String am_pm;
if (Build.VERSION. SDK_INT >= 23 ) <
hour = picker .getHour();
minute = picker .getMinute();
>
else <
hour = picker .getCurrentHour();
minute = picker .getCurrentMinute();
>
if (hour > 12 ) <
am_pm = «PM» ;
hour = hour — 12 ;
>
else
<
am_pm= «AM» ;
>
tvw .setText( «Selected Date: » + hour + «:» + minute+ » » +am_pm);
>
>);
>
>
If you observe the above code, we are calling our layout using setContentView method in the form of R.layout.layout_file_name in our activity file. Here our xml file name is activity_main.xml so we used file name activity_main and we are trying to show the selected time of TimePicker in AM / PM format on Button click.
Generally, during the launch of our activity, the onCreate() callback method will be called by the android framework to get the required layout for an activity.
Output of Android TimePicker Example
When we run the above example using an android virtual device (AVD) we will get a result like as shown below.
If you observe the above result, we are getting the time from TimePicker in AM / PM format when we click on Button in the android application.
Now we will see another example of showing the TimePicker control on the EditText click event and get the selected time value in the android application.
Androd Show TimePicker on EditText Click Example
Following is the example of open or popup timepicker dialog when we click on EditText control and get the selected time value on Button click in the android application.
Create a new android application using android studio and give names as TimePickerExample. In case if you are not aware of creating an app in android studio check this article Android Hello World App.
Now open an activity_main.xml file from \res\layout path and write the code like as shown below
activity_main.xml
xml version= «1.0» encoding= «utf-8» ?>
RelativeLayout xmlns: android = «http://schemas.android.com/apk/res/android»
android :layout_width= «match_parent» android :layout_height= «match_parent» >
EditText
android :id= «@+id/editText1»
android :layout_width= «wrap_content»
android :layout_height= «wrap_content»
android :layout_marginLeft= «100dp»
android :layout_marginTop= «150dp»
android :ems= «10»
android :hint= «Enter Time»/>
Button
android :id= «@+id/button1»
android :layout_width= «wrap_content»
android :layout_height= «wrap_content»
android :layout_below= «@+id/editText1»
android :layout_marginLeft= «100dp»
android :text= «Get Date»/>
TextView
android :id= «@+id/textView1»
android :layout_width= «wrap_content»
android :layout_height= «wrap_content»
android :layout_below= «@+id/button1»
android :layout_marginLeft= «100dp»
android :layout_marginTop= «10dp»
android :textStyle= «bold»
android :textSize= «18dp»/>
RelativeLayout >
If you observe above code we created a one EditText control, one TextView control and one Button control in XML Layout file.
Once we are done with the creation of layout with required controls, we need to load the XML layout resource from our activity onCreate() callback method, for that open main activity file MainActivity.java from \java\com.tutlane.timepickerexample path and write the code like as shown below.
MainActivity.java
package com.tutlane.timepickerexample;
import android.app.TimePickerDialog;
import android.support.v7.app.AppCompatActivity;
import android.os.Bundle;
import android.text.InputType;
import android.view.View;
import android.widget.Button;
import android.widget.EditText;
import android.widget.TextView;
import android.widget.TimePicker;
import java.util.Calendar;
public class MainActivity extends AppCompatActivity <
TimePickerDialog picker ;
EditText eText ;
Button btnGet ;
TextView tvw ;
@Override
protected void onCreate(Bundle savedInstanceState) <
super .onCreate(savedInstanceState);
setContentView(R.layout. activity_main );
tvw =(TextView)findViewById(R.id. textView1 );
eText =(EditText) findViewById(R.id. editText1 );
eText .setInputType(InputType. TYPE_NULL );
eText .setOnClickListener( new View.OnClickListener() <
@Override
public void onClick(View v) <
final Calendar cldr = Calendar.getInstance();
int hour = cldr.get(Calendar. HOUR_OF_DAY );
int minutes = cldr.get(Calendar. MINUTE );
// time picker dialog
picker = new TimePickerDialog(MainActivity. this ,
new TimePickerDialog.OnTimeSetListener() <
@Override
public void onTimeSet(TimePicker tp, int sHour, int sMinute) <
eText .setText(sHour + «:» + sMinute);
>
>, hour, minutes, true );
picker .show();
>
>);
btnGet =(Button)findViewById(R.id. button1 );
btnGet .setOnClickListener( new View.OnClickListener() <
@Override
public void onClick(View v) <
tvw .setText( «Selected Time: » + eText .getText());
>
>);
>
>
If you observe above code we are calling our layout using setContentView method in the form of R.layout.layout_file_name in our activity file. Here our xml file name is activity_main.xml so we used file name activity_main and we are trying to show the TimePicker on EditText click, get the selected date of EditText control on Button click.
Generally, during the launch of our activity, the onCreate() callback method will be called by the android framework to get the required layout for an activity.
Output of Androd Show TimePicker on EditText Click Example
When we run the above example using an android virtual device (AVD) we will get a result like as shown below.
If you observe the above result, we are able to open the TimePicker on EditText click and showing the selected date value in EditText control and getting the EditText control value on Button click in the android application.
This is how we can use TimePicker control in android applications to pick the time based on our requirements.
Источник


