- Tips on Unit Testing In Android with Kotlin
- Setup
- Know Your Test Doubles
- Test code using JUnit in JVM – tutorial
- Add dependencies
- Add the code to test it
- Create a test
- Run a test
- What’s next
- Using Kotlin in Android Tests
- Alex Ilyenko
- Why Kotlin?
- Android Studio Setup
- Project Setup
- Adding Kotlin Gradle Plugin
- Adding Kotlin dependency
- Changing source folder (optional)
- Test Example
- Converting Java to Kotlin
- Staying up-to-date with Kotlin version
- Unit Testing with Kotlin Coroutines: The Android Way
- What will we learn?
- Preparing our setup:
- Testing suspend functions with runBlocking() and runBlockingTest()
- runBlocking()
- runBlockingTest()
- Test Coroutines running on Dispatchers.Main with TestCoroutineDispatcher and MainCoroutineRule
- TestCoroutineDispatcher
- MainCoroutineRule
- Inject Dispatcher to test Coroutine dispatchers other than Dispatchers.Main e.g., Dispatchers.IO
- Test LiveData using InstantTaskExecutorRule
- Observe LiveData changes with LiveDataTestUtil
- Unit Testing with Dagger 2: Brewing a potion with Fakes, Mocks, and Custom Rules in Android
- If you have Dagger in your project but never used it for testing, it’s high time to give it a try. Dagger makes your…
Tips on Unit Testing In Android with Kotlin


Hello! Today I’d like to talk about some tips on unit testing in Android with Kotlin. Some of them may have more to do with unit testing in general, which for the most part are related to how to create such “flow” and cutting down on unnecessary things, a.k.a productivity tips.
As for the unit testing framework, JUnit 5 has been out for a while now and there have been numerous talks about how you should adopt it, but JUnit 4 has been the standard for the longest time. In this article, I’m using JUnit 4.
Setup
A little setup in app-level build.gradle:
The junit part by default is there when you create a new project, but we need to add mockito dependency by ourselves. Now, we could do unit testing without Mockito. It’s just a framework to help us creating mocks as replacements for dependencies in our project. Mock itself is just one kind of replacement among several others. Which brings us to the next part.
Know Your Test Doubles
A unit test should test functionality in isolation. Any external dependencies not related with the system under test should be replaced and conditioned to create a “controlled environment”. In the world of unit testing, this replacement has an umbrella term: test double . Now there has been some common confusion around the term. Some people say “mock” when they mean “test double” in general. Meanwhile, test double comprises:
- Dummy object, when it’s passed around but its methods are never called. It doesn’t have behavior.
2. Fake, is an object that has working implementations but not the same as production ones, usually, are simplified. One common example is when you implement a Repository using in-memory implementation.
3. Stub, is an object that has a partial implementation to an interface or class. It is there to satisfy some limited needs and usually, the implementation or behavior is predetermined.
4. Mock, is the kind of test double you have to set up with expectations.
Источник
Test code using JUnit in JVM – tutorial
This tutorial will show you how to write a simple unit test and run it with the Gradle build tool.
The example in the tutorial has the kotlin.test library under the hood and runs the test using JUnit.
To get started, first download and install the latest version of IntelliJ IDEA.
Add dependencies
Open a Kotlin project in IntelliJ IDEA. If you don’t already have a project, create one.
Specify JUnit 5 as your test framework when creating your project.
Open the build.gradle(.kts) file and add the following dependency to the Gradle configuration. This dependency will allow you to work with kotlin.test and JUnit :
Add the test task to the build.gradle(.kts) file:
If you created the project using the New Project wizard, the task will be added automatically.
Add the code to test it
Open the main.kt file in src/main/kotlin .
The src directory contains Kotlin source files and resources. The main.kt file contains sample code that will print Hello, World! .
Create the Sample class with the sum() function that adds two integers together:
Create a test
In IntelliJ IDEA, select Code | Generate | Test. for the Sample class.
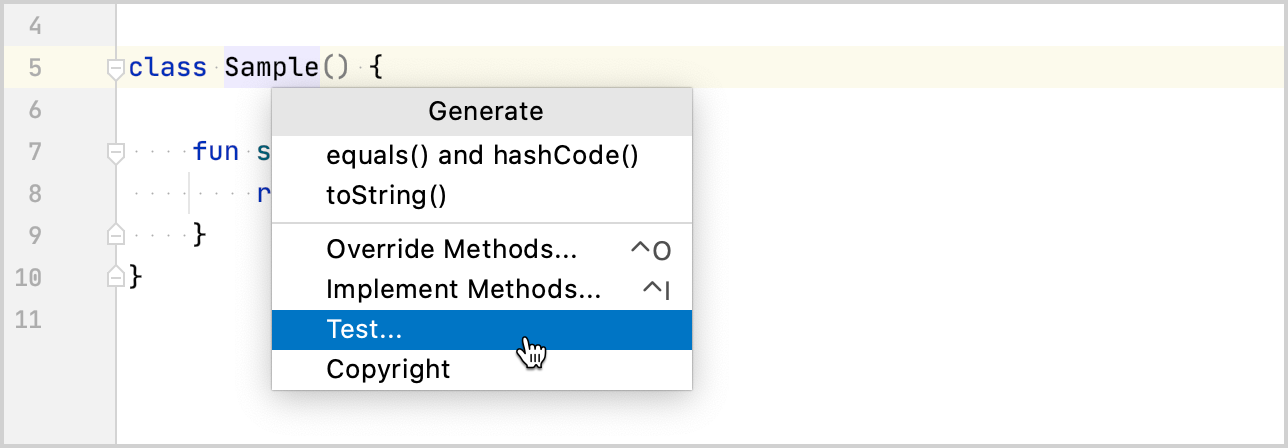
Specify the name of the test class. For example, SampleTest .
IntelliJ IDEA creates the SampleTest.kt file in the test directory. This directory contains Kotlin test source files and resources.
You can also manually create a *.kt file for tests in src/test/kotlin .
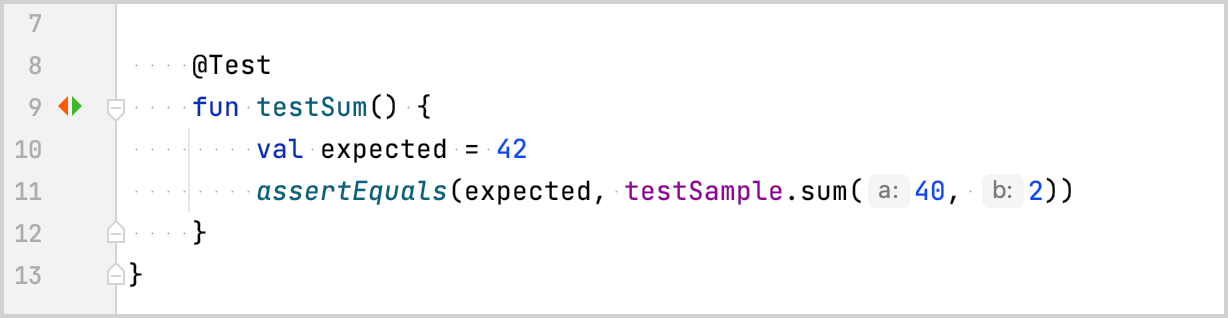
Add the test code for the sum() function in SampleTest.kt :
Define the test testSum() function using the @Test annotation.
Check that the sum() function returns the expected value by using the assertEquals() function.
Run a test
Run the test using the gutter icon.
You can also run all project tests via the command-line interface using the ./gradlew check command.
Check the result in the Run tool window:
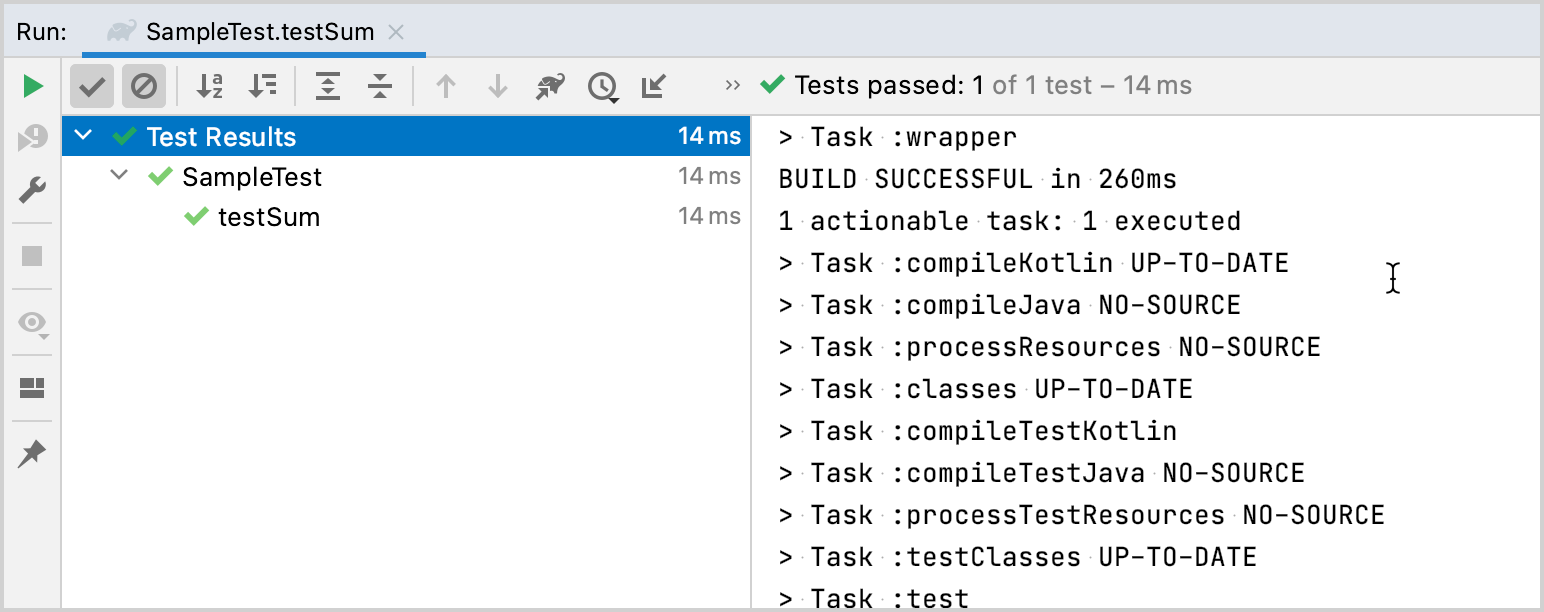
The test function was executed successfully.
Make sure that the test works correctly by changing the expected variable value to 43:
Run the test again and check the result:
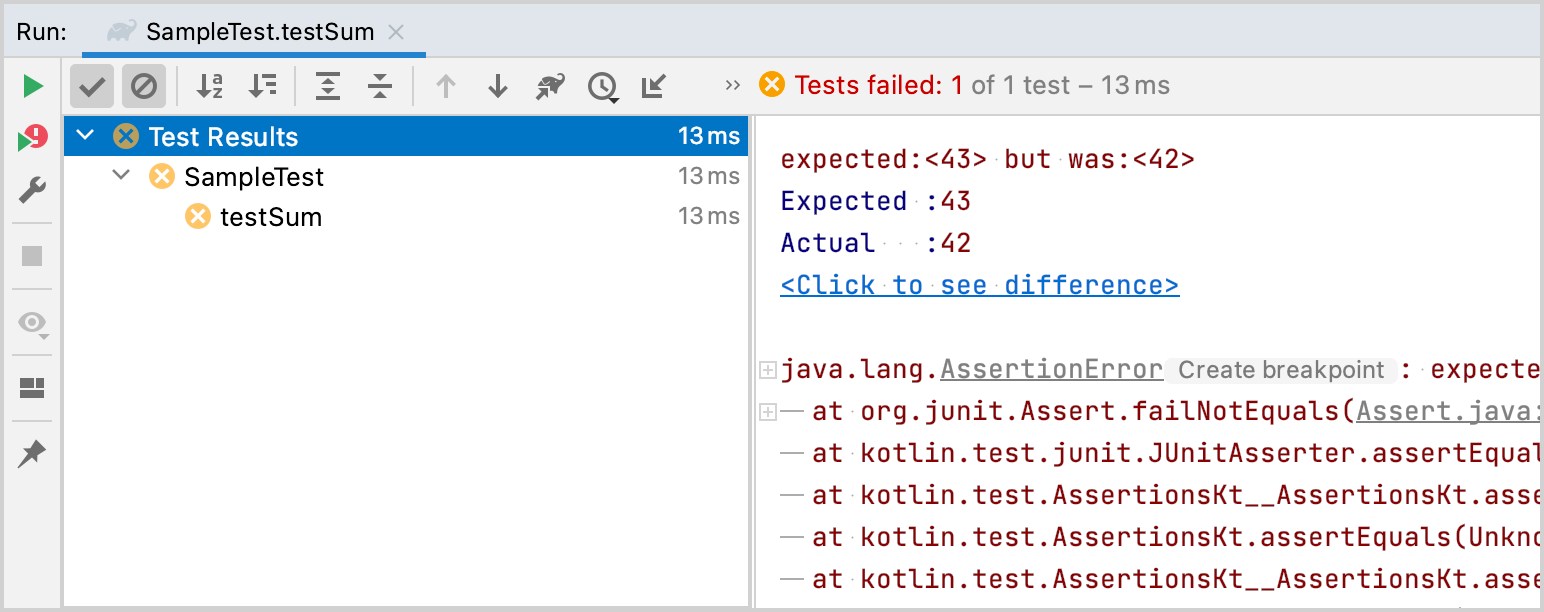
The test execution failed.
What’s next
Once you’ve finished your first test, you can:
Try to write another test using other kotlin.test functions. For example, you could use the assertNotEquals() function.
Watch these video tutorials on YouTube, which demonstrate how to use Spring Boot with Kotlin and JUnit 5.
Источник
Using Kotlin in Android Tests
Setting up your environment for Instrumentation test development
![]()
Alex Ilyenko
Software Engineer in Test
Why Kotlin?
If you follow the latest trends in Android world or development in general, you’ve likely already heard about Kotlin. It’s a programming language, developed by JetBrains company, creator of Android Studio. Among its numerous advantages one can find proper functions, less of boilerplate code, no-overhead null-safety, smart casts and stream-like arrays. If you’re wondering what other pros and cons Kotlin has in comparison to Java, check out official documentation.
Besides that during the last Google I/O conference Android team officially announced support for Kotlin in Android projects. Obviously from now on language development will become more robust and largely scaled, allowing more and more Kotlin initiatives to appear in the nearest future. Meanwhile we, as Test Developers, can adopt this modern and powerful language in our day-to-day projects. Sounds sweet, right? Let’s start then!
Note: if you haven’t chosen the tool for your Android UI tests yet, I recommend to check out my post on UiAutomator and its essentials.
Android Studio Setup
Android Studio 3.0 ships with Kotlin bundled in, which means you will no longer need to worry about compatibility issues and installation of any extras. But since most of us is still using the second version of the popular IDE, we have go through some additional steps. No worries, it wont’ take long.
First of all, we’ll need to install Kotlin plugin. This can be done by navigating to Preferences > Plugins > Browse Repositories and searching for Kotlin keyword there. After that just click on the Install button like it’s shown in the figure
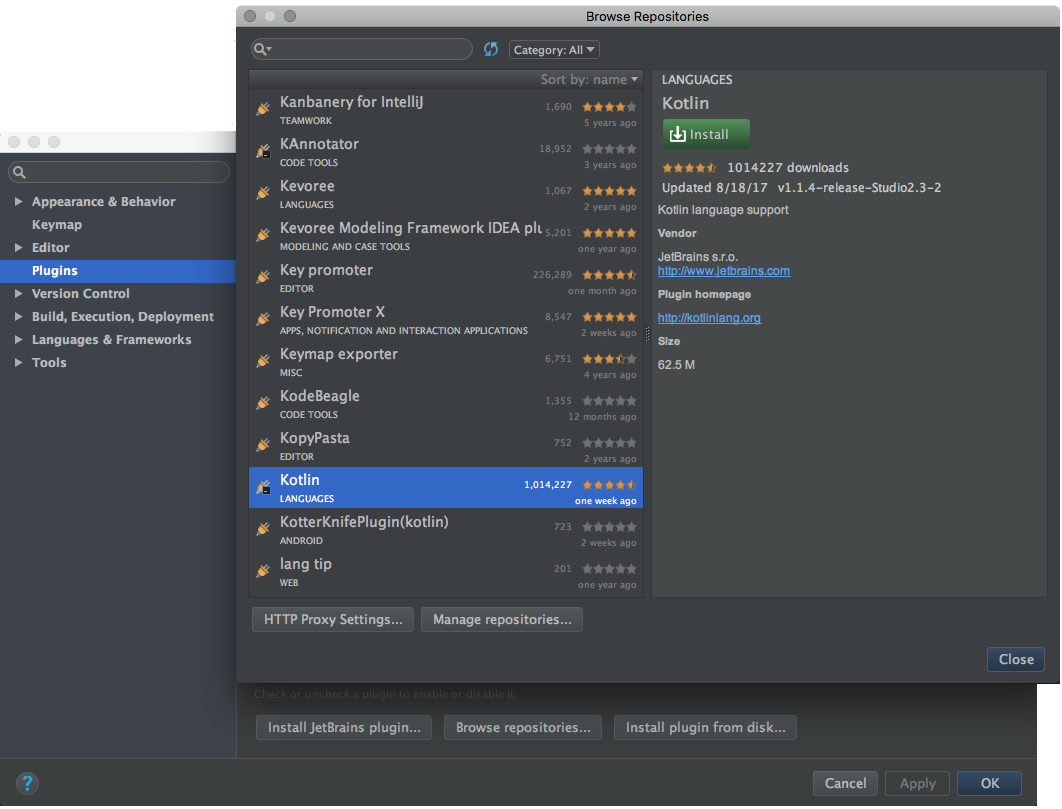 Select Kotlin and click on the Install button
After this has been done you’ll have to restart your Android Studio in order for plugin to work.
Note: in case you’re using IntelliJ Idea, you won’t need to worry about any installations, since IDE ships with Kotlin support enabled by default.
Project Setup
Next thing to do would be applying Kotlin plugin to both of your build.gralde files.
Adding Kotlin Gradle Plugin
To set up Gradle plugin we’ll need to modify buildScript , adding Kotlin plugin dependency, repository and version to it. After those manipulations our top-level build.gradle should look like this:
Adding Kotlin dependency
To be able to use Kotlin in our Instrumentation tests we’ll have to apply Kotlin plugin and add its dependency as androidTestCompile value to our app build.gradle file. Here is what should be set there:
Changing source folder (optional)
Default Android project structure is well-known to all mobile developers. Let’s take a look at it.
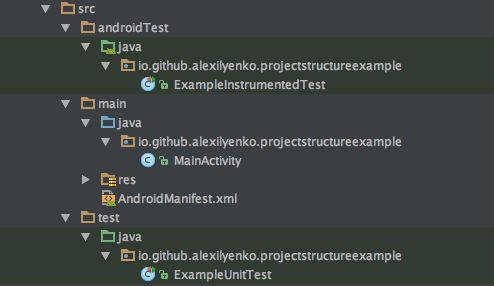 Default Android project structure
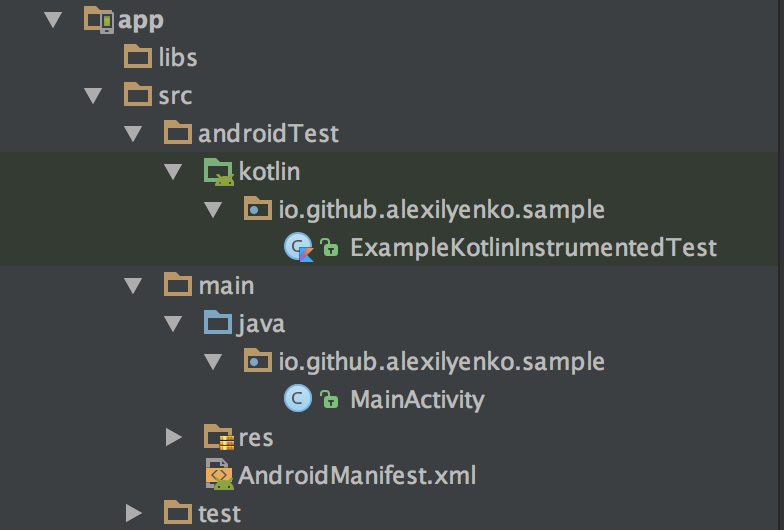
But since we’re going to use Kotlin instead of Java in our Instrumentation tests, won’t it have more sense to have source folder name to reflect that? This can be done by adding following line to your app build.grale :
Finally our project overall structure will look like this
Test Example
Let’s create our first Kotlin test. Kotlin files have .kt extension and can be easily created in your project folder. Following simple example would be enough to ensure that everything set up correctly and Kotlin can be successfully leveraged in the further development.
Converting Java to Kotlin
If you happen to have some tests already written in Java and you want to migrate them to Kotlin, I have good news! Kotlin Plugin also includes tool for easy converting sources from one language to another. It can be found by navigating to Code > Convert Java File to Kotlin File menu.
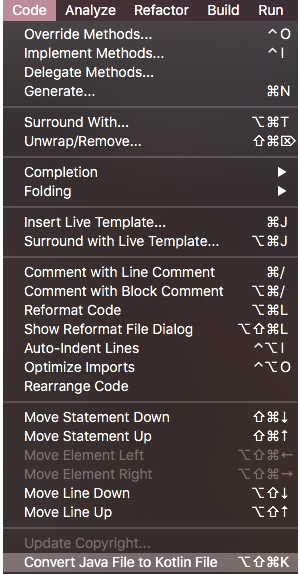 Converting Java to Kotlin
There could be some warnings after converting. But overall the tool does surprisingly great job and you may rely on it in your development.
Staying up-to-date with Kotlin version
In spite of all its advantages Kotlin is still young language, that’s being constantly developed and changed. JetBrains team suggests everyone to stay up-to-date with new features and fixes. Android Studio plugin turns that into a no-brainer with simple channel switching under the Tools > Kotlin > Configure Kotlin Plugin Updates menu. You could choose one of the three channels available — Stable , Preview or Early Access .
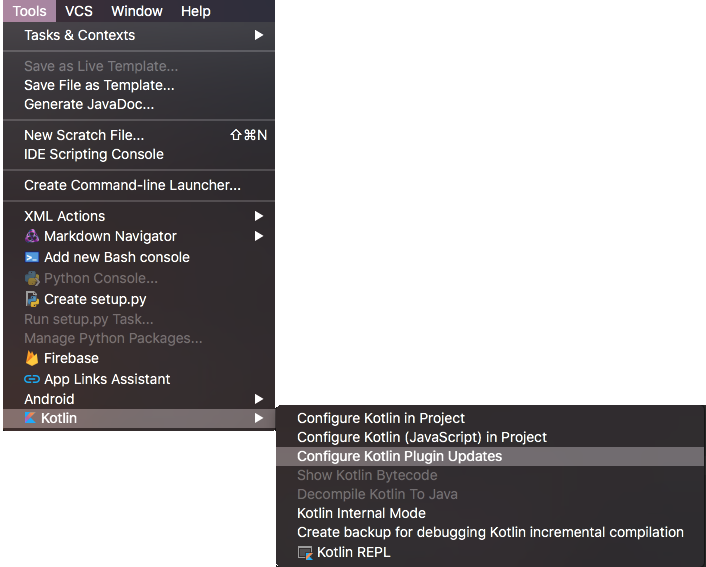 Configuring Kotlin Updates in Android Studio
At this point you should be able to start developing your Instrumentation tests in Kotlin. I’m sure you’ll love this powerful language and it’ll become your favorite tool for solving everyday problems. Happy coding!
Источник
Unit Testing with Kotlin Coroutines: The Android Way


In our app testing strategy, Unit tests are the fundamental tests. With the Unit test, we can verify if the individual logic we have written is correct. We can run those Unit tests after each build to make sure any new changes don’t cause impacts on the existing code. Thus Unit tests help us quickly catch and fix issues before the release.
If you are new to Android Development or already have years of experience, you should be quite familiar with Kotlin now. And after the deprecation of AsyncTask from API level 30, the best option you have is to go for RxJava or Kotlin’s Coroutines for Asynchronous Programming. This article is all about Kotlin’s Coroutines and different approaches to test them. We will also explore the support libraries and best practices.
What will we learn?
- Testing suspend functions with runBlocking() and runBlockingTest()
- Test Coroutines running on Dispatchers.Main with TestCoroutineDispatcher and MainCoroutineRule
- Inject Dispatcher to test Coroutine Dispatchers other than Dispatchers.Main e.g., Dispatchers.IO
- Test LiveData using InstantTaskExecutorRule
- Observe LiveData changes with LiveDataTestUtil
Preparing our setup:
For the demonstration of the project, we will be using the following three dependencies:
Testing suspend functions with runBlocking() and runBlockingTest()
A suspending function is a function that can be paused and resumed at a later time. Those functions can execute a long-running operation and wait for it to complete without blocking. A suspend function can only be called from another suspend function or a Coroutine.
runBlocking()
If our app has any suspend functions, we have to call it from another suspend function or launch it from a Coroutine. We can mitigate the problem by using the runBlocking() function. This function runs a new Coroutine and blocks the current thread interruptibly until its completion. Let’s look at an example:
From the above example, we have a MainViewModel with a checkSessionExpiry() function. This function checks if the user session has expired and returns an appropriate boolean value. To simulate an IO task, we have used the delay function. Inside the MainViewModelTest class, we have one test function that checks if the return value is true. If you run the test it will pass, but you will notice a delay of 5 seconds. That’s because the runBlocking() function can’t skip the delay operation.
runBlockingTest()
runBlockingTest() is a part of the kotlinx.coroutines.runBlocking package. This test is similar to runBlocking() function, but it will immediately progress past delays and into a launch and async blocks. You can use this to write tests that execute in the presence of calls to delay without causing your test to take extra time. Our previous test will run without any delays if we launch the same test with runBlockingTest() .
1. This test is marked as an ExperimentalCoroutinesApi so in the future it may change
2. Never use runBlocking() in your app. It’s meant to be used for Unit tests only
Test Coroutines running on Dispatchers.Main with TestCoroutineDispatcher and MainCoroutineRule
TestCoroutineDispatcher
We had a successful Unit test with runBlocking() and runBlockingTest() , but have you noticed we launched both tests in the Dispatcher.IO thread? What will happen if we use Dispatcher.Main instead of Dispatcher.IO ? Let’s see an example:
1. viewModelScope is a part of the androidx.lifecycle package. This scope is tied to the ViewModel and will be canceled when ViewModel will be cleared, i.e ViewModel.onCleared() is called.
2. By default, viewModelScope always runs on the main thread. But you can configure it to run on another thread by setting up a Dispatcher
If we try to run the Unit test in the Dispatcher.Main thread, our test will fail with the following error:
It makes sense because we can’t use the main looper in the Unit test. Let’s try replacing the Dispatcher with a TestCoroutineDispatcher .
- All consecutive usages of Dispatchers.Main will use given dispatcher under the hood
- Resets the state of the Dispatchers.Main to the original main dispatcher
- Clean up the TestCoroutineDispatcher to make sure no other work is running
MainCoroutineRule
So far, we have found ways to test our Dispatcher.IO and Dispatcher.Main Coroutines. By default, Coroutines work for Dispatcher.Main , but to test Dispatcher.IO , we have to use the TestCoroutineDispatcher for replacing the main dispatchers with the test dispatcher. This works correctly but doesn’t scale up very well. Whenever our test class increases, we have to use the same boilerplate again and again. To overcome this issue, we can create a custom MainCoroutineRule and add it to our test classes with @Rule annotation.
MainCoroutineRule sets the main Coroutines dispatcher to a TestCoroutineScope for Unit testing. The TestCoroutineScope provides control over the execution of Coroutines. All we have to is use it as a @Rule
Inject Dispatcher to test Coroutine dispatchers other than Dispatchers.Main e.g., Dispatchers.IO
Previously, we explored ways to test Coroutines for both Dispatchers.Main and Dispatchers.IO . But, what will happen when we have to replace a dispatcher dynamically for a Unit test? Let’s consider the following example:
Here, we are setting the TestCorotutineDispatcher as the main Dispatcher via MainCoroutineRule which takes control over the MainDispatcher, but we still have no control over the execution of the Coroutine launched via viewModelScope.launch(Dispatchers.IO) . Also, if we run the test now, It will fail with assertion error because our test will run on the other thread which is different from the ViewModel thread. Now, how should we resolve this?

Dispatchers should be injected into your ViewModels so you can properly test. Passing the Dispatcher via the constructor would make sure that your test and production code use the same dispatcher.
Our updated ViewModel and the test class should look this:
Run the test, and it should be successful now.
Test LiveData using InstantTaskExecutorRule
So far, we have covered everything required for testing our Coroutines. As a bonus, I would like to discuss more testing the LiveData . Let’s start with an example:
It looks like a perfect test to proceed. But if we run the Unit test, there will be an error:
That’s because LiveData is a part of the Android lifecycle, and it needs to access the main looper to proceed. Fortunately, we only need a single line of code to resolve this. Just add InstantTaskExecutorRule as a @Rule from the androidx.arch.core.executor.testing package. Now re-run the test, and it should be successful.
InstantTaskExecutorRule is a JUnit Test Rule that swaps the background executor used by the Architecture Components with a different one that executes each task synchronously.
Observe LiveData changes with LiveDataTestUtil
If you need to observe LiveData changes, then you can use an extension function called LiveDataTestUtil. It will help you observe LiveData changes without any extra effort.
If you use Dagger in your project, you can check out another article to explore the Unit testing technique with Dagger.
Unit Testing with Dagger 2: Brewing a potion with Fakes, Mocks, and Custom Rules in Android
If you have Dagger in your project but never used it for testing, it’s high time to give it a try. Dagger makes your…
Also, check out the article about generating Unit test coverage reports with JaCoCo.
Источник


