- Android для начинающих: использование REST API
- 1. Включение доступа к Интернету
- 2. Создание фоновых потоков
- 3. Создание HTTP-соединения
- 4. Добавление заголовков запросов
- 5. Чтение ответов
- 6. Разбор JSON ответов
- 7. Использование разных HTTP методов
- 8. Кэширование ответов
- Заключение
- Understanding Android API levels
- Quick start
- Android versions and API levels
- Android versions
- Android API levels
- Project API level settings
- Android SDK platforms
- Target Framework
- Minimum Android Version
- Target Android Version
- API levels and libraries
Android для начинающих: использование REST API
Russian (Pусский) translation by Ilya Nikov (you can also view the original English article)
Большинство из нас стали весьма жадны до новой информации, что в Интернете является такой важной частью нашей жизни. Поэтому создание приложений Android со статичным контентом может быть плохой идеей. Вместо этого вам следует рассмотреть возможность создания приложений, которые могут отображать свежий контент каждый раз, когда пользователь их открывает.
Это может звучать сложно, но с большим количеством сайтов, которые раскрывают свои ресурсы через REST API, на самом деле это довольно просто. (Смотрите руководство для начинающих по HTTP и REST для примера.)
В этом уроке я расскажу вам, как использовать классы и методы, доступные в Android SDK, для подключения к удаленным веб-серверам и взаимодействия с ними с использованием их REST API.
1. Включение доступа к Интернету
Использование REST API, очевидно, связано с использованием Интернета. Тем не менее, приложения Android могут получить доступ к Интернету только в том случае, если у них есть разрешение android.permission.INTERNET . Поэтому перед началом написания любого сетевого кода вы должны убедиться, что в файле манифеста вашего проекта присутствуют следующие uses-permission теги:
Поскольку android.permission.INTERNET не считается опасным разрешением, вам не нужно запрашивать его во время выполнения на устройствах с уровнем API 23 или выше.
2. Создание фоновых потоков
Платформа Android не позволяет выполнять сетевые операции в основном потоке приложения. Поэтому весь ваш сетевой код должен принадлежать фоновому потоку. Самый простой способ создать такой поток — использовать метод execute() класса AsyncTask . В качестве единственного аргумента execute() ожидает объект Runnable .
Если вы хотите узнать больше о выполнении операций в фоновом потоке, я предлагаю вам прочитать этот учебник о фоновых операциях из серии Android для начинающих.
3. Создание HTTP-соединения
Используя метод openConnection() класса URL , вы можете быстро настроить соединение с любой конечной точкой REST. Возвращаемое значение openConnection() должно быть передано в экземпляр HttpURLConnection или HttpsURLConnection , в зависимости от доступа к конечной точке через HTTP или HTTPS. Оба HttpURLConnection и HttpsURLConnection позволяют выполнять такие операции, как добавление заголовков запросов и чтение ответов.
В следующем фрагменте кода показано, как настроить соединение с корневой конечной точкой API GitHub:
Обратите внимание, что HttpsURLConnection является подклассом класса HttpURLConnection .
4. Добавление заголовков запросов
Большинство веб-сайтов, предлагающих REST API, хотят иметь возможность однозначно идентифицировать ваше приложение. Самый простой способ помочь им сделать это — включить уникальный заголовок User-Agent во все ваши запросы.
Чтобы добавить заголовок User-Agent в ваш запрос, вы должны использовать метод setRequestProperty() объекта HttpURLConnection . Например, вот как вы устанавливаете заголовок User-Agent в my-rest-app-v0.1:
Вы можете добавить несколько заголовков к своему запросу, вызвав несколько раз метод setRequestProperty() . Например, следующий фрагмент кода добавляет заголовок Accept и кастомный заголовок Contact-Me :
5. Чтение ответов
После того как вы передали все заголовки запросов, вы можете проверить, есть ли у вас валидный ответ, используя метод getResponseCode() объекта HttpURLConnection .
Если класс HttpURLConnection получает код ответа на перенаправление, например 301, он автоматически обрабатывает его и следует за перенаправлением. Поэтому, как правило, вам не нужно будет писать дополнительный код для проверки перенаправления.
В случае отсутствия ошибок вы можете теперь вызвать метод getInputStream() , чтобы получить ссылку на входящий поток соединения.
Большинство REST API в наши дни возвращают данные, отформатированные как документы JSON. Поэтому, вместо прямого чтения из объекта InputStream , я предлагаю вам создать для него InputStreamReader .
6. Разбор JSON ответов
Android SDK имеет класс JsonReader, который позволяет легко разбирать документы JSON. Вы можете создать новый экземпляр класса JsonReader , передав объект InputStreamReader его конструктору.
То как вы извлекаете определенную часть информации из документа JSON, зависит от его структуры. Например, документ JSON, возвращаемый корневой конечной точкой REST API GitHub, выглядит следующим образом:
Как вы можете видеть, ответ — это только один большой объект JSON, содержащий несколько ключей. Чтобы извлечь из него значение с именем organization_url, вам нужно будет написать следующий код:
Вышеупомянутый код обрабатывает ответ JSON как поток токенов. Поэтому он потребляет очень мало памяти. Однако, поскольку он должен обрабатывать каждый отдельный токен один за другим, он может оказаться медленным при обработке больших ответов.
После того как вы извлечете всю необходимую информацию, вы всегда должны вызвать метод close() для объекта JsonReader , чтобы он освобождал все сохраненные ресурсы.
Вы также должны закрыть соединение, вызвав метод disconnect() объекта HttpURLConnection .
7. Использование разных HTTP методов
HTTP-интерфейсы REST используют методы HTTP для определения типа операции, которая должна выполняться над ресурсом. На предыдущих шагах мы использовали метод HTTP GET для выполнения операции чтения. Поскольку класс HttpURLConnection использует по умолчанию метод GET , нам не нужно было его явно указывать.
Чтобы изменить метод HTTP вашего объекта HttpURLConnection , вы должны использовать его метод setRequestMethod() . Например, следующий фрагмент кода открывает соединение с конечной точкой, принадлежащей httpbin.org, и устанавливает свой HTTP-метод в POST :
Как вы уже знаете, POST -запросы используются для отправки данных на сервер. При записи в выходной поток соединения вы можете легко добавить любые данные в тело запроса POST . Однако, прежде чем вы это сделаете, вы должны убедиться, что вы вызываете метод setDoOutput() объекта HttpURLConnection и передаете ему значение true .
В следующем фрагменте кода показано, как отправить на сервер простую пару «ключ-значение»:
8. Кэширование ответов
Всегда рекомендуется кэшировать ответы HTTP. Таким образом, вы можете не только сократить потребление пропускной способности вашего приложения, но и сделать его более отзывчивым. Начиная с уровня API 13, Android SDK предлагает класс HttpResponseCache , который позволяет легко реализовать кэширование без каких-либо изменений в вашей сетевой логике.
Чтобы установить кэш для вашего приложения, вы должны вызвать метод install() класса HttpResponseCache . Метод ожидает абсолютный путь, указывающий, где должен быть установлен кеш, и число, определяющее размер кеша. Вы можете использовать метод getCacheDir() , если вы не хотите указывать абсолютный путь вручную.
В следующем фрагменте кода устанавливается кеш размером 100 000 байт:
Как только кеш установлен, класс HttpURLConnection начинает использовать его автоматически. Чтобы проверить, работает ли ваш кеш, вы можете использовать его метод getHitCount() , который возвращает количество HTTP-ответов, которые были отправлены из кеша.
Заключение
Существуют тысячи REST API-интерфейсов, которые вы можете свободно использовать в своих приложениях для Android. Используя их, вы можете сделать ваше приложение более информативным, интересным и многофункциональным. В этом уроке вы узнали, как использовать класс HttpURLConnection для использования таких REST API. Вы также узнали, как создать кеш ответов HTTP, который снижает использование потребление сетевого трафика вашим приложением.
Если вы считаете, что использование HttpURLConnection слишком сложное, вам следует обратить внимание на сторонние библиотеки, такие как например, Volley. Библиотеки, подобные этой, используют класс HttpURLConnection внутри, но предоставляют множество удобных методов, которые позволяют сделать ваш код более кратким и читаемым.
Чтобы узнать больше о работе с сетью на платформе Android, вы можете обратиться к руководству по сетевым операциям Android.
Источник
Understanding Android API levels
Xamarin.Android has several Android API level settings that determine your app’s compatibility with multiple versions of Android. This guide explains what these settings mean, how to configure them, and what effect they have on your app at run time.
Quick start
Xamarin.Android exposes three Android API level project settings:
Target Framework – Specifies which framework to use in building your application. This API level is used at compile time by Xamarin.Android.
Minimum Android Version – Specifies the oldest Android version that you want your app to support. This API level is used at run time by Android.
Target Android Version – Specifies the version of Android that your app is intended to run on. This API level is used at run time by Android.
Before you can configure an API level for your project, you must install the SDK platform components for that API level. For more information about downloading and installing Android SDK components, see Android SDK Setup.
Beginning in August 2020, the Google Play Console requires that new apps target API level 29 (Android 10.0) or higher. Existing apps are required to target API level 29 or higher beginning in November 2020. For more information, see Target API level requirements for the Play Console in «Create and set up your app» in the Play Console documentation.
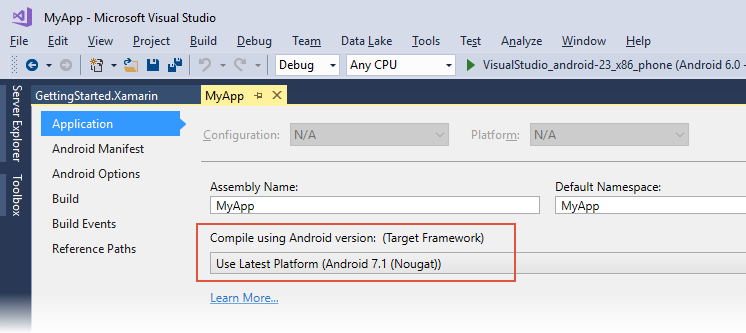
Normally, all three Xamarin.Android API levels are set to the same value. On the Application page, set Compile using Android version (Target Framework) to the latest stable API version (or, at a minimum, to the Android version that has all of the features you need). In the following screenshot, the Target Framework is set to Android 7.1 (API Level 25 — Nougat):
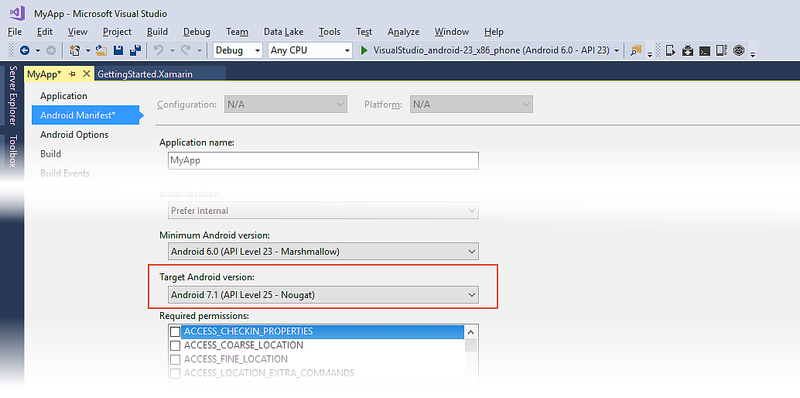
On the Android Manifest page, set the Minimum Android version to Use Compile using SDK version and set the Target Android version to the same value as the Target Framework version (in the following screenshot, the Target Android Framework is set to Android 7.1 (Nougat)):

If you want to maintain backward compatibility with an earlier version of Android, set Minimum Android version to target to the oldest version of Android that you want your app to support. (Note that API Level 14 is the minimum API level required for Google Play services and Firebase support.) The following example configuration supports Android versions from API Level 14 through API level 25:

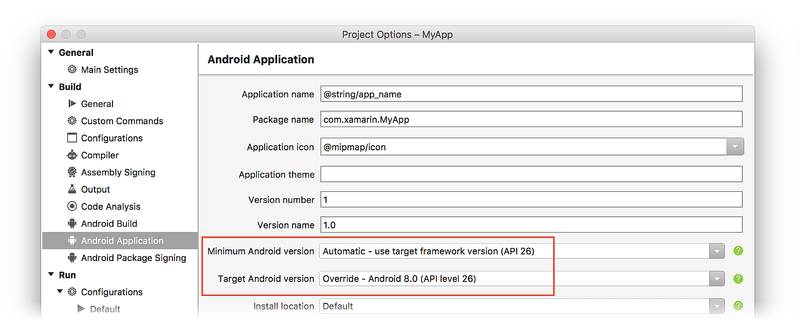
Normally, all three Xamarin.Android API levels are set to the same value. Set Target framework to the latest stable API version (or, at a minimum, to the Android version that has all of the features you need). To set the Target framework, navigate to Build > General in the Project Options. In the following screenshot, the Target Framework is set to Use the latest installed platform (8.0):

The Minimum and Target Android version settings can be found under Build > Android Application in Project Options. Set the Minimum Android version to Automatic — use target framework version and set the Target Android version to the same value as the Target Framework version. In the following screenshot, the Target Android Framework is set to Android 8.0 (API level 26) to match the Target Framework setting above:
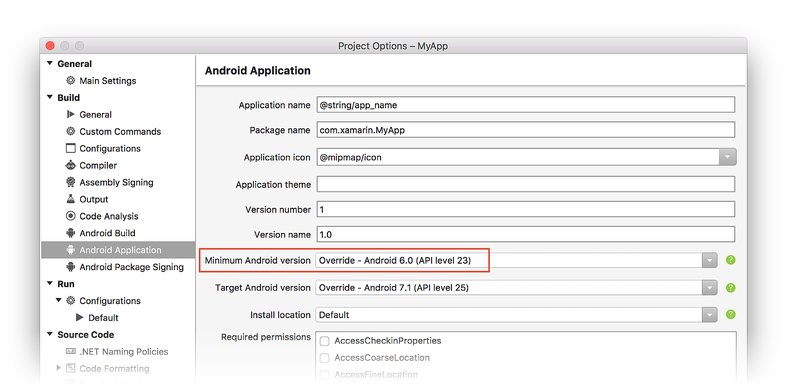
If you want to maintain backward compatibility with an earlier version of Android, change Minimum Android version to the oldest version of Android that you want your app to support. Note that API Level 14 is the minimum API level required for Google Play services and Firebase support. For example, the following configuration supports Android versions as early as API Level 14:

If your app supports multiple Android versions, your code must include runtime checks to ensure that your app works with the Minimum Android version setting (see Runtime Checks for Android Versions below for details). If you are consuming or creating a library, see API Levels and Libraries below for best practices in configuring API level settings for libraries.
Android versions and API levels
As the Android platform evolves and new Android versions are released, each Android version is assigned a unique integer identifier, called the API Level. Therefore, each Android version corresponds to a single Android API Level. Because users install apps on older as well as the most recent versions of Android, real-world Android apps must be designed to work with multiple Android API levels.
Android versions
Each release of Android goes by multiple names:
- The Android version, such as Android 9.0
- A code (or dessert) name, such as Pie
- A corresponding API level, such as API level 28
An Android code name may correspond to multiple versions and API levels (as seen in the table below), but each Android version corresponds to exactly one API level.
In addition, Xamarin.Android defines build version codes that map to the currently known Android API levels. The following table can help you translate between API level, Android version, code name, and Xamarin.Android build version code (build version codes are defined in the Android.OS namespace):
| Name | Version | API Level | Released | Build Version Code |
|---|---|---|---|---|
| Q | 10.0 | 29 | Aug 2020 | BuildVersionCodes.Q |
| Pie | 9.0 | 28 | Aug 2018 | BuildVersionCodes.P |
| Oreo | 8.1 | 27 | Dec 2017 | BuildVersionCodes.OMr1 |
| Oreo | 8.0 | 26 | Aug 2017 | BuildVersionCodes.O |
| Nougat | 7.1 | 25 | Dec 2016 | BuildVersionCodes.NMr1 |
| Nougat | 7.0 | 24 | Aug 2016 | BuildVersionCodes.N |
| Marshmallow | 6.0 | 23 | Aug 2015 | BuildVersionCodes.M |
| Lollipop | 5.1 | 22 | Mar 2015 | BuildVersionCodes.LollipopMr1 |
| Lollipop | 5.0 | 21 | Nov 2014 | BuildVersionCodes.Lollipop |
| Kitkat Watch | 4.4W | 20 | Jun 2014 | BuildVersionCodes.KitKatWatch |
| Kitkat | 4.4 | 19 | Oct 2013 | BuildVersionCodes.KitKat |
| Jelly Bean | 4.3 | 18 | Jul 2013 | BuildVersionCodes.JellyBeanMr2 |
| Jelly Bean | 4.2-4.2.2 | 17 | Nov 2012 | BuildVersionCodes.JellyBeanMr1 |
| Jelly Bean | 4.1-4.1.1 | 16 | Jun 2012 | BuildVersionCodes.JellyBean |
| Ice Cream Sandwich | 4.0.3-4.0.4 | 15 | Dec 2011 | BuildVersionCodes.IceCreamSandwichMr1 |
| Ice Cream Sandwich | 4.0-4.0.2 | 14 | Oct 2011 | BuildVersionCodes.IceCreamSandwich |
| Honeycomb | 3.2 | 13 | Jun 2011 | BuildVersionCodes.HoneyCombMr2 |
| Honeycomb | 3.1.x | 12 | May 2011 | BuildVersionCodes.HoneyCombMr1 |
| Honeycomb | 3.0.x | 11 | Feb 2011 | BuildVersionCodes.HoneyComb |
| Gingerbread | 2.3.3-2.3.4 | 10 | Feb 2011 | BuildVersionCodes.GingerBreadMr1 |
| Gingerbread | 2.3-2.3.2 | 9 | Nov 2010 | BuildVersionCodes.GingerBread |
| Froyo | 2.2.x | 8 | Jun 2010 | BuildVersionCodes.Froyo |
| Eclair | 2.1.x | 7 | Jan 2010 | BuildVersionCodes.EclairMr1 |
| Eclair | 2.0.1 | 6 | Dec 2009 | BuildVersionCodes.Eclair01 |
| Eclair | 2.0 | 5 | Nov 2009 | BuildVersionCodes.Eclair |
| Donut | 1.6 | 4 | Sep 2009 | BuildVersionCodes.Donut |
| Cupcake | 1.5 | 3 | May 2009 | BuildVersionCodes.Cupcake |
| Base | 1.1 | 2 | Feb 2009 | BuildVersionCodes.Base11 |
| Base | 1.0 | 1 | Oct 2008 | BuildVersionCodes.Base |
As this table indicates, new Android versions are released frequently – sometimes more than one release per year. As a result, the universe of Android devices that might run your app includes of a wide variety of older and newer Android versions. How can you guarantee that your app will run consistently and reliably on so many different versions of Android? Android’s API levels can help you manage this problem.
Android API levels
Each Android device runs at exactly one API level – this API level is guaranteed to be unique per Android platform version. The API level precisely identifies the version of the API set that your app can call into; it identifies the combination of manifest elements, permissions, etc. that you code against as a developer. Android’s system of API levels helps Android determine whether an application is compatible with an Android system image prior to installing the application on a device.
When an application is built, it contains the following API level information:
The target API level of Android that the app is built to run on.
The minimum Android API level that an Android device must have to run your app.
These settings are used to ensure that the functionality needed to run the app correctly is available on the Android device at installation time. If not, the app is blocked from running on that device. For example, if the API level of an Android device is lower than the minimum API level that you specify for your app, the Android device will prevent the user from installing your app.
Project API level settings
The following sections explain how to use the SDK Manager to prepare your development environment for the API levels you want to target, followed by detailed explanations of how to configure Target Framework, Minimum Android version, and Target Android version settings in Xamarin.Android.
Android SDK platforms
Before you can select a Target or Minimum API level in Xamarin.Android, you must install the Android SDK platform version that corresponds to that API level. The range of available choices for Target Framework, Minimum Android version, and Target Android version is limited to the range of Android SDK versions that you have installed. You can use the SDK Manager to verify that the required Android SDK versions are installed, and you can use it to add any new API levels that you need for your app. If you are not familiar with how to install API levels, see Android SDK Setup.
Target Framework
The Target Framework (also known as compileSdkVersion ) is the specific Android framework version (API level) that your app is compiled for at build time. This setting specifies what APIs your app expects to use when it runs, but it has no effect on which APIs are actually available to your app when it is installed. As a result, changing the Target Framework setting does not change runtime behavior.
The Target Framework identifies which library versions your application is linked against – this setting determines which APIs you can use in your app. For example, if you want to use the NotificationBuilder.SetCategory method that was introduced in Android 5.0 Lollipop, you must set the Target Framework to API Level 21 (Lollipop) or later. If you set your project’s Target Framework to an API level such as API Level 19 (KitKat) and try to call the SetCategory method in your code, you will get a compile error.
We recommend that you always compile with the latest available Target Framework version. Doing so provides you with helpful warning messages for any deprecated APIs that might be called by your code. Using the latest Target Framework version is especially important when you use the latest support library releases – each library expects your app to be compiled at that support library’s minimum API level or greater.
To access the Target Framework setting in Visual Studio, open the project properties in Solution Explorer and select the Application page:

Set the Target Framework by selecting an API level in the drop-down menu under Compile using Android version as shown above.
To access the Target Framework setting in Visual Studio for Mac, right-click the project name and select Options; this opens the Project Options dialog. In this dialog, navigate to Build > General as shown here:

Set the Target Framework by selecting an API level in the drop-down menu to the right of Target framework as shown above.
Minimum Android Version
The Minimum Android version (also known as minSdkVersion ) is the oldest version of the Android OS (i.e., the lowest API level) that can install and run your application. By default, an app can only be installed on devices matching the Target Framework setting or higher; if the Minimum Android version setting is lower than the Target Framework setting, your app can also run on earlier versions of Android. For example, if you set the Target Framework to Android 7.1 (Nougat) and set the Minimum Android version to Android 4.0.3 (Ice Cream Sandwich), your app can be installed on any platform from API level 15 to API level 25, inclusive.
Although your app may successfully build and install on this range of platforms, this does not guarantee that it will successfully run on all of these platforms. For example, if your app is installed on Android 5.0 (Lollipop) and your code calls an API that is available only in Android 7.1 (Nougat) and newer, your app will get a runtime error and possibly crash. Therefore, your code must ensure – at runtime – that it calls only those APIs that are supported by the Android device that it is running on. In other words, your code must include explicit runtime checks to ensure that your app uses newer APIs only on devices that are recent enough to support them. Runtime Checks for Android Versions, later in this guide, explains how to add these runtime checks to your code.
To access the Minimum Android version setting in Visual Studio, open the project properties in Solution Explorer and select the Android Manifest page. In the drop-down menu under Minimum Android version you can select the Minimum Android version for your application:

If you select Use Compile using SDK version, the Minimum Android version will be the same as the Target Framework setting.
To access the Minimum Android version in Visual Studio for Mac, right-click the project name and select Options; this opens the Project Options dialog. Navigate to Build > Android Application. Using the drop-down menu to the right of Minimum Android version, you can set the Minimum Android version for your application:
If you select Automatic – use target framework version, the Minimum Android version will be the same as the Target Framework setting.
Target Android Version
The Target Android Version (also known as targetSdkVersion ) is the API level of the Android device where the app expects to run. Android uses this setting to determine whether to enable any compatibility behaviors – this ensures that your app continues to work the way you expect. Android uses the Target Android version setting of your app to figure out which behavior changes can be applied to your app without breaking it (this is how Android provides forward compatibility).
The Target Framework and the Target Android version, while having very similar names, are not the same thing. The Target Framework setting communicates target API level information to Xamarin.Android for use at compile time, while the Target Android version communicates target API level information to Android for use at run time (when the app is installed and running on a device).
To access this setting in Visual Studio, open the project properties in Solution Explorer and select the Android Manifest page. In the drop-down menu under Target Android version you can select the Target Android version for your application:
We recommend that you explicitly set the Target Android version to the latest version of Android that you use to test your app. Ideally, it should be set to the latest Android SDK version – this allows you to use new APIs prior to working through the behavior changes. For most developers, we do not recommend setting the Target Android version to Use Compile using SDK version.
To access this setting in Visual Studio for Mac, right-click the project name and select Options; this opens the Project Options dialog. Navigate to Build > Android Application. Using the drop-down menu to the right of Target Android version, you can set the Target Android version for your application:
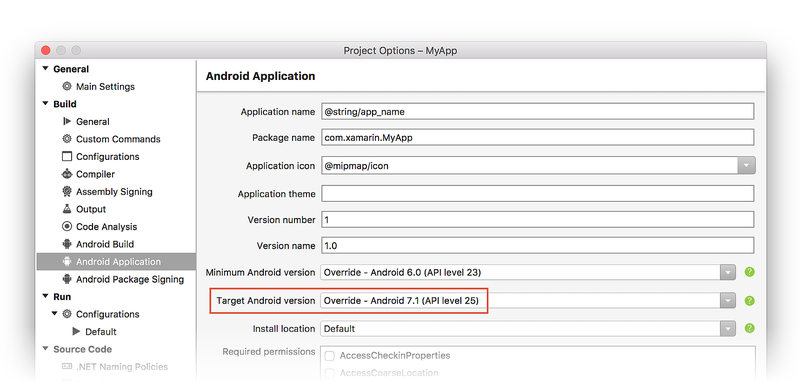
We recommend that you explicitly set the Target Android version to the latest version of Android that you use to test your app. Ideally, it should be set to the latest available Android SDK version – this allows you to use new APIs prior to working through the behavior changes. For most developers, we do not recommend setting the Target Android version to Automatic — use target framework version.
In general, the Target Android Version should be bounded by the Minimum Android Version and the Target Framework. That is:
Minimum Android Version Android.OS.Build.VERSION.SdkInt property to determine the API level of the platform the app is running on. If the API level is lower than the Minimum Android version that supports the API you want to call, then your code has to find a way to function properly without making this API call.
For example, let’s suppose that we want to use the NotificationBuilder.SetCategory method to categorize a notification when running on Android 5.0 Lollipop (and later), but we still want our app to run on earlier versions of Android such as Android 4.1 Jelly Bean (where SetCategory is not available). Referring to the Android version table at the beginning of this guide, we see that the build version code for Android 5.0 Lollipop is Android.OS.BuildVersionCodes.Lollipop . To support older versions of Android where SetCategory is not available, our code can detect the API level at runtime and conditionally call SetCategory only when the API level is greater than or equal to the Lollipop build version code:
In this example, our app’s Target Framework is set to Android 5.0 (API Level 21) and its Minimum Android version is set to Android 4.1 (API Level 16). Because SetCategory is available in API level Android.OS.BuildVersionCodes.Lollipop and later, this example code will call SetCategory only when it is actually available – it will not attempt to call SetCategory when the API level is 16, 17, 18, 19, or 20. The functionality is reduced on these earlier Android versions only to the extent that notifications are not sorted properly (because they are not categorized by type), yet the notifications are still published to alert the user. Our app still works, but its functionality is slightly diminished.
In general, the build version check helps your code decide at runtime between doing something the new way versus the old way. For example:
There’s no fast and simple rule that explains how to reduce or modify your app’s functionality when it runs on older Android versions that are lacking one or more APIs. In some cases (such as in the SetCategory example above), it’s sufficient to omit the API call when it’s not available. However, in other cases, you may need to implement alternate functionality for when Android.OS.Build.VERSION.SdkInt is detected to be less than the API level that your app needs to present its optimum experience.
API levels and libraries
When you create a Xamarin.Android library project (such as a class library or a bindings library), you can configure only the Target Framework setting – the Minimum Android version and the Target Android version settings are not available. That is because there is no Android Manifest page:

When you create a Xamarin.Android library project, there is no Android Application page where you can configure the Minimum Android version and the Target Android version – the Minimum Android version and Target Android version settings are not available. That is because there is no Build > Android Application page:

The Minimum Android version and Target Android version settings are not available because the resulting library is not a stand-alone app – the library could be run on any Android version, depending on the app that it is packaged with. You can specify how the library is to be compiled, but you can’t predict which platform API level the library will be run on. With this in mind, the following best practices should be observed when consuming or creating libraries:
When consuming an Android library – If you are consuming an Android library in your application, be sure to set your app’s Target Framework setting to an API level that is at least as high as the Target Framework setting of the library.
When creating an Android library – If you are creating an Android library for use by other applications, be sure to set its Target Framework setting to the minimum API level that it needs in order to compile.
These best practices are recommended to help prevent the situation where a library attempts to call an API that is not available at runtime (which can cause the app to crash). If you are a library developer, you should strive to restrict your usage of API calls to a small and well-established subset of the total API surface area. Doing so helps to ensure that your library can be used safely across a wider range of Android versions.
Источник


