- VideoView
- Связка с MediaPlayer
- Работа с мультимедиа
- Работа с видео
- MediaController
- Android VideoView
- Android Tutorial
- Android VideoView
- Android VideoView Example
- Android VideoView Example Code
- MainActivity.java
- Why is the MediaControl outside the VideoView?
- Android Videoview Tutorial | Play Video From URL Programmatically
- VideoView Methods
- Methods of MediaController
- 1. Android Play Video in VideoView Programmatically
- Step 2: Updating activity_main.xml file
- Step 3: Adding resource directory “raw” under “res” directory.
- Step 4: Updating MainActivity.java class :
- Step 5: Updating AndroidManifest.xml file
- Step 6: Description of MainActivity.java
- 2. Android Play video From URL in VideoView
- Step 2: Updating AndroidManifest.xml file
- Step 3: Updating activity_main.xml file
- Step 4: Updating MainActivity.java class :
- Step 5: Description of MainActivity.java
- 3. Android Kotlin VideoView Tutorial Example
- Step 2: Updating activity_main.xml file
- Step 3: Adding resource directory “raw” under “res” directory.
- Step 4: Updating MainActivity.kt class :
- Step 5: Updating AndroidManifest.xml file
- Step 6: Description of MainActivity.kt
- 4. Android Kotlin Play Video From URL
- Step 1: Updating AndroidManifest.xml file
- Step 3: Updating activity_main.xml file
- Step 4: Updating MainActivity.kt class :
- Step 5: Description of MainActivity.java
- 2 thoughts on “Android Videoview Tutorial | Play Video From URL Programmatically”
VideoView
Компонент VideoView предназначен для воспроизведения видеоклипов.
Находится в разделе Images. Желательно использовать реальное устройство при тестировании примеров.
Android поддерживает файлы формата 3gp и mp4. Точную информацию по поддержке форматов воспроизведения мультимедийных файлов смотрите на сайте .
Использовать класс VideoView очень просто. Он содержит поверхность (объект Surface), на которую выводится видео, а также инкапсулирует все операции по управлению проигрывателем. Размещаете на экране компонент и указываете путь к воспроизводимому файлу. Можно воспроизводить файлы с флеш-карточки, из ресурсов или с веб-сервера через интернет.
Данный элемент скрывает от разработчика инициализацию медиапроигрывателя, предоставляя удобный и простой API. Чтобы задать видео для воспроизведения, вызовите метод setVideoPath() или setVideoUri(). В качестве единственного параметра они принимают путь к локальному файлу, путь URI к источнику данных или адрес удалённого видеопотока.
Завершив инициализацию, вы получаете возможность управлять воспроизведением с помощью методов start(), stopPlayback(), pause() и seekTo(). VideoView также включает метод setKeepScreenOn() для предотвращения отключения подсветки экрана во время проигрывания.
Код для воспроизведения:
Метод setVideoPath() указывает на файл, который находится на SD-карточке. Не забудьте установить разрешение
Метод videoView.setMediaController(new MediaController(this)); позволяет вывести кнопки паузы и воспроизведения. Кнопки появляются, если коснуться экрана. Можете не использовать данную возможность или отключать программно, используя значение null.
Метод requestFocus() необходим, чтобы компонент получил фокус и реагировал на касания пальцев.
Метод start() позволяет сразу начать воспроизведение файла. Если вам не нужно, то не добавляйте строку в код.
Если вам нужно воспроизвести файл с сервера, то нужно использовать метод setVideoURI:
Не забываем добавить необходимое разрешение для работы через интернет:
Ещё можно поместить файл в папку ресурсов res/raw. В этом случае также надо использовать URI:
Связка с MediaPlayer
Компонент может использовать методы интерфейса, которые используются классом MediaPlayer.
В комментариях дан альтернативный вариант загрузки файла из интернета. Раньше в Android 2.2 пример работал, сейчас я проверил на новых устройствах — видео не показывалось. Не знаю с чем связано.
Источник
Работа с мультимедиа
Работа с видео
Для работы с видеоматериалами в стандартном наборе виджетов Android определен класс VideoView, который позволяет воспроизводить видео.
Какие типы видеофайлов можно использовать? Android поддерживает большинство распространенных типов видеофайлов, в частности, 3GPP (.3gp), WebM (.webm), Matroska (.mkv), MPEG-4 (.mp4).
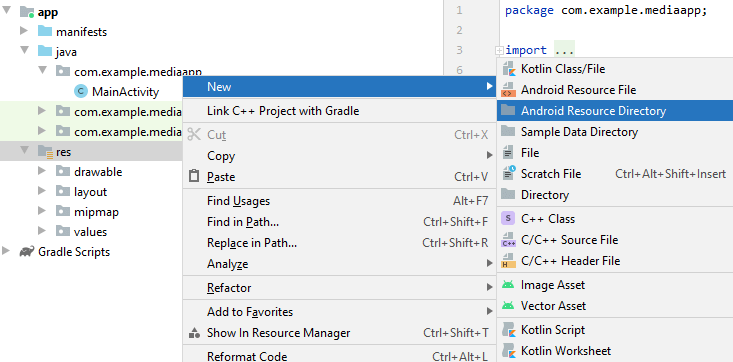
VideoView может работать как с роликами, размещенными на мобильном устройстве, так и с видеоматериалами из сети. В данном случае используем видеоролик, размещенный локально. Для этого добавим в проект какой-нибудь видеоролик. Обычно видеоматериалы помещают в проекте в папку res/raw . По умолчанию проект не содержит подобной папки, поэтому добавим в каталог res подпапку raw. Для этого нажмем на папку res правой кнопкой мыши и в появившемся меню выберем New -> Android Resource Directory :
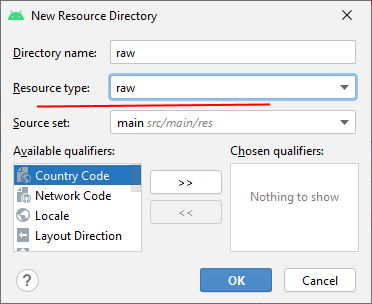
Затем в появившемся окне в качестве типа папки укажем raw (что также будет использоваться в качестве названия папки):
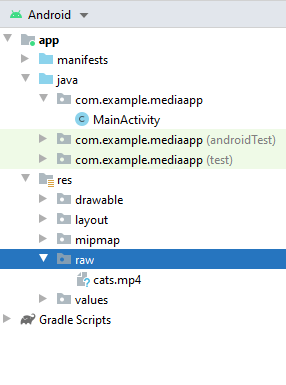
После добавления папки raw скопируем в нее какой-нибудь видеофайл:
Теперь определим функционал для его воспроизведения. Для этого в файле activity_main.xml укажем следующий код:
Для управления воспроизведением видео здесь определены три кнопки: для запуска видео, для паузы и для его остановки.
И также изменим код MainActivity :
Во-первых, чтобы управлять потоком воспроизведения, нам надо получить объект VideoView: videoPlayer = findViewById(R.id.videoPlayer);
Чтобы указать источник воспроизведения, необходим объект Uri . В данном случае с помощью выражения Uri myVideoUri= Uri.parse(«android.resource://» + getPackageName() + «/» + R.raw.cats); получаем адрес видеоролика внутри пакета приложения.
Строка URI имеет ряд частей: сначала идет Uri-схема ( http:// или как здесь android.resource:// ), затем название пакета, получаемое через метод getPackageName(), и далее непосредственно название ресурса видео из папки res/raw , которое совпадает с названием файла.
Затем этот Uri устанавливается у videoPlayerа: videoPlayer.setVideoURI(myVideoUri);
Чтобы управлять видеопотоком, обработчики нажатия кнопок вызывают соответствующее действие:
Метод videoPlayer.start() начинает или продолжает воспроизведение.
Метод videoPlayer.pause() приостанавливает видео.
Метод videoPlayer.stopPlayback() полностью останавливает видео.
Метод videoPlayer.resume() позволяет снова начать воспроизведение видео с начала после его полной остановки.
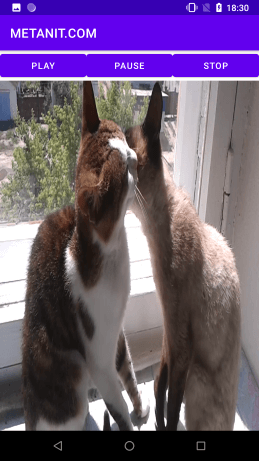
При запуске приложения мы сможем с помощью кнопок управляь воспроизведением:
MediaController
С помощью класса MediaController мы можем добавить к VideoView дополнительно элементы управления. Для этого изменим код MainActivity:
И если мы запустим приложения, то при касании по VideoView внизу появятся инструменты для управления видео. В прицнипе теперь и кнопки, которые мы создали ранее, не нужны:
Источник
Android VideoView
Android Tutorial
In this tutorial, we’ll learn about Android VideoView. We will create an android app in Android Studio and play video from URL, we will also do some customizations to it’s control panel.
Android VideoView
Android VideoView class is used to display Video files in them. Following are the acceptable formats:
- 3gp
- MP4 – Only H.263, H.264, H.264 codecs work.
VideoViews can play videos either from resource files, local data or url specified. Following are some of the methods used on VideoView:
- setVideoURI() – This is used to set the url path. It needs to be parsed as a URI.
- setVideoPath() – Used for local paths.
- start()
- stopPlayback()
- seekTo(int milliSec)
- pause()
- resume()
- isPlaying()
- canPause()
- canSeekForward()
- canSeekBackward()
- setOnCompletedListener()
- addSubtitleSource()
- setMediaController() : Used to add MediaControls on the Video. Pause/Play, Seek
- getDuration()
- setOnPreparedListener() : Gets invoked once the video starts.
Note: VideoView does not retain its full state when going into the background.
In the following section, we’ll be creating an application that runs Videos from urls one after the other.
We’ll see how the MediaController works with the VideoView .
Android VideoView Example

Do not forget to add the Internet Permission in your AndroidManifest.xml file.
Android VideoView Example Code
MainActivity.java
The code for the MainActivity.java looks like this:
We’ve added two urls in an ArrayList. We set the anchorView() on the VideoView to keep the MediaControl inside the VideoView .
The output looks something like this:

Why is the MediaControl outside the VideoView?
Well, the MediaControl doesn’t know the dimensions of the VideoView until the video is started.
For having media control inside the video, we need to set the onPreparedListener on our VideoView and then set the anchor inside it. This way the MediaController is set inside the VideoView.
Our updated MainActivity.java class looks like this now:
mp.release() is set to release the media player resources. It should be done to prevent memory leaks. Any videoView calls after this line would lead to a CRASH.
Now the output of the above application in action is given below: 
This brings an end to android video view tutorial. You can download the final Android VideoView project from the link below.
Источник
Android Videoview Tutorial | Play Video From URL Programmatically
Hello Coders, Welcome to Android Videoview tutorial with example in android studio.
One of the primary uses for smartphones and tablets is to enable the user to access and consume content. One key form of content widely used, especially in the case of tablet devices, is video.
Videoview is used to play a video file (.mp4, .avi, .mkv etc formats) in an android application.
Every android app consisting a video player is using a videoview to display a video file.
Two practical example are covered in this tutorial.
Videoview provides some in build features like play, pause, stop, next, previous etc. features.
This is a visual component which, when added to the layout of an activity, provides a surface onto which a video may be played.
The simplest possible way to play a video clip in your app, is to use the videoview class to play the video, and the MediaController class as the UI to control it.
Your app can play media files from a variety of sources, including embedded in the app’s resources, stored on external media such as an SD card, or streamed from the internet.
Android VideoView class has several methods, using which, you can control the media and video player.
Following are the methods of the Android VideoView class.
VideoView Methods
You need to add VideoView via two ways. First one is to add User Interface in .xml file and second one is to defined it’s variable in Java or Kotlin File.
You can add UI in xml file with below code
Now let us see some useful methods of VideoView class.
You can set height and width of the video player with the help of the properties like layout_height and layout_width respectively.
1. public void setMediaController (MediaController controller) :
This method will set media control object for videoview. This will add controls to our video player. Below are the coding lines
If we do not set mediacontroller, then the video will run till the end every time. User can not pause or stop the video because there are no controls are attached with video view.
I will describe setAnchorView() method later in this tutorial itself.
2. setVideoURI(Uri uri) :
When you want to load video from the local resource, you need to give path to that local video file. This method will use this path as an URI.
As you can see, path is stored in string variable first and then it is converted into uri format, This uri format is then set into the setVideoURI method.
3. requestFocus() :
This method will request focus for specific videoview. If you have more than one video on single page then this method will help to start specific video.
4. setVideoPath(String path):
This method is used to set path of video which is stored in internal or external storage of android device.
5. start() :
This method simply orders videoview to start the video.
Below source code shows how to start the video programmatically.
6. stopPlayBack() :
The current running Video will be stopped when this method is called.
Below lines show how to stop the current running video programmatically.
7. seekTo(int milliSec) :
This method moves the media to specified time position by considering the given mode.
When seekTo is finished, the user will be notified via OnSeekComplete supplied by the user. There is at most one active seekTo processed at any time. If there is a to-be-completed seekTo, new seekTo requests will be queued in such a way that only the last request is kept. When current seekTo is completed, the queued request will be processed if that request is different from just-finished seekTo operation.
8. pause() :
This method will tell the videoview to pause the video at the current position and timeline.
Following code shows how to pause the current video playback programmatically.
9. resume():
Resume method will start the paused video when it is called. Video should be start from the time where it was paused earlier.
Following lines shows usage of this method.
10. isPlaying(): If you want to check if the video is playing or not, then this method will help you out.
This method gives boolean (true or false) output. If the video is playing,then it will return true otherwise false.
Example code for this method:
11. canPause(): This method will tell you whether the videoview is able to pause currently running video or not.
It will also return boolean value. If video is able to be paused then it will return true, otherwise false.
Below are the coding details.
12. canSeekForward():
This method will return true value if video view is able to seek forward, false otherwise.
boolean value will be returned by this method.
13. canSeekBackward():
If video view is not able to seek backward then this method will return false.
It will return true if video is able to seek backward.
14. getDuration():
This method is used to get the total duration of video view.
Duration will be returned in integer format.
15. setOnCompletionListener():
What if you want to do some awesome thing when video is completed? This method will give you an opportunity to accomplish your goal.
Define your set of actions in this method as per below
Above video will restart the video when it has finished it’s streaming.
Methods of MediaController
A video player app without any media control is almost useless for the user.
User always want to control the currently playing video as per various requirements.
Video view class does not provide any controls by default but MediaController class is responsible to add media control buttons into the videoview.
To use a MediaController view, you don’t define it in your layout as you would other views. Instead you instantiate it programmatically in your app’s onCreate() method and then attach it to a media player.
Media controls will flop up at the bottom of the screen.
1.setAnchorView():
This method will help mediacontroller to set anchor view for all the controls like pause, stop, forward, backward etc.
Example lines are like below
2. show()
Use this method to show the controller on the screen.
It will go away automatically after 3 seconds of inactivity.
Usage is as follows
3. show(int timeout)
Show the controller on the screen with this method. It will go away automatically after ‘timeout‘ milliseconds of inactivity.
Use 0 to show the controller until the hide() method is called.
If you write above, then controls go away after 5 seconds.
4. hide()
Use this method to remove the controller from the screen.
If you do not want to allow user to interrupt the stream, use this method.
5. isShowing()
This method returns a boolean value about whether the controller is visible to user or not.
If it returns true then controller is visible otherwise not.
6. onTouchEvent()
Implement this method to handle touch screen motion events.
If you have read these method description, then let us make a practical example with android videoview.
1. Android Play Video in VideoView Programmatically
Today you will learn how to play videos in android’s Videoview from a raw folder of android studio directory.
You will also learn how to play video continuously in this tutorial.
First of all checkout output of this videoview android studio example then we will implement it.
Step 2: Updating activity_main.xml file
Add below code in activity_main.xml file
Step 3: Adding resource directory “raw” under “res” directory.
Now we need to create raw directory, in which we will save our video.
Follow below steps
One left left click on res directory at left menu side of android studio.
One Right click on res directory, one menu will open.
From that menu, follow New-> Android resource directory
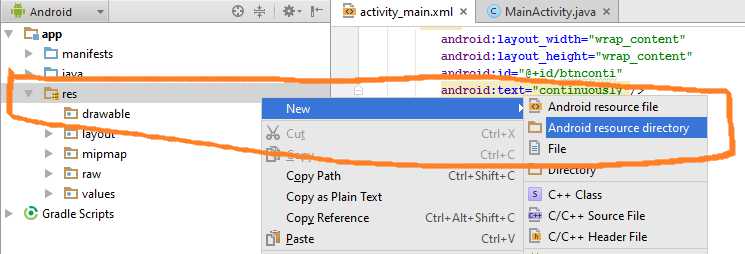 Create raw directory
When you click on Android resource directory, one dialog will open.
In Directory name give value as “raw.“
Now save your video in the raw directory.
Step 4: Updating MainActivity.java class :
Add below code to MainActivity.java
Step 5: Updating AndroidManifest.xml file
add internet permission between …. tag.
Step 6: Description of MainActivity.java
- Below code
- will set mediacontrollers(previous, pause, play, next buttons) to videoview.
- Below code
Here you need to update your package name.
Replace your package name with com.exampledemo.parsaniahardik.videoviewdemonuts
Also replace name of your video with funn in R.raw.funn
Following code will run when video has finished it’s run. vv.setOnCompletionListener(new MediaPlayer.OnCompletionListener() < @Override public void onCompletion(MediaPlayer mp) < if(isContinuously)< vv.start(); >> >); As you can see we are using boolean isContinuously todetect which button is pressed, Either “ONCE” or “Continuously “.
We are managing isContinuously and starting video on both button’s click method as below.
2. Android Play video From URL in VideoView
Hello, coders. In this load and play video from URL android studio tutorial example, we will learn to play or load video from URL or server.
You can load video from URL in android Videoview programmatically.
First, check the output of this load and play video from URL Android and then we will implement it step by step.
Step 2: Updating AndroidManifest.xml file
add internet permission between …. tag.
Step 3: Updating activity_main.xml file
Add below code in activity_main.xml file
Step 4: Updating MainActivity.java class :
Add below code to MainActivity.java
Step 5: Description of MainActivity.java
will set mediacontrollers(previous, pause, play, next buttons) to videoview.
Here you need to update your server URL to the video.
The Following code will run when a video has finished it’s run. vv.setOnCompletionListener(new MediaPlayer.OnCompletionListener() < @Override public void onCompletion(MediaPlayer mp) < if(isContinuously)< vv.start(); >> >);
As you can see we are using boolean isContinuously todetect which button is pressed, Either “ONCE” or “Continuously .“
We are managing isContinuously and starting a video on both button’s click method as below.
We will remove progressBar when a video is prepared to run. See below code
3. Android Kotlin VideoView Tutorial Example
Hello Coders, Welcome to Videoview android kotlin tutorial example. Today you will learn how to play videos in android’s Videoview from a raw folder of android studio directory.
You will also learn how to play video continuously in this tutorial.
Step 2: Updating activity_main.xml file
Add below code in activity_main.xml file
Step 3: Adding resource directory “raw” under “res” directory.
Now we need to create raw directory, in which we will save our video.
Follow below steps
One left left click on res directory at left menu side of android studio.
One Right click on res directory, one menu will open.
From that menu, follow New-> Android resource directory

- When you click on Android resource directory, one dialog will open.
- In Directory name give value as “raw.“
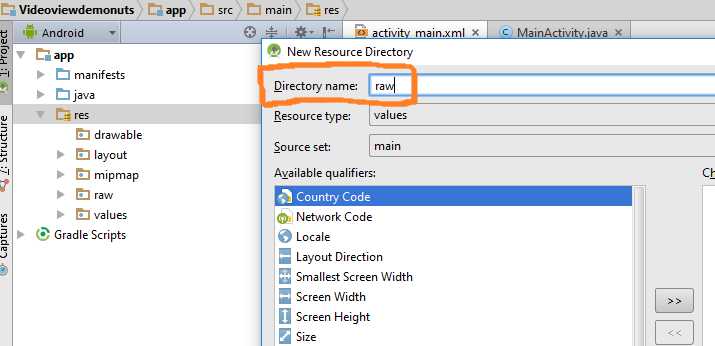
Now save your video in the raw directory.
Step 4: Updating MainActivity.kt class :
Add below code to MainActivity.kt
Step 5: Updating AndroidManifest.xml file
add internet permission between …. tag.
Step 6: Description of MainActivity.kt
- Below code
- will set mediacontrollers(previous, pause, play, next buttons) to videoview.
- Below code
Here you need to update your package name.
Replace your package name with com.exampledemo.parsaniahardik.videoviewdemonuts
Also replace name of your video with funn in R.raw.funn
Following code will run when video has finished it’s run.
- As you can see we are using boolean isContinuously todetect which button is pressed, Either “ONCE” or “Continuously “.
- We are managing isContinuously and starting video on both button’s click method as below.
So that is all for this videoview android studio kotlin example. Thank you for your interest, keep visiting for more cutting edge tutorials. 🙂
4. Android Kotlin Play Video From URL
In this load and play video from URL android kotlin tutorial example, we will learn to play or load video from URL or server.
You can load video from URL in android Videoview programmatically.
A small android app which include play, stop, play continuously and play once options.
You can implement this module any other android app as it includes only one class which is simple and easy.
It will be small video control app with kotlin and android studio.
Step 1: Updating AndroidManifest.xml file
add internet permission between …. tag.
Step 3: Updating activity_main.xml file
Add below code in activity_main.xml file
Step 4: Updating MainActivity.kt class :
Add below code to MainActivity.kt
Step 5: Description of MainActivity.java
- Below code
- will set mediacontrollers(previous, pause, play, next buttons) to videoview.
- Below code
Here you need to update your server URL to the video.
The Following code will run when a video has finished it’s run.
As you can see we are using boolean isContinuously todetect which button is pressed, Either “ONCE” or “Continuously .“
We are managing isContinuously and starting a video on both button’s click method as below.
We will remove progressBar when a video is prepared to run. See below code
So that is all for this play video url android kotlin example tutorial. Thank you for your time, keep visiting for more tutorials.
2 thoughts on “Android Videoview Tutorial | Play Video From URL Programmatically”
Can you help me with the app am working on? Trying to put multiple videos in it an ply each one of it when I click it on the list view. I don’t want sequential playing but for the user to play the video he/she chooses to watch. Thanks
are you sure it plays avi format? Cause I can not get avi to play.
Источник


