Creating a local HTTP server on android

Some month back, I was trying to implement an app feature that allowed users to communicate(send texts and files) via a local HTTP connection, more like the way Xender works.
I searched for a lot of ways to do this, I found a few libraries but they didn’t offer the speed and simplicity I was looking for.
Eventually, after days of trying different libraries, I found Sun’s HttpServer.
This tutorial assumes you have basic knowledge of Kotlin and android development.
Let’s get started!!

The sun packages are not available on gradle so you’d have to include them in your project’s lib folder.
You can download the two jar files here . (Courtesy of @Oluwalekae)
Copy and paste the files as shown in this picture 👈
In your MainActivity.kt
- create a function to format our client’s inputStream to a string.
2. Declare a variable mHttpServer, data type HttpServer, which will be the instance of our server.
3. Create a method startServer, this is where we would start our server.
4. variable ‘rootHandler’ is an HttpHandler instance used to handle a request to the root path.
You can create as many handlers as you want based on the number of endpoints you want to have.
The mHttpServer.createContext() method allows us assign handlers to endpoints/routes.
We can add a messageHandler, in the end, our MainActivity.kt would look like this.
You can do most operations that you’d normally do on any http server, like Setting headers, handling file uploads, etc.
You can access the server from:
1. your browser from your phone’s browser using “http://127.0.0.1:5000”
2. or another device connected to your phone’s hotspot using “http://192.168.43.1:5000”
because is 5000 is our port number from the code.
Sun httpServer is the fastest server library you can get, trust me.
You can read more about the HttpServer here, and here.
Источник
Простой клиент-сервер на Android (интернет-мессенджер)
Важно. Все написанное ниже не представляет собой какой либо ценности для профессионалов, но может служит полезным примером для начинающих Android разработчиков! В коде старался все действия комментировать и логировать.
Поехали. Многие мобильные приложения (и не только) используют архитектуру клиент-сервер. Общая схема, думаю, понятна.

Уделим внимание каждому элементу и отметим:
- сервер — представляет собой некую программу, работающую на удаленном компьютере, и реализующую функционал «общения» с приложениями-клиентами (слушает запросы, распознает переданные параметры и значения, корректно отвечает на них);
- клиент — в нашем случае, программа на мобильном устройстве, которая умеет формировать понятный серверу запрос и читать полученный ответ;
- интерфейс взаимодействия — некий формат и способ передачи/получения запросов/ответов обеими сторонами.
Неважно, как реализован любой из этих элементов, все они в любом случае присутствуют. Давайте реализуем примитивный сервер и Android клиент, работающий с ним. Как пример, будем использовать любой популярный мобильный интернет-мессенджер (Viber, ICQ), а приложение условно назовем «интернет-чат».
Схема взаимодействия следующая:
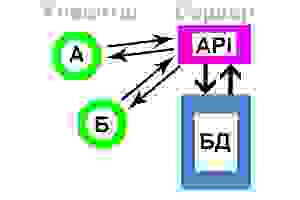
Клиент, установленный на устройстве А, посылает сообщение для клиента, установленного на устройстве Б. И наоборот. Сервер играет роль связующего звена между устройством А и Б… С, Д… и т.д. Также он играет роль «накопителя» сообщений, для их восстановления, на случай удаления на одном из клиентских устройств.
Для хранения сообщений используем SQL БД как на сервере, так и на устройствах-клиентах (в принципе, вся работа клиентов интернет-мессенджеров и сводится к постоянной синхронизации локальной и удаленной БД с сообщениями). Дополнительно, наш интернет-чат будет уметь стартовать вместе с запуском устройства и работать в фоне. Взаимодействие будет происходить путем HTTP запросов и JSON ответов.
Более логично, если синхронизация происходит через порт/сокет, это с одной стороны упрощает задачу (не нужно циклично слать HTTP запросы на проверку новых сообщений, достаточно проверять состояние прослушиваемого сокета), но с другой стороны, это усложняет создание серверной части приложения.
Делаем сервер
Для реализации «сервера», нам нужно зарегистрироваться на любом хостинге, который дает возможность работы с SQL и PHP.
Создаем пустую SQL БД, в ней создаем таблицу.
- author — автор сообщения;
- client — получатель сообщения;
- data — время и дата получения сообщения на сервере;
- text — сообщение.
В двух следующих файлах необходимо изменить переменные, содержащие данные для доступа к БД, на свои, полученные Вами при регистрации Вашего«сервера».
Структура запросов к api:
- обязательный атрибут action — может быть равен select (сервер ответит списком записей из своей БД), insert (сервер добавить новую запись в свою БД), delete (сервер очистит свою БД)
- если action=insert, нам нужно будет передать дополнительные параметры: author (кто написал сообщение), client (кому адресовано сообщение), text (сообщение)
- action=select может содержать дополнительный параметр data, в этом случае ответ сервера содержит не все сообщения из БД, а только те, у которых время создания позднее переданного
Примеры:
- chat.php?action=delete – удалит все записи на сервере
- chat.php?action=insert&author=Jon&client=Smith&text=Hello — добавит на сервере новую запись: автор Jon, получатель Smith, содержание Hello
- chat.php?action=select&data=151351333 — вернет все записи, полученные после переданного времени в long формате
Клиентская часть
Теперь структура Android приложения:
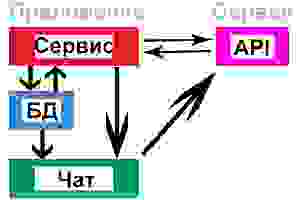
В фоне работает FoneService.java, который, в отдельном потоке, каждые 15 секунд делает запрос на сервер. Если ответ сервера содержит новые сообщения, FoneService.java записывает их в локальную БД и отправляет сообщение ChatActivity.java о необходимости обновить ListView, с сообщениями. ChatActivity.java (если она в этот момент открыта) получает сообщение и обновляет содержимое ListView из локальной БД.
Отправка нового сообщения из ChatActivity.java происходит сразу на сервер, минуя FoneService.java. При этом наше сообщение НЕ записывается в локальную БД! Там оно появится только после получения его назад в виде ответа сервера. Такую реализацию я использовал в связи с важным нюансом работы любого интернет-чата — обязательной группировкой сообщений по времени. Если не использовать группировку по времени, будет нарушена последовательность сообщений. Учитывая, что клиентские приложения просто физически не могут быть синхронизированы с точностью до миллисекунд, а возможно будут работать даже в разных часовых поясах, логичнее всего будет использовать время сервера. Так мы и делаем.
Создавая новое сообщение, мы передаем запросом на сервер: имя автора сообщения, имя получателя сообщения, текст сообщения. Получая эту запись назад, в виде ответа сервера, мы получаем то, что отправляли + четвертый параметр: время получения сообщения сервером.
Источник
Android studio web server

Android WebView Local Web Server
Create a local web server to run local html files into a webview and view them like a website.
You create a virtual web server that runs on your android device, and when you navigate to the server url in the webview it will load it from local assets. Run HTTP, HTTPS, and FILE protocols on your Android device to be viewed in a WebView.
All other websites will load directly from the web.
It is recommended that you store all website data under ‘ /www/ ‘, although you can store it under the res folder as well. You can load the files anywhere in the assets folder still and just change the .setPathInAndroidLocation(«myfiles/secondaryfolder») to reference the specific folder (or .setPathInAndroidLocation(«») if you load the files directly into the assets folder.
The purpose of this library is to enable hosting local content (such as assets or resources) under an http(s):// URL. The traditional way to access local resources is to use file:///android_asset or file://android_res/ URLs but using the file: scheme poses problems with the Same-Origin policy and makes it problematic to reference local content from content loaded over a secure ( https: ) connection.
Quick implementation will get you up and running!
Источник
Android studio web server
Android HTTP Server
Small but powerful multithreaded web server written completely in Java SE and then ported to Android.
![]()
The server implements most of the HTTP 1.1 specification and provides custom servlet API that can be used to handle dynamic pages. The servlet API is designed after the official javax.servlet API yet it is not compatible. Dynamic pages support cookies, sessions, file uploads and anything else to build a common web application.
- Small footprint, requires no external libraries
- Handles HTTP requests in separate threads
- Provides custom servlets API for generating dynamic content
- Supports GET, POST, HEAD methods (or more, depending on the configuration)
- Supports chunked transfer type
- Provides full support for mime types (uses Apache like mime.type)
- Supports buffered file upload (multipart requests), cookies, persisted sessions
- Supports serving partial body (ranges)
- Can serve static content both from file system and APK resources
Building the application
The provided Gradle wrapper should be used to build the application:
Installing Android SDK from command line
When running the full build for the first time you must first install the Android SDK. You might either install it manually or use the following script that downloads and installs all required dependencies to
To make things work after you logout and login back, configure the ANDROID_HOME environment variable:
The http subproject and the idea behind it
The http subproject is the heart of the application and it is independent on Android platform.
In fact the Android app was just an attempt to find a more practical use of the experimental HTTP protocol implementation.
One of the design goals was to keep the resulting artifact small in size and minimalistic in terms of dependency on other libraries — it does not require any third party component, all HTTP protocol implementation is based on parsing data read from raw TCP sockets.
Once the ro.polak.http package is mature enough it will be released as an independent artifact.
The subproject can be tested in the following way:
The original package code has been refactored and covered with unit and integration tests. Code coverage should be kept above 90%.

Android SDK compatibility issues
All application code is targeted to Java 7. It also compiles for the Android SDK versions finally block as an alternative when closing streams).
Another compatibility constraint is that Random instead of ThreadLocalRandom is used for generating random sequences in StringUtilities
Mutation tests can be run by executing the following command:
The results can then be found under http/build/reports/pitest/ro.polak.http/index.html and http/build/reports/pitest/ro.polak.http/mutation.xml .
Running standalone server (CLI)
Standalone server can be used to bundle the http subproject into a runnable server implementation. The CLI subproject is also independent on the Android platform, it is not bundled with the main APK.
It is also possible to build one «uber-jar» and to use it as a standalone application:
The resulting artifact can then be grabbed from ./cli/build/libs/cli-all.jar .
The standalone server jar can be run on any machine with the following command:
Overwriting configuration values from command line
For a complete list of available parameters refer to httpd.properties.

A demo application is automatically deployed to Heroku and can be reached at:
Please note the deployed application does not contain the admin application since that is only available for Android. See Procfile for the deployment description.
Hello World servlet
Request logging filter
Example servlets can be found in http/src/main/java/example.
A practical use of filters can be checked at SecurityFilter.java and LogoutFilter.java of the admin application.
Building a deployment descriptor
DeploymentDescriptorBuilder is an API alternative to traditional web.xml approach that aims to make servlet mapping building and filter registration easy. See example code below.
Serving static contents
Serving static resources is implemented using DefaultServlet
- the servlet is automatically registered as the very last element of DeploymentDescriptorBuilder acting as a fallback resource.
The actual resource loading is implemented by registering an instance ResourceProvider in the server config.
Currently there are two resource providers implemented
Sample dummy implementation of a ResourceProvider
The following example presents how to integrate Jtwig templating engine.
First you need to add Jtwig dependency in your gradle file:
Then it works out of the box:


500 error page trace in browser

Sample script to send SMS using wget command line utility
If you want to send a real SMS please remove «&test=1» from the POST params.
Android HTTP server uses icons from the beautifully designed «Farm-Fresh Web Icons» pack by FatCow Web Hosting! These icon sets are licensed under a Creative Commons Attribution 3.0 License.
The project is shared upon GNU GPLv3 license.
If you are interested in a dedicated commercial license please drop me a line at piotr [at] polak [dot] ro
About
A complete zero-dependency implementation of a web server and a servlet container in Java with a sample Android application.
Источник


