- Chat API Android SDK for WhatsApp API
- You can customize this SDK to your needs and make it more convenient by clicking here:
- Requirements
- Installation
- Maven users
- Gradle users
- Others
- Getting Started
- Documentation for API Endpoints
- Documentation for Authorization
- instanceId
- token
- Recommendation
- Preparatory work
- The first steps for beginners
- How to Use
- 1. Starting a new project
- 2. Add reference of the library project
- 3. Write sample code
- How to Test
- Other WhatsApp API SDKs
- Как сделать API на любое Android приложение. На примере WhatsApp
- Анализ ситуации.
- 1. Официальный API
- 2. Сторонний сервис. Подключение через WhatsApp WEB
- 3. Ручной режим
- Решение
- Отправка сообщения
- Приём сообщений
- Плюсы, минусы, доработка и планы
- Чем мы можем помочь?
- Custom URL Scheme
- Android intent system
- Sending message from your application to a WhatsApp Number
- Leave a Comment Cancel Reply
- 76 comments
Chat API Android SDK for WhatsApp API
You can customize this SDK to your needs and make it more convenient by clicking here:
The SDK allows you to receive and send messages through your WhatsApp account. Sign up now
Download SDK and unpack the archive. Connect SDK to your project.
Requirements
Building the API client library requires Maven to be installed.
Installation
To install the API client library to your local Maven repository, simply execute:
To deploy it to a remote Maven repository instead, configure the settings of the repository and execute:
Refer to the official documentation for more information.
Maven users
Add this dependency to your project’s POM:
Gradle users
Add this dependency to your project’s build file:
Others
At first generate the JAR by executing:
Then manually install the following JARs:
Getting Started
Please follow the installation instruction and execute the following Java code:
Documentation for API Endpoints
All URIs are relative to https://api.chat-api.com
Documentation for Authorization
Authentication schemes defined for the API:
instanceId
Type: API key
API key parameter name: instanceId
Location: URL query string
token
Type: API key
API key parameter name: token
Location: URL query string
Recommendation
It’s recommended to create an instance of ApiClient per thread in a multithreaded environment to avoid any potential issues.
Preparatory work
At the very beginning, we need to connect whatsapp with our script, so as we write the code, we check its operation. To do this, go to your personal account and get a QR code there. Next, open WhatsApp on your smartphone, go to Settings -> WhatsApp Web -> Scan a QR code.
Now we need to indicate a WebHook URL so the server can run the scrip when new messages arrive. Indicate a direct link to your script. You can’t indicate server IP only, but you can indicate the port.
The first steps for beginners
The generated code uses a few Gradle dependencies e.g., Jackson, Volley, and Apache HttpClient. The reference to these dependencies is already added in the build.gradle file will be installed automatically. Therefore, you will need internet access for a successful build.
- In order to open the client library in Android Studio click on Open an Existing Android Project .
- Browse to locate the folder containing the source code. Select the location of the WhatsappAPI gradle project and click Ok .
- Upon successful import, the project can be built by clicking on Build > Make Project or pressing Ctrl + F9 .
How to Use
The following section explains how to use the WhatsappAPI library in a new project.
1. Starting a new project
For starting a new project, click on Create New Android Studio Project .
Here, configure the new project by adding the name, domain and location of the sample application followed by clicking Next .
Following this, select the Phone and Tablet option as shown in the illustration below and click Next .
In the following step, choose Empty Activity as the activity type and click Next .
In this step, provide an Activity Name and Layout Name and click Finish . This would take you to the newly created project.
2. Add reference of the library project
In order to add a dependency to this sample application, click on the android button shown in the project explorer on the left side as shown in the picture. Click on Project in the drop down that emerges.
Right click the sample application in the project explorer and click on New > Module as shown in the picture.
Choose Import Gradle Project and click Next .
Click on Finish which would take you back to the sample application with the refernced SDK.
In the following step first navigate to the SampleApplication > settings.gradle file and add the line
implementation project(path: ‘:WhatsappAPILib’)«` to the dependencies section as shown in the illustration below. Also add the following packagingOptions.
packagingOptions exclude ‘META-INF/LICENSE’ exclude ‘META-INF/NOTICE’ exclude ‘META-INF/DEPENDENCIES’ >
Finally, press Sync Now in the warning visible as shown in the picture below.
3. Write sample code
Once the SampleApplication is created, a file named SampleApplication > app > src > main > java > MainActivity will be visible in the Project Explorer with an onCreate method. This is the entry point for the execution of the created project. Here, you can add code to initialize the client library and instantiate a Controller class. Sample code to initialize the client library and using controller methods is given in the subsequent sections.
How to Test
The generated code and the server can be tested using automatically generated test cases. JUnit is used as the testing framework and test runner.
In Android Studio, for running the tests do the following:
- Right click on SampleApplication > WhatsappAPILib > androidTest > java) from the project explorer.
- Select «Run All Tests» or use «Ctrl + Shift + F10» to run the Tests.
Other WhatsApp API SDKs
You can configure the SDK or generate other SDKs in 30+ programming languages: Chat API SDK generator.
Источник
Как сделать API на любое Android приложение. На примере WhatsApp
Анализ ситуации.
Казалось, требуется всего лишь отправлять и принимать сообщения. А столько подводных камней…
1. Официальный API
Официального API в релизе тогда ещё не было. Но Facebook успел прислать ссылку на форму, для подключения официального API, находящегося в тестировании.
2. Сторонний сервис. Подключение через WhatsApp WEB
Рассматривал вариант «серого» способа, использование неофициального сервиса, который отправляет сообщения через WEB интерфейс, подключается сканированием QR кода.
Но это зависимость от чужого API, в любой момент может всё отвалиться, да и передавать чужому сервису номера клиентов не хотелось. А ещё писать под чужой авторский API, да ещё который придётся переписывать, при переезде на другой сервис, тоже такое себе удовольствие.
Ну и ещё требуется держать телефон включенным (хотя некоторые сервисы за доп плату решали эту проблему 🙂
3. Ручной режим
Посадить человека, пускай копипастит сообщения клиентам. Шутки шутками, а из этой идеи родилось решение!
Решение
Отправка сообщения
 Есть такая программка для автоматизации действий под Android, называется Tasker, одна из первых подобных программ. Но я в ней не разобрался с первого раза… Поискал аналоги, наткнулся на программу Automagic. В ней события, действия и ветвления рисуются как блок схема.
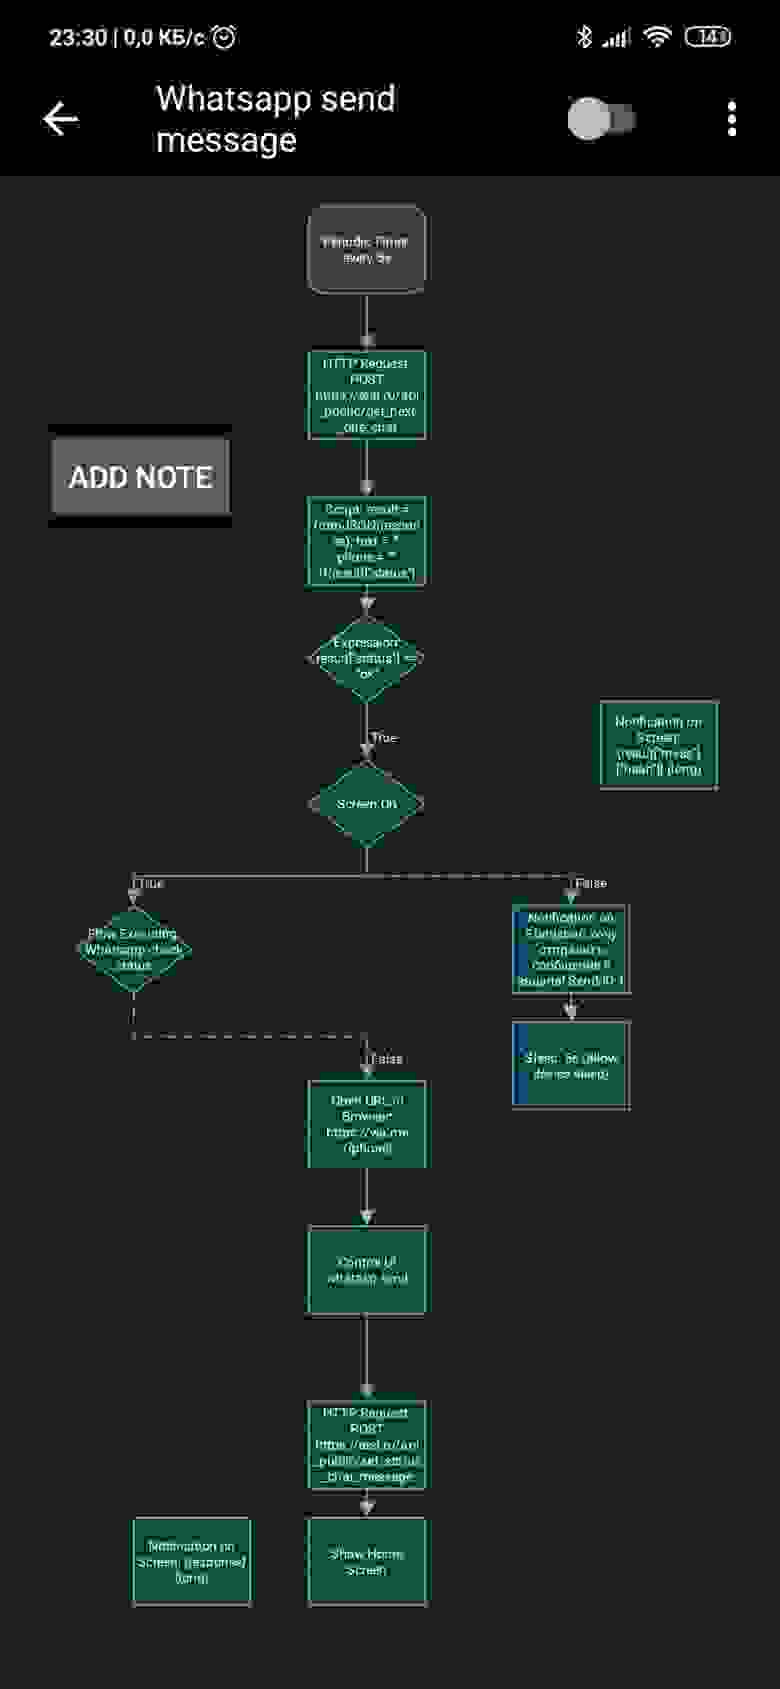
И вот в ней я то и придумал решение, root права нам не нужны. Получилось методом научного тыка нарисовать скрипт отправки сообщения, далее буду называть поток, так именуется каждый отдельный нарисованный алгоритм в данной программе. А теперь разберём его работу:
- Каждые 5 секунд периодичным таймером генерируется событие и передаётся следующему блоку.
- Блок HTTP Request спрашивает у сервера, есть ли в очереди следующее сообщение, которое нужно отправить? Бэкенд написан на PHP.
- Парсим ответ сервера JSON.
- Если от сервера в ответе пришла метка, что нужно отправить сообщение, идём дальше.
- Проверяем, включен ли экран устройства, если нет, отправляем уведомление, с целью разбудить телефон. Если же экран включен, и не выполняется другой поток, проверяющий статус, доставлено ли сообщение, то:
- Генерируем ссылку и открываем её, что бы инициировать диалог с полученным от сервера номером телефона в WhatsApp’е
- Самое интересное. Блок Control UI. В нём в виде кода реализована логика проверки успешности открытия чата (проверка регистрации в мессенджере), вставка текста в окно ввода и клацанье по кнопке Отправить.
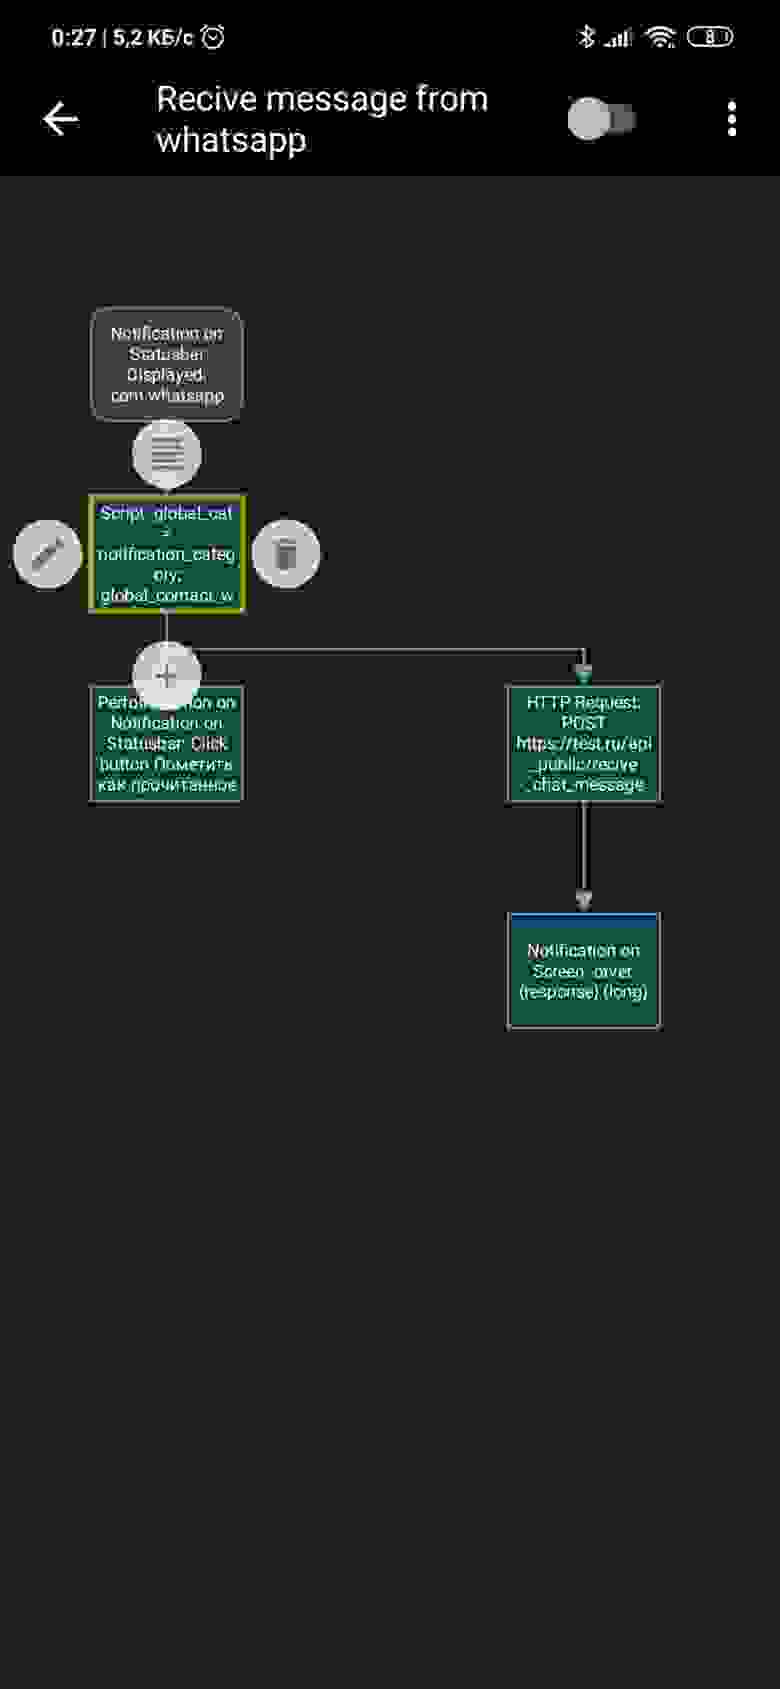
Приём сообщений
Принимать сообщения на много проще. Ставим событие на уведомление от мессенджера. Как только приходит уведомление, помечаем его прочитанным, и отправляем его на сервер как есть. Тот уже спарсит адресата и текст.
Плюсы, минусы, доработка и планы
Основную функцию отправки сообщения алгоритм выполняет отлично. Так как не используется WEB интерфейс, схватить баню от мессенджера тут меньше рисков, как мне кажется. Арендовал слабенький виртуальный сервер, установил туда Android и перенёс всё.
На отправку одного сообщения новому контакту уходит
5 сек. Для проверки доставки и прочтения сообщения, разработал отдельный поток, но он в черновом варианте и иногда не срабатывает. Поэтому о нём позже.
В данный момент не реализована функция приёма медиа сообщений (фото, аудио, вложения), но это можно выгружать из WhatsApp, используя кнопку поделиться сообщением в будущем.
Чуть позже хочу сверху виртуальной машины, где запущен мессенджер, написать SIP транк, через который можно будет звонить через WhatsApp как через SIP ^.^ что может сэкономить расходы на связь.
Ещё хочу делать скриншоты аватарок и отправлять их на сервер, для прикрепления миниатюры к контакту в CRM системе.
Ну и вообще самое интересное: Данный способ обёртывания в API подойдёт почти для любого приложения под Android 🙂
Всё изначально разрабатывал и запускал на Android 9, xiaomi mi 9 se, root прав нет.
UPD:
Пример на Python3.8 в качестве бекенда доступен на GitHub, доработан алгоритм ловли уведомлений и код отправки из комментариев от ivan909020
Источник
Чем мы можем помочь?
There are two ways to integrate with WhatsApp:
-Through a custom URL scheme
-Through Android’s intent system.
Custom URL Scheme
WhatsApp provides a custom URL scheme to interact with WhatsApp:
If you have a website and want to open a WhatsApp chat with a pre-filled message, you can use our custom URL scheme to do so. Opening whatsapp://send?text= followed by the text to send, will open WhatsApp, allow the user to choose a contact, and pre-fill the input field with the specified text.
Here is an example of how to write this on your website:
Android intent system
Like most social apps on Android, WhatsApp listens to intents to share media and text. Simply create an intent to share text, for example, and WhatsApp will be displayed by the system picker:
Intent sendIntent = new Intent(); sendIntent.setAction(Intent.ACTION_SEND); sendIntent.putExtra(Intent.EXTRA_TEXT, «This is my text to send.»); sendIntent.setType(«text/plain»); startActivity(sendIntent);
However, if you prefer to share directly to WhatsApp and bypass the system picker, you can do so by using setPackage in your intent:
This would simply be set right before you call startActivity(sendIntent);
Similarly you can use Android’s intent system to send media through WhatsApp, once again, using setPackage to restrict the package to WhatsApp if you only want to send to WhatsApp. Check this developer page for more information.
Источник
Sending message from your application to a WhatsApp Number
In this blog. we will learn about sending a message from your application to a WhatsApp Number and how you can open a particular contact in WhatsApp.
While building applications many times we need to provide the user with a facility of contacting the service providers and WhatsApp messaging in today’s World is much popular.
Opening a particular contact or sending some particular text/url/ images to WhatsApp is a task but combining them both and that too with not so much clear documentation is a hurdle that needs to be overcome. And After Following this blog, you will see that reading the documentation is hard than implementing the same.
First, let’s have a look at the code snippet to send a particular message from your application to WhatsApp Application.As per the official documents and my implementation of the docs you can directly use below-shared Code Segment for the aforesaid purpose.
Now, let’s have a look at how we can open a particular WhatsApp Number on the WhatsApp application.
But if you want to send a particular message to a particular user from your application to WhatsApp. All you need to do is to implement this segment of code and everything will work fine.
I prefer using the last piece of code as it will automatically check if the WhatsApp is installed or not and if WhatsApp is not installed, this will redirect to Google play store for installing the WhatsApp.
Keep coding and Keep Sharing.
Leave a Comment Cancel Reply
76 comments


The code snippet in the blog are complete. All you need to do is adjust the message and contact number as per your use.
The explanation in the blog as per me is sufficient for any reader to read and implement this functionality.
Still, if you have doubts in any point do let me know and i will try to improvise the same in blog.
Moreover, if you still have any errors in the code then share the code with me and i will help you out, regarding the same.


For starting you can try reading AccessibilityService from the core android packages and then modifying it to achieve what you want.
Please note that in this case the approach with the use of “http://api.whatsapp.com/send?phone=” might not work and you might need to redefine your whole logic based on the default Intents and Actions and open WhatsApp using that.
Please do let me know if you actually get a working solution for that.

But as someone in other comments suggested using appium or something that can really find the send button and automatically push the message.
I am not sure but i think what you want is possible.


Well I Am Afraid there is no direct api/ method to send a single message to multiple numbers officially.
Also, for the approach shared in the article it requires user to press the final send button on the whatsApp Screen so that the mesaage actually is delivered to the intended number.
If still you would want to send it to multiple devices, then I would advise you
1) To create a array/ array list in which all the numbers are stored
2) Create a Reciever that is trigerred when your user comes back to your application
3) Simply repeat the process used for sending to a single number until your end of array is reached.

Well, I have no exposure to Xamarin Forms.
But the approaches discussed in the blog will work definitively for core android as it is using only intents and uri scheme.

Suppose your country is India and your phone number is “xxxxxxxxxx”, then you need to send the “91xxxxxxxxxx” in the phone number field.

But if i was in your place, i would do something like this–>
public void shareImageOnWhatsApp(Uri imgBitmapUri) <
PackageManager pm=getPackageManager();
try <
Intent waIntent = new Intent(Intent.ACTION_SEND);
PackageInfo info=pm.getPackageInfo(“com.whatsapp”, PackageManager.GET_META_DATA);
//Check if package exists or not. If not then code
//in catch block will be called
waIntent.setPackage(“com.whatsapp”);
waIntent.setFlags(Intent.FLAG_ACTIVITY_NEW_TASK);
waIntent.putExtra(Intent.EXTRA_STREAM,imgBitmapUri);
waIntent.setType(“image/png”);
waIntent.addFlags(Intent.FLAG_GRANT_READ_URI_PERMISSION);
waIntent.putExtra(Intent.EXTRA_TEXT, “My Custom Text “);
waIntent.putExtra(Intent.EXTRA_SUBJECT, “Subject text”);
startActivity(Intent.createChooser(waIntent, “Share this”));
> catch (PackageManager.NameNotFoundException e) <
Toast.makeText(this, “WhatsApp not Installed”, Toast.LENGTH_SHORT)
.show();
>catch(Exception e) <
e.printStacktrace();
>
>
Please note that you need to pass the Uri of the image file you want to share as an argument to this function.
Источник


