- Урок 19. Как создать андроид-приложение с вкладками – TabLayout с ViewPager2 на Kotlin
- Добавление TabLayout в макет разметки экрана
- Реализация вкладок в MainActivity
- Android TabLayout Example using ViewPager and Fragments
- What is Android TabLayout?
- Android TabLayout Video Tutorial
- Creating our Android TabLayout Example
- Adding Design Support to our Project
- Creating Layouts for the Tab Views
- Android tablayout with viewpager
- Android Tablayout Tutorial | Custom Fragments,ViewPager,Swipe
- 1. Android Tablayout Example With Fragments,ViewPager
- Step 1: Create a new project in Android Studio.
- Step 2: Update build.gradle(Module:app) file
- Step 3: Updating colors.xml
- Step 4: Preparing three fragments
- Step 5: Updating MainActivity
- Step 6: Explanation of MainActivity.java
- 2. Android Change ActionBar/Toolbar Icon/Text in Each tab
- Step 1: Creating Base Project
- Step 2: Adding images to drawable
- Step 3: Updating styles.xml
- Step 4: Creating toolbar.xml file
- Step 5: Developing OneActivity
- Step 6: Creating menu resource directory
- Step 7: Updating all fragments
- 3. Android Custom Tablayout Example
- Step 1: Making Base Project
- Step 2: Adding custom_tab.xml file
- Step 3: Updating MainActivity.java
- 4. Android Change Tab Icon/Text/Background Color/Text Color When Selected
- Output
- Step 1. Update colors.xml file
- Step 2. Necessary strings
- Step 3. Various Icons
- Step 4. Making Drawable resource files
- Step 5. Four Fragments for Four Tabs
- Step 6. Main Activity
- Update Main Activity java file
- Step 7. Explanation of Main Activity
- unselectElse
- removeAllFragment()
- One thought on “Android Tablayout Tutorial | Custom Fragments,ViewPager,Swipe”
Урок 19. Как создать андроид-приложение с вкладками – TabLayout с ViewPager2 на Kotlin
На прошлом уроке мы познакомились с ViewPager2 и создали андроид-приложение, в котором можно листать экраны свайпом вправо или влево. На этом уроке добавим в верхней части экрана вкладки, которые будут содержать заголовки и индикатор экрана, на котором находится пользователь в данный момент, а также рассмотрим некоторые их свойства и способы оформления.
В этом уроке будем использовать проект из прошлого урока, можно скачать его на странице урока 18 по ссылке вверху.
Добавление TabLayout в макет разметки экрана
Чтобы добавить вкладки на экран, нужно открыть макет разметки и добавить компонент com.google.android.material.tabs.TabLayout в верхней части экрана:
Для корректного размещения нужно изменить компонент ViewPager2 – высоту укажем 0dp. Таким образом, высоту компонента будет регулировать корневой ConstraintLayout по заданным ограничениям. А вместо ограничения app:layout_constraintTop_toTopOf=»parent» поставим app:layout_constraintTop_toBottomOf=»@+id/tab_layout» – чтобы верх компонента ViewPager2 был ограничен не верхней границей родительского компонента, а нижней границей компонента TabLayout.
Рассмотрим подробнее компонент com.google.android.material.tabs.TabLayout. Свойство app:tabMode=»scrollable» обеспечивает размещение в видимой части экрана только нескольких вкладок, остальные будут доступны в процессе прокрутки. Если мы не укажем это свойство, то в видимой части экрана будут одновременно отображаться все вкладки, и при большом их количестве визуальное восприятие будет затруднено.
Свойство app:tabIndicatorColor=»@color/teal_200″ указывает цвет, а app:tabIndicatorHeight=»4dp» – толщину индикатора вкладки.
Далее идут свойства ширины – указываем по родителю – и высоты – указываем по содержимому.
Последние три свойства – ограничения верхней части и боковых сторон компонента по родителю.
Реализация вкладок в MainActivity
Открываем класс MainActivity и пишем реализацию вкладок:
Источник
Android TabLayout Example using ViewPager and Fragments
If you are using the latest android application then you have noticed that now days android is following a design pattern. This is material design and it came with Android Lollipop (5.0). Though we can still use this design pattern for the older versions (>4.0) by using the support libraries. One of the component of material design is TabLayout. So in this Android TablLayout Example we will see how we can implement it in our android application. You may have already seen Android TabLayout Example in the apps you use daily. For example WhatsApp the home screen is an Android TabLayout Example from where we switch to calls, chats and contacts.
So lets see in this Android TablLayout Example how we can implement the same in our android project.
What is Android TabLayout?
Android TabLayout provides horizontal layout to display tabs. We can display more screens in a single screen using tabs. User can swipe the tabs quickly as you can see in the image below.
 Android Tablayout Example
Android TabLayout Video Tutorial
- Check this updated video tutorial for Android TabLayout.
Creating our Android TabLayout Example
- Open Android Studio and create a new project.
- I have created AndroidTabLayout.
Adding Design Support to our Project
- We have to add design support library to the dependencies. So right click on app and to go module settings.

- Now go to dependencies tab and click on the + button and select library dependency.

- Select design and click on ok.

Creating Layouts for the Tab Views
- We have to create the layout resource files for our tabs. As in this project I will be displaying 3 tabs so I need to create 3 layout files.

- You can see in the image I have tab1.xml, tab2.xml and tab3.xml. All these files are having the same code you can see below.
Источник
Android tablayout with viewpager
Android TabLayout with ViewPager
We will introduce Google’s new TabLayout included in the support design library release for Android «M».
Add Support Library
To implement sliding tabs, make sure to add the Support Library setup instructions first. (make sure these versions have been updated.)
Sliding Tabs Layout
Add android.support.design.widget.TabLayout that will handle the different tab options, and android.support.v4.view.ViewPager component will handle the page between the various fragments we will create.
We define the XML layout( res/layout/fragment_content.xml ) for the fragment which will be displayed on screen when a particular tab is selected.
Then ContentFragment.java define the logic for the fragment of tab content.
Following, we implement the adapter for your ViewPager which controls the order of the tabs, the titles and their associated content. The most important methods to implement here are getPageTitle(int position) which is used to get the title for each tab and getItem(int position) which determines the fragment for each tab.
Setup Sliding Tabs
Finally, we need to attach our ViewPager to the PagerAdapter and then configure the sliding tabs with a two step process:
- In the onCreate() method of your activity, find the ViewPager and connect the adapter.
- Set the ViewPager on the TabLayout to connect the pager with the tabs.
Heres the output:

Customize Tab Indicator Color
Add style to styles.xml
Then override this style for your TabLayout:
Add Icons to TabLayout
Add icon resource to PagerAdapter and getPageTitle(position) method as shown in the code snippet below.
By default, the tab created by TabLayout sets the textAllCaps property to be true, which prevents ImageSpans from being rendered. You can override this behavior by changing the tabTextAppearance property.
Tabs with images:

Add Custom View to TabLayout
We will show how to custom XML layout for each tab. First, we create a template Tab(custom_tab_item.xml).
To achieve this, iterate over all the TabLayout.Tab s after attaching the sliding tabs to the pager.
Next, we add the getTabView(position) method to the PagerAdapter class.
Finally, we can setup any custom tab content for each page in the adapter. 
Источник
Android Tablayout Tutorial | Custom Fragments,ViewPager,Swipe

Whatsapp is using Android tablayout for basic navigation.
In today’s Android tablayout example, we will develop that kind of structure programmatically.
1. Android Tablayout Example With Fragments,ViewPager
Android tablayout uses fragments, material design and view pager as basic components.
First, watch the output, then we will prepare it.
Step 1: Create a new project in Android Studio.
Always try to create new project in android studio with empty activity.
Step 2: Update build.gradle(Module:app) file
Add below in build.gradle(Module:app) file
Whole source code for build.gradle(Module:app)
Step 3: Updating colors.xml
Go to the res->values->colors.xml directory
update colors.xml as below
Step 4: Preparing three fragments
Create three fragments and give them name as “OneFragment,” “TwoFragment,” and “ThreeFragment.“
In every application with tab layout, use of fragment is must. Gmail is also using same concept.
Fragments simplifies the back stack problem arises if we use activity instead of fragment.
Here, we are using three fragments. You can increase or decrease this number as per your requirements.
Add below code in fragment_one.xml
Add following in OneFragment.java
Copy below source code in fragment_two.xml
Copy following code in TwoFragment.java
Add below code in fragment_three.xml
Paste below code in ThreeFragment.java
Step 5: Updating MainActivity
update activity_main.xml as below
Update MainActivity.java as per following
Step 6: Explanation of MainActivity.java
First of all setupViewPager() method is called.
Consider below source code
In above method, we have added each fragment to view pager adapter.
addFragment() method have two parameters. First have the object of fragments and second have the name of that fragment.
The value of Second parameter will shown as the name of the tab.
After that, ViewPagerAdapter class is defined. You do not need to do any modification in this class.
2. Android Change ActionBar/Toolbar Icon/Text in Each tab
We will learn about tablayout android studio example.
Tablayout android studio tutorial will guide you to make different actionbar/toolbar menuitems for different colors.
In whatsapp, when you slide fragments menu items are also changing. We will develop this functionality in tablayout android tutorial.
First, check the output of this example.
Step 1: Creating Base Project
After you have completed above tutorial, you will have one android project with simple tablayout.
Now follow below steps.
Step 2: Adding images to drawable
Download images and copy them into “drawable” directory
Step 3: Updating styles.xml
Update styles.xml file as per below source code
Step 4: Creating toolbar.xml file
Create a new resource file named toolbar.xml and paste below
Step 5: Developing OneActivity
Create a new activity named “OneActivity.”
Copy following in activity_one.xml
Add following source code into OneActivity.java class
Step 6: Creating menu resource directory
Create a new resource directory named “menu” inside the “res” directory as per below image.
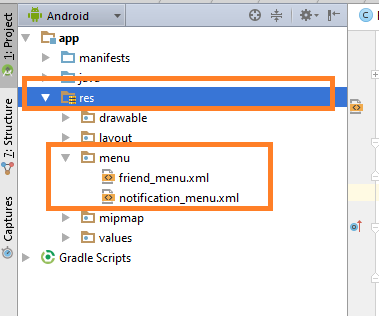
Inside “menu,” make three new xml files and name them as one_menu.xml,two_menu.xml and three_menu.xml
Add below source code in one_menu.xml
Add following in two_menu.xml
Add below in three_menu.xml
Step 7: Updating all fragments
Update OneFragment.java as per below code
Update TwoFragment.java as per following
Update ThreeFragment.java like below
3. Android Custom Tablayout Example
Custom Tablayout Android Studio example creates custom tablayout with custom view.
We will create a custom view for tablayout in this example.
You can use both icon and tab name in custom tablayout.
There are Four ways to set icons with respect to text(tab name)
- Left side of text,
- Right side of text,
- Above text and
- Below text.
First, check the output of a tutorial, then we will develop it.
Step 1: Making Base Project
After you have completed above tutorial, you will have one android project with tablayout.
Make sure you followed all the steps of above tutorial. It is must for going further with this example.
Now follow below steps.
Step 2: Adding custom_tab.xml file
Create a new resource directory named custom_tab.xml and add below code
This custom_tab.xml file is the core of this tutorial.
You can customize all of your tabs here with various icons, tab names and colors of tab names.
Step 3: Updating MainActivity.java
Update MainActivity.java as per below code
Now consider below lines
headerView is the object of View class and is inflated with layout resource file named custom_tab.xml
In above lines, linearlayoutOne, linearlayout2 and linearlayout3 are inflated with headerView.
We will set custom view for each tab with the help of below source code lies.
4. Android Change Tab Icon/Text/Background Color/Text Color When Selected
Android change tab icon when selected tutorial with example is tonight’s hot topic.
In this tutorial, you will learn how to change tab icon, tab text, tab icon color, tab text color, tab background color, indicator color programmatically when user selects the tab.
Developers use these features to indicate the current working tab to the user.
Output
What will be the final output at the end of this example?
Check it out in the below video.
Step 1. Update colors.xml file
Add some necessary colors in the colors.xml file which is located at the values->colors.xml path.
Step 2. Necessary strings
A file which is available at values->strings.xml needed to be replaced with following source code
Step 3. Various Icons
As we want to change the color or may be the whole icon when the user clicks on the tab, we need to add different icons for every situation.
There should be different icons for both events, when the tab is selected and when it is deselected.
Click on below link to download necessary icons for this practical example tutorial.
Now copy all these icons in the mipmap folder.
Step 4. Making Drawable resource files
In the drawable folder, make one new resource file and name it like roundback.xml
Copy the following code in it
Create another resource file named roundleft.xml and add the below code
Step 5. Four Fragments for Four Tabs
There are four tabs in this android studio example so we have to create separate fragments for each tab.
Make first fragment with name IntroFragment.
Add below code in IntroFragment.java file
Code for fragment_intro.xml
Now second fragment’s name is Location.
LocationFragment.java
fragment_location.xml
Third fragment is Login Fragment
LoginFragment.java
fragment_login.xml
Product Fragment is the last one.
ProductFragment.java
fragment_product.xml
Step 6. Main Activity
In the last step, you need to add required code in Main Activity’s both files.
In the activity_main.xml, add following code
I have designed four Linear Layouts, which represents the four tabs.
Each Linear layout includes one imageview and one textview.
ImageView represnts the tab icon and Textview represents the tab text.
You can add other UI elements as per your requirement.
After four linear layouts, there is a frame layout in which fragment for each tab will be loaded.
Update Main Activity java file
Finally, time to update MainActivity.java file
Step 7. Explanation of Main Activity
In the main activity, I have defined four linear layouts which are representing four tabs as per below.
Now, I have set onclick listeners for each above linear layout.
It will work when the user clicks on any tab.
Now you might have noticed that two methods are present in each click listener.
Both these methods are described below.
unselectElse
This method will deselect the current selected tab.
For example, user first clicks on Login fragment, so the icon color and text color for login tab is changes to white.
Now user selects or clicks on the product fragment, so the icon and text color for product is changed to white but here, login tab is also white.
If we do not change icon and text color of login tab back to black, there will be two selected tabs which is not ideal condition.
so unselectElse method will make the look and feel of selected tab back to the deselected.
Code for this method
removeAllFragment()
This method will simply empty the fragment backstack.
Whenever new fragment is loaded in the frame layout, it is added into the backstack also.
This method will be helpful to overcome this issue.
The second parameter of this method will decide whether to add newly loaded fragment into the backstack or not.
Checkout it’s implementation
That was all the details about android change tab icon when selected.
One thought on “Android Tablayout Tutorial | Custom Fragments,ViewPager,Swipe”
Keep sharing sir. You always post awesome articles .
Источник


