- Android Material Design Tabs (Tab Layout) with Swipe
- Урок 19. Как создать андроид-приложение с вкладками – TabLayout с ViewPager2 на Kotlin
- Добавление TabLayout в макет разметки экрана
- Реализация вкладок в MainActivity
- Android tabs with views
- Android tabs with views
- Android TabLayout example using ViewPager2 and Fragments with Latest android API AndroidX
Android Material Design Tabs (Tab Layout) with Swipe
Jan 16, 2018 · 7 min read
Tab layout are visible below toolbar with View pager, used to create swipeable views on. Tabs are designed to work with fragments. Use them to swipe fragments in view pager. In this article, we are going to show you how to implement material design tabs in your android app.
After creating new project, open build.gradle of app level and add design support library because Tablayout is a part of Android Design Support Library:
Add Tab layout and View pager in you layout activity_main.xml
app_bar.xml for toolbar
Create tab ad a pter which extends to FragmentStatePagerAdapter. Create two list for fragment list and title list. Create method for passing fragment and title that you want to add.
Create Fragments for view pager. We will add fragments in adapter from activity.
Layout for Tab1Fragment fragment_one.xml
Similarly create more fragment that you want to add, Tab2Fragment, Tab3Fragment and so on.. with their layouts.
Define Tab layout and view pager from layout, define adapter, add your fragments with title, set adapter to view pager and tablayout setup with view pager as viewpager swipe with tablayout.
Run this code and you will find below output:


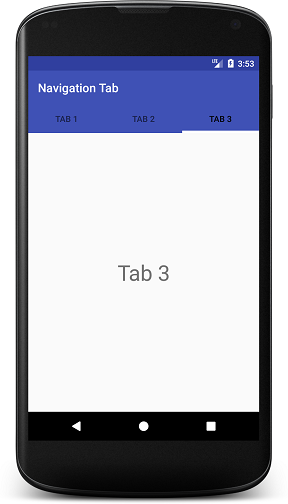
Some options to customize tabs appearance:
app:tabGravity=”fill” for Navigation tab gravity. Other is center for placing navigation tabs from center
app:tabIndicatorColor=”@color/white” for indicator in tabs. Here you can see white indicator.
app:tabIndicatorHeight=”4dp” for indicator height.
app:tabMode=”fixed” for tab mode. Other is scrollable for many more tabs.
app:tabTextColor=”@color/semi_yellow” for unselected tab text color.
app:tabSelectedTextColor=”@color/yellow” for selected tab text color.
If you want to add icons to tab, you have to do is call setIcon() method of tab. Create icon array and assign each one for each tab like this:
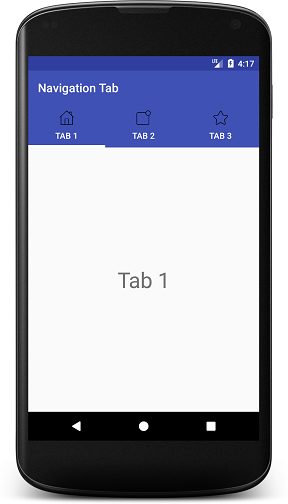
If you want to put only icons to tab, modify getPageTitle() method in adapter class as below:

Here you can see there is no more customization after this. For more custom tabs, you have to create custom tabview for navigation tabs manually.
Custom Navigation Tab Layout:
Create custom layout for tab custom_tab.xml
Add below method in your TabAdapter:
Remove below code from your activity:
Add below code in your activity after calling setAdapter() method:
Now if you want to show big text on selected tab or change text color, then you can do this by creating separate method in your adapter like getSelectedTabView() as below:
Modify your DemoActivity.java code as below:

Now same as TextView, add ImageView to tab layout:
Change to your DemoActivity.java code:
Changes to you Tab Adapter class:
Here it is your output for custom navigation tab.

You can change tab text style using typeface, bold, italic, color, text size etc as well as for tab icon.
Источник
Урок 19. Как создать андроид-приложение с вкладками – TabLayout с ViewPager2 на Kotlin
На прошлом уроке мы познакомились с ViewPager2 и создали андроид-приложение, в котором можно листать экраны свайпом вправо или влево. На этом уроке добавим в верхней части экрана вкладки, которые будут содержать заголовки и индикатор экрана, на котором находится пользователь в данный момент, а также рассмотрим некоторые их свойства и способы оформления.
В этом уроке будем использовать проект из прошлого урока, можно скачать его на странице урока 18 по ссылке вверху.
Добавление TabLayout в макет разметки экрана
Чтобы добавить вкладки на экран, нужно открыть макет разметки и добавить компонент com.google.android.material.tabs.TabLayout в верхней части экрана:
Для корректного размещения нужно изменить компонент ViewPager2 – высоту укажем 0dp. Таким образом, высоту компонента будет регулировать корневой ConstraintLayout по заданным ограничениям. А вместо ограничения app:layout_constraintTop_toTopOf=»parent» поставим app:layout_constraintTop_toBottomOf=»@+id/tab_layout» – чтобы верх компонента ViewPager2 был ограничен не верхней границей родительского компонента, а нижней границей компонента TabLayout.
Рассмотрим подробнее компонент com.google.android.material.tabs.TabLayout. Свойство app:tabMode=»scrollable» обеспечивает размещение в видимой части экрана только нескольких вкладок, остальные будут доступны в процессе прокрутки. Если мы не укажем это свойство, то в видимой части экрана будут одновременно отображаться все вкладки, и при большом их количестве визуальное восприятие будет затруднено.
Свойство app:tabIndicatorColor=»@color/teal_200″ указывает цвет, а app:tabIndicatorHeight=»4dp» – толщину индикатора вкладки.
Далее идут свойства ширины – указываем по родителю – и высоты – указываем по содержимому.
Последние три свойства – ограничения верхней части и боковых сторон компонента по родителю.
Реализация вкладок в MainActivity
Открываем класс MainActivity и пишем реализацию вкладок:
Источник
Android tabs with views
Android Tabs Example
Example app showing how to implement tabs in Android.

Table of Contents
- Import project into Android Studio
- Switch to the desired Git branch
- Hit Run
Each branch contains a fully working configuration:
- 01_swipe_views_and_actionbar: ActionBar as app bar, ViewPager (swipe views), no tabs
- 02_swipe_views_and_pagertitlestrip_and_actionbar: ActionBar as app bar, ViewPager (swipe views) with PagerTitleStrip (titles of current, previous, and next page), no tabs
- 03_actionbar_tabs_DEPRECATED: ActionBar as app bar, ViewPager (swipe views), ActionBar tabs (combined with ViewPager)
- 04_swipe_views_and_toolbar: Toolbar as app bar, ViewPager (swipe views), no tabs
- 05_swipe_views_and_pagertitlestrip_and_toolbar: Toolbar as app bar, ViewPager (swipe views) with PagerTitleStrip (titles of current, previous, and next page), no tabs
- 06_tablayout_tabs_fixed_and_toolbar: Toolbar as app bar, ViewPager (swipe views), fixed TabLayout tabs (combined with ViewPager)
- 07_tablayout_tabs_scrollable_and_toolbar: Toolbar as app bar, ViewPager (swipe views), scrollable TabLayout tabs (combined with ViewPager)
Typically, an implementation of tabs in Android consists of:
These are two independent navigation patterns, but they can be combined with each other.
In general: swipe views can (but don’t need to) be combined with tabs, and tabs can (but don’t need to) be combined with swipe views. However, tabs benefit tremendously from being combined with swipe views, as explained below.
Swipe views allow to flip through a set of «pages» by swiping horizontally on the screen.
Combined with tabs, this allows the user to switch to the next or previous tab by just swiping anywhere on the screen, rather than having to click on the tab itself.
- Swipe views are implemented by the ViewPager ViewGroup (declared in the activity’s layout XML)
- A page is typically implemented as a Fragment
- A PagerAdapter supplies the ViewPager with the pages (fragments) to display. In the case of using fragments as pages, this PagerAdapter is a FragmentPagerAdapter or FragmentStatePagerAdapter
The swipe views architecture is illustrated below:

References:
There are currently two ways to implement a tabs UI element in Android:
- TabLayout tabs using TabLayout from the Design Support Library
- ActionBar tabs using the ActionBar’s NAVIGATION_MODE_TABS feature (DEPRECATED)
This is the preferred approach as it’s easier to implement than ActionBar tabs and does not rely on an ActionBar.
TabLayout tabs are especially easy to implement if they are used in combination with a formerly implemented ViewPager (see Swipe Views), because then the tabs can be automatically populated by the ViewPager (i.e. no need to create and add the individual tabs manually). This is shown in the following:
- In the activity’s layout XML, add a TabLayout element above the ViewPager element (and below the Toolbar element, if a Toolbar is used)
- In the activity’s onCreate method, call setupWithViewPager(ViewPager) on the TabLayout to populate and integrate the TabLayout with the ViewPager (requires that getPageTitle of the PagerAdapter is overriden)
Note: to use TabLayout, the Design Support Library must be added to the project. In the module build.gradle file, do:
References:
Note that this approach was DEPRECATED in API level 21.
This requires the usage of the old-fashioned ActionBar as the app bar (rather than the «modern» Toolbar).
To implement ActionBar tabs, the following steps are needed in the activity’s onCreate method:
If the tabs are used in combination with swipe views (see above), the tabs must be bidirectionally integrated with the ViewPager:
This ensures that when the user clicks on a tab, the ViewPager switches to the corresponding page (1), and vice versa, when the user swipes to another page, the corresponding tab is selected in the ActionBar (2).
Источник
Android tabs with views
Android TabLayout with ViewPager
We will introduce Google’s new TabLayout included in the support design library release for Android «M».
Add Support Library
To implement sliding tabs, make sure to add the Support Library setup instructions first. (make sure these versions have been updated.)
Sliding Tabs Layout
Add android.support.design.widget.TabLayout that will handle the different tab options, and android.support.v4.view.ViewPager component will handle the page between the various fragments we will create.
We define the XML layout( res/layout/fragment_content.xml ) for the fragment which will be displayed on screen when a particular tab is selected.
Then ContentFragment.java define the logic for the fragment of tab content.
Following, we implement the adapter for your ViewPager which controls the order of the tabs, the titles and their associated content. The most important methods to implement here are getPageTitle(int position) which is used to get the title for each tab and getItem(int position) which determines the fragment for each tab.
Setup Sliding Tabs
Finally, we need to attach our ViewPager to the PagerAdapter and then configure the sliding tabs with a two step process:
- In the onCreate() method of your activity, find the ViewPager and connect the adapter.
- Set the ViewPager on the TabLayout to connect the pager with the tabs.
Heres the output:

Customize Tab Indicator Color
Add style to styles.xml
Then override this style for your TabLayout:
Add Icons to TabLayout
Add icon resource to PagerAdapter and getPageTitle(position) method as shown in the code snippet below.
By default, the tab created by TabLayout sets the textAllCaps property to be true, which prevents ImageSpans from being rendered. You can override this behavior by changing the tabTextAppearance property.
Tabs with images:

Add Custom View to TabLayout
We will show how to custom XML layout for each tab. First, we create a template Tab(custom_tab_item.xml).
To achieve this, iterate over all the TabLayout.Tab s after attaching the sliding tabs to the pager.
Next, we add the getTabView(position) method to the PagerAdapter class.
Finally, we can setup any custom tab content for each page in the adapter. 
Источник
Android TabLayout example using ViewPager2 and Fragments with Latest android API AndroidX
In this tutorial we are going to create 3 Tabs .Every tab have its own Fragment to control over screen. Also user can swipe between 3 tabs.

we are using AndroidX support Library , ViewPager2 and 3 different fragment & 3 different xml for layouts. And TabLayout for Tabs.
Layout Demonstration :
- Checkout the following pic which explains the complete overview of layout architecture. Basically we are using ViewPager as main layout and for individual pager views we use Fragments. The tabs are part of Action Bar.

STEP 1: CREATING PROJECT
- Let’s start with creating new project in android studio with package name com.example.manualSliding and class name MainActivity.java and its layout name is activity_main.xml.
STEP 2: ADDING DEPENDENCIES
- open file Gradle Scripts/build.gradle(Module: app)
- under dependencies add this:
- under compileOptions<> add this:
STEP 3: EDIT app/res/values/colors.xml
STEP 4: EDIT app/res/values/styles.xml : we using this theme because TabLayout component works in this theme.
STEP 6: CREATING LAYOUT FOR EACH FRAGMENT :
- create new xml layout file under app/res/layout/first_frag.xml and add the below code:
- create new xml layout file under app/res/layout/second_frag.xml and add the below code:
- create new xml layout file under app/res/layout/third_frag.xml and add the below code:
STEP 7: Create FRAGMENT CLASS for each view layout:
Источник


