- Команды для Android Terminal Emulator
- Использование терминала на Android
- Команды терминала
- Команды Android Terminal Emulator на андроид
- 10 basic Android terminal commands you should know
- 1. The adb devices command
- 2. The adb push command
- 3. The adb pull command
- 4. The adb reboot command
- 5. The adb reboot-bootloader and adb reboot recovery commands
- 6. The fastboot devices command
- 7. The fastboot unlock command
- 8. The adb install command
- 9. The adb sideload command
- 10. The adb shell command
- Cyber Monday Canada: The best discounts from Amazon, Walmart & more
- Cyber Monday deals for the best Android phones are here
- Cyber Monday: Be ready, because these fitness tracker deals are going fast
- These are the absolute best Galaxy Tab S7 Plus cases you can buy
Команды для Android Terminal Emulator
Операционная система Android хоть и создана изначально на основе Linux, по умолчанию не имеет многих классических элементов данной платформы вроде Терминала. При этом по необходимости на телефоне все же можно воспользоваться подобным ПО, включая связанные команды, подготовив и установив специальный эмулятор. В рамках нашей сегодняшней статьи мы постараемся достаточно подробно рассмотреть все связанные аспекты и, конечно же, основные команды Терминала на Андроид.
Использование терминала на Android
Как было сказано, по умолчанию на смартфоне отсутствует Терминал, поэтому для применения подходящих команд придется установить Android Terminal Emulator по представленной ниже ссылке. В качестве альтернативы можно также воспользоваться утилитой ADB, однако подобный подход потребует обязательного подключения к ПК и может быть не удобен для использования на постоянной основе.
- Процедура установки приложения не отличается от любого другого софта для Android из официального магазина приложений, равно как и запуск, осуществляемый с помощью иконки Терминала на главном экране. Так или иначе после запуска появится окно с темным фоном и мигающим курсором.

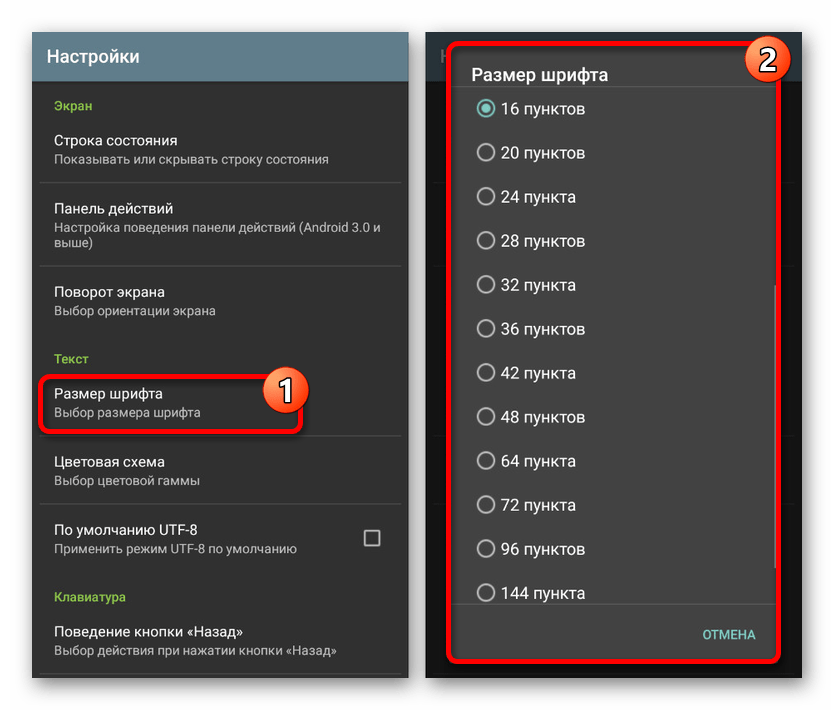
Так как по умолчанию Терминал имеет малый размер шрифта, неудобный для чтения, лучше всего сразу воспользоваться внутренними «Настройками», выбрав соответствующих пункт в меню. Особенно заметны недостатки на экране с большим количеством точек (DPI).
Здесь можно поменять «Цветовую схему», «Размер шрифта», параметры клавиатуры и многое другое. В результате шрифт должен быть легко читаемым.
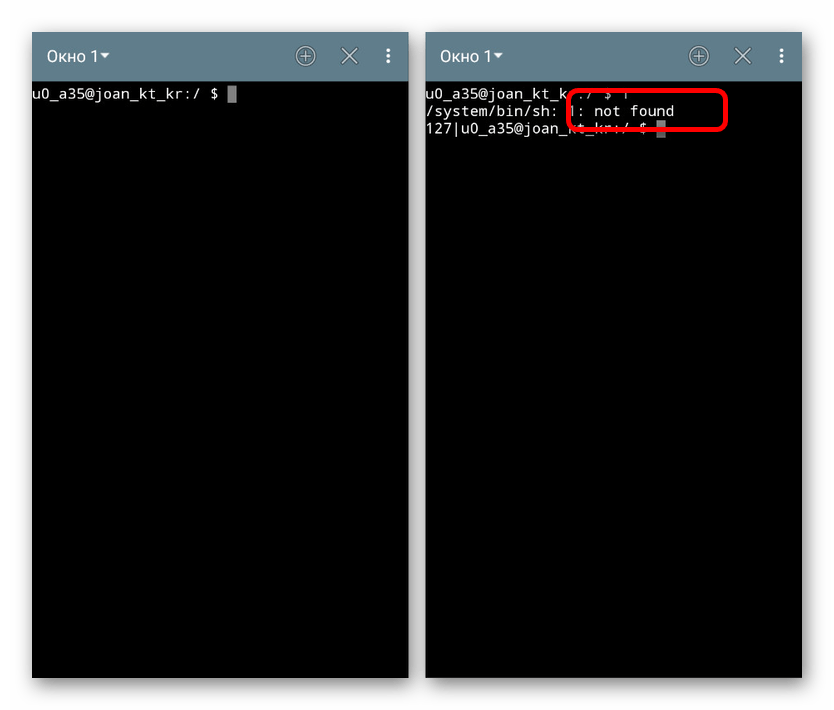
Во время работы с Терминалом из-за особенностей операционной системы многие команды будут выполняться с задержкой, ввиду чего стоит набраться терпения. Если же в процессе запроса допустить ошибку, выполнение будет сразу же отклонено с уведомлением «not found».
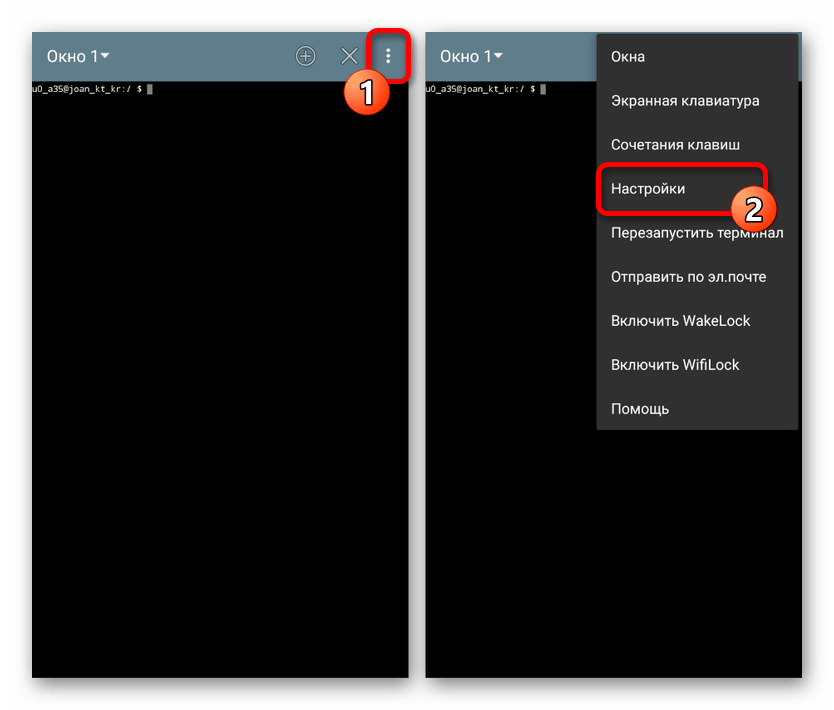
С помощью значка «+» на верхней панели можно создавать дополнительные окна и переключаться между ними через выпадающий список. Для выхода используйте рядом расположенную пиктограмму с крестиком.

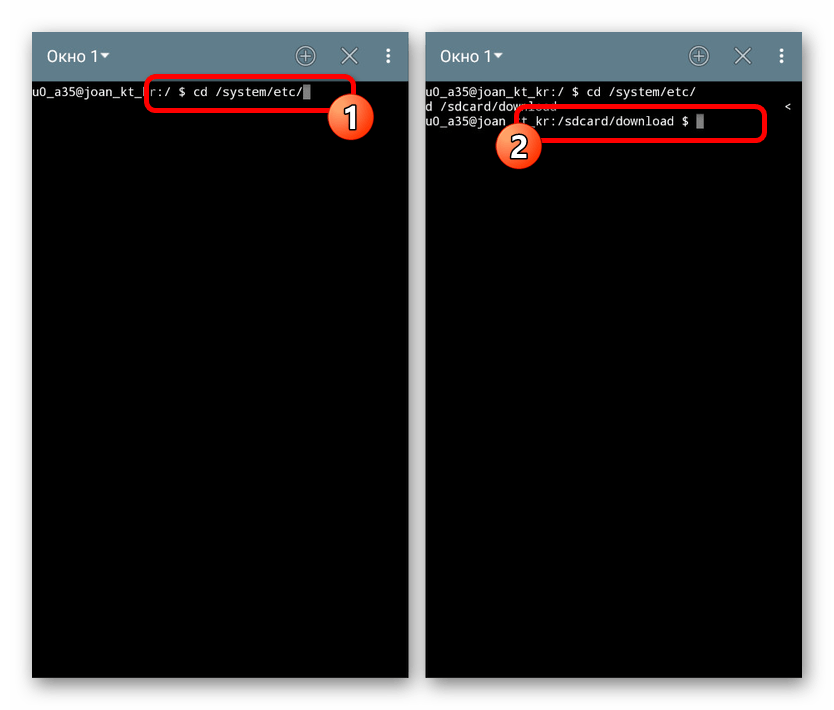
При вводе команд, требующих перехода в конкретную папку или открытия файлов, необходимо указывать полный путь вроде /system/etc/ . К тому же использовать нужно пути без пробелов и только на английском языке – другие раскладки Терминалом не поддерживаются.
Надеемся, мы развернуто описали основные особенности Терминала, так как в целом приложение имеет массу аспектов, заслуживающих внимания. При возникновении каких-то вопросов обязательно обращайтесь в комментариях, и мы постараемся помочь.
Команды терминала
Разобравшись с подготовкой, можно приступать к рассмотрению основных команд Терминала. В то же время стоит учитывать, подавляющее большинство вариантов полностью соответствует Linux и было нами рассмотрено в соответствующей статье на сайте. Кроме того, существует отдельная команда для просмотра всех доступных запросов.
Системные команды
- date – выводит на экран текущую дату, установленную в настройках устройства;
- -help – одна из основополагающих команд, отображающая свойства конкретного запроса. Работает строго через пробел после указания нужной команды;
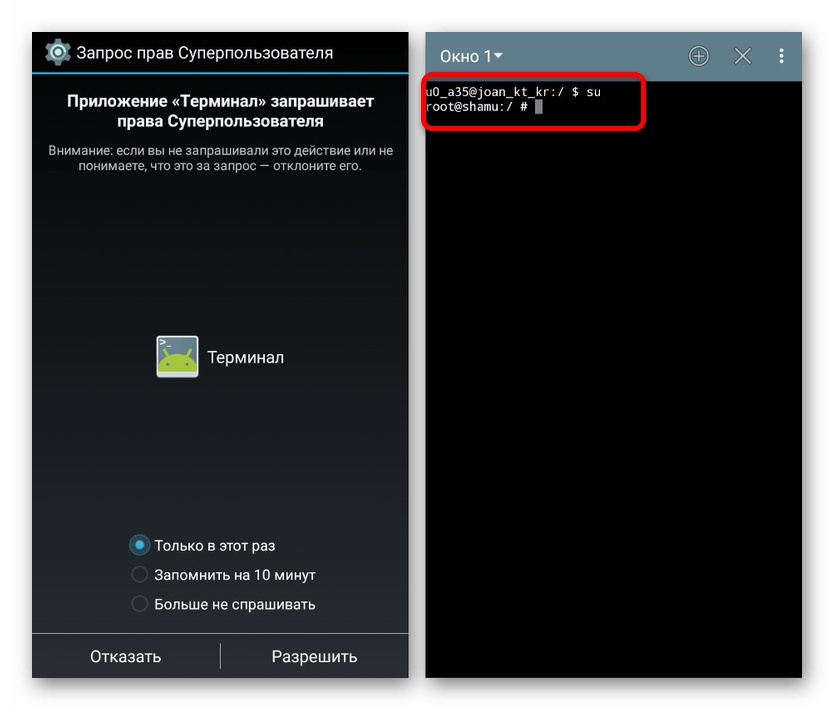
- su – по умолчанию недоступная команда, позволяющая получить рут-доступ. Можно использовать для проверки наличия и работоспособности рут-прав на телефоне;
Активные процессы
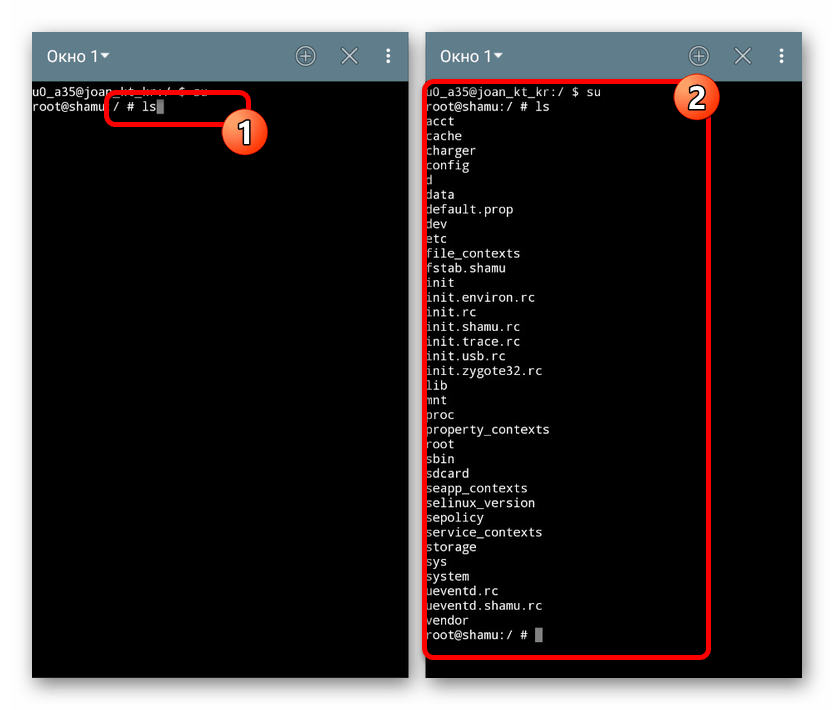
- ps – отображает все активные процессы в системе;

Файловая система
- cd – команда для перехода в определенную папку из Терминала. С помощью данного запроса можно общаться к файлам в директории без указания полного пути;
- cat – используется для чтения файла, например, чтобы открыть какой-либо документ средством по умолчанию. В целом все способы применения команды заслуживают отдельной статьи;
- cp – команда для создания дубликата любого выбранного файла;
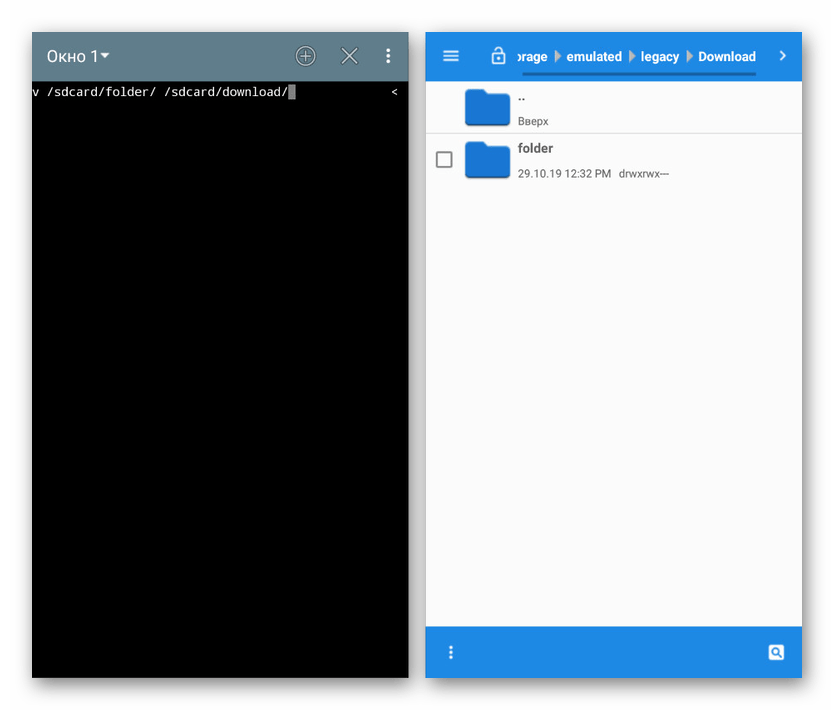
- mv – позволяет переместить выбранный файл или каталог по новому пути;
Работа с приложениями
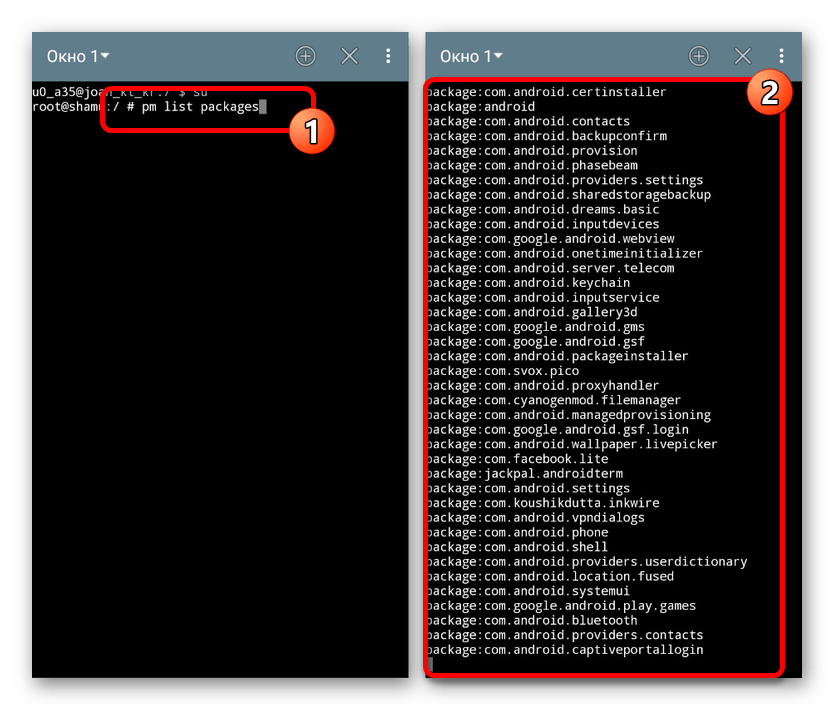
- pm list packages – показывает список установленных пакетов приложений;
На этом мы заканчиваем рассмотрение основных команд Терминала для Android, так как перечисление всех возможных запросов заняло бы куда больше времени, в том числе и во время изучения списка. Вы всегда можете найти описание нужных команд в сети или воспользоваться ранее указанной статьей по Терминалу Линукса.
Помимо этой статьи, на сайте еще 12473 инструкций.
Добавьте сайт Lumpics.ru в закладки (CTRL+D) и мы точно еще пригодимся вам.
Отблагодарите автора, поделитесь статьей в социальных сетях.
Источник
Команды Android Terminal Emulator на андроид
Какие интересные команды есть для эмулятора терминала?
Эмулятор терминала — приложение для android через которое можно использовать команды для управления системой и внесения в нее изменений. Этот механизм основан на том, что система андроид включает в себя ядро linux.
На компьютере с помощью командной строки и утилит выполняется настройка системы и подключение дополнительных модулей. Андроид унаследовал много похожих возможностей, которые можно применить для различных целей.
То есть имеются бинарные файлы, взаимодействующие непосредственно с «железом». Каждому такому файлу соответствует текстовая команда, которая запускается через эмулятор терминала.
Перед тем как начать работу с командной строкой надо отметить, что наибольший простор в модификациях будет после рутирования андроид устройства.
Кроме этого, следует поставить busybox — бинарный файл, который позволит использовать больше команд, так как встроенных часто недостаточно. Чтобы его установить надо:
- скачать из Play Market BusyBox;
- открыть и предоставить ему права суперпользователя;
- обязательно подождать пока приложения просканирует устройство;
- нажать кнопку «install busybox»;
- определить место «/system/xbin»;
- нажать «ок».
Дальше ждем пока закончится установка и закрываем. Приложение можно удалить, но лучше оставить, так как через него busybox обновляется.
После этого можно приступить к установке терминала на андроид и работе с ним. Для этого:
- из Play Market устанавливаем приложение Terminal Emulator for Android;
- открываем его, появится приглашение для ввода текста «u0_a106@android:/ $» так и должно быть;

- вводим команду, например, ls и нажимаем «enter»;
- появится результат работы, в нашем случае выведется список файлов в корневой директории.
Другие команды могут выполняться долго, при этом высветится белый курсор. Если при написании была допущена ошибка, то появится надпись «/system/bin/sh: kv: not found» и приглашение для ввода. Это сообщение говорит о том, что команда kv не найдена среди имеющихся.
Закрывается терминал нажатием на крестик в верхнем правом углу, дальше появится окно в котором нажимаем «ok».
Команд очень много, чтобы посмотреть их всех нужно написать «busybox» без кавычек. В принципе, описание каждой можно посмотреть в самом терминале, для этого надо ввести команду, о которой хотим узнать и «—help». Появится информация, но на английском. При работе с терминалом надо учесть некоторые особенности:
- путь к файлам и папкам надо писать полностью после команд, например, rm /storage/sdcard0/download/file;
не должно быть ошибок и лишних пробелов; - команда запускается кнопкой «enter», то есть ввели и нажали.
Вот самые популярные команды терминала android:
- cat — чтение содержимого, cp — копирование, rm — удаление файла, rmdir — удаление папки, touch — создание файла, mkdir — создание папки, — после этих команд вводим путь к нужному объекту или месту;
- mv — перемещение, cp — копирование, — сначала пишем путь к файлу или папке потом к новому месту;
- ls — выводит содержимое текущей папки;
- cd — осуществляет переход к нужной директории;
- pwd — показывает полный путь к используемой папке;
- date — выводит настоящую дату;
- df — показывает размер объектов в указанной папке;
- du — печатает объем файла;
pm install — выполняет установку программы из apk файла; - pm list packages — показывает пакеты-файлы установленных приложений;
- service list — выводит список работающих процессов;
- pm uninstall — удаляет приложение, при этом надо указывать путь /data/app/название файла, который можно узнать командой pm list packages;
- ln — создает символьную ссылку на файл, синтаксис такой же, как у cp.
Выполнять команды эмулятора терминала, о которых расскажу дальше, надо очень осторожно, так как их применяют для модификации системы и при неправильном использовании можно серьезно навредить устройству:
- su — предоставляет полный доступ к системе на рутированных устройствах, после ее ввода строка приглашения будет выглядеть так «root@android:/ #»;
- chown и chgrp, первая для смены владельца, вторая — группы, которые указывают после команды, а затем пишут название файла;
- chmod — утилита по смене прав файла, синтаксис как у предыдущей — сначала права, потом файл;
- insmod и rmmod с помощью первой подключают модули к ядру, второй — удаляют, эти команды лучше использовать только продвинутым пользователям;
- kill — останавливает процесс по его идентификатору, который можно узнать с помощь утилиты ps — она выводит информацию обо всех активностях;
- mount, umount предназначены для монтирования и размонтирования файловых систем и разделов, использовать только после детального изучения системы.
Особые команды, которые выполняются эмулятором терминала Android:
- reboot — используется после команды su для перезагрузки устройства;
- exit — закрывает терминал, также через нее можно выйти из администратора.
То есть мы использовали su для утилит требующих рут права и дальше, чтобы случайно что-то не поменять, вводим exit, приглашение при этом снова станет таким «u0_a106@android:/ $».
Есть еще одна необычная утилита dd — она по байтам копирует один файл или раздел в другой. Синтаксис у нее такой:
dd if=/dev/block/platform/mmcblk0p1 of=/storage/external_SD/image
if= устройство, с которого копируем of= файл куда копируем. Эта команда создаст образ раздела mmcblk0p1.
У нее есть еще 2 параметра — count= фрагмент, которым будет записываться новый файл, bs= объем фрагменты в байтах. Например, команда dd if=/storage/sdcard0/file1 of=/storage/external_SD/file2 bs=500 count=7 скопирует из file1 в file2 7 кусков по 500 байт.
Источник
10 basic Android terminal commands you should know
 Source: Jerry Hildenbrand / Android Central
For a lot of us, the fact that we can plug our Android phone into a computer and interact with it is a big plus. Besides the times when we’ve broken something and need to fix it, there are plenty of reasons why an advanced Android user would want to talk to their device. To do that, you need to have a few tools and know a few commands. That’s what we’re going to talk about today.
Granted, this won’t be the end-all-be-all discussion of adb commands, but there are 10 basic commands everyone should know if they plan to get down and dirty with the command line.
You’ll need some tools and getting them is easy. Head on over to the Android developer’s site. You can either install the full Android Studio package if you want extra debugging tools or you can scroll down to the bottom of the page and download just the command line tools. Unless you’re developing or debugging something on or for your phone, you’ll want just the command line tools.
If you’re using Windows, there’s one more step. Visit the manufacturer’s page for your device and install the adb and fastboot drivers for Windows. You’ll need this so that your computer can talk to your Android device. If you hit a snag (Windows can be fickle) visit the forums and somebody is bound to be able to help you through it.
Now that we’re all on the same page, enable USB debugging on your device (see your devices manual if you need help finding it) and plug your phone into your computer.
1. The adb devices command
 Source: Jerry Hildenbrand / Android Central
The adb devices command is the most important one of the bunch, since it’s used to make sure your computer and Android device are communicating. That’s why we’re covering it first.
If you’re a pro at the operating system on your computer, you’ll want to add the directory with the Android tools to your path. If you’re not, no worries. Just start up your terminal or command console and point it where you put the extracted tools you downloaded above.
Once you’re sure that you are in the right folder, type adb devices at the command prompt. If you get a serial number, you’re good to go! If you don’t, make sure you’re in the right folder and that you have the device driver installed correctly if you’re using Windows. And be sure you have USB debugging turned on!
Now that we have everything set up, let’s look at a few more commands.
2. The adb push command
Source: Jerry Hildenbrand / Android Central
If you want to move a file onto your Android device programmatically, you want to use the adb push command. You’ll need to know a few parameters, namely the full path of the file you’re pushing, and the full path to where you want to put it. In the picture above I’m pushing a song from my Music folder on my desktop to the music folder on my phone.
Notice the slashes in the file path and the quotes around the path on my computer in the command. Windows uses \ as a directory switch in a file path and Unix uses /. Because the file name has spaces and special characters (I renamed it this way on purpose!) you need to encase the path in quotes.
3. The adb pull command
Source: Jerry Hildenbrand / Android Central
If adb push sends files to your Android device, it stands to reason the adb pull command would pull them out.
That’s exactly what it does, and it works the same way as the adb push command did. You need to know both the path of the file you want to pull off, as well as the path you want it placed into. You can leave the destination path blank and it will drop the file into your tools folder to make things easy.
In this example, I did it the hard way and entered the full path(s) so you can see what it looks like. Remember your forward slash versus backward slash rules here and you’ll have no problems.
4. The adb reboot command
Source: Jerry Hildenbrand / Android Central
This is exactly what you think it is — a way to reboot your device from the command line. Running it is simple: just type adb reboot and enter.
Before you say «I can just push the button!» you have to understand that these commands can be scripted, and your device can reboot in the middle of a script if you need it to. And that’s a good segue to number five.
5. The adb reboot-bootloader and adb reboot recovery commands
 Source: Jerry Hildenbrand / Android Central
Not only can you reboot your device, but you can also specify that it reboots to the bootloader. This is awfully handy, as sometimes those button combos are touchy, and if you have a lot of devices it’s tough to remember them all. Some devices don’t even have a way to boot to the bootloader without this command. And once again, being able to use this command in a script is priceless.
Doing it is easy, just type adb reboot-bootloader and hit the enter key.
Most devices can also boot into the recovery directly with the adb reboot recovery (note there is no hyphen in this one) and some can’t. It won’t hurt anything to try.
6. The fastboot devices command
Source: Jerry Hildenbrand / Android Central
When you’re working inside the bootloader, adb no longer works. You’re not yet booted into Android, and the debugging tools aren’t active to communicate with. You’ll need to use the fastboot command in its place.
Fastboot is probably the most powerful Android debug tool available, and many devices don’t have it enabled. If yours does, you need to be sure things are communicating. That’s where the fastboot devices command comes into play. At the prompt, just type in fastboot devices and you should see a serial number, just like the adb devices command we looked at earlier.
If things aren’t working and you’re using Windows, you likely have a driver issue and you’ll need to source it from the manufacturer.
7. The fastboot unlock command
Source: Jerry Hildenbrand / Android Central
The fastboot unlock process will erase everything on your phone and reset it.
The holy grail of Android commands, fastboot flashing unlock does one thing, and one thing only — unlocks your bootloader. It’s not enabled on every phone, even phones that support fastboot, but we’re including it because even if you don’t need it, it’s an important part of Android’s openness. Google doesn’t care what we do with phones as long as it doesn’t go against rules for Google Play access, and that includes this easy way to crack them open, even if the company who made your phone doesn’t support it.
Using it is easy enough. Once you’ve used fastboot devices to make sure everything is communicating, just type fastboot flashing unlock at the prompt and hit enter. Look at your device, read carefully, and choose wisely.
8. The adb install command
Source: Jerry Hildenbrand / Android Central
While adb push can copy files to our Android devices, adb install can actually install apps. You’ll need to supply the path where you have the .apk file saved, then run it like this: adb install TheAppName.apk.
If you’re updating an app, you use the -r switch: adb install -r TheAppName.apk. There is also a -s switch which tries to install on the SD card as well as other commands you probably won’t ever need.
And finally, you can uninstall apps by their package name with adb uninstall package-name-here. Uninstall has a switch, too. The -k switch will uninstall the app but leave all the app data and cache in place.
9. The adb sideload command
Source: Jerry Hildenbrand / Android Central
An OTA (over-the-air) update is downloaded by your phone as a .zip file. You can also download that zip file manually and install it without having to wait for your phone to have the update pushed to it. The end result is the same as if you had waited, but we hate waiting.
All you have to do is download the update to your computer. Plug your phone into the computer. Then, reboot into recovery on your phone and using the up and down volume buttons choose Apply update from ADB. Then hop into your favorite terminal/command line and type adb sideload Full-Path-to-the-file.zip and hit enter. Let things run their course, and you’re golden.
10. The adb shell command
Source: Jerry Hildenbrand / Android Central
The adb shell command confuses a lot of folks. There are two ways to use it, one where you send a command to the device to run in its own command-line shell, and one where you actually enter the device’s command shell from your terminal.
In the image above, I’m inside the device shell. Getting there is easy enough, just type adb shell and enter. Once inside, you can interact with the actual running operating system on your phone. I’ll warn you that unless you’re familiar with an ash or bash shell, you need to be careful here because things can turn south quickly if you’re not. Ash and bash are command shells. They allow you to interact with your phone through typed commands and a lot of folks use one or both on their Linux or Mac computers even if they didn’t know it. ** It is not DOS so don’t try any DOS commands.**
The other method of using the adb shell command is using it to tell your phone to run a shell command without going into the shell. Using it is easy; type adb shell An example would be changing permissions on a file like so: adb shell chmod666 /sdcard/somefile.
Be very careful running direct commands using these methods.
And there you have it. There are plenty more commands to learn if you ‘re the type who likes to learn commands, but these 10 are the ones you really need to know if you want to start digging around at the command prompt.
![]()
Cyber Monday Canada: The best discounts from Amazon, Walmart & more
The time to start Cyber Monday shopping is now! We’re gathering all the best Cyber Monday deals from retailers across Canada right here, from Amazon and Best Buy to Walmart and more.
![]()
Cyber Monday deals for the best Android phones are here
If you’re hoping to find a new phone at a discount, Cyber Monday is the perfect opportunity to shop for one.
![]()
Cyber Monday: Be ready, because these fitness tracker deals are going fast
Whether you are looking to save some cash on a new fitness tracker for yourself, someone else, or just a nice stocking stuffer, Cyber Monday is a great time to pick one up — and we’ve got the deals for you to do just that.
![]()
These are the absolute best Galaxy Tab S7 Plus cases you can buy
One of Samsung’s most powerful tablet to date is big, bold, and absolutely in need of protection against drops, dents, and dings. A good case is functional as well as durable, and these cases are the absolute best.
Источник


