- Testing in-app purchases on Android
- Overview
- Testing, according to the documentation
- Static responses
- Test purchases
- Testing, according to real life
- Bonus tip: faster testing for test subscriptions
- Update! 17/01/2018
- Conclusion
- Помогите сделать следующую версию Android лучше
- О Программе бета-тестирования
- Что нового
- Уже регистрировались?
- Как стать участником программы?
- Перед регистрацией
- Ваши устройства, отвечающие условиям Программы
- После регистрации
- Обновления телефона
- Выход из Программы бета-тестирования
- Альфа и бета тестирование android приложений
Testing in-app purchases on Android

An addendum to the official documentation
Overview
Monetization is one of the most important aspects of distributing your product to the rest of the world. It can make or break a small freelance developer or an established startup.
Android, being so widespread, provides ways for users to purchase products from within your app: this is referred to as In-app Billing. Through this set of APIs, developers can offer two types of products:
- Managed in-app products
As the name suggests, these products are managed by the developer, and they branch into consumable and non-consumable. A consumable product is usually temporary and, once consumed, can be bought again, whereas a non-consumable product is a one-off benefit that the user will continue having in your app. - Subscriptions
These products come with a validity period (days, months, weeks, years) and are automatically renewed at the end of each billing cycle. When a subscription is not renewed, the product is no longer active for the user.
The official documentation is very helpful when it comes to the first steps for adding in-app products to your application. In particular, the “Selling In-App Products” training is well structured and walks you through each required step:
- Adding the Play Billing Library to your app (also check out this article by Joe Birch)
- Configuring the products in the Google Play Console
- Testing the in-app products in your app
Let’s focus on the third point.
Testing, according to the documentation
According to the documentation for testing, we have two ways of testing purchases:
- Static responses from Google Play
By using a restricted set of product IDs, you can trigger static responses from Google Play, so you can test that your app correctly handles all the possible states. You should use this when integrating the Play Billing Library into our app, or for instrumentation testing. - Test purchases
A Google account whitelisted as license-test in the Play Console will be able to make purchases without being actually charged. You can use this when the app goes to QA, or for general testing.
Static responses
Using static responses sounds easy enough, right? You just use one on the following product IDs during a purchase operation:
- android.test.purchased
- android.test.canceled
- android.test.refunded
- android.test.item_unavailable
and the Play Store will reply accordingly. The code looks roughly like this:
However, if you are testing subscriptions, you’re out of luck:
Note: If you’re testing subscription purchases, you must use the product ID of an actual subscription, not a reserved product ID. [Reference]
This means that we cannot rely on static responses to test subscriptions; instead, we need to resort to test purchases.
Test purchases
By using the so-called In-app Billing Sandbox, we can enable access to test purchases. These are the closest thing we have to actual purchases, with a few notable exceptions:
- You are not being charged any amount for the product you buy
- If you’re buying a subscription, the billing period recurs on a daily basis, regardless of the duration configured in the Play Console
- You have manual control over the response for each purchase
The last point is particularly interesting, because we have two ways of customizing the test purchase behavior.
The first method allows for fine control over the licensing behavior for all the testers: for example, by leaving it to RESPOND_NORMALLY we have a behavior similar to the real one.
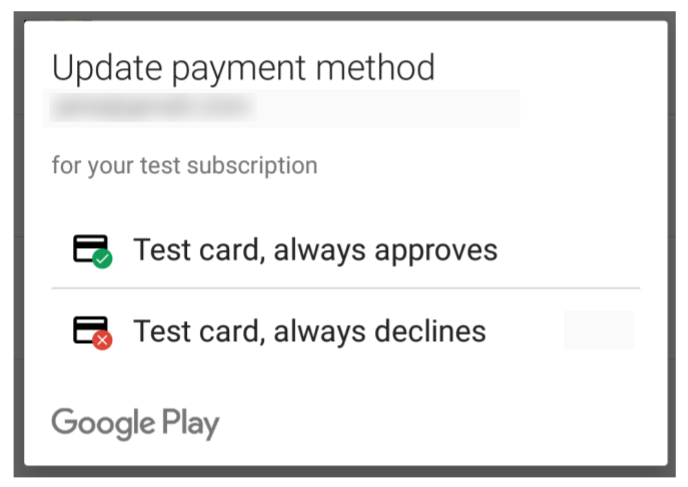
The second method, on the other hand, allows for coarse control over the response of the fake credit card: you can decide whether the card will always approve the purchase or always decline it. Intuitively enough, this second method can be customized by each tester.
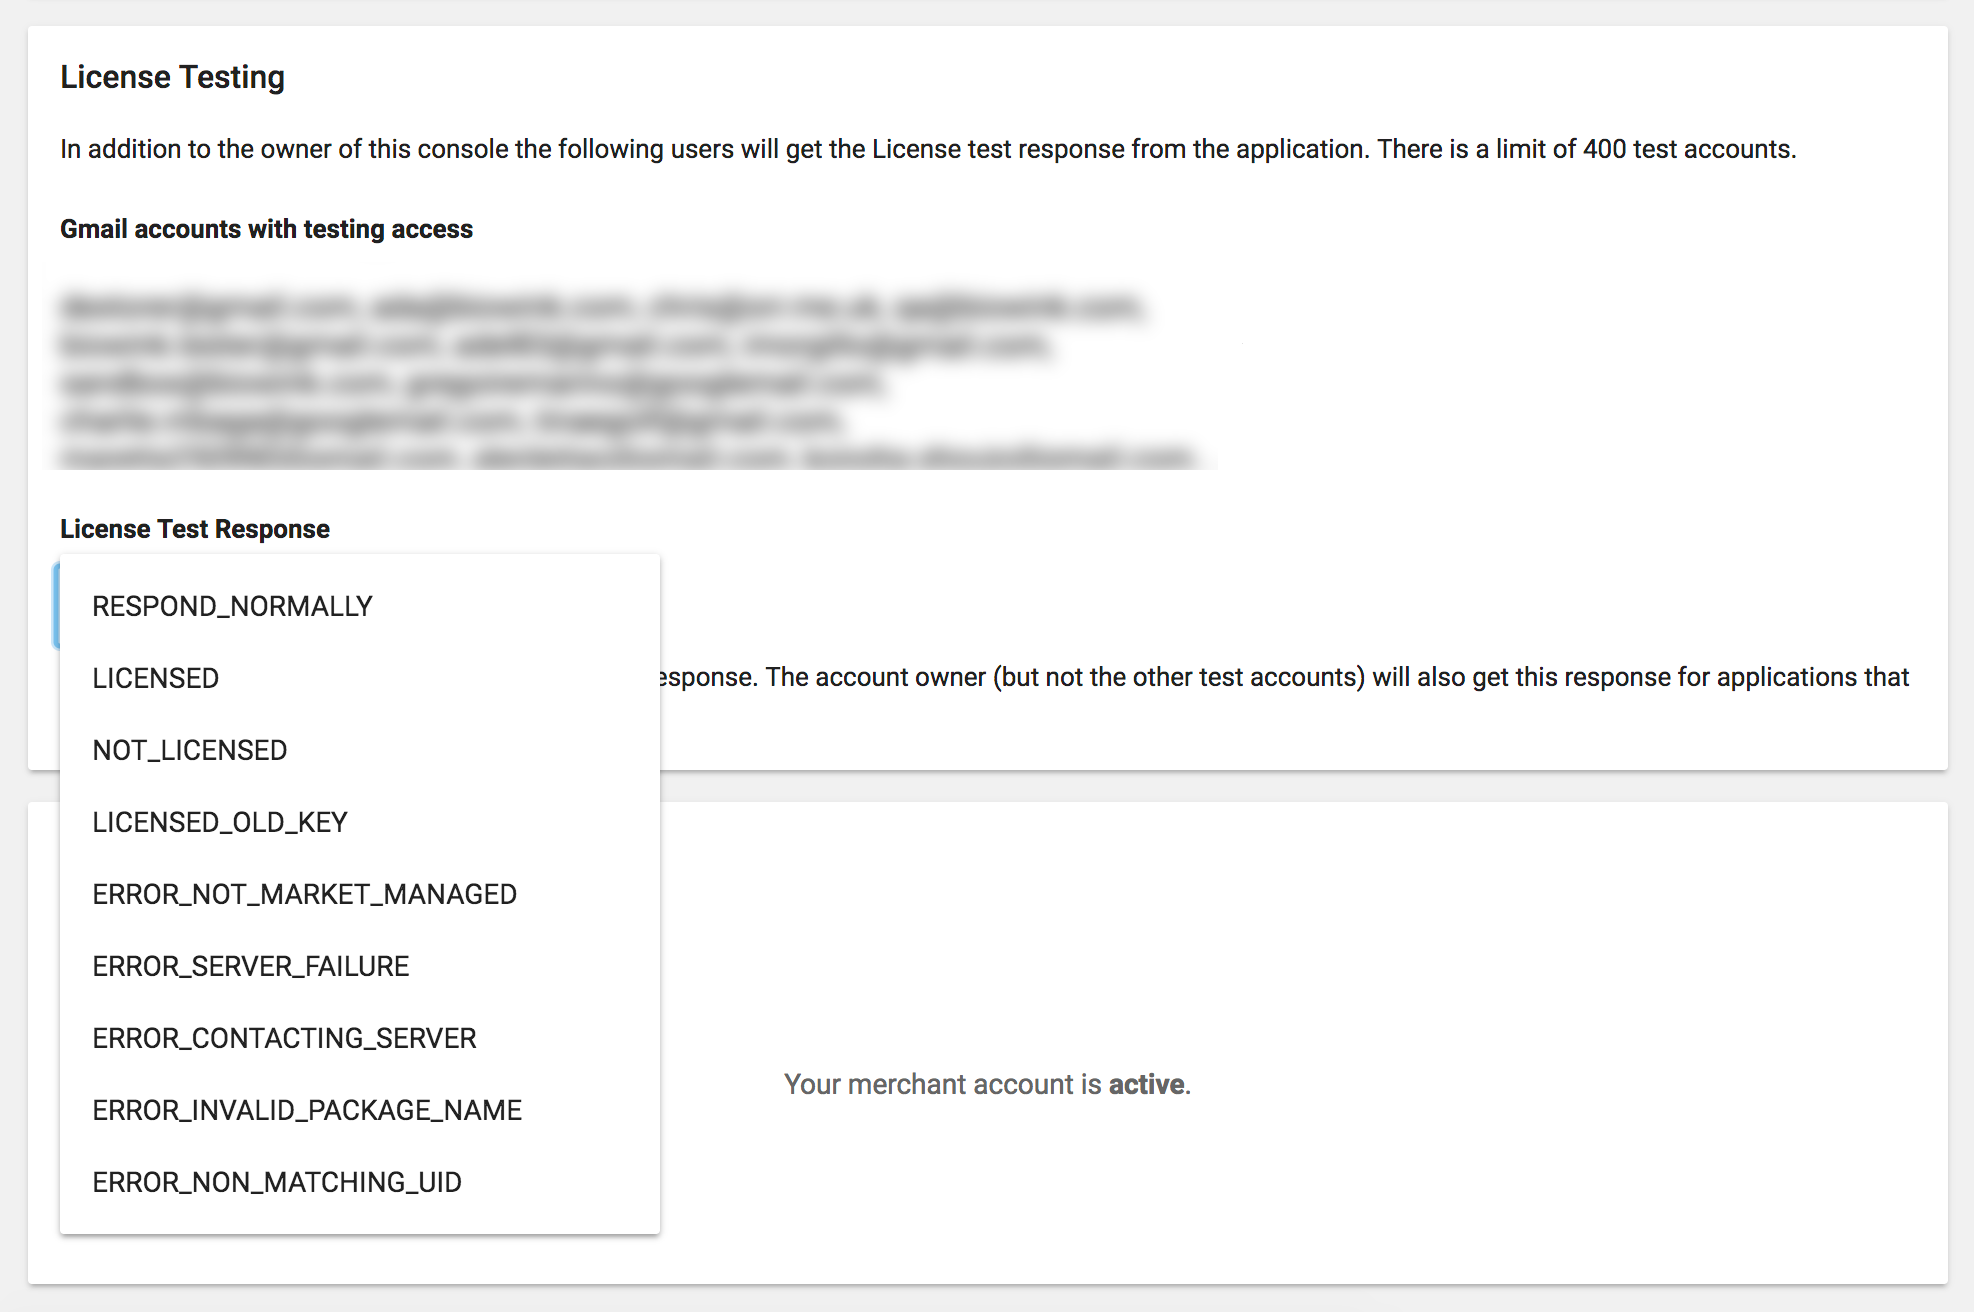
In order to be eligible for test purchases, there are a few steps to go through:
- Your APK must be uploaded to the Play Console (drafts are no longer supported)
- Add license testers in the Play Console
- Have testers join the alpha/beta testing group (if available)
- Wait 15 minutes, then start testing
Sounds easy enough, right? The documentation is also very encouraging
It’s easy to set up test purchases [1]
…Sure, let’s see about that. 😒
Testing, according to real life
You religiously follow the documentation, wait 15 minutes (make it 30, just in case), you start testing and…an error occurs. What now?
It turns out that the documentation is fairly optimistic when explaining the required steps for testing in-app purchases. According to this StackOverflow answer, which in turn is a collection of various trial-and-errors by other users, plus my personal experience, there are actually 10+ conditions that you need to meet or account for before being able to properly use test products!
Let’s recap them here:
- Your app is published (i.e., not in draft).
- The APK must be published (either production, alpha or beta channels).
- The APK you uploaded matches the one you’re testing with when it comes to version code, version name, and keystore signature (this point, in my experience, is not needed).
- When testing on the device, you’re using a different account than the one tied to the Play Console (i.e., not your developer account).
- The instructions to wait 15 minutes are a bit too optimistic, as it can take up to 2 hours for changes to propagate from the Play Console.
- Double check that the SKU you’re using in the app matches the one for the product that was configured in the Play Console.
- Double check that you’re not trying to purchase an already owned product or an already active subscription.
- Double check that you have activated your products in the Play Console: by default, products in the console are deactivated and you need to manually activate them.
- If you’re using the alpha/beta channels, make sure that the account you’re testing with is part of the testing group (i.e., has clicked on “Become a tester” after following the opt-in URL).
- If you use ABI flavors, like arm-v7, arm-v8, etc., make sure the APK you’re using for testing contains all the ABI libraries.
- Make sure that, when retrieving the Intent using getBuyIntent , you’re passing the correct product type, i.e., inapp if you’re purchasing managed in-app products or subs if you’re purchasing subscriptions.
- If you’re using the public key for enhanced security, make sure it matches the one on the Play Console because it might change over time (see here).
- Check that Google Play Services are updated on the test device by going to the Google Play Services page on the Play Store.
As you can see, the sandbox is far from straightforward when it comes to real usage, but at least now we have a few extra hints to start looking for a solution!
Bonus tip: faster testing for test subscriptions
We mentioned earlier that test subscriptions have a 1-day expiration period, regardless of their original duration. This means that, even if we cancel the subscription, it will still be considered active for that day. In turn, when the app retrieves the list of purchased products, it will receive the cancelled subscription and present it as an active subscription (because it technically still is). Your UI will then react accordingly and display premium features, instead of the purchase button: again, technically correct, but very inconvenient for us to do quick testing.
However, there’s a nice way of checking whether a subscription’s auto-renewal has been cancelled: the autoRenewing field inside the INAPP_PURCHASE_DATA JSON payload that comes from the billing service (see documentation). When checking the validity of a subscription in a debug environment, you can assume that when autoRenewing is false the subscription is cancelled and you can purchase another one.
⚠️ Be careful though! This check should only be done in debug/staging environments and not in production, so make sure you limit this “strict” check to debug/staging builds only. ⚠️
Update! 17/01/2018
While this post was still being drafted, Google announced that test subscriptions will no longer be renewed daily. Instead, the renewal period will vary from 5 to 30 minutes, depending on the original billing period.
In addition to this, they are limiting the amount of times a test subscription can be renewed to 6 (it is currently unlimited).
All these modifications will be applied starting February 20th 2018.
Conclusion
While far from perfect, the in-app billing support is critical for the Android ecosystem to grow and to being able to generate revenue.
When implementing purchases in your app, it’s worth paying attention to the checklist we reported before to avoid headaches, as well as provide a reliable sandbox environment for you to develop with and for your testers to test the app.
It’s also nice to see that Google is committed for the long run, as they just released the all new Play Billing Library (compared to the old 2013 version!).
A final shout out to the Android community, for being as open and as supportive as ever!
Источник
Помогите сделать следующую версию Android лучше
О Программе бета-тестирования
Участвуя в Программе бета-тестирования Android для Pixel, вы сможете в числе первых испытать предварительные версии Android и попробовать новые функции в деле. Ваши отзывы будут помогать нам выявлять и устранять проблемы. На зарегистрированные устройства автоматически будут устанавливаться обновления последней бета-версии Android. Подробнее о поддерживаемых устройствах…
Что нового
В декабре 2021 года в рамках Программы бета-тестирования Android 12 станут доступны предварительные версии обновлений с комплектами новых функций, исправлениями ошибок и улучшениями, которые повышают стабильность и производительность. Мы всё ещё разрабатываем платформу, добавляем функции и устраняем ошибки.
Уже регистрировались?
Если вы участвовали в Программе бета-тестирования Android 12, начиная с декабря 2021 года на ваши поддерживаемые устройства будут автоматически установлены следующие бета-версии обновлений для Android 12. Покинуть Программу без удаления всех данных с устройства можно до 1 декабря 2021 года. Согласно правилам Программы выход из нее после установки предстоящей декабрьской бета-версии приведет к удалению всех пользовательских данных с устройства.
Как стать участником программы?
Чтобы увидеть список своих поддерживаемых устройств, войдите в аккаунт Google. Зарегистрировавшись в Программе бета-тестирования Androidи приняв Условия использования, вы сможете делиться своим мнением об Android 12 прямо на устройстве, а также вступить в сообщество Reddit Программы бета-тестирования Android.
Перед регистрацией
Обновления, которые вы будете получать в рамках Программы, являются предварительными версиями и могут содержать ошибки, влияющие на работу устройства.
Если вы захотите выйти из Программы и вернуться к стабильной общедоступной версии Android, потребуется удалить все данные, хранящиеся на устройстве. Вы также можете столкнуться с проблемами при восстановлении резервной копии.
Ваши устройства, отвечающие условиям Программы
Здесь будут показаны устройства, на которых вы вошли в свой аккаунт Google в качестве основного пользователя и которые отвечают условиям Программы.
После регистрации
Обновления телефона
Выход из Программы бета-тестирования
Здесь не будут показаны устройства, которые вы скрыли в Google Play. Чтобы увидеть их, откройте страницу play.google.com/settings.
Мы расширили список производителей устройств, на которых доступна бета-версия Android 12. Подробнее о регистрации: android.com/beta.
Вы получите обновление в течение 24 часов. Если за это время оно не появится, убедитесь, что устройство подключено к Интернету, а затем выберите Настройки > Система > Дополнительные настройки > Обновление системы.
Участвуя в Программе, вы будете автоматически получать до двух обновлений в месяц. Примечание. При этом вы не будете получать отдельные ежемесячные обновления системы безопасности, так как они уже входят в бета-версию.
Если вы установили версию Android 12 вручную, скачав образ с сайта developer.android.com, то для получения автоматических обновлений вам понадобится зарегистрировать устройство в Программе бета-тестирования Android для Pixel на этой странице.
Телефоны Android
На устройстве Android сделать это можно двумя способами:
- Выберите Настройки > О телефоне > Номер сборки. Если номер начинается с SPB, значит у вас установлена бета-версия Android 12.
- Перезагрузите устройство. Вы увидите сообщение о том, что на нем установлена бета-версия Android.
Это бета-версия, поэтому официальная поддержка недоступна. Опубликуйте свой вопрос в сообществе Программы в Reddit, и, возможно, вам ответит кто-то из его участников.
Сначала убедитесь, что вы используете бета-версию Android. Найдите нужное устройство в этом списке и нажмите Отключить. В течение 24 часов вы получите автоматическое обновление, которое удалит с устройства все пользовательские данные и установит последнюю общедоступную версию Android. Если вы захотите выйти из Программы и вернуться к стабильной общедоступной версии Android, потребуется удалить все данные, хранящиеся на устройстве. Вы также можете столкнуться с проблемами при восстановлении резервной копии.
Источник
Альфа и бета тестирование android приложений
До недавнего времени для тестирования своих приложений я использовал различные способы публикации, от простого выкладывания apk файла на хостинг до использования специализированных сайтов типа testflightapp.com или использование своих велосипедов.
В очередном обновлении Google Play Developer Console была добавлена возможность тестирования приложений на определенном круге пользователей.
Если раньше загрузка apk файла сразу приводила к публикации приложения, то теперь добавлены 2 промежуточных шага.
При загрузке очередной версии приложения мы выбираем раздел:
- альфа тестирование
- бета тестирование
- продакшион
из альфа тестирование можно перевести в бета или сразу продакшион, из беты — в продакшион.
полезная особенность, если приложение не опубликовано, а находится только в стадии тестирования, оно доступно только его тестировщикам, остальным пользователям оно не доступно ни через поиск, ни по прямой ссылке.
Чтобы стать тестировщиком, пользователю необходимо вступить в сообщество google+ созданное разработчиком (указывается в настройках приложения) и перейти по ссылке play.google.com/apps/testing/com.yourdomain.package 
Посмотреть на Яндекс.Фотках
В данный момент у меня получается достаточно удобный сценарий работы над небольшим социальным приложением:
- Разработку и отладку я веду на одном устройстве под специальным аккаунтом.
- Заканчиваю работу над очередной фичей, отлаживаю на этом устройстве, публикую альфа версию в google play
- Некоторое количество моих устройств разного формата и версий android самостоятельно обновляются на версию
- В течении дня-двух все устройства тестируются
- Все работает, данная версия переходит в следующую стадию, профит.
Плюсы:
- Удобное администрирование тестировщиков
- Тестировщикам нет необходимости ставить галочку разрешающую установку приложений из Uknown sources, потенциальная угроза безопасности
- Установка приложения из маркета для пользователя выглядит безопаснее, «солиднее»
- Большая группа бета тестировщиков автоматически станет пользователями опубликованного приложения, плюс в статистику
- штатный трекер ошибок, нет необходимости добавлять в приложения сторонние библиотеки
Минусы:
- штатный трекер ошибок, медлительный и менее информативный
Источник


