- Android testing with appium
- Preparing your app for test (Android)
- Preparing your app for test (Windows)
- Running your test app with Appium (iOS)
- Running your test app with Appium (Android)
- Running your test app with Appium (Windows)
- Android testing with appium
- Mobile Safari on a Real iOS Device
- For XCUITest
- For Instruments
- Setup for an iOS real device
- Running your test
- Android mobile web automation
- Troubleshooting Chromedriver
- Android testing with appium
- How to run tests
- Make bundletool.jar executable
- Test with different languages
- APPIUM Tutorial for Android & iOS Mobile Apps Testing
- What is Appium?
- How APPIUM Works?
- Prerequisite to use APPIUM
- Install Appium Desktop:
- APPIUM Inspector
- Attach Android Emulator to Appium
- APPIUM Test Case for Native Android App(Calculator)
Android testing with appium
Test apps run on the simulator have to be compiled specifically for the simulator, for example by executing the following command in the Xcode project (you can use xcodebuild -showsdks to see the list of available SDKs):
This creates a build/Release-iphonesimulator directory in your Xcode project that contains the .app package that you’ll need to communicate with the Appium server.
If you want, you can zip up the .app directory into a .zip file! Appium will unpack it for you. Nice if you’re not using Appium locally.
Preparing your app for test (Android)
Nothing in particular needs to be done to run your .apk using Appium. If you want to zip it up, you can.
Preparing your app for test (Windows)
Nothing in particular needs to be done to run your test.
Running your test app with Appium (iOS)
The best way to see what to do currently is to look at the example tests:
Basically, first make sure Appium is running:
Then script your WebDriver test, sending in the following desired capabilities:
In this set of capabilities, myApp must be either:
- A local absolute path to your simulator-compiled .app directory or .zip
- A url of a zip file containing your .app package
- A path to one of the sample app relative to the appium install root
Using your WebDriver library of choice, set the remote session to use these capabilities and connect to the server running at port 4723 of localhost (or whatever host and port you specified when you started Appium). You should be all set now!
Running your test app with Appium (Android)
First, make sure you have one and only one Android emulator or device connected. If you run adb devices , for example, you should see one device connected. This is the device Appium will use for tests. Of course, to have a device connected, you’ll need to have made an Android AVD. If the Android SDK tools are on your path, you can simply run:
And wait for the android emulator to finish launching. Sometimes, for various reasons, adb gets stuck. If it’s not showing any connected devices or otherwise failing, you can restart it by running:
Now, make sure Appium is running:
There are several ways to start an Appium application (it works exactly the same as when the application is started via adb):
- apk or zip only, the default activity will be launched (‘app’ capability)
- apk + activity (‘app’ + ‘appActivity’ capabilities)
- apk + activity + intent (‘app’ + ‘appActivity’ + ‘appIntent’ capabilities)
- .
Activities may be specified in the following way:
- absolute (e.g. appActivity: ‘com.helloworld.SayHello’).
- relative to appPackage (e.g. appPackage: ‘com.helloworld’, appActivity=’.SayHello’)
If the ‘appWaitPackage’ and ‘appWaitActivity’ caps are specified, Appium automatically spins until those activities are launched. You may specify multiple wait activities for instance:
- appActivity: ‘com.splash.SplashScreen’
- appPackage: ‘com.splash’ appActivity: ‘.SplashScreen’
- appPackage: ‘com.splash’ appActivity: ‘.SplashScreen,.LandingPage,com.why.GoThere’
If you are not sure what activity are configured in your apk, you can proceed in one of the following ways:
- Mac/Linux: ‘adb shell dumpsys window windows | grep mFocusedApp’
- In the Ruby console: ‘adb shell dumpsys window windows`.each_line.grep(/mFocusedApp/).first.strip’
- In Windows terminal run ‘adb shell dumpsys window windows’ and manually look for the mFocusedApp line.
Then script your WebDriver test, sending in the following desired capabilities:
In this set of capabilities, myApp must be either:
- A local absolute path to your .apk or a .zip of it
- A url of a zip file containing your .apk
- A path to one of the sample app relative to the appium install root
Using your WebDriver library of choice, set the remote session to use these capabilities and connect to the server running at port 4723 of localhost (or whatever host and port you specified when you started Appium). You should be all set now!
Running your test app with Appium (Windows)
Simply ensure that Appium is listening, and run your test with your test runner of choice.
Источник
Android testing with appium
First of all, make sure developer mode is turned on in your Safari preferences so that the remote debugger port is open.
Mobile Safari on a Real iOS Device
For XCUITest
We use appium-ios-device to handle Safari since Appium 1.15. You no longer need to install additional dependencies.
For Instruments
For iOS 9.3 and below (pre-XCUITest), we use the SafariLauncher App app to launch Safari and run tests against mobile Safari. This is because Safari is an app that is owned by Apple, and Instruments cannot launch it on real devices. Once Safari has been launched by SafariLauncher , the Remote Debugger automatically connects using the ios-webkit-debug-proxy. When working with ios-webkit-debug-proxy , you have to trust the machine before you can can run tests against your iOS device.
For instruction on how to install and run ios-webkit-debugger-proxy see iOS WebKit debug proxy documentation.
Setup for an iOS real device
Before you can run your tests against Safari on a real device you will need to:
- XCUITest and Instruments
- Turn on web inspector on iOS device (settings > safari > advanced)
- Only for Instruments
- Have the ios-webkit-debug-proxy installed, running and listening on port 27753 (see the hybrid docs for instructions)
- Make sure that SafariLauncher will work (see the SafariLauncher docs for instructions)
Running your test
To configure you test to run against safari simply set the «browserName» to be «Safari» .
Android mobile web automation
Appium supports automating the Chrome browser both real and emulated Android devices.
- Make sure Chrome is installed on your device or emulator.
- Chromedriver needs to be installed (a default version comes with Appium) and configured for automating the specific version of Chrome available on the device. See here for more information and details about compatibility.
Then, use desired capabilties like these to run your test in Chrome:
Note that on 4.4+ devices, you can also use the ‘Browser’ browserName cap to automate the built-in browser. On all devices you can use the ‘Chromium’ browserName cap to automate a build of Chromium which you have installed.
Troubleshooting Chromedriver
If your test target requires newer Chromedriver version, chromedriver_autodownload feature will help. It has been available since Appium 1.15.0 with the security option. Read the linked documentation to learn how to use it. chromedriverExecutableDir capability also helps when you need a specific Chromedriver version.
As of Chrome version 33, a rooted device is no longer required. If running tests on older versions of Chrome, devices needed to be rooted as Chromedriver required write access to the /data/local directory to set Chrome’s command line arguments.
If testing on Chrome app prior to version 33, ensure adb shell has read/write access to /data/local directory on the device:
There is a desired capability showChromedriverLog which, when set to true , writes the Chromedriver logs inline with the Appium logs. This can be helpful for debugging.
For more Chromedriver specific documentation see ChromeDriver documentation.
Источник
Android testing with appium
Google has released the Android App Bundle feature. An .aab file is generated by the feature, which we are supposed to upload to the Google Play Store. We can manage the .aab file via CLI using the official bundletool which is available from bundletool. The guide also help us to understand the feature.
We can get distributed apk files from the .aab file via the CLI. Using the generated files, we can test against the release module. Since Appium 1.9.2, you can Appium tests against an .apks file using UiAutomator2 driver. 1 and 2 are PRs for the feature.
How to run tests
- Export bundletool.jar in your path
- Appium looks for bundletool.jar in your local environemnt. Make sure you can find the path with which ‘bundletool.jar’ . If you can’t find it, please set the path correctly.
- Please make sure the bundletool version is above 1.6.0
- Generate the .apks file from the .aab file
- The .aab is available over Android Studio 3.2
- You must sign correctly when you generate .apks from .aab . This step requires data signing.
- Use the path to the .apks file as your app capability.
You can find another way to get test APKs in https://developer.android.com/guide/app-bundle/
You could also install .apks bundles via Install App command like below.
Make bundletool.jar executable
Make sure the bundletool is executable. $ chmod 655 /path/to/bundletool.jar can make it executable, for example.
Test with different languages
Set fullReset: true if you would like to test against the app using different languages’ resources.
Appium only installs the minimum set of resources, following the behavior of the appbundle feature. For example, if a device’s language is set of English, Appium will only install the en resource. The installed apk will have no Japanese resources.
In orfer to force re-install with a different set of language resources, specify fullreset: true
Источник
APPIUM Tutorial for Android & iOS Mobile Apps Testing
Updated October 7, 2021
What is Appium?
APPIUM is a freely distributed open source mobile application UI Testing framework. Appium allows native, hybrid and web application testing and supports automation test on physical devices as well as an emulator or simulator both. It offers cross-platform application testing, i.e. single API works for both Android and iOS platform test scripts.
It has NO dependency on Mobile device OS. Because APPIUM has framework or wrapper that translate Selenium Webdriver commands into UIAutomation (iOS) or UIAutomator (Android) commands depending on the device type, not any OS type.
Appium supports all languages that have Selenium client libraries like- Java, Objective-C, JavaScript with node.js, PHP, Ruby, Python, C#, etc.
In this tutorial, we will learn about
How APPIUM Works?
- Appium is an ‘HTTP Server’ written using a Node.js platform and drives iOS and an Android session using Webdriver JSON wire protocol. Hence, before initializing the Appium Server, Node.js must be pre-installed on the system.
- When Appium is downloaded and installed, then a server is set up on our machine that exposes a REST API.
- It receives connection and command request from the client and executes that command on mobile devices (Android / iOS).
- It responds back with HTTP responses. Again, to execute this request, it uses the mobile test automation frameworks to drive the user interface of the apps. A framework like:-
- Apple Instruments for iOS (Instruments are available only in Xcode 3.0 or later with OS X v10.5 and later)
- Google UIAutomator for Android API level 16 or higher
- Selendroid for Android API level 15 or less
Prerequisite to use APPIUM
- Install ANDROID SDK (Studio)[Link]-
- Install JDK (Java Development Kit) [Link]
- Install Eclipse [Link]
- Install TestNg for Eclipse [Link]
- Install Selenium Server JAR [Link]
- Appium Client Library[Link]
- APK App Info on Google Play [Link]
- js (Not Required – Whenever Appium server is installed, it by default comes with “Node.exe” & NPM. It’s included in Current version of Appium.)
- Install Appium Desktop
Install Appium Desktop:
Appium Studio is an Open source GUI app to install Appium Server. It comes bundled with all the pre-requisites to install and use Appium Server. It also has an Inspector to get basic information on your Apps. It comes with a Recorder to create boilerplate code to automate your mobile apps.

Step 2) For Windows, select the exe file and download. The file is around 162MB will take time to download based on your internet speed.

Step 3) Click on the downloaded exe.

Step 4) On a Windows machine, there is no need to install Appium. It runs directly from the exe. Once you click the exe you will see the following image for few minutes.

For Mac, you need to install the dmg
Step 5) Next you will see the Server Start Window. It populates the default host and port option which you can change. It also mentions the version of Appium being used.

Step 6) On clicking the Start Server Button, a new server is launched on the specified host and port. Server log output is shown.

Step 7) Click New Session Window.

Step 8) You can enter the Desired Capabilities and start a session.

APPIUM Inspector
Similar to Selenium IDE record and playback tool, Appium has an ‘Inspector’ to record and Playback. It records and plays native application behavior by inspecting DOM and generates the test scripts in any desired language. However, currently, there is no support for Appium Inspector for Microsoft Windows. In Windows, it launches the Appium Server but fails to inspect elements. However, UIAutomator viewer can be used as an option for Inspecting elements.
Steps to start with Appium Inspector on Mac machine:-
Step 1) Download and start your Appium server with the default IP Address 0.0.0.0 and the port 4725.
- Select the source file or .app files from local to test.
- Check the ‘App Path’ Checkbox to enable ‘Choose’ button.
Step 2)Now, click on ‘Choose’ button will give the option to browse and select test file from the local drive.

Step 3) Start Simulator on Mac machine.
Step 4) Click ‘Launch’ button from a top right corner, which enables a blue color icon. Again, click on this blue color icon, it will open the Appium inspector and Simulator with a pre-selected application.

Step 5)– Launching your Appium Inspector will show the element hierarchy in column-wise structure. Also, a user can apply actions using buttons like Tap, Swipe, etc.

Step 6) Click on ‘Stop’ button to stop recording.
Attach Android Emulator to Appium
Step 1) Install Android SDK in your system.
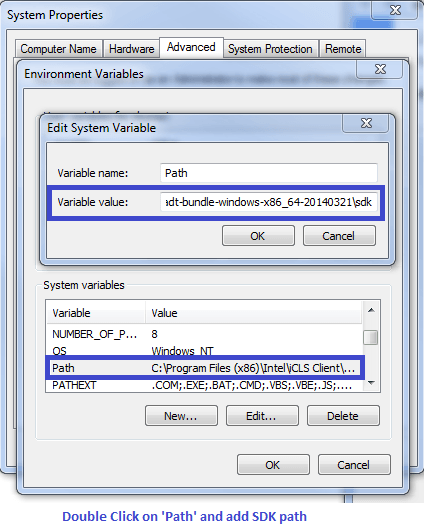
Go to Control panel >> System and Security >> System and from the left panel click on ‘Advanced System Settings’. From ‘System Properties’ pop up, click on ‘Advanced’ tab and then click on “Environment Variables” button.

Step 2) Now, from ‘Environment variables’ pop up, ‘double click on ‘Path’ and set ANDROID_HOME variable that point to your SDK directory. In the path append the whole SDK folder path.
Step 3) Start your Android emulator or any attach any Android device to your system (Make sure you have Android Debugging option enabled in your Android device. To check Debugging Option. Go to Device Settings >> Developer Options >> Check “Debugging Option”).
Step 4) Open Command Prompt and navigate to your Android SDK’s \platform-tools\ directory (E.g. D:\adt-bundle-windows-x86_64-20130514\sdk\platform-tools).
Step 5)– Run ‘adb devices’ command. You can see your connected device listed in Command Prompt window. (In CMD write ‘>adb devices’- This command will list the connected emulator instances. E.g.: adb –s emulator-5554 install )

Step 6)– Run ‘adb start-server’ command. It will start ADB server that will be used by Appium to send commands to your Android device.
Step 7) Now, navigate to Appium directory in your system and start Appium by clicking an Appium.exe file.
Step 8) Do not alter the IP address or port number and click ‘Launch’ button. Your Appium console starts at 127.0.0.1:4723 as shown in below.

Step 9) Click on ‘Start’ button, Appium server started running on your system.
APPIUM Test Case for Native Android App(Calculator)
Step 1)) Download ADT eclipse plugin or download ADT bundled separately here
Step 2) Open Eclipse and Create a new Project >> Package >> Class
Step 3) Import Selenium library and Testng inside that new project.
Источник


