- Tek Eye
- Determining the Size of an Android View or Screen at Run Time
- Finding the Size of an Android View in Code
- Finding the Size of an Android Layout in Code
- Finding the Size of an Android View During Screen Construction
- See Also
- Archived Comments
- Do you have a question or comment about this article?
- Making the most of TextView auto-sizing on Android
- Dynamically adjusting the size of text on Android with a simple API
- When is this needed? 🤔
- The basics 🔤
- Default auto-sizing 1️⃣
- In XML:
- Programmatically:
- Granular auto-sizing 2️⃣
- In XML:
- Programmatically:
- Preset auto-sizing 3️⃣
- In XML:
- Programmatically:
- Pro-tips and gotchas 🤓
- Mixing value types:
- Auto-sizing to a single line:
- Performance:
- Масштабируемый TextView
- 1. По умолчанию
- Использование библиотеки поддержки
- 2. Детализация
- Использование библиотеки поддержки
- 3. Предустановленные размеры
- Использование библиотеки поддержки
- Масштабируемый TextView : 1 комментарий
Tek Eye
For efficient bitmap handling or dynamic View creation in an app, the area that a screen item or layout is using needs to be known. If no fixed sizes are allocated at design time the size of a View may not be known until an app is executed. This is because of the wide range of display sizes that Android supports. Just look on GSMArena to see the huge range of Android devices produced over the years, and to see the wide variation in screen sizes and pixel densities. The example code in this article shows how to read the screen size and the size of Views as the app runs.
(Note: All Android screen items are derived from Views. A screen component, e.g. a TextView , is derived from the View class. Such screen components are also known as widgets. Layouts are ViewGroups and are also derived from Views.)
Determining the Size of an Android View or Screen at Run Time
To run the example code in this article first create a new Android project. Those new to Android programming can read the article Your First Android Hello World Java Program to see how. For this article the app is called View Size.
Use a simple layout for activity_main.xml (the layout file may have another name). Add a TextView with id labXY and set the Text attribute to X,Y. Next to it add another TextView called textXY with Text set to ? (actually \? to make it valid in the XML). Here is the layout used for this example:
Add this code to the bottom of the onCreate method in MainActivity.java (or whatever the class was called). Add the required an imports for TextView and DisplayMetrics when prompted with the Alt-Enter:
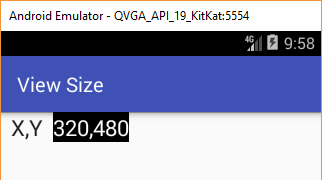
This is the code running on an Android Virtual Device (AVD) with a 320×480 screen:
Finding the Size of an Android View in Code
Drop an ImageView onto the layout, here using the ic_launcher.png icon file, or other images can be used. The size of a View can be retrieved using the getWidth and getHeight methods. Change the code in the onCreate to set the TextView to the ImageView’s width and height (an import for View is required, again usually prompted for and added with Alt-Enter):
Mmmmm! The code is showing 0,0 for the ImageView size, even though we can see that it is not 0,0:
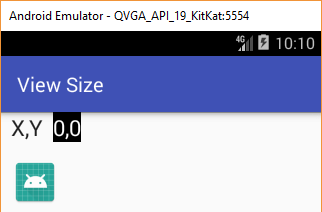
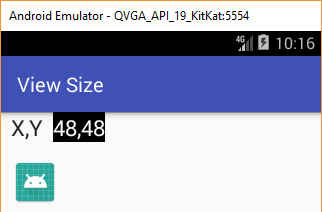
This is because in onCreate the screen has not yet been laid out so the size of the ImageView has not been determined hence the getWidth() and getHeight() methods are returning zero. In fact they will likely return zero in onStart() and onResume(). What is needed is to override onWindowFocusChanged() to get the ImageView sizes:
Finding the Size of an Android Layout in Code
The same code can be used to get the size of the View (the layout, i.e. ViewGroup) in which the screen components sit. Notice that in the screen XML the RelativeLayout was given an id (@+id/screen), which means the base View’s width and height can be grabbed (change R.id.imageView to R.id.screen in the code):
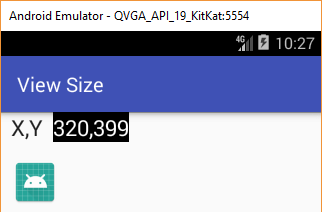
Notice that the layout height is less than the screen height because of the notification bar.
Finding the Size of an Android View During Screen Construction
To get the the size of a View as soon as it is known (rather than waiting for the onWindowFocusChanged event) attach a listener to its ViewTreeObserver . Do this by writing a class that implements ViewTreeObserver.OnGlobalLayoutListener in the Activity’s class. This new class will have an onGlobalLayout method that gets the View dimensions that can then be stored for later use (here they are displayed as before). Here is the example source code for the entire MainActivity.java file to show this way of getting the ImageView’s width and height:
Download some example code in view-size.zip from this article, ready for importing into Android Studio. See the instructions in the zip file, alternatively the code can also be accessed via the Android Example Projects page.
See Also
- Using Immersive Full-Screen Mode on Android Developers
- See the Android Example Projects page for lots of Android sample projects with source code.
- For a full list of all the articles in Tek Eye see the full site alphabetical Index.
Archived Comments
Kestrel on December 15, 2014 at 4:20 am said: Hey fantastic article, can you also talk about the fitSystemWindows and how things are affected when its set or not set by default. Thanks in advance.
Author: Daniel S. Fowler Published: 2013-06-19 Updated: 2017-12-17


Do you have a question or comment about this article?
(Alternatively, use the email address at the bottom of the web page.)
↓markdown↓ CMS is fast and simple. Build websites quickly and publish easily. For beginner to expert.
Free Android Projects and Samples:
Источник
Making the most of TextView auto-sizing on Android
Dynamically adjusting the size of text on Android with a simple API

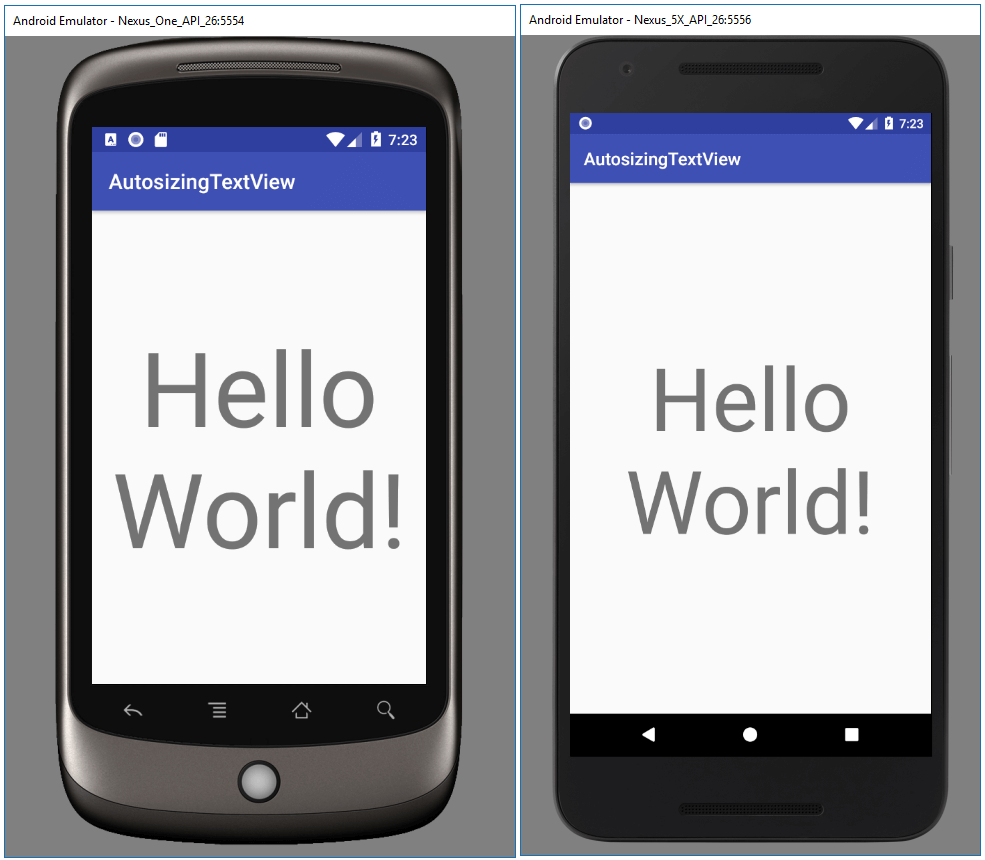
TextView auto-sizing was introduced to the framework with Android 8.0 Oreo (API 26). It offers a simple yet powerful API to solve a particular problem: scaling of text size to fit text bounds.
When is this needed? 🤔
For Android Development, using a fixed textSize , layout_width=»match_parent” and layout_height=»wrap_content” (perhaps inside a scrollable parent) is fairly common practice and suitable for most TextView use cases.
However, consider the case where the width and/or height of the text bounds are fixed and the text needs to adapt to the available space. Examples include a newspaper-style layout, a font selector that needs to show each different font typeface/name on a single-line, etc. The text can’t scroll and we can’t just add a «read more» button. In these scenarios, TextView auto-sizing is precisely what we need.
The basics 🔤
The TextView auto-sizing API is fairly concise. It can be implemented in XML layouts or programmatically. There are three distinct ways of enabling auto-sizing on a TextView , with increasing levels of specificity: Default, Granular and Preset.
At the time of this writing, the chances of anyone having a minSdk of 26 are quite slim. Thankfully, all of the auto-sizing functionality is available in the AndroidX core package (formerly Support Library). The differences to the framework API are minimal:
- Use the app namespace for XML attributes
- Use the functions in TextViewCompat instead those on TextView directly
Note: All of the examples in this post will use the AndroidX implementation.
Before we get going, there are two important points to keep in mind:
- Auto-sizing (as the name would suggest) only adjusts the text size. Other properties (eg. letterSpacing , lineHeight , etc.) are not changed. They do, of course, affect the text layout bounds and thus impact the automatic size chosen for the text.
- It is advised to not use a layout_width or layout_height of «wrap_content» when using TextView auto-sizing, as this may lead to unexpected results. Using a fixed dimension or «match_parent» is fine (or a “0dp” match_constraint if you are using ConstraintLayout ) .

Default auto-sizing 1️⃣
This is the simplest way of enabling TextView auto-sizing. Given the bounds and attributes of a TextView , the text size is adjusted in an attempt to perfectly fit the horizontal and vertical axes.
Note: The granularity dimensions for default auto-sizing are minTextSize = 12sp, maxTextSize = 112sp, and granularity = 1px (see Granular auto-sizing below).
In XML:
Programmatically:
where autoSizeTextType can be:
- TextViewCompat. AUTO_SIZE_TEXT_TYPE_UNIFORM (enabled)
- TextViewCompat. AUTO_SIZE_TEXT_TYPE_NONE (disabled)
Granular auto-sizing 2️⃣
This allows you to define the values used in uniform auto-sizing: the minimum and maximum text sizes as well a dimension for the size of each «step». A «step» is the increase/decrease in size of the text layout bounds. The text size scales uniformly between the minimum and maximum text size after each «step».
In XML:
Programmatically:
where unit is the TypedValue dimension unit of all of the configuration values (eg. TypedValue. COMPLEX_UNIT_SP ).
Preset auto-sizing 3️⃣
This allows you to specify all the possible values used for auto-sizing. The most appropriate text size will be picked from these values to fit the text bounds.
In XML:
Add the preset sizes to res/values/arrays.xml:
Programmatically:
where unit is the TypedValue dimension unit of the preset size values in the array.
Pro-tips and gotchas 🤓
Mixing value types:
You may have noticed that the programmatic versions of granular and preset auto-sizing could be limiting: the TypedValue unit in these functions applies to all of the supplied auto-sizing values. If you want to mix types (eg. PX and SP) then you need to do so in XML.
Auto-sizing to a single line:
You may be required to restrict auto-sized text to a single line. You can set the lines or maxLines TextView layout attributes to «1» (or use the programmatic equivalent). You may also need to adjust the granular autoSizeMinTextSize , as single-line text will be clipped if the minimum text size is reached but the width still exceeds that of the layout bounds.
Performance:
For performance optimization, one might assume that using preset auto-sizing is the best option. In reality, granular text sizes are precomputed given the minimum, maximum and step values and the difference is negligible.
I hope this post has provided some insight into TextView auto-sizing and how best to make use of it. If you have any questions, thoughts or suggestions then I’d love to hear from you!
Источник
Масштабируемый TextView
Паттерн Material Design рекомендует использовать текст динамического типа вместо маленького размера текста или обрезания текста большого размера. Android упрощает работу с текстом, реализовывая изменения размера TextView.
Android 8.0 API 26 позволяет создавать TextView так, чтобы его размер увеличивался или уменьшался с целью заполнения разметки на основе характеристик и границ TextView. Это позволяет упростить оптимизацию размера текста на разных размерах экранов.
Support Library 26 полностью поддерживает изменение размера TextView на устройствах под управлением Android ниже 8.0. Библиотека работает на версиях от Android 4.0 API 14 и выше. Пакет android.suppport.v4.widget содержит класс TextViewCompat для обратной совместимости.
Перед началом работы нужно подключить библиотеку поддержки. Support Library 26 теперь перенесена в репозиторий Maven Google, поэтому сначала нужно добавить его в файл build.gradle проекта.
Затем в файл build.gradle модуля приложения нужно добавить следующую зависимость:
Вы можете использовать фреймворк или библиотеку поддержки для настройки TextView программно или через XML.
Существует 3 способа настройки TextView:
- По умолчанию
- Детализация
- Предустановленные размеры
Примечание: если вы настроили изменение размера TextView в XML файле, то не рекомендуется использовать значение wrap_content для атрибутов android:width и android:height, так как это может привести к непредвиденному результату.
1. По умолчанию
Значение по умолчанию позволяет масштабировать TextView равномерно по горизонтальной и вертикальной осям.
Чтобы программно задать параметры по умолчанию, нужно нужно вызвать метод setAutoSizeTextTypeWithDefaults(int autoSizeTextType).
В параметры следует передать AUTO_SIZE_TEXT_TYPE_NONE, чтобы выключить функцию изменения размера, или AUTO_SIZE_TEXT_TYPE_UNIFORM, чтобы равномерно масштабировать по горизонтали и вертикали.
Примечание: размеры по умолчанию равны minTextSize = 12sp, maxTextSize = 112sp, детализация 1px.
Чтобы задать параметры по умолчанию в XML, используйте атрибут android:autoSizeTextType со значением none или uniform.
Использование библиотеки поддержки
Чтобы программно задать параметры по умолчанию через библиотеку поддержки, вызовите метод TextViewCompat.setAutoSizeTextTypeWithDefaults(TextView textView, int autoSizeTextType).
В параметры передаются экземпляр TextView, который нужно масштабировать, а также AUTO_SIZE_TEXT_TYPE_NONE, чтобы выключить функцию изменения размера, или AUTO_SIZE_TEXT_TYPE_UNIFORM, чтобы равномерно масштабировать по горизонтали и вертикали.
Чтобы задать параметры по умолчанию через библиотеку поддержки в XML, нужно установить атрибут app:autoSizeTextType со значение none или uniform.
2. Детализация
В этом способе TextView масштабируется равномерно в диапазоне между минимальным и максимальным размером. Приращение принимает размер шага, указанного в атрибуте детализации.
Чтобы определить диапазон размеров и шаг программно, нужно вызвать метод setAutoSizeTextTypeUniformWithConfiguration(int autoSizeMinTextSize, int autoSizeMaxTextSize, int autoSizeStepGranularity, int unit).
В параметры передаются минимальный и максимальный размер, шаг, а также значение из TypedValue.
Чтобы определить диапазон размеров и шаг в XML, нужно установить следующие атрибуты:
- android:autoSizeTextType — установите значение none, чтобы выключить масштабирование и uniform, чтобы включить.
- android:autoSizeMinTextSize, android:autoSizeMaxTextSize, android:autoSizeStepGranularity — установите параметры для масштабирования.
Использование библиотеки поддержки
Чтобы определить диапазон размеров и шаг через библиотеку поддержки программно, нужно вызвать метод TextViewCompat.setAutoSizeTextTypeUniformWithConfiguration (int autoSizeMinTextSize, int autoSizeMaxTextSize, int autoSizeStepGranularity, int unit).
Аналогично обычному способу, сюда передаются параметры для масштабирования, а также экземпляр TextView, к которому нужно эти параметры применить.
Чтобы определить диапазон размеров и шаг через библиотеку поддержки в XML, нужно установить атрибуты app:autoSizeTextType, app:autoSizeMinTextSize, app:autoSizeMaxTextSize, app:autoSizeStepGranularity, принимающие аналогичные обычному способу значения.
3. Предустановленные размеры
Предустановленные размеры позволяют вам определить значения, которые TextView выбирает при масштабировании текста.
Чтобы использовать предустановленные размеры программно, вызовите метод setAutoSizeTextTypeUniformWithPresetSizes (int [] presetSizes, int unit).
Здесь в параметры передаётся массив значений, содержащий размеры TextView, а также значение из TypedValue.
Чтобы использовать предустановленные размеры через XML, нужно создать массив значений в ресурсах. Для этого в папке res/values создать файл arrays.xml (или открыть, если он существует), и добавить в него массив.
После этого нужно добавить атрибуты для TextView:
- android:autoSizeTextType — установите значение none, чтобы выключить масштабирование и uniform, чтобы включить.
- android:autoSizePresetSizes — установите сюда массив, который был создан в ресурсах.
Использование библиотеки поддержки
Чтобы использовать предустановленные размеры через библиотеку поддержки программно, используйте метод TextViewCompat.setAutoSizeTextTypeUniformWithPresetSizes(TextView textView, int [] presetSizes, int unit).
Аналогично обычному способу, добавляется массив значений и TypedValue, а также экземпляр TextView, для которого нужно применить масштабирование.
Чтобы использовать предустановленные размеры через библиотеку поддержки в XML, нужно, аналогично обычному способу, создать в ресурсах массив со значениями, затем добавить его в атрибут app:autoSizePresetSizes и указать атрибут app:autoSizeTextType.
Масштабируемый TextView : 1 комментарий
Если TextView содержит длинные слова, то android делает выбор в пользу занять больше свободного пространства, а не в пользу уменьшения шрифта, чтобы уместить всё слово без переносов на новую строку.
Параметр android:breakStrategy=»simple» тоже не помогает.
Получаются вот такие глупые переносы:
Автоматизац
ия
Источник


