- Android и кастомные шрифты или «Да здравствует API 26»
- Как было раньше. Краткий обзор
- view.xml
- CustomFontTextView.class
- Но все изменилось в API 26
- Fonts in XML
- Creating a font family
- Using fonts in XML layouts
- Adding fonts to a TextView
- Adding fonts to style
- Using fonts programmatically
- Kotlin
- Using the support library
- Kotlin
- Tek Eye
- Easy Font Modifications to Get Different Text Styles in Android
- Edit the Text Properties with the Android Studio’s Graphical Layout
- Update to Android with the fontFamily Attribute
- Bold and Italic with or without All Caps
- Combining Properties into a Text Appearance
- Using a Style Resource
- Font Size Measurements in Android
- Using a Custom Font
- Using the Android Fonts on Your PC
- A Final Word on Fonts
- See Also
- Archived Comments
- Do you have a question or comment about this article?
Android и кастомные шрифты или «Да здравствует API 26»
Как было раньше. Краткий обзор
Если было много view где требовались нестандартные шрифты, то мы использовали что-то вроде такого:
view.xml
CustomFontTextView.class
И это я пропустил огромный кусок который отвечает за то, чтобы не писать каждый раз путь к шрифту, а указывать
Ну, или шли на гитхаб и в результате находили Calligraphy (7000 звезд!)
Ни для кого не секрет что этот подход содержал много минусов как в огромном количестве boilerplate кода, так и в том, чтобы сделать это эффективно и где-нибудь не утечь по памяти запрашивая каждый раз Typeface.
Но все изменилось в API 26
Похоже, гугл наконец-то сдался и решил отказаться от навязывания Roboto и сделал удобное подключение сторонних шрифтов, за что ему огромное спасибо.
Линк для тех, кто любит читать в оригинале.
Теперь подключение состоит всего из нескольких несложных шагов:
1. Создаем папку font в res
Resource type выбираем font

2. Перетаскиваем в новую папку все нужные нам в проекте шрифты
3. Создаем файл для семейства шрифтов.
Обратите внимание: я сразу добавил в пример то как должен выглядеть файл, если вы хотите поддерживать и более старые версии Андроида. (Начиная с 14). Если вам повезло и у вас таргет только на супер-новые девайсы, то ваш файл сократится в 2 раза
Ну а дальше остается только наслаждаться сборкой
Использование в TextView
Используем в стилях
И у вас больше не болит голова об эффективности 🙂
Источник
Fonts in XML
Android 8.0 (API level 26) introduces a new feature, Fonts in XML, which lets you use fonts as resources. You can add the font file in the res/font/ folder to bundle fonts as resources. These fonts are compiled in your R file and are automatically available in Android Studio. You can access the font resources with the help of a new resource type, font . For example, to access a font resource, use @font/myfont , or R.font.myfont .
To use the Fonts in XML feature on devices running Android 4.1 (API level 16) and higher, use the Support Library 26. For more information on using the support library, refer to the Using the support library section.
To add fonts as resources, perform the following steps in the Android Studio:
- Right-click the res folder and go to New > Android resource directory.
The New Resource Directory window appears.
In the Resource type list, select font, and then click OK.
Note: The name of the resource directory must be font.

Figure 1. Adding the font resource directory
Add your font files in the font folder.
The folder structure below generates R.font.dancing_script , R.font.lobster , and R.font.typo_graphica .

Figure 2. Adding the font files in the resource directory
Double-click a font file to preview the file’s fonts in the editor. 
Figure 3. Previewing the font file
Creating a font family
A font family is a set of font files along with its style and weight details. In Android, you can create a new font family as an XML resource and access it as a single unit, instead of referencing each style and weight as separate resources. By doing this, the system can select the correct font based on the text style you are trying to use.
To create a font family, perform the following steps in the Android Studio:
- Right-click the font folder and go to New > Font resource file. The New Resource File window appears.
- Enter the file name, and then click OK. The new font resource XML opens in the editor.
- Enclose each font file, style, and weight attribute in the element. The following XML illustrates adding font-related attributes in the font resource XML:
Using fonts in XML layouts
Use your fonts, either a single font file or a font from a font family, in a TextView object or in styles. To add fonts to the TextView or in styles, use the fontFamily attribute.
Note: When you use a font family, the TextView switches on its own, as needed, to use the font files from that family.
Adding fonts to a TextView
To set a font for the TextView , do one of the following:
- In the layout XML file, set the fontFamily attribute to the font file you want to access.
- Open the Properties window to set the font for the TextView .
- Select a view to open the Properties window.
Note: The Properties window is available only when the design editor is open. Select the Design tab at the bottom of the window.

Figure 4. Selecting the font from the Properties window
The Android Studio layout preview, shown in the rightmost pane of Figure 5, allows you to preview the font set in the TextView .
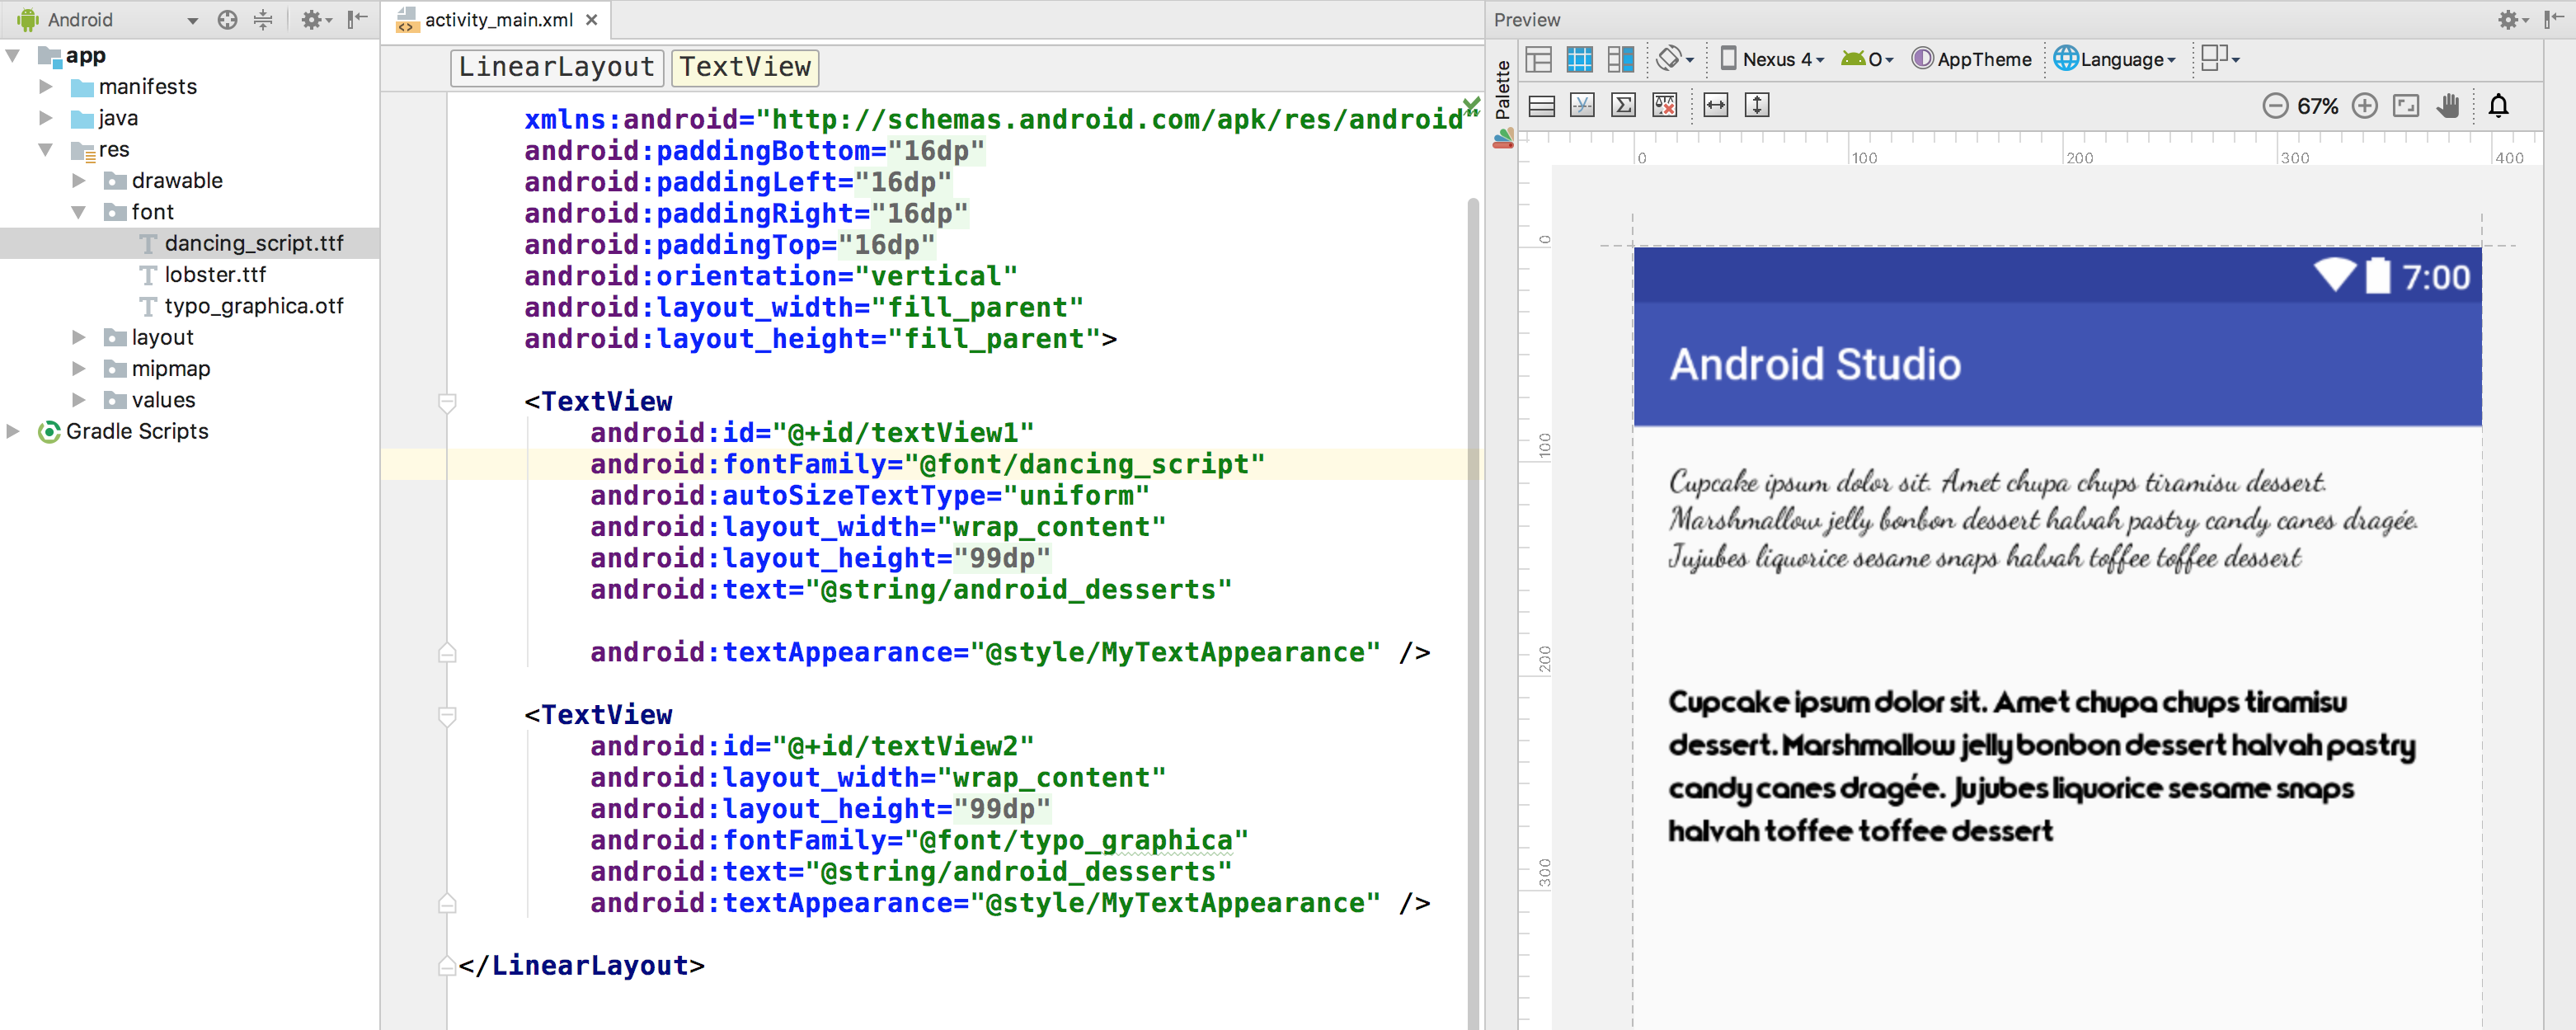
Figure 5. Previewing fonts in layout preview
Adding fonts to style
Open the styles.xml , and set the fontFamily attribute to the font file you want to access.
Using fonts programmatically
To retrieve fonts programmatically, call the getFont(int) method and provide the resource identifier of the font you want to retrieve. This method returns a Typeface object. Although the system picks the best style for you from the fonts information, you can use the setTypeface(android.graphics.Typeface, int) method to set the typeface with specific styles.
Note: The TextView already does this for you.
Kotlin
Using the support library
The Support Library 26.0 provides support to the Fonts in XML feature on devices running Android 4.1 (API level 16) and higher.
Note: When you declare font families in XML layout through the support library, use the app namespace to ensure your fonts load.
To retrieve fonts programmatically, call the ResourceCompat.getFont(Context, int) method and provide an instance of Context and the resource identifier.
Kotlin
Content and code samples on this page are subject to the licenses described in the Content License. Java is a registered trademark of Oracle and/or its affiliates.
Источник
Tek Eye
Setting a new font when developing an Android app puts your own style onto the user interface (UI), and can help it stand out from the crowd. This article shows how easy it is to change Android TextView and EditText fonts using properties. Assigning a custom font in code from the app’s assets is also covered in the Using a Custom Font section.
(This Android font example assumes that Android Studio is installed, a basic App can be created and run, and the code in this article can be correctly copied into Android Studio. The example code can be changed to meet your own requirements. When entering code in Studio add import statements when prompted by pressing Alt-Enter.)
Easy Font Modifications to Get Different Text Styles in Android
For many Activity screens the interface is usually constructed using Android layouts and interface widgets. The interface widgets, such as CheckBoxes and TextViews, have various properties that can be easily modified to change their look. Changing properties can be done via:
- The Properties list when viewing an Activity in the Design (graphical layout) screen in Studio.
- By editing the layout XML directly in the Text view.
- Or by using code to set property values.
Follow this article as a tutorial by starting a new Android project in Studio. Here the project is called Fonts and uses an Empty Activity. All other settings are left at their default values.
Edit the Text Properties with the Android Studio’s Graphical Layout
The new Android Studio project will have an activity_main.xml as the starting layout. With the Design mode open select the Hello World! TextView . With a TextView selected its properties can be changed in the Properties pane. Increase the textSize to better see the changes you make to the properties.
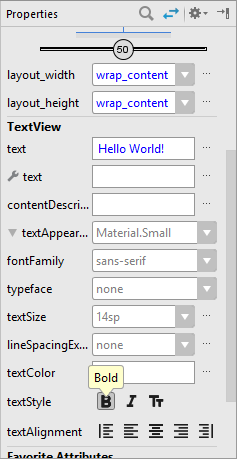
For the TextView find the typeface property and try the various settings of normal, sans, serif, and monospace. Add several TextViews to the screen each set to a different typeface value to compare them. The typeface property is stored in the XML layout file as the TextView’s attribute android:typeface.
Having no typeface set (the android:typeface attribute is not present) or having it set to normal or sans results in the same font style. This is because the default (normal) font setting uses the sans value. The monospace setting provides a font in which each letter takes up an equal amount of screen space (unlike the other settings in which the space a letter takes up various depending upon the letter, so i’s are a lot narrower than w’s).
A serif font is one that has additional decoration at the end of the strokes that make up the letter. As this picture based on the Wikipedia entry for serif shows. The name of the sans setting comes from the phrase sans serif which means without serif as sans is french for without.

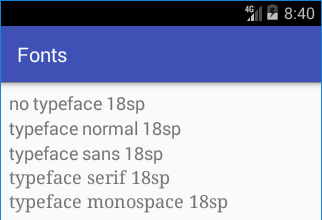
Update to Android with the fontFamily Attribute
For more control of the fonts used by Views a fontFamily attribute is supported. This also allows loading of fonts from a res/font folder instead of using other resources as described in Using a Custom Font further on in the article. Try the various fontFamily settings of sans-serif, sans-serif-condensed, serif, monospace, serif-monospace, casual, cursive and sans-serif-small-caps. The sans-serif value is the same as typeface sans.
Note: Older versions of Android will not support fontFamily. A fontFamily not present on the system, i.e. not available to typeface, will fall back to the default typeface attribute setting (sans).
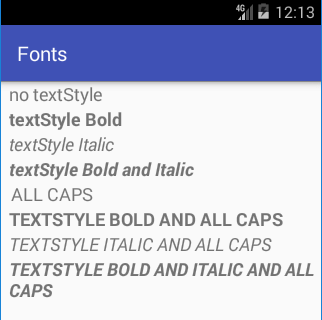
Bold and Italic with or without All Caps
Use the textStyle Property to add bold, italic, or bold and italic options to the text (in the layout XML the android:textStyle attribute). The default value is normal, the value it takes if no textStyle is set. The other values are bold and italic, either individually or combined with a bar, as in android:textStyle=»bold|italic» .
The textAllCaps property (in XML android:textAllCaps ) is set true for all capital letters (false or not present for normal text, the default setting).
Combining Properties into a Text Appearance
When putting together an app’s design you may have several Views that you want to set with the same properties (such as text color and text size). Setting the properties on all the Views individually becomes a chore with many Views in an app, especially if you decide to change a property later and have to find each View to edit the property. Fortunately Android can group properties into styles, a style is then applied to a View with one property. Then you only need to edit style properties in a single location, similar to the way HTML web pages are styled with cascading style sheets (CSS). As for CSS styles can themselves use other defined styles.
Styles that only modify a View’s text properties is applied with the textAppearance property (XML attribute android:textAppearance ). Styles that modify non-text properties are applied via the style property. This tutorial will only include a brief introduction to styles.
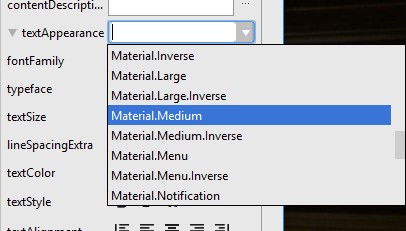
Change the textAppearance property of a TextView to AppCompat.Large, the full value is @style/TextAppearance.AppCompat.Large, in the XML:
This says it is pointing to an Android style attribute called TextAppearance.AppCompat.Large. You can see this attribute in the appcompat library in the project tree. The source is under the folder where the Android SDK was installed:
The styles.xml has:
This gives an idea on how to styles are built up and referenced.
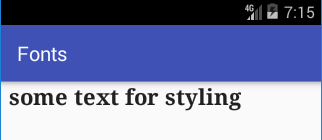
Using a Style Resource
Use a style to add bold and serif to a text view. To add a styles file select the res folder in the Project tree and using the Files menu or context menu (normally right-click) select New then XML and then Values XML File. Give it a name, here mytextstyle was used to create mytextstyle.xml. (Styles do not need to be in a file named styles.xml, they can be stored in any named resource file). Click the finish button. In the new opened XML file define a new style for bold and serif, the textSize is set to 18sp to override the small default font size.
Set the textAppearance of a TextView to this new style android:textAppearance=»@style/MySerifBold» .
Instead of setting the textSize to 18sp an existing large style code be set as the parent:
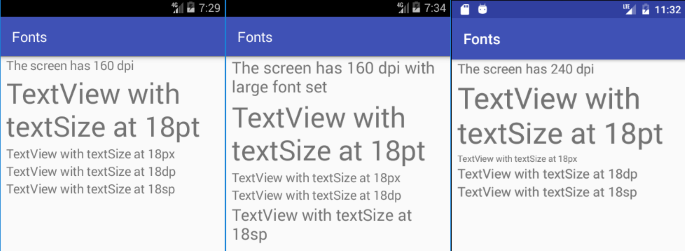
Font Size Measurements in Android
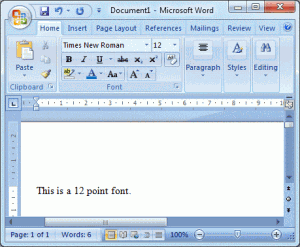
When it comes to sizing text for display in an Activity there are several factors to consider, the size needed for easy reading, the size and resolution of the screen, and the user’s font size device setting. The size of text has traditionally been based on the point. This is a unit of measurement originating from the physical printing process. There are 72 points to an inch so a 12 point font will produce a line of text one sixth of an inch, about 4.2mm, high (12/72=1/6). Word processing software still uses this measurement with the font size of the text entered or selected under the font formatting options as a simple number (usually selectable from a range such as 8, 9, 10, 11, 12, 14, 16 and so on).
Android supports the point size (pt) but it is a bit cumbersome for mobile device screens. Android devices come in all sorts of screen sizes and resolutions. The screen density of a device is usually stated in dots per inch (DPI). This is the number of pixels that a screen contains in one inch. A 240 DPI screen has a lower resolution than a 320 DPI screen. Font sizes can be set using pixel measurements (px) but this leads to different size texts on different screen densities even though the screens may be similar in size physically. A 3 inch wide 240 DPI screen would have larger text than on a 3 inch wide 320 DPI when sizing font using pixel values. To allow for this Android provides the density pixel (dp) setting and sizes set using dp are scaled correctly for different DPIs. However, dp does not cater for a user’s font size setting.

Android devices can help those with poor eyesight by allowing them to increase the font size setting on their devices (or decrease it for the keen-sighted). Depending upon the version of Android the default text size can be bumped up or down one or more sizes. You Apps should also cater for this setting by defining Text Size using scaled pixels (sp). As the user changes their device font settings so the text in your Activity would scale appropriately if sp is used.
Using a Custom Font
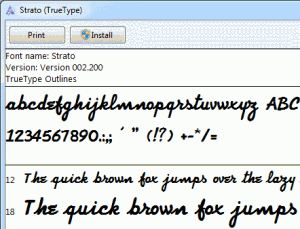
The fonts bundled with Android do not give a great deal of choice. Fortunately Android supports any TrueType font. The font file is added to the project then loaded into a Typeface object and assigned to the widget. (See also the new fontFamily attribute.) You could use a font bundled with your development PC (for example on Windows from the C:\Windows\Fonts folder), or one you purchased, though there may be licensing issues. There are lots of free fonts available. In this example we are using the Strato free font from the Font Library website. Download the font and extract the .ttf (TrueType) files from the strato.zip file.
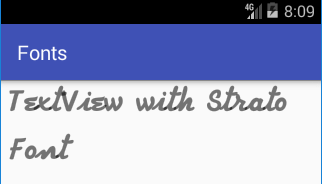
The Strato-linked.ttf file is copied to the src/main/assets folder. (To create an assets folder highlight the app in the Project explorer and use the File or context menu. Select New then Folder then Assets Folder.) Open the MainActivity.java. Just before the closing brace of the onCreate method a Typeface object is created and loaded with a font from assets. It is then assigned to a TextView or EditText using the setTypeface method:
Ideally this needs to be wrapped in an exception handler incase the TTF file is corrupt or the name is misspelt. If you are using text characters outside of the typical text range ensure that the font chosen contains those characters.
Using the Android Fonts on Your PC
The fonts shipped with Android are placed onto you PC when the SDK is installed. Look in android-sdk\platforms\android-x\data\fonts (where x is the API level), these fonts can be installed onto your PC and used in your word processor, useful when doing app design documents.
A Final Word on Fonts
This tutorial has given a brief overview on how to use different fonts in an Android Activity, you can also use color, spacing and borders to improve Activity layouts. As well as the Font Library mentioned above, the Wikipedia article Open-source Unicode typefaces is a good source of information on a variety of royalty free fonts. A demo project featuring the techniques used in this tutorial is available to download in the fonts.zip file ready for importing into Android Studio. Instructions are included in the zip and also on the the Android Example Projects page.
See Also
- Android Styles and Themes on the Android Developers website.
- Download the code for this example, available in fonts.zip
- For more tutorials in Studio see the Android Example Projects page.
- For a full list of all the articles in Tek Eye see the full site Index.
Archived Comments
Nitin on January 7, 2013 at 10:09 am said: I want to apply Comic-sans to my whole android application but not got it can you please help me?
Tek Eye on January 7, 2013 at 4:27 pm said: The Comic Sans MS files (comic.ttf and comicbd.ttf) are usually in the C:\Windows\Fonts folder on a PC. Unfortunately Comic Sans can not be distributed because of licensing (see https://www.microsoft.com/typography/faq/faq11.htm). Use an alternative similar free font, for example one listed at https://www.fontsquirrel.com/fonts/list/style/Comic
Sulaiman Khan on June 5, 2013 at 10:13 am said: Nice, a very very informative article.
Melissa on December 17, 2013 at 12:26 pm said: I am brand new to the Android app development world. When I add textview objects to my layout page, the only property that I am allowed to change is the text. I can’t change font size, style, etc. Any ideas on what is wrong with my setup? I can’t do it on any app that I create.
Tek Eye on December 17, 2013 at 2:04 pm said: Changing the properties of a selected item should be straightforward. Are you using Eclipse with the Android SDK or Android Studio? If you can’t change values using the Properties list on the Outline tab (use the Window then Show View menu if it is not shown) can you edit the XML layout file directly? (Click the layout file name next to the Graphical Layout tab to see the raw XML). Add a property in the XML to see if the item changes, e.g. add textStyle=»bold» to bold the text:
When you create a new app and does it run OK? (see Your First Android Hello World Java Program). Can you change the default app screen?
Melissa on December 18, 2013 at 12:31 pm said: I am using Eclipse with the Android SDK or Android Studio? I can edit the XML layout file directly? The app runs fine! I am working with 15 students and it works perfect on about 11 of the devices, but the other 4 can’t modify the properties in the graphical layout. Once I enter the code on the XML layout file, then it lets them modify that setting on the properties dialog box.
Tek Eye on December 18, 2013 at 4:58 pm said: I’ve not seen that behaviour before. I checked the Android project issue tracker and someone has reported a similar issue (62792). I suggest you add your experience to the bug report so that Android has as much information as possible so solve the issue.
Published: 2012-11-06 Updated: 2017-05-29


Do you have a question or comment about this article?
(Alternatively, use the email address at the bottom of the web page.)
↓markdown↓ CMS is fast and simple. Build websites quickly and publish easily. For beginner to expert.
Free Android Projects and Samples:
Источник


