- TextView
- Программная установка текста
- Атрибуты
- Программная установка фона
- Реагируем на событие onClick
- Многострочный текст
- Увеличиваем интервалы между строками
- Бой с тенью
- Создание ссылок автоматом
- Совет: Используйте полупрозрачность с умом
- Выделить текст для копирования
- romannurik / AndroidManifest.xml
- This comment has been minimized.
- jrub commented Jun 24, 2015
- This comment has been minimized.
- ursusursus commented Feb 19, 2016
- Styles and Themes
- Themes versus Styles
- Create and apply a style
- Extend and customize a style
- Apply a style as a theme
- Style hierarchy
- TextAppearance
- Customize the default theme
- Add version-specific styles
- Customize widget styles
- Additional resources
- Blog posts
TextView
Компонент TextView предназначен для отображения текста без возможности редактирования его пользователем, что видно из его названия (Text — текст, view — просмотр).
Находится в разделе Texts.
TextView — один из самых используемых компонентов. С его помощью пользователю удобнее ориентироваться в программе. По сути, это как таблички: Руками не трогать, По газону не ходить, Вход с собаками воспрещен, Часы работы с 9.00 до 18.00 и т.д., и служит для представления пользователю описательного текста.
Для отображения текста в TextView в файле разметки используется атрибут android:text, например:
Такой подход является нежелательным. Рекомендуется всегда использовать текстовые ресурсы. В будущем эта привычка позволит вам обеспечить многоязыковую поддержку:
Программная установка текста
Программно текст можно задать методом setText():
Атрибуты
Для всех вышеперечисленных атрибутов в классе TextView есть соответствующие методы для чтения или задания соответствующих свойств.
Программно установим размеры текста при помощи setTextSize() с различными единицами измерения.

По умолчанию у компонентов TextView отсутствует фоновый цвет. Чтобы задать цвет, укажите значение Drawable для атрибута android:background. В качестве значения Drawable может использоваться изображение или XML-представление фигуры, включающий ресурс Drawable (поместить в папку res/drawable).
Программная установка фона
В некоторых случаях программисты из-за невнимательности неправильно меняют фон элемента программным способом и удивляются, почему ничего не работает.
Предположим, у вас определён в ресурсах зелёный цвет:
Следующий код будет ошибочным:
Нужно так (два варианта):
Реагируем на событие onClick
Если вы хотите, чтобы TextView обрабатывал нажатия (атрибут android:onClick), то не забывайте также использовать в связке атрибут android:clickable=»true». Иначе работать не будет!
Многострочный текст
Если вы хотите создать многострочный текст в TextView, то используйте символы \n для переноса строк.
Например, в ресурсах:
Обратите внимание, что в тексте также применяется простое форматирование.
Также перенос на новую строку можно задать в коде:
Увеличиваем интервалы между строками
Вы можете управлять интервалом между соседними строчками текста через атрибут android:lineSpacingMultiplier, который является множителем. Установите дробное значение меньше единицы, чтобы сократить интервал или больше единицы, чтобы увеличить интервал между строками.
Бой с тенью
Чтобы оживить текст, можно дополнительно задействовать атрибуты для создания эффектов тени: shadowColor, shadowDx, shadowDy и shadowRadius. С их помощью вы можете установить цвет тени и ее смещение. Во время установки значений вы не увидите изменений, необходимо запустить пример в эмуляторе или на устройстве. В следующем примере я создал тень красного цвета со смещением в 2 пикселя по вертикали и горизонтали. Учтите, что для смещения используются единицы px (пиксели), единицы dp не поддерживаются.

Программный эквивалент — метод public void setShadowLayer (float radius, float dx, float dy, int color):
Создание ссылок автоматом
У TextView есть ещё два интересных свойства Auto link (атрибут autoLink) и Links clickable (атрибут linksClickable), которые позволяют автоматически создавать ссылки из текста.
Выглядит это следующим образом. Предположим, мы присвоим элементу TextView текст Мой сайт: developer.alexanderklimov.ru и применим к нему указанные свойства.
При этом уже на этапе разработки вы увидите, что строка адреса сайта после слов Мой адрес: стала ссылкой. Если вы запустите приложение и нажмете на ссылку, то откроется браузер с указанным адресом. Вам даже не придется писать дополнительный код. Аналогично, если указать номер телефона (параметр phone), то запустится звонилка.
У ссылки есть интересная особенность — при длительном нажатии на ссылку появляется диалоговое окно, позволяющее скопировать ссылку в буфер обмена.
Атрибут autoLink позволяет комбинировать различные виды ссылок для автоматического распознавания: веб-адрес, email, номер телефона.

Цвет ссылки можно поменять через свойство Text color link (XML-атрибут textColorLink), а программно через метод setTextLinkColor().
Программно можно установить ссылки на текст через класс Linkify:

Кроме константы ALL, можно также использовать Linkify.EMAIL_ADDRESSES, Linkify.MAP_ADDRESSES, Linkify.PHONE_NUMBERS. К сожалению, русские адреса не распознаются. В моём случае индекс был распознан как телефонный номер, а город и улица не стали ссылкой.
В таких случаях придётся самостоятельно добавить ссылки в текстах. Например, определим ссылку в ресурсе:
Присвоим созданный ресурс тексту в TextView и запустим пример. Сам текст будет выглядеть как ссылка, но реагировать не будет. Чтобы исправить данную проблему, добавим код:
Ссылки в тексте выглядят не совсем удобными. Есть отдельная библиотека, которая улучшает функциональность. Описание проблем и ссылка на библиотеку есть в статье A better way to handle links in TextView — Saket Narayan.
Совет: Используйте полупрозрачность с умом
Если вам нужно установить текст полупрозрачным, то не используйте атрибут android:alpha:
Дело в том, что такой подход затрачивает много ресурсов при перерисовке.
Атрибут textColor позволяет установить полупрозрачность без потери производительности:
Выделить текст для копирования
По умолчанию, текст в TextView нельзя выделить для копирования. Но в API 11 появилась такая возможность, которая может пригодиться. Делается либо при помощи XML-атрибута android:textIsSelectable, либо через метод setTextIsSelectable().
Добавьте в разметку два компонента TextView и одно текстовое поле EditText для вставки скопированного текста. У первой текстовой метки установим возможность выделения текста декларативно.
Для второго компонента возможность выделения создадим программно.
Сделайте долгий тап на тексте в любом TextView. Увидите стандартные ползунки для выбора длины текста. Скопируйте текст, сделайте длинный тап в EditText и вставьте текст.
Источник
romannurik / AndroidManifest.xml
This file contains bidirectional Unicode text that may be interpreted or compiled differently than what appears below. To review, open the file in an editor that reveals hidden Unicode characters. Learn more about bidirectional Unicode characters
| manifest . > |
| . |
| Make sure your app (or individual activity) uses the |
| theme with the custom attribute defined. —> |
| application android : theme = » @style/AppTheme » . > |
| . |
| application > |
| manifest > |
This file contains bidirectional Unicode text that may be interpreted or compiled differently than what appears below. To review, open the file in an editor that reveals hidden Unicode characters. Learn more about bidirectional Unicode characters
| public class MyActivity extends Activity < |
| protected void onCreate ( Bundle savedInstanceState ) < |
| super . onCreate(savedInstanceState); |
| . |
| // Pass in the theme attribute that’ll resolve to the |
| // desired button style resource. The current theme |
| // must have a value set for this attribute. |
| Button myButton = new Button ( this , null , R . attr . myButtonStyle); |
| myButton . setText( » Hello world » ); |
| ViewGroup containerView = ( ViewGroup ) findViewById( R . id . container); |
| containerView . addView(myButton); |
| > |
| > |
This file contains bidirectional Unicode text that may be interpreted or compiled differently than what appears below. To review, open the file in an editor that reveals hidden Unicode characters. Learn more about bidirectional Unicode characters
| The convention is to put the And TextView initialization does: But it doesn’t recognize fontFamily attribute :S Is it a normal behaviour? This comment has been minimized.Copy link Quote reply jrub commented Jun 24, 2015Very useful indeed, thanks Roman. This should definitely be included into the official documentation for Themes & Styles (http://developer.android.com/guide/topics/ui/themes.html) This comment has been minimized.Copy link Quote reply ursusursus commented Feb 19, 2016For me this does not apply layout params like layout_width, layout_height when I have them in my style. Only default wrap_content LayoutParams gets created in both dimensions Источник Styles and ThemesStyles and themes on Android allow you to separate the details of your app design from the UI structure and behavior, similar to stylesheets in web design. A style is a collection of attributes that specify the appearance for a single View . A style can specify attributes such as font color, font size, background color, and much more. A theme is a collection of attributes that’s applied to an entire app, activity, or view hierarchy—not just an individual view. When you apply a theme, every view in the app or activity applies each of the theme’s attributes that it supports. Themes can also apply styles to non-view elements, such as the status bar and window background. Styles and themes are declared in a style resource file in res/values/ , usually named styles.xml . Figure 1. Two themes applied to the same activity: Theme.AppCompat (left) and Theme.AppCompat.Light (right) Themes versus StylesThemes and styles have many similarities, but they are used for different purposes. Themes and styles have the same basic structure—a key-value pair which maps attributes to resources. A specifies attributes for a particular type of view. For example, one style might specify a button’s attributes. Every attribute you specify in a style is an attribute you could set in the layout file. By extracting all the attributes to a style, it’s easy to use and maintain them across multiple widgets. A defines a collection of named resources which can be referenced by styles, layouts, widgets, and so on. Themes assign semantic names, like colorPrimary , to Android resources. Styles and themes are meant to work together. For example, you might have a style that specifies that one part of a button should be colorPrimary , and another part should be colorSecondary . The actual definitions of those colors is provided in the theme. When the device goes into night mode, your app can switch from its «light» theme to its «dark» theme, changing the values for all those resource names. You don’t need to change the styles, since the styles are using the semantic names and not specific color definitions. For more information about how themes and styles work together, see the blog post Android Styling: Themes vs Styles. Create and apply a styleTo create a new style or theme, open your project’s res/values/styles.xml file. For each style you want to create, follow these steps: You can apply the style to a view as follows: Each attribute specified in the style is applied to that view if the view accepts it. The view simply ignores any attributes that it does not accept. Note: Only the element to which you add the style attribute receives those style attributes—any child views do not apply the styles. If you want child views to inherit styles, instead apply the style with the android:theme attribute. However, instead of applying a style to individual views, you’ll usually apply styles as a theme for your entire app, activity, or collection of views. Extend and customize a styleWhen creating your own styles, you should always extend an existing style from the framework or support library so that you maintain compatibility with platform UI styles. To extend a style, specify the style you want to extend with the parent attribute. You can then override the inherited style attributes and add new ones. For example, you can inherit the Android platform’s default text appearance and modify it as follows: However, you should always inherit your core app styles from the Android Support Library. The styles in the support library provide compatibility with Android 4.0 (API level 14) and higher by optimizing each style for the UI attributes available in each version. The support library styles often have a name similar to the style from the platform, but with AppCompat included. To inherit styles from a library or your own project, declare the parent style name without the @android:style/ part shown above. For example, the following example inherits text appearance styles from the support library: You can also inherit styles (except those from the platform) by extending a style’s name with a dot notation, instead of using the parent attribute. That is, prefix the name of your style with the name of the style you want to inherit, separated by a period. You should usually do this only when extending your own styles, not styles from other libraries. For example, the following style inherits all styles from the GreenText style above and then increases the text size: You can continue inheriting styles like this as many times as you’d like by chaining on more names. Note: If you use the dot notation to extend a style, and you also include the parent attribute, then the parent styles override any styles inheritted through the dot notation. To find which attributes you can declare with an tag, refer to the «XML attributes» table in the various class references. All views support XML attributes from the base View class, and many views add their own special attributes. For example, the TextView XML attributes includes the android:inputType attribute that you can apply to a text view that receives input, such as an EditText widget. Apply a style as a themeYou can create a theme the same way you create styles. The difference is how you apply it: instead of applying a style with the style attribute on a view, you apply a theme with the android:theme attribute on either the tag or an tag in the AndroidManifest.xml file. For example, here’s how to apply the Android Support Library’s material design «dark» theme to the whole app: And here’s how to apply the «light» theme to just one activity: Now every view in the app or activity applies the styles defined in the given theme. If a view supports only some of the attributes declared in the style, then it applies only those attributes and ignores the ones it does not support. Beginning with Android 5.0 (API level 21) and Android Support Library v22.1, you can also specify the android:theme attribute to a view in your layout file. This modifies the theme for that view and any child views, which is useful for altering theme color palettes in a specific portion of your interface. The previous examples show how to apply a theme such as Theme.AppCompat that’s supplied by the Android Support Library. But you’ll usually want to customize the theme to fit your app’s brand. The best way to do so is to extend these styles from the support library and override some of the attributes, as described in the next section. Style hierarchyAndroid provides a variety of ways to set attributes throughout your Android app. For example, you can set attributes directly in a layout, you can apply a style to a view, you can apply a theme to a layout, and you can even set attributes programmatically. When choosing how to style your app, be mindful of Android’s style hierarchy. In general, you should use themes and styles as much as possible for consistency. If you’ve specified the same attributes in multiple places, the list below determines which attributes are ultimately applied. The list is ordered from highest precedence to lowest:
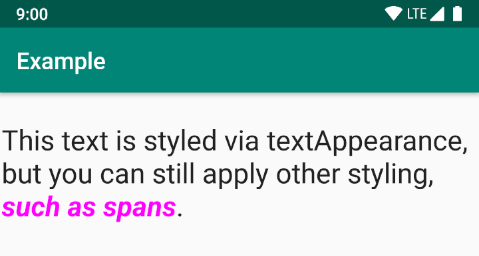
Figure 2. Styling from a span overrides styling from a textAppearance . If you’re trying to style your app and not seeing the results you expect, it’s likely that other styling is overriding your changes. For example, if you apply a theme to your app, along with a style to an individual View , the style attributes would override any matching theme attributes for that View . Note, however, that any theme attributes that aren’t overridden by the style are still used. TextAppearanceOne limitation with styles is that you can apply only one style to a View . In a TextView , however, you can also specify a TextAppearance attribute which functions similarly to a style, as shown in the following example: TextAppearance allows you to define text-specific styling while leaving a View ’s style available for other uses. Note, however, that if you define any text attributes directly on the View or in a style, those values would override the TextAppearance values. TextAppearance supports a subset of styling attributes that TextView offers. For the full attribute list, see TextAppearance . Some common TextView attributes not included are lineHeight[Multiplier|Extra] , lines , breakStrategy , and hyphenationFrequency . TextAppearance works at the character level and not the paragraph level, so attributes that affect the entire layout are not supported. Customize the default themeWhen you create a project with Android Studio, it applies a material design theme to your app by default, as defined in your project’s styles.xml file. This AppTheme style extends a theme from the support library and includes overrides for color attributes that are used by key UI elements, such as the app bar and the floating action button (if used). So you can quickly customize your app’s color design by updating the provided colors. For example, your styles.xml file should look similar to this: Notice that the style values are actually references to other color resources, defined in the project’s res/values/colors.xml file. So that’s the file you should edit to change the colors. But before you start changing these colors, preview your colors with the Material Color Tool. This tool helps you pick colors from the material palette and preview how they’ll look in an app. Once you know your colors, update the values in res/values/colors.xml : And then you can override whatever other styles you want. For example, you can change the activity background color as follows: For a list of attributes you can use in your theme, see the table of attributes at R.styleable.Theme . And when adding styles for the views in your layout, you can also find attributes by looking at the «XML attributes» table in the view class references. For example, all views support XML attributes from the base View class. Most attributes are applied to specific types of views, and some apply to all views. However, some theme attributes listed at R.styleable.Theme apply to the activity window, not the views in the layout. For example, windowBackground changes the window background and windowEnterTransition defines a transition animation to use when the activity starts (for details, see Start an Activity with an Animation). The Android Support Library also provides other attributes you can use to customize your theme extended from Theme.AppCompat (such as the colorPrimary attribute shown above). These are best viewed in the library’s attrs.xml file Note: Attribute names from the support library do not use the android: prefix. That’s used only for attributes from the Android framework. There are also different themes available from the support library that you might want to extend instead of the ones shown above. The best place to see the available themes is the library’s themes.xml file. Add version-specific stylesIf a new version of Android adds theme attributes that you want to use, you can add them to your theme while still being compatible with old versions. All you need is another styles.xml file saved in a values directory that includes the resource version qualifier. For example: Because the styles in the values/styles.xml file are available for all versions, your themes in values-v21/styles.xml can inherit them. As such, you can avoid duplicating styles by beginning with a «base» theme and then extending it in your version-specific styles. For example, to declare window transitions for Android 5.0 (API level 21) and higher, you need to use some new attributes. So your base theme in res/values/styles.xml could look like this: Now you can apply AppTheme in your manifest file and the system selects the styles available for each system version. For more information about using alternative resources for different devices, read Providing Resources. Customize widget stylesEvery widget in the framework and support library has a default style. For example, when you style your app using a theme from the support library, an instance of Button is styled using the Widget.AppCompat.Button style. If you’d like to apply a different widget style to a button, then you can do so with the style attribute in your layout file. For example, the following applies the library’s borderless button style: And if you want to apply this style to all buttons, you can declare it in your theme’s buttonStyle as follows: You can also extend widget styles, just like extending any other style, and then apply your custom widget style in your layout or in your theme. Additional resourcesTo learn more about themes and styles, see the following additional resources: Blog postsContent and code samples on this page are subject to the licenses described in the Content License. Java is a registered trademark of Oracle and/or its affiliates. Источник  Когда к мобильному устройству присоединены наушники  ОС Google Android развивается, и по всему видимому |