- Android timepicker with seconds
- Android TimePicker Example
- Android TimePickerDialog Example
- TimePicker dialog fragment
- Activity
- TimePickerDialog example output
- Android TimePickerDialog event handling
- TimePicker Widget Example
- TimePicker widget example output
- Android TimePicker Modes
- Android TimePicker Custom Material Style
- TimePicker material style application level
- Android TimePicker widget custom style
- Android TimePicker Spinner Custom Color
- About
- Android time picker example
- 1. TimePicker
- 2. Code Code
- 3. Demo
- Android TimePicker with Examples
- Create Android DatePicker in XML Layout File
- Android TimePicker with Clock Mode
- Android TimePicker with Spinner Mode
- Android TimePicker Control Attributes
- Android TimePicker Example
- activity_main.xml
- MainActivity.java
- Output of Android TimePicker Example
- Androd Show TimePicker on EditText Click Example
- activity_main.xml
- MainActivity.java
- Output of Androd Show TimePicker on EditText Click Example
Android timepicker with seconds
Android TimePicker Example
October 06, 2017
Android TimePicker UI control can be used to let users pick time in android applications. Using TimePicker, applications can get valid and well formatted time. TimePicker control can be provided by using TimePickerDialog or TimePicker widget.
In this post, you can learn using TimePicker, TimePickerDialog, TimePicker widget, TimePicker material styles, TimePicker custom styles, TimePicker event handling, TimePicker clock mode, and TimePicker spinner mode.
Android TimePickerDialog Example
To show TimePicker using TimePickerDialog, you need to create a fragment by extending DialogFragment class and implementing onCreateDialog method. In onCreateDialog method, you need to instantiate TimePickerDialog setting current time and return it.
In the activity where you need to show TimePicker, you need to instantiated the Fragment and show it in response to user event such as button click.
TimePicker dialog fragment
Activity
TimePickerDialog example output

Android TimePickerDialog event handling
To handle TimePickerDialog events, you need to implement TimePickerDialog.OnTimeSetListener interface which has onTimeSet callback that gets called every time user picks time using TimePicker. You can add timeSetListener to TimePickerDialog by passing it to constructor as shown in the above dialog fragment code.
TimePicker Widget Example
Instead of TimePickerDialog, you can use TimePicker widget to provide TimePicker control in your application. You can define TimePicker in layout xml using TimePicker element as shown below.
In the activity, you can get the TimePicker object and set time change listener by calling setOnTimeChangedListener method and passing TimePicker.OnTimeChangedListener instance to it. TimePicker.OnTimeChangedListener interface has one callback method onTimeChanged, in this method you can get user picked time.
TimePicker widget example output

Android TimePicker Modes
TimePicker can be used in two modes: clock and spinner mode. If you use material themes, the default TimePicker mode is clock. Above pictures show TimePicker in clock mode. You can change default setting using android:timePickerMode attribute. It takes clock or spinner as values. Below picture shows TimePicker in spinner mode.

Android TimePicker Custom Material Style
TimePicker material style application level
You can change time picker color by defining custom colors in your custom application theme as shown below and setting it as application theme. This color change impacts not only TimePicker but also other controls throughout the application.
To change colors of only TimePicker control throughout the application, you need to first define custom TimePicker style and set it as theme for time picker in your application theme as shown below.

Android TimePicker widget custom style
Android provides Widget.Material.TimePicker and Widget.Material.Light.TimePicker material styles for TimePicker widget. You can customize and apply these styles to TimePicker as shown below.
Applying custom material to TimePicker.
Output of TimePicker custom material style.

Android TimePicker Spinner Custom Color
To change TimePicker spinner’s selection divider color, define colorControlNormal property in your custom style and apply it to TimePicker.

About
Android app development tutorials and web app development tutorials with programming examples and code samples.
Источник
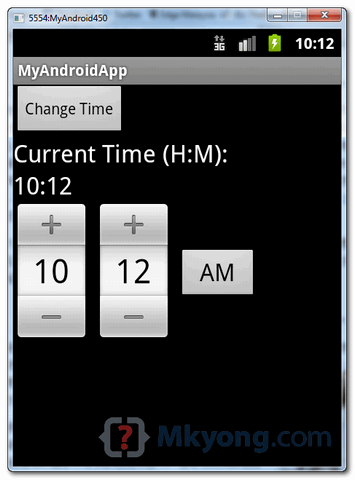
Android time picker example
By mkyong | Last updated: August 29, 2012
Viewed: 209,618 (+7 pv/w)
In Android, you can use “android.widget.TimePicker” class to render a time picker component to select hour and minute in a pre-defined user interface.
In this tutorial, we show you how to render time picker component via android.widget.TimePicker in current page, and also in dialog box via android.app.TimePickerDialog. In addition, we also show you how to set a hour and minute in time picker component.
P.S This project is developed in Eclipse 3.7, and tested with Android 2.3.3.
1. TimePicker
Open “res/layout/main.xml” file, add time picker, label and button for demonstration.
P.S The “ TimePickerDialog ” is declare in code, not XML.
2. Code Code
Read the code’s comment, it should be self-explanatory.
P.S The “TimePickerDialog” example above, is referenced from Google Android time picker example, with some minor change.
3. Demo
Run the application.
1. Result, “time picker” and “textview” are set to current time.
2. Click on the “Change Time” button, it will prompt a time picker component in a dialog box via TimePickerDialog .
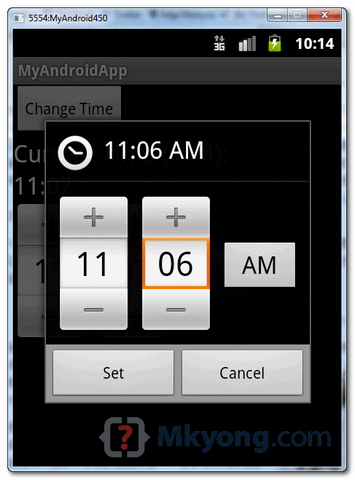
3. Both “time picker” and “textview” are updated with selected time.
Источник
Android TimePicker with Examples
In android, TimePicker is a widget for selecting the time of day, in either 24-hour or AM/PM mode.
If we use TimePicker in our application, it will ensure that the users will select a valid time for the day.
Following is the pictorial representation of using a timepicker control in android applications.

Generally, in android TimePicker available in two modes, one is to show the time in clock mode and another one is to show the time in spinner mode.
Create Android DatePicker in XML Layout File
In android, we can create a TimePicker in XML layout file using element with different attributes like as shown below
TimePicker android :id= «@+id/timePicker1»
android :layout_width= «wrap_content»
android :layout_height= «wrap_content»/>
In anroid, the TimePicker supports a two types of modes, those are Clock and Spinner to show the date details in our application.
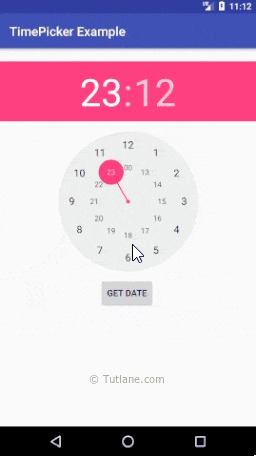
Android TimePicker with Clock Mode
We can define android TimePicker to show time in clock format by using TimePicker android :timePickerMode attribute.
Following is the example of showing the TimePicker in Clock mode.
TimePicker android :id= «@+id/timePicker1»
android :layout_width= «wrap_content»
android :layout_height= «wrap_content»
android :timePickerMode= «clock»/>
The above code will return the TimePicker like as shown below.
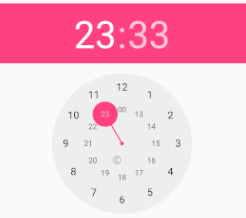
If you observe the above result we got the TimePicker in clock mode to select a time in Hours and Minutes based on our requirements.
Android TimePicker with Spinner Mode
If we want to show the TimePicker in spinner format like showing hours and minutes separately to select the time, then by using TimePicker android :timePickerMode attribute we can achieve this.
Following is the example of showing the TimePicker in spinner mode.
The above code will return the TimePicker like as shown below
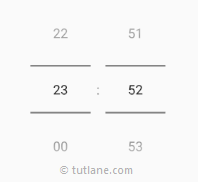
If you observe the above result we got the TimePicker in spinner mode to select the time in Hours and Minutes.
We can change the TimePicker in spinner mode to AM / PM format instead of 24 Hours format by using the setIs24HourView(true) method in Activity file like as shown below.
TimePicker picker=(TimePicker)findViewById(R.id. timePicker1 );
picker.setIs24HourView( true );
The above code will return the TimePicker like as shown below
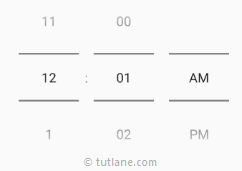
If you observe the above result we got the TimePicker with AM / PM format in spinner mode to select the time separately by hours, minutes and AM/PM.
This is how we can use TimePicker in different modes based on our requirements in android applications.
Android TimePicker Control Attributes
The following are some of the commonly used attributes related to TimePicker control in android applications.
| Attribute | Description |
|---|---|
| android:id | It is used to uniquely identify the control |
| android:timePickerMode | It is used to specify timepicker mode, either spinner or clock |
| android:background | It is used to set the background color for the date picker. |
| android:padding | It is used to set the padding for left, right, top or bottom of the date picker. |
Android TimePicker Example
Following is the example of defining one TimePicker control, one TextView control and one Button control in RelativeLayout to show the selected time in AM / PM format on Button click in the android application.
Create a new android application using android studio and give names as TimePickerExample. In case if you are not aware of creating an app in android studio check this article Android Hello World App.
Now open an activity_main.xml file from \res\layout path and write the code like as shown below
activity_main.xml
xml version= «1.0» encoding= «utf-8» ?>
RelativeLayout xmlns: android = «http://schemas.android.com/apk/res/android»
android :layout_width= «match_parent» android :layout_height= «match_parent» >
TimePicker
android :id= «@+id/timePicker1»
android :layout_width= «wrap_content»
android :layout_height= «wrap_content»
android :layout_centerHorizontal= «true»
android :layout_marginTop= «20dp»/>
Button
android :id= «@+id/button1»
android :layout_width= «wrap_content»
android :layout_height= «wrap_content»
android :layout_below= «@+id/timePicker1»
android :layout_marginTop= «10dp»
android :layout_marginLeft= «160dp»
android :text= «Get Date»/>
TextView
android :id= «@+id/textView1»
android :layout_width= «wrap_content»
android :layout_height= «wrap_content»
android :layout_below= «@+id/button1»
android :layout_marginLeft= «120dp»
android :layout_marginTop= «10dp»
android :textStyle= «bold»
android :textSize= «18dp»/>
RelativeLayout >
If you observe above code we created a one TimePicker control, one TextView control and one Button control in XML Layout file.
Once we are done with the creation of layout with required controls, we need to load the XML layout resource from our activity onCreate() callback method, for that open main activity file MainActivity.java from \java\com.tutlane.timepickerexample path and write the code like as shown below.
MainActivity.java
package com.tutlane.timepickerexample;
import android.os.Build;
import android.support.v7.app.AppCompatActivity;
import android.os.Bundle;
import android.view.View;
import android.widget.Button;
import android.widget.TextView;
import android.widget.TimePicker;
public class MainActivity extends AppCompatActivity <
TimePicker picker ;
Button btnGet ;
TextView tvw ;
@Override
protected void onCreate(Bundle savedInstanceState) <
super .onCreate(savedInstanceState);
setContentView(R.layout. activity_main );
tvw =(TextView)findViewById(R.id. textView1 );
picker =(TimePicker)findViewById(R.id. timePicker1 );
picker .setIs24HourView( true );
btnGet =(Button)findViewById(R.id. button1 );
btnGet .setOnClickListener( new View.OnClickListener() <
@Override
public void onClick(View v) <
int hour, minute;
String am_pm;
if (Build.VERSION. SDK_INT >= 23 ) <
hour = picker .getHour();
minute = picker .getMinute();
>
else <
hour = picker .getCurrentHour();
minute = picker .getCurrentMinute();
>
if (hour > 12 ) <
am_pm = «PM» ;
hour = hour — 12 ;
>
else
<
am_pm= «AM» ;
>
tvw .setText( «Selected Date: » + hour + «:» + minute+ » » +am_pm);
>
>);
>
>
If you observe the above code, we are calling our layout using setContentView method in the form of R.layout.layout_file_name in our activity file. Here our xml file name is activity_main.xml so we used file name activity_main and we are trying to show the selected time of TimePicker in AM / PM format on Button click.
Generally, during the launch of our activity, the onCreate() callback method will be called by the android framework to get the required layout for an activity.
Output of Android TimePicker Example
When we run the above example using an android virtual device (AVD) we will get a result like as shown below.
If you observe the above result, we are getting the time from TimePicker in AM / PM format when we click on Button in the android application.
Now we will see another example of showing the TimePicker control on the EditText click event and get the selected time value in the android application.
Androd Show TimePicker on EditText Click Example
Following is the example of open or popup timepicker dialog when we click on EditText control and get the selected time value on Button click in the android application.
Create a new android application using android studio and give names as TimePickerExample. In case if you are not aware of creating an app in android studio check this article Android Hello World App.
Now open an activity_main.xml file from \res\layout path and write the code like as shown below
activity_main.xml
xml version= «1.0» encoding= «utf-8» ?>
RelativeLayout xmlns: android = «http://schemas.android.com/apk/res/android»
android :layout_width= «match_parent» android :layout_height= «match_parent» >
EditText
android :id= «@+id/editText1»
android :layout_width= «wrap_content»
android :layout_height= «wrap_content»
android :layout_marginLeft= «100dp»
android :layout_marginTop= «150dp»
android :ems= «10»
android :hint= «Enter Time»/>
Button
android :id= «@+id/button1»
android :layout_width= «wrap_content»
android :layout_height= «wrap_content»
android :layout_below= «@+id/editText1»
android :layout_marginLeft= «100dp»
android :text= «Get Date»/>
TextView
android :id= «@+id/textView1»
android :layout_width= «wrap_content»
android :layout_height= «wrap_content»
android :layout_below= «@+id/button1»
android :layout_marginLeft= «100dp»
android :layout_marginTop= «10dp»
android :textStyle= «bold»
android :textSize= «18dp»/>
RelativeLayout >
If you observe above code we created a one EditText control, one TextView control and one Button control in XML Layout file.
Once we are done with the creation of layout with required controls, we need to load the XML layout resource from our activity onCreate() callback method, for that open main activity file MainActivity.java from \java\com.tutlane.timepickerexample path and write the code like as shown below.
MainActivity.java
package com.tutlane.timepickerexample;
import android.app.TimePickerDialog;
import android.support.v7.app.AppCompatActivity;
import android.os.Bundle;
import android.text.InputType;
import android.view.View;
import android.widget.Button;
import android.widget.EditText;
import android.widget.TextView;
import android.widget.TimePicker;
import java.util.Calendar;
public class MainActivity extends AppCompatActivity <
TimePickerDialog picker ;
EditText eText ;
Button btnGet ;
TextView tvw ;
@Override
protected void onCreate(Bundle savedInstanceState) <
super .onCreate(savedInstanceState);
setContentView(R.layout. activity_main );
tvw =(TextView)findViewById(R.id. textView1 );
eText =(EditText) findViewById(R.id. editText1 );
eText .setInputType(InputType. TYPE_NULL );
eText .setOnClickListener( new View.OnClickListener() <
@Override
public void onClick(View v) <
final Calendar cldr = Calendar.getInstance();
int hour = cldr.get(Calendar. HOUR_OF_DAY );
int minutes = cldr.get(Calendar. MINUTE );
// time picker dialog
picker = new TimePickerDialog(MainActivity. this ,
new TimePickerDialog.OnTimeSetListener() <
@Override
public void onTimeSet(TimePicker tp, int sHour, int sMinute) <
eText .setText(sHour + «:» + sMinute);
>
>, hour, minutes, true );
picker .show();
>
>);
btnGet =(Button)findViewById(R.id. button1 );
btnGet .setOnClickListener( new View.OnClickListener() <
@Override
public void onClick(View v) <
tvw .setText( «Selected Time: » + eText .getText());
>
>);
>
>
If you observe above code we are calling our layout using setContentView method in the form of R.layout.layout_file_name in our activity file. Here our xml file name is activity_main.xml so we used file name activity_main and we are trying to show the TimePicker on EditText click, get the selected date of EditText control on Button click.
Generally, during the launch of our activity, the onCreate() callback method will be called by the android framework to get the required layout for an activity.
Output of Androd Show TimePicker on EditText Click Example
When we run the above example using an android virtual device (AVD) we will get a result like as shown below.
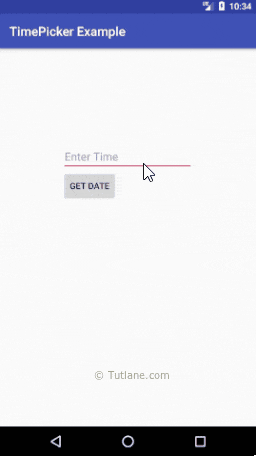
If you observe the above result, we are able to open the TimePicker on EditText click and showing the selected date value in EditText control and getting the EditText control value on Button click in the android application.
This is how we can use TimePicker control in android applications to pick the time based on our requirements.
Источник


