- How to Install ADB on Windows, macOS, and Linux
- What is Android Debug Bridge (ADB)?
- How does ADB Work?
- How to Setup ADB
- Phone Setup
- How to setup ADB on Microsoft Windows
- How to setup ADB on macOS
- How to setup ADB on Linux
- Examples of ADB Commands
- Bonus
- What else can I do with ADB?
- How to Install ADB and Fastboot on Linux
- Download ADB for Linux
- How to install ADB and Fastboot on Linux
- Add ADB & Fastboot system-wide (Optional)
- Install ADB & Fastboot via Terminal commands
How to Install ADB on Windows, macOS, and Linux
Several features of the Android platform can be accessed only through paths and methods that are hidden away from the average user. These have generally been done with the help of some command line Android Debug Bridge (ADB) commands, a tool that Google offers for developers to debug various parts of their applications or the system, but which we can use for all kinds of neat and hidden tricks. A prerequisite to these tricks is installing ADB on your computer. So, in this guide, we will show you how to install ADB on Windows, macOS, and Linux in quick and easy-to-follow steps.
Table of Contents:
What is Android Debug Bridge (ADB)?
The internal structure of the Android Debug Bridge (ADB) is based on the classic client-server architecture. There are three components that make up the entire process.
- The client, i.e. the PC or Mac you have connected to your Android device. We are sending commands to our device from this coomputer through the USB cable (and wirelessly as well in some cases).
- A daemon (adbd), which runs commands on a device. The daemon runs as a background process on each device.
- A server, which manages communication between the client and the daemon. The server runs as a background process on the PC/Mac.
How does ADB Work?
Because there are three pieces that makeup ADB (the Client, Daemon, and the Server), this requires certain pieces to be up and running in the first place. So if you have freshly booted the computer (and you don’t have it setup to start the daemon on boot), then you will need it to be running before any communication can be sent to the target Android device. You’ll see this the following message in the command prompt or terminal, as it will check to make sure the daemon is running.

If the daemon isn’t running, then it will start the process and tell you which local TCP port it has been started on. Once that ADB service has been started, it will continue to listen to that specific port for commands that have been sent by the ADB client. It will then set up connections to all running devices which are attached to the computer (including emulators). This is the moment where you’ll receive the authorization request on the Android device if the computer hasn’t been authorized in the past.
How to Setup ADB
Note: Setting up ADB on the computer is just half the equation since you’ll also need to do some things on the smartphone or tablet to accept the ADB commands.
Phone Setup
- Launch the Settings application on your phone.
- Tap the About Phone option generally near the bottom of the list.
- Then tap the Build Number option 7 times to enable Developer Mode. You will see a toast message when it is done.
- Now go back to the main Settings screen and you should see a new Developer Options menu you can access.
- Go in there and enable the USB Debugging mode option.

- You are partially done with the phone setup process. Next up, you will need to scroll below and follow the rest of the instructions for your particular operating system.

Follow along for the operating system on your computer.
How to setup ADB on Microsoft Windows
- Download the Android SDK Platform Tools ZIP file for Windows.
- Extract the contents of this ZIP file into an easily accessible folder (such as C:\platform-tools)
- Open Windows explorer and browse to where you extracted the contents of this ZIP file
- Then open up a Command Prompt from the same directory as this ADB binary. This can be done by holding Shift and Right-clicking within the folder then click the “Open command window here” option. (Some Windows 10 users may see “PowerShell” instead of “command window”.)
- Connect your smartphone or tablet to your computer with a USB cable. Change the USB mode to “file transfer (MTP)” mode. Some OEMs may or may not require this, but it’s best to just leave it in this mode for general compatibility.
- In the Command Prompt window, enter the following command to launch the ADB daemon:В adb devices
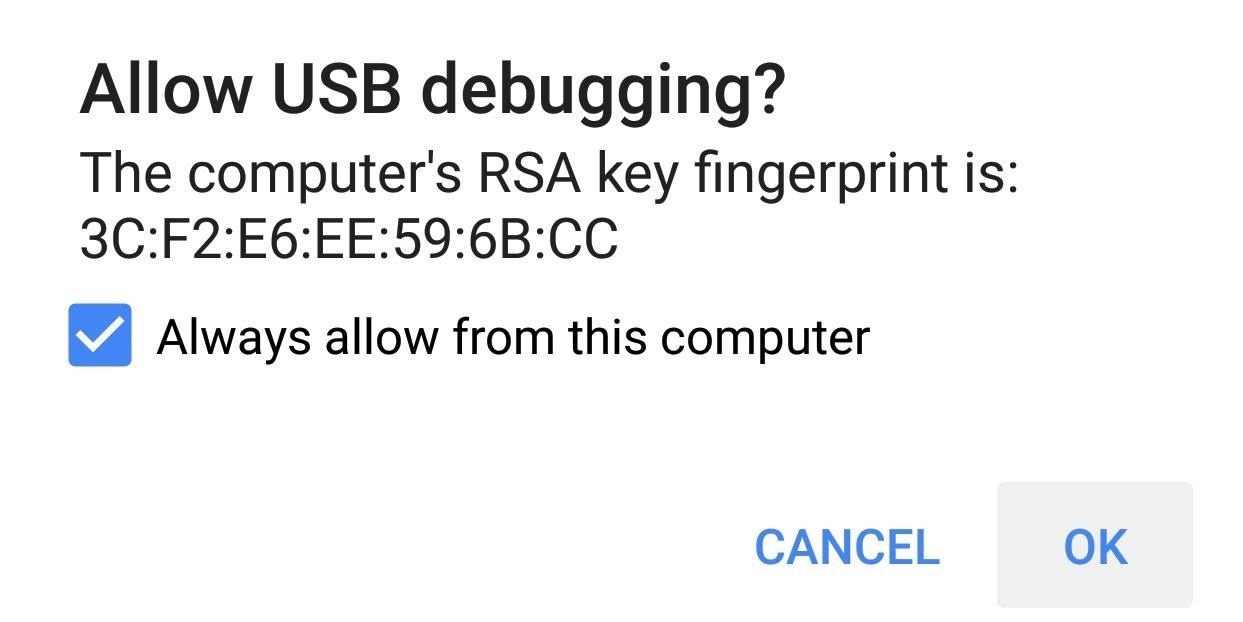
- On your phone’s screen, you should see a prompt to allow or deny USB Debugging access. Naturally, you will want to grant USB Debugging access when prompted (and tap the always allow check box if you never want to see that prompt again).
- Finally, re-enter the command from step #6. If everything was successful, you should now see your device’s serial number in the command prompt (or the PowerShell window).


Yay! You can now run any ADB command on your device! Now go forth and start modding your phone by following our extensive list of tutorials!
How to setup ADB on macOS
- Download the Android SDK Platform Tools ZIP file for macOS.
- Extract the ZIP to an easily-accessible location (like the Desktop for example).
- Open Terminal.
- To browse to the folder you extracted ADB into, enter the following command:В cd /path/to/extracted/folder/
- For example, on my Mac it was this: cd /Users/Doug/Desktop/platform-tools/
- Connect your device to your Mac with a compatible USB cable. Change the USB connection mode to “file transfer (MTP)” mode. This is not always required for every device, but it’s best to just leave it in this mode so you don’t run into any issues.
- Once the Terminal is in the same folder your ADB tools are in, you can execute theВ following command to launch the ADB daemon:В ./adb devices
- On your device, you’ll see an “Allow USB debugging” prompt. Allow the connection.
- Finally, re-enter the command from step #7. If everything was successful, you should now see your device’s serial number in macOS’s Terminal window.

Congratulations! You can now run any ADB command on your device!В Now go forth and start modding your phone by following our extensive list of tutorials!
While the guide above will certainly work, some seasoned macOS users should be aware that there can be an easier way to install ADB on their Macs using an unofficial package manager such as Homebrew or MacPorts.
How to setup ADB on Linux
- Download the Android SDK Platform Tools ZIP file for Linux.
- Extract the ZIP to an easily-accessible location (like the Desktop for example).
- Open a Terminal window.
- Enter the following command:В cd /path/to/extracted/folder/
- This will change the directory to where you extracted the ADB files.
- So for example: cd /Users/Doug/Desktop/platform-tools/
- Connect your device to your Linux machine with your USB cable. Change the connection mode to “file transfer (MTP)” mode. This is not always necessary for every device, but it’s recommended so you don’t run into any issues.
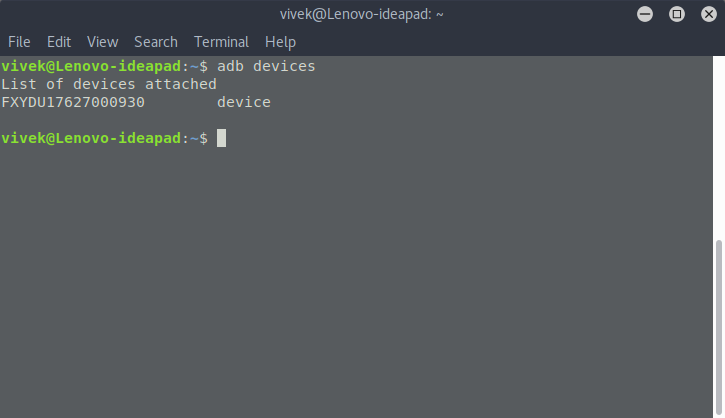
- Once the Terminal is in the same folder your ADB tools are in, you can execute theВ following command to launch the ADB daemon:В ./adb devices
- Back on your smartphone or tablet device, you’ll see a prompt asking you to allow USB debugging. Go ahead and grant it.
- Finally, re-enter the command from step #8. If everything was successful, you should now see your device’s serial number in the Terminal window output.

Congrats! You can now run any ADB command on your device!В Now go forth and start modding your phone by following our extensive list of tutorials!
Some Linux users should be aware that there can be an easier way to install ADB on their computer. The guide above will certainly work for you, but those own a Debian or Fedora/SUSE-based distro of Linux can skip steps 1 and 2 of the guide above and use one of the following commands:
- Debian-based Linux users can type the following command to install ADB:
- Fedora/SUSE-based Linux users can type the following command to install ADB:
However, it is always better to opt for the latest binary from the Android SDK Platform Tools release, since the distro-specific packages often contain outdated builds.
Just to cover all of our bases here, users may need to put a ./ in front of the ADB commands we list in future tutorials, especially when they are using the extracted binaries directly from the Platform Tools ZIP. This is something that is likely known by any *nix user (or Windows user running PowerShell) already, but again, we want as many people as possible to understand how to do these tweaks for Android no matter how much of your operating system you know.
Examples of ADB Commands
To check if you have successfully installed ADB, connect your device to your PC/Mac with your USB cable, and run the adb devices command as described above. It should display your device listed in the Command Prompt/PowerShell/Terminal window. If you get a different output, we recommend starting over with the steps.
As mentioned above, you can use ADB to do all sorts of things on an Android device. Some of these commands are built directly into the ADB binary and should work on all devices. You can also open up what is referred to as an ADB Shell and this will let you run commands directly on the device. The commands which are run directly on the device can vary from device to device (since OEMs can remove access to certain ones, and also modify adb behavior) and can vary from one version of Android to the next as well.
Below, you’ll find a list of example commands which you can do on your device:
- Print a list of connected devices: adb devices
- Kill the ADB server: adb kill-server
- Install an application: adb install
Copy a file/directory to the device: adb push
Bonus
For those who want to take this a step further, you can follow this new tutorial we put together that will walk you through how to set up ADB so that you can use the command from any directory on a Windows or Linux desktop.
What else can I do with ADB?
Below is a list of XDA tutorials for various devices that detail many applications of ADB commands in order to modify hidden settings, customize OEM features or user interfaces, and much more!
Источник
How to Install ADB and Fastboot on Linux
If you’re an Android enthusiast, you’ve most probably heard of ADB & Fastboot. If I had to bet I’d bet that you’ve most probably even used them. Android is very customizable but there are certain things that you still can’t do without root access. Yet, there are certain things that you can do without root access but you need ADB & Fastboot. From backing up your device to changing screen resolution or even flashing custom recoveries, unlocking the bootloader, ADB and Fastboot have a lot of uses. We’ve seen how you can install ADB & Fastboot on Windows before. Windows isn’t the only desktop OS around though. There are several others based on Linux, just like Android. Here’s how to setup or install ADB and Fastboot on Linux.
Download ADB for Linux
The best way to install ADB and Fastboot on Linux or any other OS would be to install the Android SDK Tools. It comes with ADB and Fastboot bundled and is also regularly updated by Google. You can download the zip from the download link below.
How to install ADB and Fastboot on Linux
- Extract the downloaded zip file to an easy to access location such as the desktop. This downloaded folder contains all the files necessary to run ADB & Fastboot and requires no further installation. To use ADB & Fastboot though you will need to access this folder from a Terminal.
- Open the Terminal by pressing Ctrl+Alt+T or via whichever app launcher or method you prefer.
- In the Terminal, access the extracted folder by using this command:
Replace /path/to/extracted/folder/ with the actual path to the folder. For instance,
Alternatively, you can open the folder using Nautilus, which is the default file manager on most Linux distros, right-click on an empty area and select Open in Terminal. 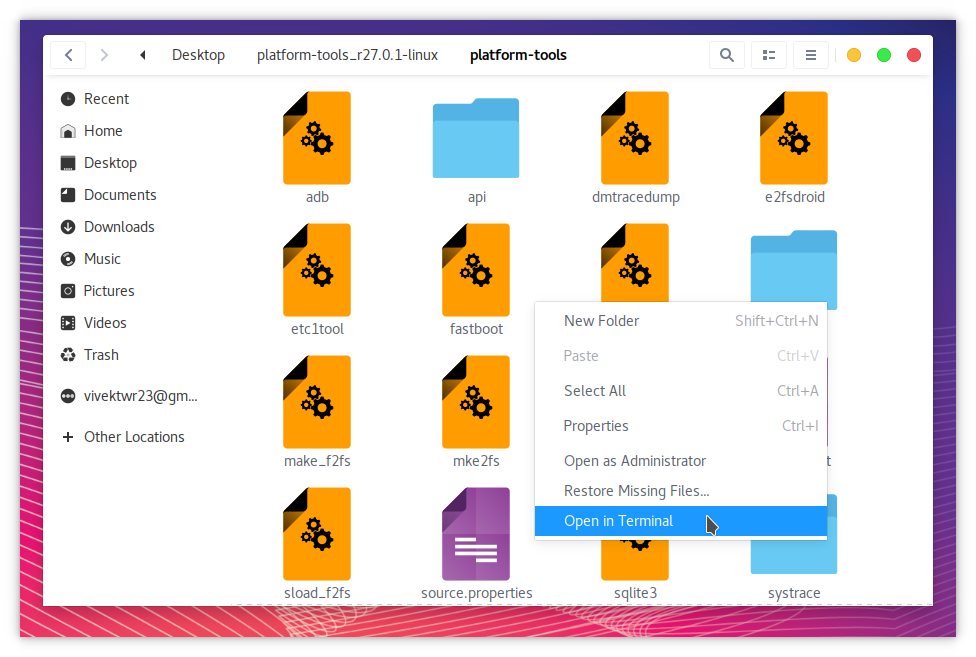
Add ADB & Fastboot system-wide (Optional)
- In a Terminal, enter the following command to open the .bashrc file in a Text editor of your choice. The command below will open the file in gedit.
- At the end of the file, add the following line then save and exit.
- In the Terminal, type adb to see if ADB still works. If it doesn’t, which is possible on 64-bit systems, install the packages glibc.i686 and libstdc++ and it should work.
Install ADB & Fastboot via Terminal commands
While the above method will work for every Linux distro, it is not the best way to install ADB & Fastboot on all Linux distros. Some Linux users can have a more hassle-free, system-wide ADB & Fastboot installation. Users who have a Debian or Fedora/SUSE-based distro of Linux need not download the above linked platform-tools folder. Simply launch a Terminal and enter one of the following commands depending on the Linux distribution you use.
- Debian-based Linux users can type the following command to install ADB: sudo apt — get install adb
- Fedora/SUSE-based Linux users can type the following command to install ADB: sudo yum install android — tools
For the uninitiated, Ubuntu, the most popular Linux distribution and its various official flavors and derivatives are all Debian based. Also, while Ubuntu users need not worry, there’s one other thing that you should keep in mind if you’re using other Linux distributions. If you’re using such a distribution, you probably already know but you may have to type a ./ before every ADB command. For instance, the adb devices command used above should be typed as below.
Источник


