- 5 best Android apps to transfer files from Android to PC and other ways too!
- AirDroid and Pushbullet
- Cloud Storage
- Feem v4
- Resilio Sync
- Xender
- Non-app ways to transfer files
- Top 3 Ways to Transfer Files from Android to PC Using USB Cable
- Part 1: How to Transfer Photos from Android to PC Using USB Cable & Windows File Explorer
- Part 2: How to Transfer Files from Android to PC/Mac Using USB Cable & Coolmuster Android Assistant
- Part 3: How to Transfer Files from Android to Mac via USB Cable & Android File Transfer
5 best Android apps to transfer files from Android to PC and other ways too!
![]()
We’d also like to give an honorable mention to Syncthing-Fork (Google Play link). It’s a bit more power-user friendly than regular user friendly, but it worked perfectly in our testing.
Read more:
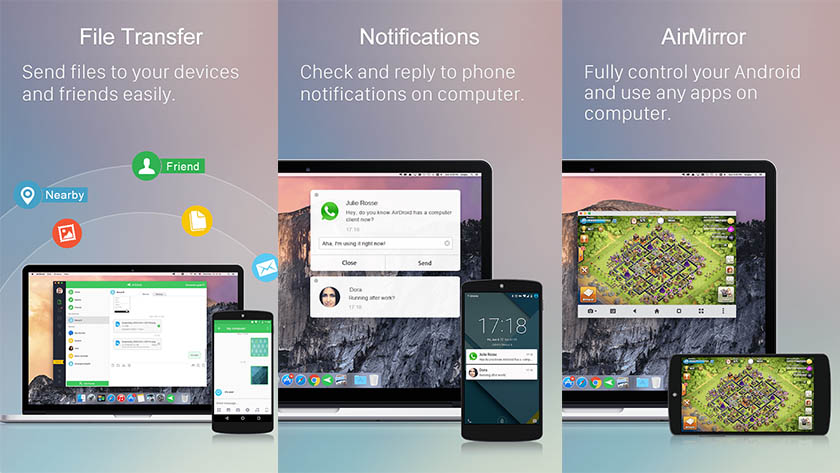
AirDroid and Pushbullet
Price: Free / $1.99 per month / $19.99 per year / $38.99 per two years
AirDroid is one of the more popular apps to transfer files from Android to PC. It can do other stuff too. The features include sending and receiving SMS/MMS from your PC, see your device notifications, and much more. It can even find a lost phone, control the camera, and use apps. You’ll also be able to transfer files to your computer from your phone. You get the basic stuff for free. You’ll have to subscribe to the service to get everything. Pushbullet works very much the same way in terms of transferring files to PC from your Android device, even if it costs a little more. You can go with either of these options. They are the two most popular options.
Cloud Storage
Price: Free / Varies by app
Cloud Storage is an excellent method to transfer files from Android to PC and back again. There are a variety of services to choose from, including Dropbox, Google Drive, OneDrive, Box.com, and others. Transferring files is easy enough. You upload the file to cloud storage on one device. You then download it on another device. Most cloud storage apps have their own dedicated apps and it makes the process easier. We have our best cloud storage apps list linked up toward the top of this article.

Feem v4
Price: Free
Feem is a simple app that does one thing very right. It transfers things from devices connected to the same WiFi network. That includes mobile phones, tablets, computers, laptops, or whatever else. Each device simply downloads Feem and runs it. From there, you can transfer whatever you want to and from those devices. The WiFi doesn’t need to be connected to the actual internet. A local network is all you really need. It’s simple, effective, cheap, and the Material Design looks nice. ShareIt is another app in this same style that does well.
Resilio Sync
Price: Free / Up to $75
Resilio Sync (formerly BitTorrent Sync) is kind of a wildcard. It works a lot like cloud storage. However, the cloud storage server is your own desktop or laptop. You can sync as much data as you’d like, transfer files back and forth at will, and a lot more. It should support Mac, Linux, and Windows as well. It’s definitely among the more secure options. Your stuff is never on a cloud server. It’s just your phone and your device talking to each other. The app is free for limited use and you can unlock all the features for a single, albiet somewhat expensive payment if you want to. This can easily replace cloud storage entirely if you want it to.

Xender
Price: Free
Xender is one of the most popular apps in this space. It lets you connect your phone to another device and transfer over WiFi. It works with other Android or iOS phones, Macs, PCs, and even Tizen. The app does its job as intended most of the time and it worked okay in our testing. However, this is one of those apps that either works perfectly or it doesn’t work at all. It also has a few other features, like the ability to convert video to audio and you can apparently use it to download Facebook, Whatsapp, and Instagram videos. Another strong (albeit less popular) competitor here is Feem (Play Store link).
See more app lists:
Non-app ways to transfer files
- Use Bluetooth – If your laptop has a Bluetooth module or if you have a Bluetooth dongle for your desktop or laptop, you can pair your device with your computer using Bluetooth and send files that way. The transfer rates are very slow so only use this method for smaller files.
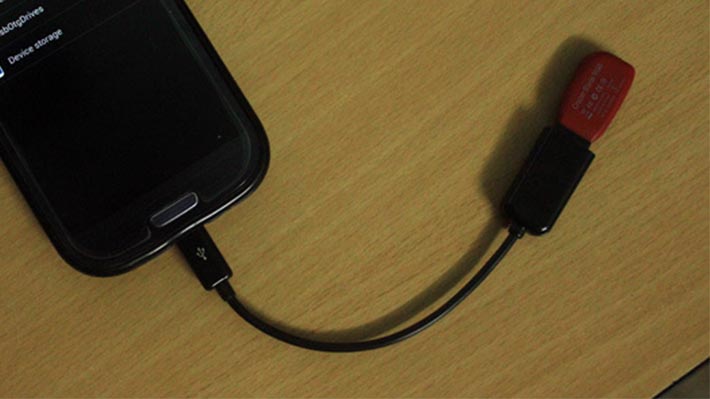
- USB On-The-Go – USB OTG cables allow you to connect your device to USB devices such as external hard drives or flash drives. You use the cable to transfer documents to your flash drive or external hard drive or vice versa. They are relatively inexpensive.
- Share to email – This only works with small files like photos or documents, but you can send most types of files over email. Most emails have a limit of around 25MB for attachments.
- Share to chat – This works for a number of file types, especially if you use something like Discord, Slack, or Skype. You send yourself the file in a chat on one device and retrieve it on another. This should work for smaller files like photos, documents, or similar things. Skype and Slack have support for things like PDF files, archived (zipped) files, and other document types as well.
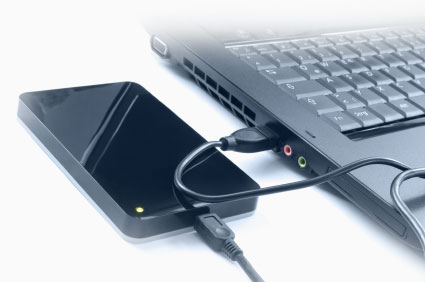
- Use your data/charging cable – This one is fairly obvious. Just plug your phone into your computer using the USB cable that comes with your charger. This is the most common and reliable method of transferring files to PC from Android devices.
- Your micro SD card – Devices with micro SD card support can transfer files much like flash drives. You use a file manager app to move the files to the SD card, pop it out of your phone (after turning it off, of course), and then use an adapter to put it into your card reader on your laptop or a different adapter to connect it to your computer’s USB drive.
- Android’s Nearby Share feature – Android’s Nearby Share utility works a lot like Apple AirDrop, but for Android. You can quickly share small or large files with devices right next to you. This only works from one Android device to another Android device, but it’s still a method to move files around.
Thank you for reading! Try these out too:
If we missed any of the best methods or apps to transfer files from Android to PC, tell us about them in the comments! You can also click here to check out our latest Android app and game lists!
Источник
Top 3 Ways to Transfer Files from Android to PC Using USB Cable

Technological innovation has made everything easier these days. Mobile phone storage is getting larger by the day. As a result, people can store huge amount of data on their phones. However, files stored on a mobile phone are at risk because the device can crash and you could end up losing valuable information.
For this reason, mobile phone users need to back up their files and data from the phone to their personal computers. The following are the methods that can be used to transfer files from Android to PC using USB cable.
Part 1: How to Transfer Photos from Android to PC Using USB Cable & Windows File Explorer
Android phone users can also use Windows explorer to move files from their Android phones to their computers. However, you need to know that in this method, you have to copy the data in bits. This is why it is appropriate to photos, videos, and music. When copying pictures from the phone to the computer using this method, you have to follow the following steps.
Step one: Use a USB cable to connect the Android phone to the personal computer.
Step two: The phone will request to know the kind of connection you want to create. Select the «Transfer files» option.
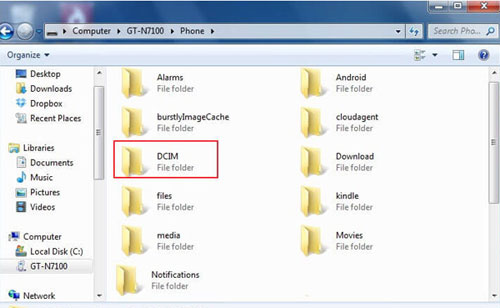
Step three: On your computer, open the Windows File Explorer.
Step four: On the left side of the screen, there is a list. Select your phone.
Step five: Go through the photos from «DCIM» («Photos» or other image folder) and highlight the ones you want to transfer from Android phone.
Step six: Right click and select the «Copy» option, then navigate to desktop on PC (or other location), and right click to choose «Paste» to store the copied images.
Alternatively, drag and drop them to your preferred location on the computer, the transfer process will begin automatically.
Step seven: After you have moved all the files, the computer will notify you once the transfer is complete. Right click on your phone’s name and select the «eject» option.
Step eight: Unplug the phone and the USB cable.
Part 2: How to Transfer Files from Android to PC/Mac Using USB Cable & Coolmuster Android Assistant
When it comes to Android USB File Transfer, using Coolmuster Android Assistant is the easiest way of moving files from an Android phone to a personal computer or Mac. Android users can manage their data with just one click.
Features
* The method supports all types of data including contacts, text messages, call logs, apps, music, photos, music, videos, books (ePubs & PDFs), audios and more.
* Users can move data selectively to Windows PC or Mac after preview, using USB cable or Wi-Fi connection.
* It offers one-click Backup & Restore feature to back up and restore Android files with ease.
* It transfer files very fast and retains its quality by 100%.
* It allows users to add, edit, delete, import, export, unduplicate Android files directly on computer.
* It is fully compatible with almost all Android phones and tablets from Android 2.0 to Android 9.0 (or later), including Samsung Galaxy S10/S10+/S10e/S9+/S9/S8+, HTC U11+/U11/10 M10H, HUAWEI Mate X/Mate 20/Mate 10 Pro/Mate 10, Xiaomi 9/9 SE/8/8 SE/Play/6X, ZTE, Sony, OPPO, LG and more.
Download the free trial version of Coolmuster Android Assistant on your PC/Mac below:


The following are the three significant steps involved in this procedure:
Step one: Launch the program on your computer.
After installation, please run the software on computer. In this step, the Coolmuster program assistant (Android version) will be installed on your phone for successful connection.
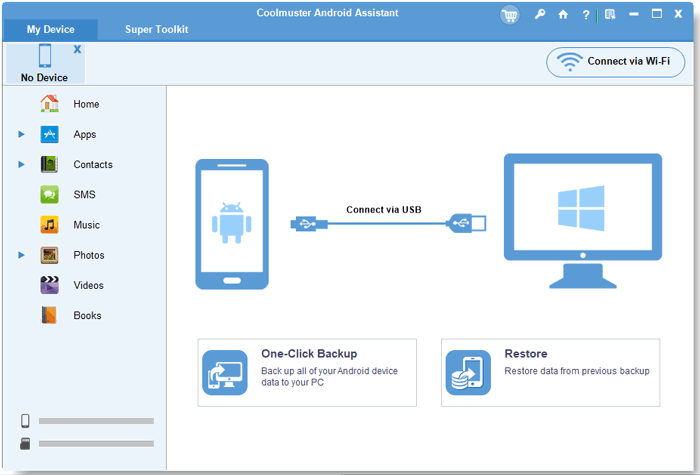
Step two: Connect the Android phone to the computer.
— Connect the phone to the computer using a USB cable to ensure that the program has recognized the Android phone.
— Enable USB debugging on the Android phone by clicking on the «Allow» on the notification bar.
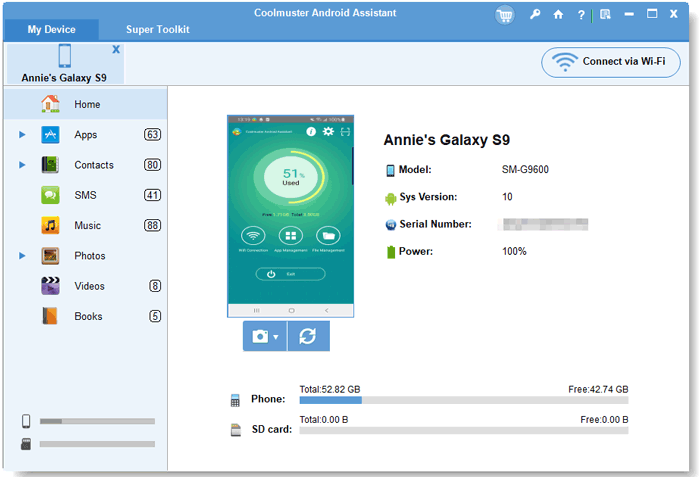
— When your phone is successfully connected, the following interface will be shown.
Step three: Transfer and manage files with one click
— Choice 1: Transfer files from Android to PC using USB cable selectively (in batches or individually)
After Coolmuster Android Assistant has detected the phone, you can select the files that you want to move from the main interface, such as «Contacts», «Photos», etc. Click the «Export» button. The transfer will begin automatically.
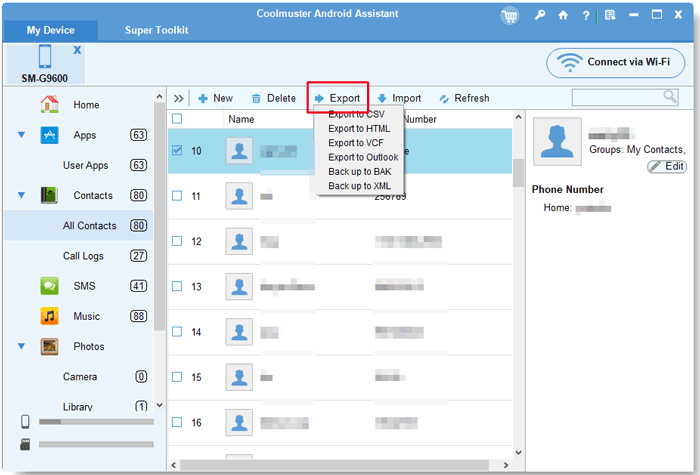
Similarly, how to transfer photos from Android to PC using USB? Simply click «Export» button after choosing the pictures you want.

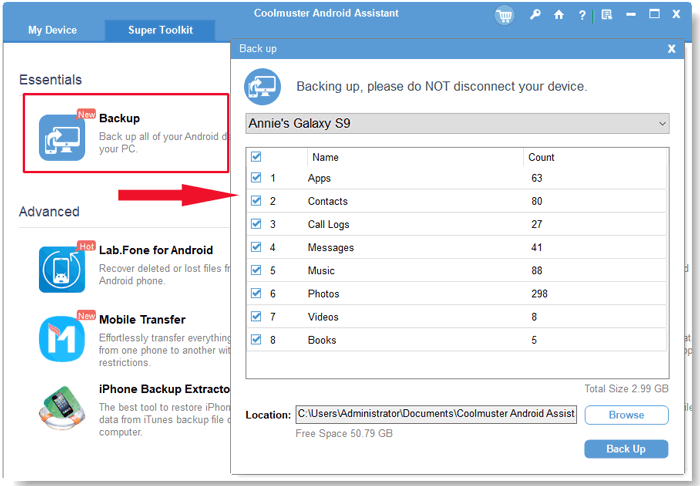
— Choice 2: One Click to Transfer files from Android to PC using USB cable (all at once or by category)
After having your phone connected, please go to «Super Toolkit» > «Backup» > choose your device > choose file types to transfer > (choose location to store backup file on PC) > «Back Up». Done!
Note that the connection must be stable until the transfer process is complete. Using Coolmuster software for transferring files to the machine is easy and convenient because you can move files of any size. It is also swift because, with one click, the data are safe.
Video Tutorial
Check how to backup Android phone to computer effectively with Coolmuster Android Assistant below:
Part 3: How to Transfer Files from Android to Mac via USB Cable & Android File Transfer
One of the advantages of transferring files using Android File Transfer is that you do not need an internet connection. Several steps have to be followed in this process.
The things that you need:
* An Android phone
* A Mac computer with macOS 10.7 and higher
When moving the files from the Android phone to a Mac, please follow these steps below.
Here’s how:
Step one: Open the Mac finder or spotlight search to find the Android File Transfer on your list of programs. In case it is not available, download Android File Transfer here.
Step two: Launch the Android File Transfer after downloading and installing it on the computer.
Step three: Use a USB cable to connect the phone to the Mac
Step four: On the options that appear on the screen, select the «Transfer files» option.
Step five: Open the Android drive icon on the Mac.
Step six: Highlight the files and the folders from your phone and transfer them to the computer.
Step seven: Once the transfer process is complete, open the Finder sidebar, go to Devices and select the «Eject» button.
Step eight: Unplug the Android phone from the computer.
![]()
Summary
Every person who owns a phone should be concerned about the security of their personal and business data and information. Human error, natural calamity, and loss of devices are some of the factors that can lead to loss of valuable data. To be on the safe side, you should consider transferring the data from the Android device to the personal computer or Mac using the above methods.
Источник


