- Темы и стили в Android-приложениях
- О чем пойдет речь:
- Начнем с основ
- Стиль
- Атрибут
- Наследование тем и стилей
- ThemeOverlay
- Последовательность применения тем и стилей ко View-компоненту
- Да прибудет с нами Material Components
- Перейдем к практике
- Что там по темной теме?
- А если мы хотим все делать самостоятельно?
- 9. Тема, стиль или… ?
- 10. Использовать TextAppearance
- Заключение
- Color
- Picking colors
- Official color tool
- Playground
- Tools by the community
- 2014 Material Design color palettes
- Important Terms
- Color palette
- Color
- Color Tool Expand and collapse content An arrow that points down when collapsed and points up when expanded.
- Create color schemes
- Test accessibility
- Preview your UI in color
- Color palette Expand and collapse content An arrow that points down when collapsed and points up when expanded.
- The color palette
- Color system Expand and collapse content An arrow that points down when collapsed and points up when expanded.
- Choosing a color scheme
- Material Design’s color system
- Primary color
- Secondary Color
- Using color in your app
- Usability Expand and collapse content An arrow that points down when collapsed and points up when expanded.
- Hierarchy
- Meaning
- State
- Contrast
- Text on backgrounds
- Legibility
- Dark text on light backgrounds
Темы и стили в Android-приложениях

Каждому Android-разработчику так или иначе приходилось работать со стилями. Кто-то чувствует себя с ними уверенно, у кого-то есть только поверхностные знания, которые зачастую не позволяют самостоятельно решить поставленную задачу.
В преддверии выхода темной темы было решено освежить в памяти всю информацию, касающуюся тем и стилей в Android-приложениях.
О чем пойдет речь:
Начнем с основ
По своей структуре темы и стили имеют общее строение:
Для создания используется тег style . У каждого cтиля есть имя и он хранит в себе параметры key-value .
Все достаточно просто. Но в чем же разница между темой и стилем?
Единственное отличие заключается в том, как мы их используем.
Тема — это набор параметров, которые применяются ко всему приложению, Activity или View-компоненту. Она содержит базовые цвета приложения, стили для отрисовки всех компонентов приложения и различные настройки.
В теме переопределены основные цвета приложения ( colorPrimary , colorSecondary ), стиль для текста ( textAppearanceHeadline1 ) и некоторых стандартных компонентов приложения, а также параметр для прозрачного статус-бара.
Для того чтобы стиль стал настоящей темой, необходимо отнаследоваться (о наследовании мы поговорим чуть позже) от дефолтной реализации темы.
Стиль
Стиль — это набор параметров для стилизации одного View-компонента.
Атрибут
Атрибутом принято называть ключ стиля или темы. Это маленькие кирпичики из которых все строится:
Все эти ключи являются стандартными атрибутами.
Мы можем создавать свои атрибуты:
Атрибут myFavoriteColor будет указывать на цвет или ссылку на ресурс цвета.
В формате мы можем указать вполне стандартные значения:
По своей природе атрибут является интерфейсом. Его необходимо реализовать в теме:
Теперь мы можем на него ссылаться. Общая структура обращения выглядит так:
Ну и, наконец, давайте поменяем, например, цвет текста у поля:
Благодаря атрибутам мы можем добавлять какие-угодно абстракции, которые будут изменяться внутри темы.
Наследование тем и стилей
Как и в ООП, мы можем перенимать функционал существующей реализации. Сделать это можно двумя способами:
При явном наследовании мы указываем родителя с помощью ключевого слова parent :
При неявном наследовании мы используем dot-notation для указания родителя:
Никакой разницы в работе этих подходов нет.
Очень часто мы можем встретить подобные стили:
Может показаться, что стиль создан путем двойного наследования. На самом деле это не так. Множественное наследование запрещено. В таком определении явное наследование всегда выигрывает.
То есть будет создан стиль с именем Widget.MyApp.Snackbar , который является наследником Widget.MaterialComponents.Snackbar .
ThemeOverlay
ThemeOverlay — это специальные «легковесные» темы, которые позволяют переопределить атрибуты основной темы для View-компонента.
За примером далеко ходить не будем, а возьмем кейс из нашего приложения. Дизайнеры решили, что нам нужно сделать стандартное поле для ввода логина, которое будет иметь отличный от основного стиля цвет.
С основной темой поле ввода выглядит так:
Выглядит отлично, но дизайнеры настаивают на том, чтобы поле было в коричневом стиле.
Окей, как мы можем решить такую задачу?
Да, мы можем переопределить стиль и вручную поменять основные цвета вьюшки, но для этого нужно будет писать много кода, да и есть шанс, что мы про что-нибудь забудем.
Написать свою вьюшку по гайдлайнам и с кастомными параметрами?
Хороший вариант, так мы сможем удовлетворить любые хотелки дизайнеров и заодно прокачать скилл, но все это трудозатратно и может привести к нежелательным багам.
Переопределить основной цвет в теме?
Мы выяснили, что для нужного нам вида достаточно поменять colorPrimary в теме. Рабочий вариант, но так мы затронем внешний вид остальных компонентов, а нам это не нужно.
Правильное решение — это использовать ThemeOverlay.
Создаем ThemeOverlay и переопределяем основной цвет темы:
Далее указываем его с помощью специального тега android:theme в наш TextInputLayout :
Все работает так, как нам и нужно.
Конечно же возникает вопрос — как это работает под капотом?
Эту магию позволяет провернуть ContextThemeWrapper . При создании View в LayoutInflater будет создан контекст, где за основу будет взята текущая тема и в ней будут переопределены параметры, которые мы указали в нашей Overlay теме.
Аналогичным образом мы можем самостоятельно переопределить любой параметр темы в приложении.
Последовательность применения тем и стилей ко View-компоненту
Главный приоритет имеет файл разметки. Если в нем определен параметр, то далее все аналогичные параметры будут игнорироваться.
Следующий приоритет имеет стиль View:
Далее используются предопределенные стили для компонента:
Если параметры не были найдены, то используются атрибуты темы:
В общем-то это все, что нужно знать для того чтобы начать работу с темами. Теперь кратко посмотрим на обновленную дизайн-библиотеку Material Components.
Да прибудет с нами Material Components
Material Сomponents была представлена на Google I/O 2018 и является заменой Design Support Library.
Библиотека дает нам возможность использовать обновленные компоненты из Material Design 2.0. Кроме того, в ней появилось множество интересных настроек по кастомизации. Все это позволяет писать яркие и уникальные приложения.
Вот некоторые примеры приложений в новом стиле: Owl, Reply, Crane.
Перейдем к практике
Для создания темы нужно отнаследоваться от базовой темы:
Все они очень похожи на AppCompat темы, но имеют дополнительные атрибуты и настройки.
Подробнее с новыми атрибутами можно познакомиться на material.io.
Если по каким-то причинам вы сейчас не можете переключиться на новую тему, то вам подойдут Bridge темы. Они наследуются от AppCompat тем и имеют все новые атрибуты Material Components. Нужно всего лишь добавить постфикс Bridge и использовать все возможности без опасений:
А вот и наша тема:
Важно понимать, что когда вы переопределяете стиль в теме, он применится ко всем View этого типа в приложении (Activity).
Если же вы хотите применить стиль только к одной конкретной View, то нужно использовать тег style в файле с разметкой:
Одно из нововведений, которое меня действительно впечатлило — это ShapeAppearance. Оно позволяет изменять форму компонентов прямо в теме!
Каждый View-компонент относится к определенной группе:
shapeAppearanceSmallComponent
shapeAppearanceMediumComponent
shapeAppearanceLargeComponent
Как мы можем понять из названия, в группах вьюшки разных размеров.
Проверим на практике:
Мы создали Widget.MyApp.SmallShapeAppearance для «маленьких» компонентов. Закруглили верхний левый угол на 20dp и правый нижний угол срезали на 15dp .
Получили такой результат:
Выглядит интересно. Будет ли это работать в реальной жизни? Время покажет.
Как и для стилей, мы можем применить ShapeAppearance только для одного View-компонента.
Что там по темной теме?
Совсем скоро состоится релиз Android Q, а вместе с ним к нам придет и официальная темная тема.
Пожалуй, одна из самых интересных и эффектных возможностей новой версии Android — это автоматическое применение темной темы для всего приложения одной строчкой кода.
Звучит здорово, давайте пробовать. Предлагаю взять всеми любимый гитлаб клиент от terrakok.
Разрешаем перекрашивать приложение (по умолчанию запрещено):
Атрибут android:forceDarkAllowed доступен с API 29 (Android Q).
Запускаем, смотрим что получилось:
Согласитесь, что для одной строчки кода выглядит очень круто.
Конечно, есть проблемы — BottomNavigationBar сливается с фоном, лоадер остался белым, выделение кода страдает и, вроде бы, все, по крайне мере мне больше ничего серьезного в глаза не бросилось.
Уверен, что потратив не так много времени, можно решить основные проблемы. Например, отключив автоматический темный режим для отдельных вьюшек (да, так тоже можно — android:forceDarkAllowed доступен для View в файле-разметке).
Следует помнить, что данный режим доступен только для светлых тем, если вы используете темную, то принудительная темная тема работать не будет.
Рекомендации по работе можно почитать в документации и на material.io.
А если мы хотим все делать самостоятельно?
Как бы не было просто использовать принудительную темную тему, этот режим лишен гибкости. Фактически, все работает по заранее определенным правилам, которые могут не устраивать нас и, что более важно, заказчика. Думаю, что такое решение можно рассматривать как временное, до тех пор пока мы не сделаем свою реализацию темной темы.
В API 8 (Froyo) был добавлен квалификатор -night , который и по сей день используется для применения темной темы. Он позволяет автоматически применять нужную тему в зависимости от времени суток.
В темах DayNight уже используется такая реализация, нам достаточно отнаследоваться от них.
Давайте попробуем написать свою:
Нам теперь на каждую версию API делать тему со всеми параметрами? Нет, конечно! Мы сделаем базовую тему, где будут определены базовые атрибуты, доступные для всех версий API и отнаследуемся от нее в нужной версии API:
9. Тема, стиль или… ?
При созданий собственных тем и стилей будет здорово, если вы укажите префикс, говорящий о том что это за стиль и для чего он определен. Такое именование позволит очень просто структурировать и расширять стили.
10. Использовать TextAppearance
Хорошим тоном будет расширить основные стили для текста и везде их использовать.
Много полезной информации можно найти на сайте Material Design: Typography, Typography Theming.
Заключение
В заключение хочется сказать, что стилизация приложения — это обязанность не только разработчиков, но и дизайнеров. Только благодаря тесному взаимодействию мы сможем получить по-настоящему хороший и красивый продукт. Дизайнеры должны иметь представления о платформе и возможностях Material Components. Ведь именно на их плечи ложится ответственность по поддержке визуальной составляющей приложения. Дизайнерам доступен специальный плагин для Sketch — Material Theme Editor. В нем очень просто выбирать цвета для приложения и строить экраны на основе стандартных компонентов. Если ваши дизайнеры еще не знают о нем, то обязательно расскажите им.
Начать изучать Material Components можно с репозитория на GitHub — Modular and customizable Material Design UI components for Android. В нем собрано очень много информации по стандартным стилям и их возможностям. Кроме того, там есть приложение — sample, чтобы все сразу попробовать на практике.
Источник
Color
Convey meaning through color. Out of the box you get access to all colors in the Material Design guidelines.
The Material Design color system can be used to create a color theme that reflects your brand or style.
Picking colors
Official color tool
The Material Design team has also built an awesome palette configuration tool: material.io/resources/color/. This can help you create a color palette for your UI, as well as measure the accessibility level of any color combination.
The output can be fed into createTheme() function:
Playground
To test a material.io/design/color color scheme with the MUI documentation, simply select colors using the palette and sliders below. Alternatively, you can enter hex values in the Primary and Secondary text fields.
The output shown in the color sample can be pasted directly into a createTheme() function (to be used with ThemeProvider ):
Only the main shades need be provided (unless you wish to further customize light , dark or contrastText ), as the other colors will be calculated by createTheme() , as described in the Theme customization section.
If you are using the default primary and / or secondary shades then by providing the color object, createTheme() will use the appropriate shades from the material color for main, light and dark.
Tools by the community
- mui-theme-creator: A tool to help design and customize themes for the MUI component library. Includes basic site templates to show various components and how they are affected by the theme
- Material palette generator: The Material palette generator can be used to generate a palette for any color you input.
2014 Material Design color palettes
These color palettes, originally created by Material Design in 2014, are comprised of colors designed to work together harmoniously, and can be used to develop your brand palette. To generate your own harmonious palettes, use the palette generation tool.
Important Terms
- Palette: A palette is a collection of colors, i.e. hues and their shades. MUI provides all colors from the Material Design guidelines. This color palette has been designed with colors that work harmoniously with each other.
- Hue & Shade: A single color within the palette is made up of a hue such as «red», and shade, such as «500». «red 50» is the lightest shade of red (pink!), while «red 900» is the darkest. In addition, most hues come with «accent» shades, prefixed with an A .
Color palette
Given a HUE (red, pink, etc.) and a SHADE (500, 600, etc.) you can import the color like this:
Источник
Color
Color Tool Expand and collapse content An arrow that points down when collapsed and points up when expanded.
The Color Tool helps you create, share, and apply color palettes to your UI, as well as measure the accessibility level of any color combination.

Create color schemes
Create color schemes that include darker and lighter variations of your primary and secondary colors.

Test accessibility
Check if text is accessible on different-colored backgrounds, as measured using the Web Content Accessibility Guidelines legibility standards.

Preview your UI in color
Preview the look of your color scheme across a range of Material Design components, with editable HTML, CSS, or JavaScript in Codepen.

Color palette Expand and collapse content An arrow that points down when collapsed and points up when expanded.
The color palette
This color palette comprises primary and accent colors that can be used for illustration or to develop your brand colors. They’ve been designed to work harmoniously with each other. The color palette starts with primary colors and fills in the spectrum to create a complete and usable palette for Android, Web, and iOS. Google suggests using the 500 colors as the primary colors in your app and the other colors as accents colors.
Themes enable consistent app styling through surface shades, shadow depth, and ink opacity.

Color system Expand and collapse content An arrow that points down when collapsed and points up when expanded.
Choosing a color scheme
You can customize your app’s color scheme to match your brand colors. Alternatively, you can create an entirely new color scheme using the material design color palette.
When creating a color scheme:
- Use the Color Tool to create and apply palettes to your app
- Ensure your app’s color usage meets accessibility standards, with sufficient contrast between elements

Material Design’s color system
In Material Design, a primary color refers to a color that appears most frequently in your app. A secondary color refers to a color used to accent key parts of your UI.
Using colors from the Material Design palette is optional.

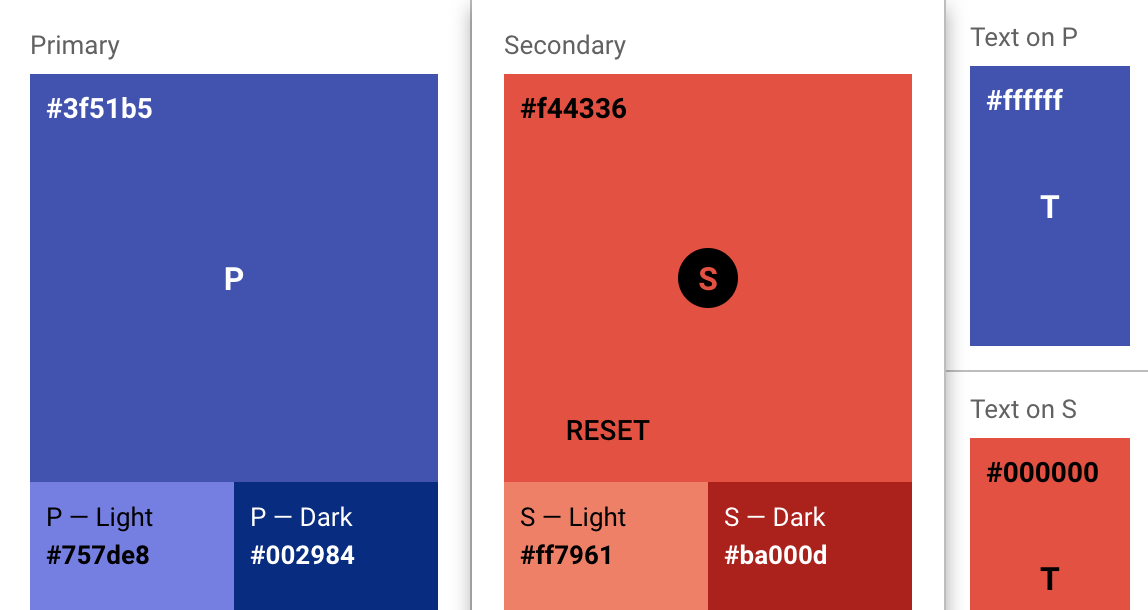
This color scheme has a primary color, lighter and darker versions of that color, and a secondary color.

Beneath the region using the primary color, related information is colored with a lighter version of the primary color. The floating action button uses the secondary color to accent it.

This color scheme contains a primary color, plus darker and lighter versions of that color.

This primary color is applied to the toolbar and status bar, while also being used to accent the floating action button.
Primary color
A primary color is the color displayed most frequently across your app’s screens and components. It can also be used to accent elements, if you don’t have a secondary color.
To create contrast between elements, you can use lighter or darker tones of your primary color. The contrast between lighter and darker tones helps show division between surfaces, such as between the status bar and a toolbar.

This color scheme contains different tones of the primary color, for when lighter or darker contrast is needed.
Secondary Color
A secondary color is used to accent select parts of your UI. It can be complementary or analogous to your primary color, but it should not simply be a light or dark variation of your primary color. It should contrast with elements that surround it and be applied sparingly as an accent.
Secondary colors are best used for:
- Buttons, floating action buttons, and button text
- Text fields, cursors, and text selection
- Progress bars
- Selection controls, buttons, and sliders
- Links
- Headlines
Using a secondary color is optional. It’s not necessary if you use variations of your primary color to accent elements.

A secondary color scheme with varied tones.

Secondary color schemes do not have to be colorful. They only need to contrast with surrounding elements and be used sparingly throughout your UI.
Using color in your app
Large UI areas and elements should be colored with your primary color. A secondary color can be used to accent smaller areas. If you don’t have a secondary color, you can use your primary color instead for these areas.

The floating action button is accented using the secondary color, while the phone icon uses the primary color.

The switch uses the secondary color as an accent. The system bar uses the primary color, while the toolbar uses a darker variation of the primary color.
Use the primary color to accent elements, such as buttons or checkboxes.
Elements that appear rarely, such as alerts, should be distinct from other elements and not use your primary color.

To indicate that buttons and checkboxes are selected, use the primary color as an accent.

Your secondary color can be used on typical elements, such as buttons and links.
Secondary colors, and anything used to accent parts of the UI, should be used sparingly.

Use a secondary color for certain text, such as linked text.

Don’t use bright colors for body text, even if your primary or secondary colors are bright.
See the Color Tool for more guidance about typographic legibility on color.

You can use your primary color as a link accent.

Use your primary or secondary color to emphasize select shorter text, such as headlines.

Use your secondary color for your primary action button.

Don’t use the secondary color for app bars, larger areas of color, or the floating action button if it rests on a background of that color.

Use a monochromatic color as an accent to let imagery and other colorful elements take prominence.

You can use your primary color in a different tone on elements that rest on top of a primary color region (like this floating action button).

Text fields and switches can use your secondary color as an accent.

Text selection can use your secondary color as an accent.
Alternative secondary colors
If your secondary color is too light or dark to sufficiently contrast with the background color, use a lighter or darker shade of the secondary color instead.

Use a different tone of your secondary color against backgrounds that are very light or very dark.

Don’t use a secondary color on top of a background if there is not enough contrast between the two colors.
Usability Expand and collapse content An arrow that points down when collapsed and points up when expanded.
Hierarchy
Hierarchy refers to organizing content according to different levels of importance. Color can convey how important some content is relative to other content.
For example, a brightly colored button on a colorless background makes that button stand out. Alternatively, colorless bars and buttons allow bright content to take prominence in a UI.

Bold color emphasizes the floating action button and the toolbar, giving prominence to message creation and navigation.

Colorless bars and buttons allow colorful content to take precedence, deemphasizing the status and navigation bars.
Meaning
Color may be used to communicate the meaning of various elements on a screen. A weather app may display colors that indicate current weather conditions, and a maps app may use color to show traffic conditions, with roads colored red or green.

A weather app uses color to signal the time of day.

A maps app uses color to signal traffic conditions.
State
Color can provide information about:
- An element’s current state, such as if a button is enabled or disabled
- An app or element’s change of state
Color that indicates a change of state should be noticeable, as subtle differences in color may be missed. It’s best to indicate a change of state in more than one way, such as displaying an icon or moving the location of an element.

The red color in the label and helper text indicate error messages.

The color changes from blue to red to indicate different states.
Contrast
Your app’s primary and secondary colors should ensure sufficient color contrast between elements so that all users can see and use your app.
To learn more about color, contrast, and accessibility design, read Material Design Accessibility.

In this UI, red signifies the time of day and green represents the foggy weather.

This is how users with deuteranopia (red/green color blindness) might see the UI shown to the left. They might not be able to see differences between text and other elements.
Additional affordances, beyond color, should be used to convey information.

Smaller text may be difficult to read for individuals with cataracts, for whom your UI may appear blurry. Elements without sufficient contrast get lost in the background.
To accommodate all users, offer enlarged text settings.
Text on backgrounds
Text should be legible on the background on which it appears. It is recommended that:
- Dark gray text is used on light backgrounds
- Light gray text is used on dark backgrounds
If your app has both light and dark themes, the text should be available in a contrasting color against each theme.
Legibility
Text that appears on colored backgrounds should be legible and meet accessibility standards. Both backgrounds and text must use colors and opacities that, when used together, meet these standards. The Web Content Accessibility Guidelines (WCAG 2.0) level AA requires a contrast ratio of 4.5:1 for normal text and a 3:1 ratio for large text.

Using opacity instead of shifting colors often creates better contrast and relative luminance. For example, gray text (#727272) becomes hard to read if the background color changes to magenta.

Shifting to gray instead of decreasing contrast on black often lowers the relative luminance, making typography unreadable.
Dark text on light backgrounds
The level of opacity used for text depends on whether your background is dark or light. For dark text on light backgrounds, apply the following opacity levels:
- The most important text has an opacity of 87%
- Secondary text, which is lower in the visual hierarchy, has an opacity of 54%
- Text hints (such as text fields and labels) and disabled text have even lower visual prominence with an opacity of 38%
Источник


