- Try Sign-In for Android
- Get the project
- Configure a Google API project
- Run the sample
- How it works
- Next steps
- Integrating Google Sign-In into Your Android App
- Before you begin
- Configure Google Sign-in and the GoogleSignInClient object
- Check for an existing signed-in user
- Add the Google Sign-in button to your app
- Start the sign-in flow
- Google Android Tutorial
- Demo 1 — TextBox
- Demo 2 — Spinner
- Demo 3 — Ticker
- Demo 4 — Checkbox
- Demo 5 — RadioButtons
- Demo 6 — Gallery
- How to uninstall an application from the emulator?
Try Sign-In for Android
Use our Android sample app to see how Sign-In works, or add Sign-In to your existing app.
Get the project
If this is your first time using a Google services sample, check out the google-services repository.
Open Android Studio.
Select File > Open, browse to where you cloned the google-services repository, and open google-services/android/signin .
Configure a Google API project
To use the sample, you need to provide some additional information to finish setting up your project. Click the button below, and specify the package name com .google .samples .quickstart .signin when prompted. You will also need to provide the SHA-1 hash of your signing certificate. See Authenticating Your Client for information.
The sample’s IdTokenActivity and ServerAuthCodeActivity examples require you to specify an OAuth 2.0 web client ID. In a real app, this client ID would represent your app’s backend server. A client ID for this purpose was created when you configured the project above.
Find this value by opening the Google API Console:
Your web server client ID is displayed next to Web client (Auto-created for Google Sign-in). Copy and paste the client ID into your project’s strings.xml file:
Run the sample
Now you’re ready to build the sample and run it from Android Studio.
Build the sample and click the run button and select a connected device or emulator with the latest version of Google Play services.
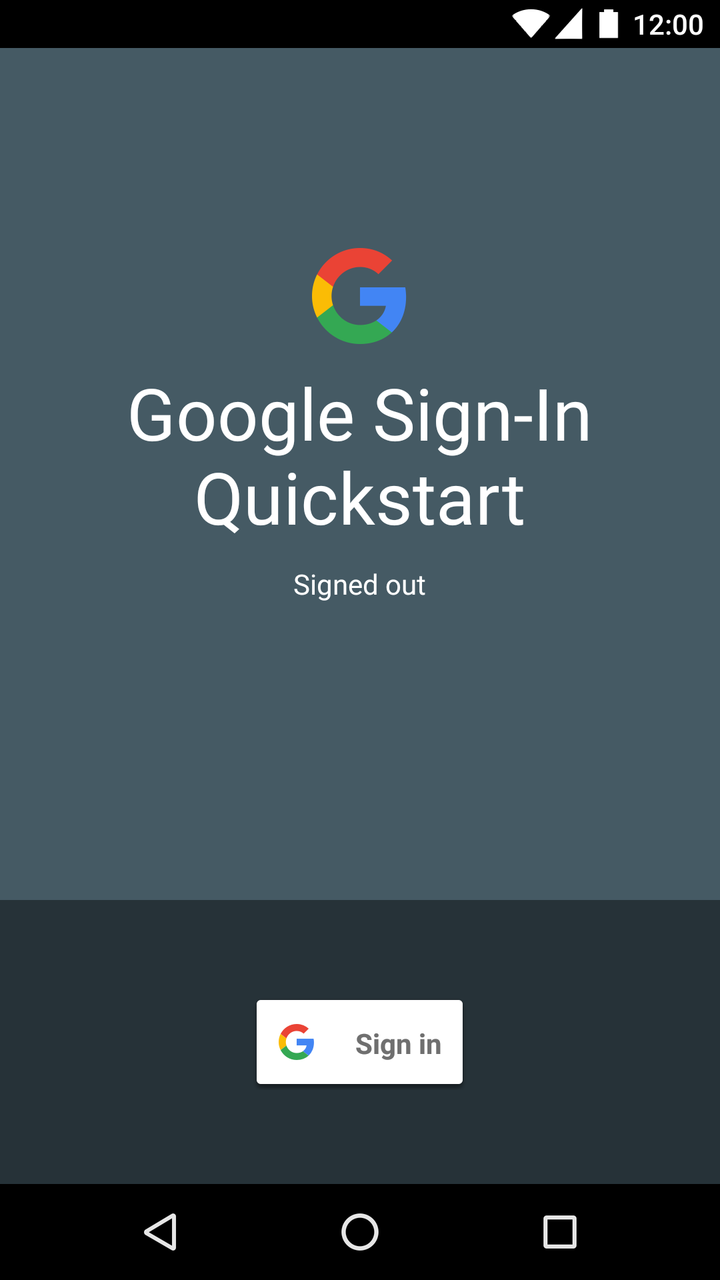
How it works
The application builds a GoogleSignInClient , specifying the sign-in options it needs. Then, when the sign-in button is clicked, the application starts the sign-in intent, which prompts the user to sign in with a Google account.
Next steps
If you want to see how you can implement Google Sign-In in your own app, take a look at our implementation guide.
Did you have a good experience? Run into trouble? Let us know!
Except as otherwise noted, the content of this page is licensed under the Creative Commons Attribution 4.0 License, and code samples are licensed under the Apache 2.0 License. For details, see the Google Developers Site Policies. Java is a registered trademark of Oracle and/or its affiliates.
Источник
Integrating Google Sign-In into Your Android App
To integrate Google Sign-In into your Android app, configure Google Sign-In and add a button to your app’s layout that starts the sign-in flow.
Before you begin
Configure Google Sign-in and the GoogleSignInClient object
In your sign-in activity’s onCreate method, configure Google Sign-In to request the user data required by your app. For example, to configure Google Sign-In to request users’ ID and basic profile information, create a GoogleSignInOptions object with the DEFAULT_SIGN_IN parameter. To request users’ email addresses as well, create the GoogleSignInOptions object with the requestEmail option.
If you need to request additional scopes to access Google APIs, specify them with requestScopes . For the best user experience, on sign-in, only request the scopes that are required for your app to minimally function. Request any additional scopes only when you need them, so that your users see the consent screen in the context of an action they performed. See Requesting Additional Scopes.
Then, also in your sign-in activity’s onCreate method, create a GoogleSignInClient object with the options you specified.
Check for an existing signed-in user
In your activity’s onStart method, check if a user has already signed in to your app with Google.
If GoogleSignIn.getLastSignedInAccount returns a GoogleSignInAccount object (rather than null ), the user has already signed in to your app with Google. Update your UI accordingly—that is, hide the sign-in button, launch your main activity, or whatever is appropriate for your app.
If GoogleSignIn.getLastSignedInAccount returns null , the user has not yet signed in to your app with Google. Update your UI to display the Google Sign-in button.
Add the Google Sign-in button to your app
 Add the SignInButton in your application’s layout:
Optional: If you are using the default sign-in button graphic instead of providing your own sign-in button assets, you can customize the button’s size with the setSize method.
In the Android activity (for example, in the onCreate method), register your button’s OnClickListener to sign in the user when clicked:
Start the sign-in flow
 In the activity’s onClick method, handle sign-in button taps by creating a sign-in intent with the getSignInIntent method, and starting the intent with startActivityForResult .
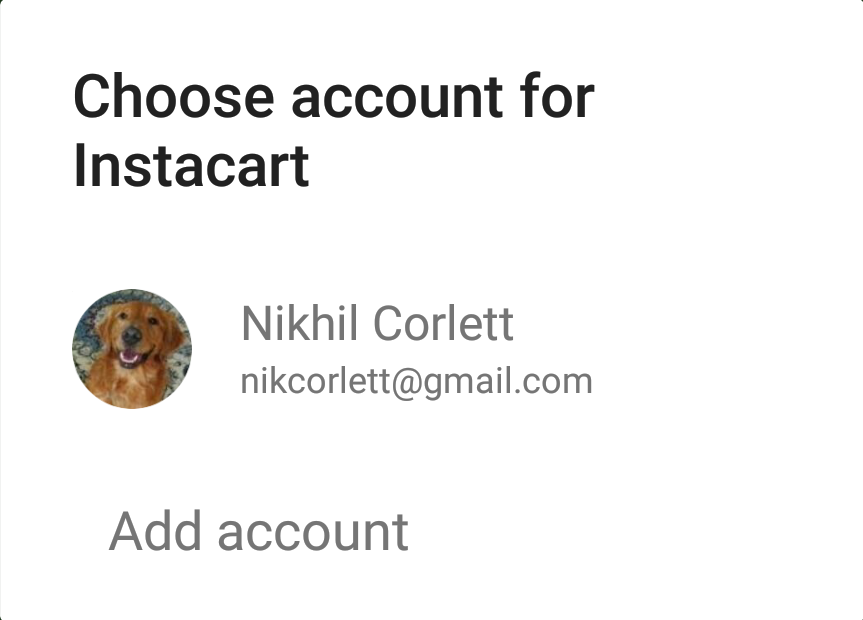
Starting the intent prompts the user to select a Google account to sign in with. If you requested scopes beyond profile , email , and openid , the user is also prompted to grant access to the requested resources.
After the user signs in, you can get a GoogleSignInAccount object for the user in the activity’s onActivityResult method.
The GoogleSignInAccount object contains information about the signed-in user, such as the user’s name.
You can also get the user’s email address with getEmail , the user’s Google ID (for client-side use) with getId , and an ID token for the user with getIdToken . If you need to pass the currently signed-in user to a backend server, send the ID token to your backend server and validate the token on the server.
Except as otherwise noted, the content of this page is licensed under the Creative Commons Attribution 4.0 License, and code samples are licensed under the Apache 2.0 License. For details, see the Google Developers Site Policies. Java is a registered trademark of Oracle and/or its affiliates.
Источник
Google Android Tutorial
Join the DZone community and get the full member experience.
Google has recently released the Android platform for developing mobile applications. The language used for developing Android programs is Java, but it is not Java Micro Edition. No wireless application developer can ignore Android. Google is the best known brand name, among the users of the web and Android comes from Google.
I am presenting this hands-on tutorial, as a sequel to my j2me series. Adequate knowledge of core-java ,especially Event-handling, Swing and inner-classes is assumed. Though Android does not make use of Swing, it uses similar ideas.
We can develop Android lessons and applications in Eclipse environment. Google have provided an Eclipse-plugin for Android. This is the popular method. Google has not given direct support to Netbeans. But some Netbeans users have developed a method for running Android in Netbeans . It is available at http://undroid.nolimit.cz/. You can find more screenshots and guidance in http://eppleton.com/blog/.
We can develop Android lessons without using either Eclipse or Netbeans. The necessary command-line tools have been provided by Google. I found that using these command-line tools is easier than either Eclipse or Netbeans method. So, I am basing all the following lessons on these tools. I think, most readers will agree with my view, after they try this method as well as Eclipse method. The Android site at ‘code.google.com/android’ has already given step-by-step instructions about Android in Eclipse. You can also get more details with screen shots from a wonderful website at www.tanguay.info/web/welcome.php titled ‘Edward’s Web Developer site’. He gives excellent guidance with plenty of screen shots
The Android site lacks clarity about the command-line method. Hence, I think I am adding something useful by writing on the command-line method instead of simply repeating the material in Android site.
Let us start from the beginning. The first step is downloading the Android SDK (version m5-rc14, Feb-12, 2008). Android was released in November, 2007 . It has been revised in the Feb-2008 version.Some of the earlier examples may not work in the newer version.
I am working in Windows-2000 and so I downloaded the windows version. The supported platform in Windows is either Windows-XP or Vista.(Mac OS 10 & Ubuntu Linux are the other platforms mentioned). However, it works well in my Win-2000. It is advisable to have at least 512MB memory. The android SDK is a zip file. I unzipped it to C:\unzipped\android and later, I copied that folder to D:\android. If you want, you can simply copy it to another drive like G:\android also. In the following lessons D:\android is used.
If you want to develop using Eclipse, you must have installed either Eclipse3.2 or Eclipse3.3(Europa). I have tested with Eclipse3.2. No problem.It works. But, we require ADT (ie) Android Development Tools plugin for Eclipse, if you are using Eclipse.You can get this plugin from http://code.google.com/android/adt_download. You have to be careful about the ADT version number.It is ADT-0.3.3.
As my present focus is on command-line method, let me begin straight away and give a simple demo.The procedure given here is common for all our experiments and so I will not be repeating it in each demo. So, please note it down carefully.
Demo 1 — TextBox
In my first demo, I will have a customary button and textbox ( called EditField in Android). When I click the button, I want the message «SUCCESS!» to be displayed in textbox. Just as an exercise, I am using two buttons and two textboxes.
The first step is to start the Emulator
It will take a long time to get started. Do not be in a hurry. Wait till it gets fully started. And do not close that window carelessly by mistake. In that case, you will have to start it again and wait for a long time again. Finally, we get the emulator screen

The second step is to give the following command, from another command window.
activityCreator —out demo mypack.mydemos.demo
This means that my project is ‘demo’ and my package is ‘mypack.mydemos’. A number of folders are created automatically by this command:
We need to note the src and res folders carefully. We will place the java source file in src folder and main.xml file in res\layout, overwriting any files that are generated automatically. For the moment, we can think of the res\layout folder as the one which decides the gui design. As in asp.net, flex etc, the gui details are specified in xml file. But how shall we write the XML file? by hand? Not too difficult .But. luckily, there is an open-source gui designer named ‘DroidDraw’ available in http://www.droiddraw.org/ .It is a nice tool and if you like it, you can send your appreciation to brendan.d.burns@gmail.com. He has given a simple tutorial too, on how to use this gui tool.
I downloaded this software from the above site. I unzipped it. ( any folder). When we click on the icon, we get the screen as given below.
[img_assist|nid=3268|title=Drawing Canvas Area|desc=|link=none|align=undefined|width=189|height=266]
[img_assist|nid=3269|title=Toolbox & Blank Area|desc=|link=none|align=undefined|width=204|height=222]
Thus we get a window, showing the drawing canvas on leftside and toolbox and a blank area in the rightside. ( for printing purpose, I have split them into two screens) as above.
From the toolbox, we learn that we are having controls like button,check,radio,spinner,edittext(textbox) and textview (label) etc. There is also a combo to choose layout, in the canvas screen. I am choosing ‘absolute layout’. I simply drag and drop a button and an editview on the canvas.(Drag and drop, do not click and drop! It won’t work).
You will notice a number of tabs in toolbox. Select ‘properties’ tab.. After clicking the button on the canvas, give the id property of button as @id/button1. Similarly, for editview as @id/text1. Also, button2 and text2 After this, just click the ‘generate’ button at the bottom of the blank window. We get the following XML file(main.xml) automatically generated.
We can now create our java source file. The code refers to main.xml for id of the controls.
(d:\android\mydemos\ex1\demo.java).This is our work folder.
The Android documentation and sample programs use anonymous inner class. I think it is quite unnecessary and is very tedious to follow. Instead, I have used user-defined ‘clicker’. This makes the code cleaner and more readable. This is just like any Swing program. In Android Terminology, an Activity is like a frame in swing (a screen). Just like ActionListener, here also we have, OnClickListener. I am not going into detailed theory now. I just want to show how to develop and run a program first. Theory will follow later.
We have to copy this file(demo.java) to D:\android\tools\demo\src\mypack\mydemos
Give path= c:\winNT\system32;c:\jdk1.5\bin;e:\ant1.6\bin
(carefully note that this will not work with jdk1.4.2. It requires jdk1.5).
Secondly, how about the reference to Ant? Ant is a famous build tool from Apache Software foundation. Android requires the latest version of Ant for Windows(ie) Ant1.6. Do I have to know how to write the Ant’s build.xml file? NO. It is automatically created by the command.
So, I downloaded ant1.6 from the Apache website. It is a compact zip file. I have unzipped it and placed it as E:\ant1.6). Now use the command ‘ant’
We will get a series of messages. If we had done the previous steps correctly, we will get the message ‘BUILD SUCCESSFUL». Otherwise, we will get error messages, with line numbers where the errors occurred. We can correct them and build again.
The build process would have created a zip file named ‘demo.apk’ in demo\bin folder. All that remains now is to run the program in the emulator. As you remember, we have already started the emulator and it is running.
Now copy d:\android\tools\demo\bin\demo.apk to d:\android\tools. After copying, give the command as:
After giving this command. go to the emulator window. You will find a checkpattern displayed for a while. Then an additional button appears in the screen with caption ‘demo’. Our program has been installed. We can test it by clicking on this ‘demo’button.

You can execute the program ‘demo’ now. Two textboxes and two buttons will appear. Click on button1. ‘welcome’ will appear in text1. Click on button2.’how are you?’ will appear in text2. The result is shown below.
That completes our first demo in android.
We will be following exactly same procedure for all our demos. We will hereafter, see xml file and java files only, for the various demos. After a few more demos, it will be enough if I give the imports, declaration, definition and event handler.
The Android SDK comes with a number of sample applications. Within the APIDemos folder, we have a folder named ‘Views‘. I read it as ‘GUI’. It deals with layouts and controls and animations etc. There are a lot of demos. It may be confusing at first. Though, we may like to modify and simplify the code later, it is instructive to try each one of the sample programs by clicking on ‘apidemos’ button in the emulator screen and getting familiarity . I will list and give a brief comment on these, later.
Demo 2 — Spinner
As usual, the standard widgets are label(textview), textbox(edittext), combo(spinner), check, radio, ticker etc. I will now give a demo for spinner. I have provided a spinner, button and a text to display the selected item in edittext.
We can design our layout as before using DroidDraw and get the following main.xml.
(obtained by using DroidDraw).
The corresponding java source file is given below.
As before place demo.java in d:\android\tools\demo\src\mypack\mydemos. Place main.xml in d:\android\tools\demo\res\layout
Build using ant. Deploy demo.apk to the emulator exactly as in previous demo. The original demo gets overwritten. But, our work folder , where we have our xml and java files is d:\android\mydemos\ex1.They are intact. So, no problem..The current java and xml files are in d:\android\mydemos\ex2.
When we click on the spinner, we get the items displayed as drop-down. We select an item and confirm. The selected item appears in text1. I am not going to explain the code. It is simple enough, if we remember our core java.

Demo 3 — Ticker
The third demo is a ‘ticker’ having a textbox for entering the ticker’s text, a ticker(timer) , two labels(editview) one for status and the other for diplaying the sliding message.
LinearLayout with vertical orientation is like FlowLayout but in a vertical direction.

Demo 4 — Checkbox
Copy this to tools\demo\res\layout\
To be copied to tools\demo\mypack\mydemos
This is just the usual Java code and needs very little explanation. The only difference is the way , the controls are defined ( through res\layout\xml file).
Demo 5 — RadioButtons
The next standard control is the RadioButton, within a RadioGroup.
To be placed in tools\demo\res\layout
The following Java code should be placed in tools\demo\src\mypack\mydemo
You would have observed that I am naming all my java files as ‘demo.java’. May be confusing at first but I am doing so with a purpose. First of all, the emulator screen gets cluttered with too many buttons if we go on adding my examples. What I have done is :
I have created a folder as d:\android\mydemos.
In mydemos folder, I have created subfolders such as (ex1,ex2 etc). But, within each folder, I have demo.java & main.xml.
This way, we can easily test each of our demos by uniform procedure. In my system, I had the problem of insufficient memory. And, by the above step, I was able to test all my programs by the same name.
Here is an important tip however, if you choose to name the source files and xml files differently and want to reduce the clutter.
Demo 6 — Gallery
Interestingly, there is a ready-made control in the toolbox, named ‘gallery’. Let us now learn to use this control, though the syntax is a bit difficult. This time, we will need demo.java, main.xml and also another folder in tools\demo\res\drawable. This special folder is to be created by us. You can read ‘img’ instead of ‘drawable’. So, we place all the image files to be displayed in the gallery, in this folder.
Let us as usual create the xml file by using DroidDraw as follows.
The following class is to be placed in tools\demo\mypack\mydemos
How to uninstall an application from the emulator?
That completes the first part of my introductory tutorial on Android SDK.
Opinions expressed by DZone contributors are their own.
Источник


