- Get Started
- Before you begin
- App prerequisites
- Set up your app in your AdMob account
- Configure your app
- Initialize the Google Mobile Ads SDK
- Example MainActivity (excerpt)
- Kotlin
- Select an ad format
- Banner
- Interstitial
- Native
- Rewarded
- Additional resources
- Integrating Google Sign-In into Your Android App
- Before you begin
- Configure Google Sign-in and the GoogleSignInClient object
- Check for an existing signed-in user
- Add the Google Sign-in button to your app
- Start the sign-in flow
- Authenticating Your Client
- Using Play App Signing
- Self-signing Your Application
- Using Keytool on the certificate
- Using Keytool on an APK or AAB
- Using Gradle’s Signing Report
- Try Sign-In for Android
- Get the project
- Configure a Google API project
- Run the sample
- How it works
- Next steps
- Developer guide
- Prerequisites
- Work profiles
- Key features of a work profile
- Work profile benefits on Android 5.0+
- Considerations for work profiles
- Prevent intents from failing between profiles
- Share files across profiles
- Implement managed configurations
- Best practices for implementing managed configurations
- When first launching the app
- Listen for changes to managed configurations
- Dedicated devices
- Set up single sign-on with Chrome custom tabs
- Requirements
- How do I implement SSO with custom tabs?
- Test your app
- Use Test DPC to test your Android app
- Provision a work profile
- Provision a fully managed device
- End-to-end testing
Get Started
Integrating the Google Mobile Ads SDK into an app is the first step toward displaying ads and earning revenue. Once you’ve integrated the SDK, you can choose an ad format (such as native or rewarded video) and follow the steps to implement it.
Before you begin
To prepare your app, complete the steps in the following sections.
App prerequisites
- Use Android Studio 3.2 or higher
Make sure that your app’s build file uses the following values:
- A minSdkVersion of 16 or higher
- A compileSdkVersion of 28 or higher
Set up your app in your AdMob account
Register your app as an AdMob app by completing the following steps:
Register your app with AdMob. This step creates an AdMob app with a unique AdMob App ID that is needed later in this guide.
Configure your app
In your project-level build.gradle file, include Google’s Maven repository and Maven central repository in both your buildscript and allprojects sections:
Add the dependencies for the Google Mobile Ads SDK to your module’s app-level Gradle file, normally app/build.gradle :
Add your AdMob app ID (identified in the AdMob UI) to your app’s AndroidManifest.xml file. To do so, add a tag with android:name=»com.google.android.gms.ads.APPLICATION_ID» . You can find your app ID in the AdMob UI. For android:value , insert your own AdMob app ID, surrounded by quotation marks.
In a real app, use your actual AdMob app ID, not the one listed above. If you’re just looking to experiment with the SDK in a Hello World app, you can use the sample app ID shown above.
Note also that failure to add the tag as shown above results in a crash with the message:
(Optional) Declare AD_ID permission for previous versions to work with Android S.
If your app uses the Google Mobile Ads SDK version 20.4.0 or higher, you can skip this step since the SDK automatically declares the com.google.android.gms.permission.AD_ID permission and is able to access the Advertising ID whenever it’s available.
For apps that use the Google Mobile Ads SDK version 20.3.0 or lower and are targeting Android S, you must add the com.google.android.gms.permission.AD_ID permission in the AndroidManifest.xml file in order to target Android S:
To learn more about the com.google.android.gms.permission.AD_ID permission declaration, including how to disable it, please refer to this Play Console article.
Initialize the Google Mobile Ads SDK
Before loading ads, have your app initialize the Google Mobile Ads SDK by calling MobileAds.initialize() which initializes the SDK and calls back a completion listener once initialization is complete (or after a 30-second timeout). This needs to be done only once, ideally at app launch.
Ads may be preloaded by the Google Mobile Ads SDK or mediation partner SDKs upon calling MobileAds.initialize() . If you need to obtain consent from users in the European Economic Area (EEA), set any request-specific flags (such as tagForChildDirectedTreatment or tag_for_under_age_of_consent ), or otherwise take action before loading ads, ensure you do so before initializing the Google Mobile Ads SDK.
Here’s an example of how to call the initialize() method in an Activity:
Example MainActivity (excerpt)
Kotlin
If you’re using mediation, wait until the completion handler is called before loading ads, as this will ensure that all mediation adapters are initialized.
Select an ad format
The Google Mobile Ads SDK is now imported and you’re ready to implement an ad. AdMob offers a number of different ad formats, so you can choose the one that best fits your app’s user experience.
Banner
Rectangular ads that appear at the top or bottom of the device screen. Banner ads stay on screen while users are interacting with the app, and can refresh automatically after a certain period of time. If you’re new to mobile advertising, they’re a great place to start.
Interstitial

Full-screen ads that cover the interface of an app until closed by the user. They’re best used at natural pauses in the flow of an app’s execution, such as between levels of a game or just after a task is completed.
Native

Customizable ads that match the look and feel of your app. You decide how and where they’re placed, so the layout is more consistent with your app’s design.
Rewarded

Ads that reward users for watching short videos and interacting with playable ads and surveys. Used for monetizing free-to-play apps.
Additional resources
The Google Mobile Ads repository on GitHub demonstrates how to use the different ad formats that this API offers.
Except as otherwise noted, the content of this page is licensed under the Creative Commons Attribution 4.0 License, and code samples are licensed under the Apache 2.0 License. For details, see the Google Developers Site Policies. Java is a registered trademark of Oracle and/or its affiliates.
Источник
Integrating Google Sign-In into Your Android App
To integrate Google Sign-In into your Android app, configure Google Sign-In and add a button to your app’s layout that starts the sign-in flow.
Before you begin
Configure Google Sign-in and the GoogleSignInClient object
In your sign-in activity’s onCreate method, configure Google Sign-In to request the user data required by your app. For example, to configure Google Sign-In to request users’ ID and basic profile information, create a GoogleSignInOptions object with the DEFAULT_SIGN_IN parameter. To request users’ email addresses as well, create the GoogleSignInOptions object with the requestEmail option.
If you need to request additional scopes to access Google APIs, specify them with requestScopes . For the best user experience, on sign-in, only request the scopes that are required for your app to minimally function. Request any additional scopes only when you need them, so that your users see the consent screen in the context of an action they performed. See Requesting Additional Scopes.
Then, also in your sign-in activity’s onCreate method, create a GoogleSignInClient object with the options you specified.
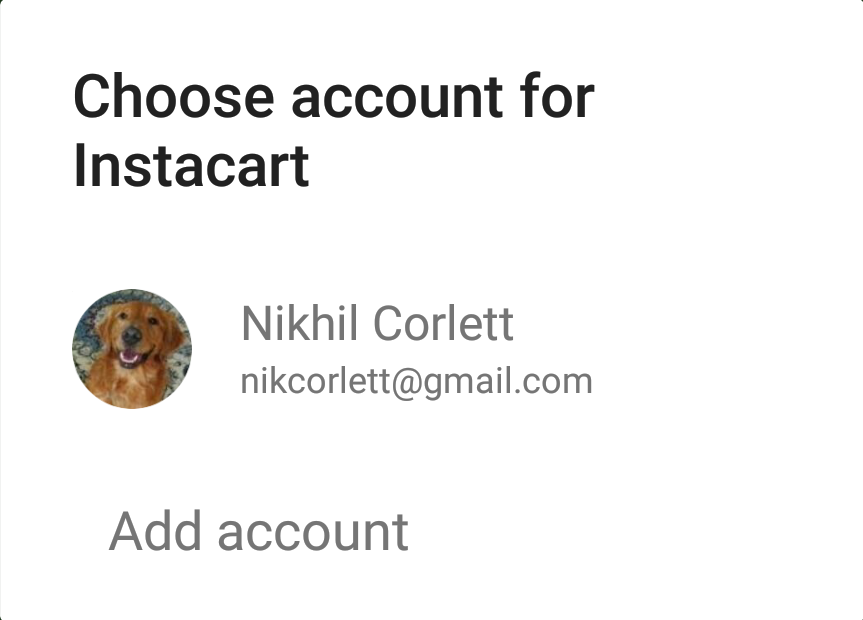
Check for an existing signed-in user
In your activity’s onStart method, check if a user has already signed in to your app with Google.
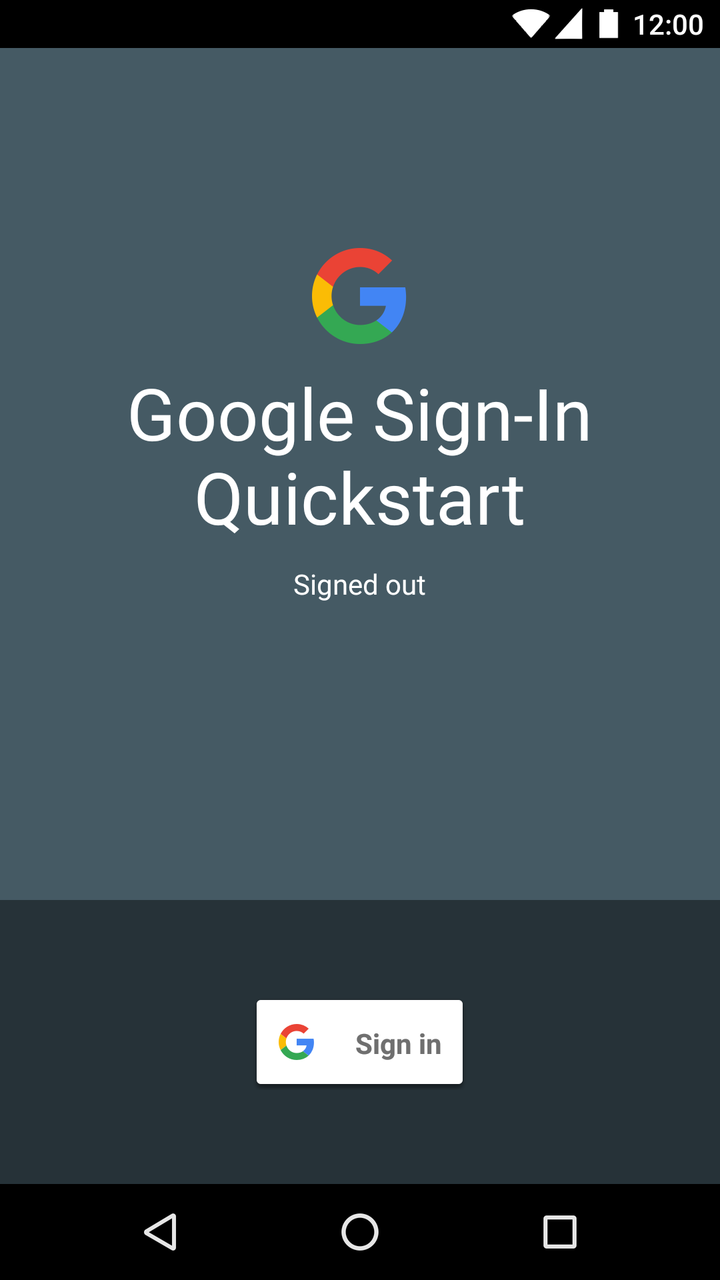
If GoogleSignIn.getLastSignedInAccount returns a GoogleSignInAccount object (rather than null ), the user has already signed in to your app with Google. Update your UI accordingly—that is, hide the sign-in button, launch your main activity, or whatever is appropriate for your app.
If GoogleSignIn.getLastSignedInAccount returns null , the user has not yet signed in to your app with Google. Update your UI to display the Google Sign-in button.
Add the Google Sign-in button to your app
 Add the SignInButton in your application’s layout:
Optional: If you are using the default sign-in button graphic instead of providing your own sign-in button assets, you can customize the button’s size with the setSize method.
In the Android activity (for example, in the onCreate method), register your button’s OnClickListener to sign in the user when clicked:
Start the sign-in flow
 In the activity’s onClick method, handle sign-in button taps by creating a sign-in intent with the getSignInIntent method, and starting the intent with startActivityForResult .
Starting the intent prompts the user to select a Google account to sign in with. If you requested scopes beyond profile , email , and openid , the user is also prompted to grant access to the requested resources.
After the user signs in, you can get a GoogleSignInAccount object for the user in the activity’s onActivityResult method.
The GoogleSignInAccount object contains information about the signed-in user, such as the user’s name.
You can also get the user’s email address with getEmail , the user’s Google ID (for client-side use) with getId , and an ID token for the user with getIdToken . If you need to pass the currently signed-in user to a backend server, send the ID token to your backend server and validate the token on the server.
Except as otherwise noted, the content of this page is licensed under the Creative Commons Attribution 4.0 License, and code samples are licensed under the Apache 2.0 License. For details, see the Google Developers Site Policies. Java is a registered trademark of Oracle and/or its affiliates.
Источник
Authenticating Your Client
Certain Google Play services (such as Google Sign-in and App Invites) require you to provide the SHA-1 of your signing certificate so we can create an OAuth2 client and API key for your app.
Using Play App Signing
If you’ve published your app using Play App Signing, a requirement when using Android App Bundle, you can get your SHA-1 from the Google Play Console on the Release > Setup > App Integrity page.
Self-signing Your Application
If you’re not using Play App Signing, follow the instructions below to use Keytool or Gradle’s Signing Report to get your SHA-1.
Using Keytool on the certificate
Open a terminal and run the keytool utility provided with Java to get the SHA-1 fingerprint of the certificate. You should get both the release and debug certificate fingerprints.
To get the release certificate fingerprint:
To get the debug certificate fingerprint:
The keytool utility prompts you to enter a password for the keystore. The default password for the debug keystore is android . The keytool then prints the fingerprint to the terminal. For example:
Using Keytool on an APK or AAB
To get the certificate of an application binary:
Using Gradle’s Signing Report
You can also get the SHA-1 of your signing certificate using the Gradle signingReport command:
The signing report will include the signing information for each of your app’s variants:
To learn more about digital signing on Android, see Signing Your Applications.
Except as otherwise noted, the content of this page is licensed under the Creative Commons Attribution 4.0 License, and code samples are licensed under the Apache 2.0 License. For details, see the Google Developers Site Policies. Java is a registered trademark of Oracle and/or its affiliates.
Источник
Try Sign-In for Android
Use our Android sample app to see how Sign-In works, or add Sign-In to your existing app.
Get the project
If this is your first time using a Google services sample, check out the google-services repository.
Open Android Studio.
Select File > Open, browse to where you cloned the google-services repository, and open google-services/android/signin .
Configure a Google API project
To use the sample, you need to provide some additional information to finish setting up your project. Click the button below, and specify the package name com .google .samples .quickstart .signin when prompted. You will also need to provide the SHA-1 hash of your signing certificate. See Authenticating Your Client for information.
The sample’s IdTokenActivity and ServerAuthCodeActivity examples require you to specify an OAuth 2.0 web client ID. In a real app, this client ID would represent your app’s backend server. A client ID for this purpose was created when you configured the project above.
Find this value by opening the Google API Console:
Your web server client ID is displayed next to Web client (Auto-created for Google Sign-in). Copy and paste the client ID into your project’s strings.xml file:
Run the sample
Now you’re ready to build the sample and run it from Android Studio.
Build the sample and click the run button and select a connected device or emulator with the latest version of Google Play services.
How it works
The application builds a GoogleSignInClient , specifying the sign-in options it needs. Then, when the sign-in button is clicked, the application starts the sign-in intent, which prompts the user to sign in with a Google account.
Next steps
If you want to see how you can implement Google Sign-In in your own app, take a look at our implementation guide.
Did you have a good experience? Run into trouble? Let us know!
Except as otherwise noted, the content of this page is licensed under the Creative Commons Attribution 4.0 License, and code samples are licensed under the Apache 2.0 License. For details, see the Google Developers Site Policies. Java is a registered trademark of Oracle and/or its affiliates.
Источник
Developer guide
Android’s enterprise features provide organizations with a secure, flexible, and unified Android mobility platform—combining devices, applications, and management. Android apps are compatible with Android’s enterprise features by default. However, there are additional features you can use to make your app work best on managed Android devices:
- Work profile compatibility—Modify your Android app so it functions best on a managed device.
- Managed configurations—Modify your app to allow IT admins the option to specify custom settings for your apps.
- Dedicated devices—Optimize your app so that it can be deployed on an Android device as a kiosk.
- Single Sign-On (SSO)—Simplify the sign-on process for users signing in to different apps on their managed Android device.
Prerequisites
- You’ve created an Android app.
- You’re ready to modify your app so that it works best for organizations.
- Minimum version: Android 5.0 Lollipop recommended version: Android 6.0 Marshmallow and later.
Note: Android’s enterprise features are built into most Android 5.0 devices; however, Android 6.0 and later offers additional features, especially with regard to dedicated devices.
Work profiles
You can manage a user’s business data and applications through a work profile. A work profile is a managed corporate profile associated with the primary user account on an Android device. A work profile securely isolates work apps and data from personal apps and data. This work profile is in a separate container from the personal profile, which your user controls. These separate profiles allow organizations to manage the business data they care about, but leave everything else on a user’s device under the user’s control. For a deep dive into best practices, see the Work profiles guide. For an overview of those best practices, see below.
Key features of a work profile
- Separate and secure profile
- Managed Google Play for application distribution
- Separate badged work applications
- Profile-only management capabilities controlled by an admin
Work profile benefits on Android 5.0+
- Full device encryption
- One Android application package (APK) for both profiles when there’s a personal profile and a work profile present on the device
- Device policy controller (DPC) is limited to the work profile
- Device administration via the DevicePolicyManager class
Considerations for work profiles
- The Android system prevents intents from crossing profiles and IT admins can enable or disable system apps.
- A file path (Uniform Resource Identifier [URI]) that’s valid on one profile may not be valid on the other.
Prevent intents from failing between profiles
It’s difficult to know which intents can cross between profiles, and which ones are blocked. The only way to know for sure is by testing. Before your app starts an activity, you should verify that the request is resolved by calling Intent.resolveActivity() .
- If it returns null , the request doesn’t resolve.
- If it returns something, it shows that the intent resolves, and it’s safe to send the intent.
Note: For detailed testing instructions, see Prevent Failed Intents.
Share files across profiles
Some developers use URIs to mark file paths in Android. However, because there are separate file systems when a work profile is present, we recommend:
| Use: Content URIs |
|
| Don’t use: File URI |
|
Next steps: Once your app supports managed profiles, test it in a work profile. See Test your app.
Implement managed configurations
Managed configurations are a set of instructions that IT admins can use to manage their users’ mobile devices in a specific way. These instructions are universal and work across any EMM, allowing admins to remotely configure applications on their users’ phones.
If you’re developing apps for business or government, you may need to satisfy your industry’s specific set of requirements. Using managed configurations, the IT admin can remotely specify settings and enforce policies for their users’ Android apps; for example:
- Configure if an app can sync data via cellular/3G, or only Wi-Fi
- Allow or block URLs on a web browser
- Configure an app’s email settings
- Enable or disable printing
- Manage bookmarks
Best practices for implementing managed configurations
The Set up Managed Configurations guide is the key source for information on how to build and deploy managed configurations. After you’ve reviewed this documentation, see recommendations below for additional guidance.
When first launching the app
As soon as you launch an application, you can see if managed configurations are already set for this app in onStart() or onResume() . Additionally, you can find out if your application is managed or unmanaged. For example, if getApplicationRestrictions() returns:
- A set of application-specific restrictions—You can configure the managed configurations silently (without requiring user input).
- An empty bundle—Your application acts like it’s unmanaged (for example, how the app behaves in a personal profile).
- A bundle with a single key value pair with KEY_RESTRICTIONS_PENDING set to true—your application is being managed, but the DPC isn’t configured correctly. You should block this user from your app, and direct them to their IT admin.
Listen for changes to managed configurations
IT admins can change managed configurations and what policies they want to enforce on their users at any time. Because of this, we recommend you ensure that your app can accept new restrictions for your managed configuration as follows:
- Fetch restrictions on launch—Your app should call getApplicationRestrictions() in onStart() and onResume() , and compare against old restrictions to see if changes are required.
- Listen while running—Dynamically register ACTION_APPLICATION_RESTRICTIONS_CHANGED in your running activities or services, after you’ve checked for new restrictions. This intent is sent only to listeners that are dynamically registered, and not to listeners declared in the app manifest.
- Unregister while not running—In onPause() , you should unregister for the broadcast of ACTION_APPLICATION_RESTRICTIONS_CHANGED .
Dedicated devices
Dedicated devices are kiosk devices used for a single purpose, such as digital signage displays, ticket printing kiosks, or checkout registers.
When an Android device is configured as a dedicated device, the user sees an application locked to the screen with no Home or Recent Apps buttons to escape the app. Dedicated devices can also be configured to show a set of applications, such as a library kiosk with an app for the library catalog and a web browser.
Set up single sign-on with Chrome custom tabs
Enterprise users often have multiple apps on their device, and they prefer to sign in once to access all of their work applications. Typically, users sign in through a WebView; however, there are a couple reasons why this isn’t ideal:
- Users often need to sign in multiple times with the same credentials. The WebView solution often isn’t a true Single Sign-On (SSO) experience.
- There can be security risks, including malicious applications inspecting cookies or injecting JavaScript® to access a user’s credentials. Even trusted developers are at risk if they rely on potentially malicious third-party SDKs.
A solution to both problems is to authenticate users using browser Custom Tabs, instead of WebView. This ensures that authentication:
- Occurs in a secure context (the system browser) where the host app cannot inspect contents.
- Has a shared cookie state, ensuring the user has to sign in only once.
Requirements
Custom Tabs are supported back to API level 15 (Android 4.0.3). To use Custom Tabs you need a supported browser, such as Chrome. Chrome 45 and later implement this feature as Chrome Custom Tabs.
How do I implement SSO with custom tabs?
Google has open sourced an OAuth client library that uses Custom Tabs, contributing it to the OpenID Connect working group of the OpenID Foundation. To set up Custom Tabs for SSO with the AppAuth library, see the documentation and sample code on GitHub.
Test your app
After you’ve developed your app, you’ll want to test it—both in a work profile and on a fully managed device. See the instructions below.
Use Test DPC to test your Android app
We provide the Test DPC app to help Android developers test their apps in an enterprise environment. Using Test DPC, you can set EMM policies or managed configuration values on a device—as if an organization managed the device using an EMM. To install Test DPC on a device, choose one of the following methods:
- Install Test DPC from GooglePlay.
- Build from the source on GitHub.
For more information on how to configure Test DPC, see the instructions below and the Test DPC User Guide.
Provision a work profile
To test your app in a work profile, you need to first provision a work profile on device using the Test DPC app, as follows:
- Install Test DPC on the device.
- In the Android launcher, tap the Set up Test DPC app icon.
- Follow the onscreen instructions.
- Install your app on the device and test to see how it runs in the work profile.
Android creates a work profile and installs a copy of Test DPC in the work profile. You use this work-badged instance of Test DPC to set policies and managed configurations in the work profile. To learn more about setting up a work profile for development, read the developer’s guide Work profiles.
Provision a fully managed device
Organizations use fully managed devices because they can enforce a full range of management policies on the device. To provision a fully managed device, follow these steps:
- Install Test DPC on the device.
- Confirm that there are no other users or a work profile on the device.
- Confirm that there are no accounts on the device.
- Run the following Android Debug Bridge (adb) command in your terminal:
- Once you’ve completed provisioning the device owner, you can test your app on that device. You should specifically test how managed configurations and intents work on that device.
You can also use other provisioning methods—see the Test DPC User Guide. To learn how IT admins typically enroll and provision Android-powered devices, read Provision devices.
End-to-end testing
After you’ve finished testing your app in the environments above, you’ll likely want to test your app in an end-to-end production environment. This process includes the steps a customer needs to take to deploy your app in their organization, including:
- App distribution through Play
- Server-side managed configuration
- Server-side profile policy control
You need to access an EMM console to complete the end-to-end testing. The easiest way to get one is to request a testing console from your EMM. Once you have access, complete these tasks:
- Create a test version of your application with a new ApplicationId.
- Claim a managed Google domain and bind it to your EMM. If you already have a testing domain that’s bound to an EMM, you may need to unbind it to test it with your preferred EMM. Please consult your EMM for the specific unbinding steps.
- Publish your application to the private channel for their managed Google domain.
- Use the EMM console and EMM application to:
- Set up work devices.
- Distribute your application.
- Set managed configuration.
- Set device policies.
This process will differ based on your EMM. Please consult your EMM’s documentation for further details. Congrats! You’ve completed these steps and verified that your app works well for enterprise users.
Content and code samples on this page are subject to the licenses described in the Content License. Java is a registered trademark of Oracle and/or its affiliates.
Источник


