LineageOS 18.1 Android TV (Android 11)
for Raspberry Pi 4
Here’s my build of LineageOS 18.1 Android TV for Raspberry Pi 4 Model B, Pi 400, and Compute Module 4. It is unofficial and unsupported by the LineageOS team. It’s for advanced users only. Pi 4 model with at least 2GB of RAM is required to run this build.
Important! This image includes parts that are licensed under non-commercial license (Creative Commons Attribution-NonCommercial-ShareAlike 4.0 International). You may use this build freely in personal/educational/etc use. Commercial use is not allowed with this build!

Do not mirror my builds! Please post a link to this page instead.
lineage-18.1-20211123-UNOFFICIAL-KonstaKANG-rpi4-atv.zip
https://www.androidfilehost.com/?fid=7161016148664844938
md5:38d6684bd6d73344856178ed179e4be4
Working:
- Audio (HDMI, 3.5mm jack, USB microphones, bluetooth speakers/headphones, etc)
- Audio DAC (using GPIO DACs e.g. Hifiberry DAC+)
- Bluetooth (and bluetooth tethering)
- Camera (using official Pi camera modules & UVC USB webcams)
- GPIO
- GPS (using external USB modules e.g. U-Blox 7)
- Ethernet
- Hardware accelerated graphics (V3D, OpenGL & Vulkan)
- HDMI display (and HDMI-CEC)
- I2C
- IR remotes (using external GPIO IR modules e.g. TSOP4838)
- RTC (using external GPIO I2C modules e.g. DS3231)
- Sensors (using external GPIO I2C modules e.g. MPU6050, LSM6DS3, LSM303DLHC & BME280/BMP280 accelerometer/gyroscope/magnetometer/temperature/pressure/humidity)
- Serial console (using external GPIO serial console adapters e.g. PL2303)
- SPI
- Touchscreen/multi-touch (USB touchscreens, Waveshare SPI touchscreens)
- USB (mouse, keyboard, storage, etc)
- USB-C (ADB, MTP, PTP, USB tethering)
- Wifi (and wifi tethering)
Not working:
- Hardware video decoding & encoding (software decoding & encoding works)
Issues:
- Chromecast functionality is not supported on uncertified Android TV devices
- SELinux is in permissive mode
- and more…
Sources:
Thanks:
- Peter Yoon and android-rpi project
- Roman Stratiienko and GloDroid project
- AOSP reference board developers (dragonboard, hikey, yukawa)
- E. Anholt for V3D graphics driver
- Maxime Ripard for Pi 4 KMS driver
- Android-x86 project
- LineageOS team and everyone who has contributed to LineageOS 18.1
How to install:
- Follow the official Raspberry Pi instructions for writing the image to the SD card.
FAQ:
Q: How to enable developer options?
A: Settings -> System -> About -> Click ‘Build number’ several times.
Q: How to enable root access?
A: LineageOS no longer has built-in root management for applications. You can have root access via ADB after enabling Settings -> System -> Developer options -> Rooted debugging, SSH (see FAQ below), or serial console. It is also possible to install Magisk following instructions later in the FAQ.
Q: How to enable advanced reboot options?
A: Settings -> System -> Buttons -> Advanced reboot
Q: How to find several Raspberry Pi specific settings options?
A: Settings -> System -> Raspberry Pi settings
Most options in this menu require you to reboot your device for the setting to take effect.
Q: My display is not working. I can only see the rainbow screen but no Android boot animation. What should I do?
A: This build only supports HDMI displays that report supported resolutions using EDID. 1920×1080 resolution is used by default with this build. You can change value in /boot/resolution.txt to use a different resolution that your display supports. Removing /boot/resolution.txt will use the preferred resolution of your display.
Q: Settings -> Storage shows total system size of 7 GB. There’s unallocated space on my sdcard. What should I do?
A: This is a 7 GB image, remaining space on your sdcard will remain unallocated. Easiest way to extend /data partition is to simply flash my resize zip in TWRP.
Alternative option is to use e.g. GParted and extend /data partition (/dev/block/mmcblk0p4) to cover the unallocated space. Resizing the partition manually will break support for encrypting /data. Format /data in TWRP recovery (Wipe -> Format data) after resizing to leave required space for crypto footer.
Q: Raspberry Pi doesn’t have a power button. How to power off/reboot device?
A: Following keyboard keys work as Android buttons: F1 = Home, F2 = Back, F3 = Multi-tasking, F4 = Menu, F5 = Power, F11 = Volume down, and F12 = Volume up. You can also use one of many third party reboot applications.
Q: How to create a DIY hardware power button?
A: You can send power button events by connecting GPIO21 to ground.
You can enable the feature by using a settings option found in Settings -> System -> Raspberry Pi settings -> Power button.
You can also use the DIY power button to boot the device to TWRP recovery. Press and hold the button while powering on the device until you see the TWRP screen.
Q: How to enable audio through 3.5mm jack?
A: You can enable the feature by using a settings option found in Settings -> System -> Raspberry Pi settings -> Audio device.
Q: How to use IR remote?
A: You can enable the feature by using a settings option found in Settings -> System -> Raspberry Pi settings -> Infrared remote.
You can place a keymap for your remote as /boot/rc_keymap.txt to be automatically loaded on boot (see available keymaps for reference).
Q: How to use RTC?
A: You can enable the feature by using a settings option found in Settings -> System -> Raspberry Pi settings -> Real time clock.
System time is automatically read and set from the RTC on boot once you’ve enabled the feature. You need to write the system time you want to use to the RTC in rooted shell:
Q: How to use SSH?
A: You can start/stop the built-in SSH server by using a settings option found in Settings -> System -> Raspberry Pi settings -> SSH.
Android doesn’t have user accounts with passwords so key based authentication is used with SSH instead. Necessary keys are generated on the first boot and you need to pull the private key to your computer (or alternatively you can push your own previously generated keys to the device). See Settings -> System -> About -> Status -> IP address for your device’s IP address (192.168.0.100 is assumed here). Enable Android debugging & Rooted debugging under Settings -> System -> Developer options.
It’s recommended to disable adb after this.
Q: How to boot from USB device?
A: Warning , this is still an experimental feature. Especially TWRP seems to have some issues with USB boot.
- Install EEPROM that supports booting from USB
- Write image to your USB device as above
- Mount the USB device on your computer and make following changes to /boot/config.txt under ‘Boot device’ section:
Q: How to boot to TWRP recovery?
A: You can boot to TWRP by selecting Settings -> System -> Reboot -> Recovery after enabling advanced restart options.
If mouse cursor doesn’t appear, try replugging your mouse.
Q: How to boot out of TWRP recovery?
A: You can boot out of recovery by simply selecting reboot to system option in TWRP.
Q: How to update from previous LineageOS 18.1 build without losing data?
A:
- Boot to TWRP recovery with the build you want to keep the data (see FAQ)
- Plug in an external USB storage device and select ‘Backup’
- Use ‘Select Storage’ to choose the USB device and ‘Swipe to backup’ (it’s only necessary to backup the data partition so you can uncheck other partitions to speed up the process)
- Write new LineageOS 18.1 image to the sdcard following installation instructions
- Boot to TWRP recovery with the new build (see FAQ)
- Select ‘Restore’ and find the backup you created from the USB device (‘Select Storage’)
- Make sure you only have data selected as partitions to restore (uncheck other partitions if available) and select ‘Swipe to Restore’
- (Flash Google apps package/other add-ons you had previously installed)
- Boot out of recovery (see FAQ)
Q: How to install Magisk?
A:
- Download lineage-18.1-rpi-magisk.zip and save it to your device’s internal storage or use an external USB drive
- Download Magisk-v23.0.apk
- Boot to TWRP recovery (see FAQ)
- Install lineage-18.1-rpi-magisk.zip from your selected storage
- Boot out of recovery (see FAQ)
- Install Magisk-v23.0.apk using Android’s built-in file manager/’adb install’/etc.
Q: How to install Google apps?
A:
- Download open_gapps-arm64-11.0-tvstock-xxxxxxxx.zip and save it to your device’s internal storage or use an external USB drive
- Boot to TWRP recovery (see FAQ)
- Install open_gapps-arm64-11.0-tvstock-xxxxxxxx.zip from your selected storage
- Wipe -> Factory reset!
- Boot out of recovery (see FAQ)
Merged commits not mentioned in the changelog.
23.11. changelog:
- add support for BME280/BMP280 temperature/pressure/humidity sensors
- add option to select HDMI-CEC device
- show IP address and port for SSH/VNC options
- setup wizard improvements for TV devices (merged)
- fix resizing data partition that broke with previous build
- update to TWRP 3.6.0_11-0-KonstaKANG
- update to Mesa 21.3.0
- update to Linux 5.4.161 kernel and patch known vulnerabilities (CVE-xxxx-xxxx, and more)
- Android security patch level: 5 November 2021 (merged)
26.10. changelog:
- switch to 64-bit kernel & userspace
- switch to minigbm gbm_mesa and gralloc@4 API (thanks to Roman Stratiienko)
- update to Mesa 21.2.4
- update to Linux 5.4.155 kernel and patch known vulnerabilities (CVE-xxxx-xxxx, and more)
11.10. changelog:
- add support for Vulkan
- rework bluetooth (thanks to android-rpi)
- switch to new two-panel settings UI (merged)
- update to Mesa 21.1.8
- update to Linux 5.4.152 kernel and patch known vulnerabilities (CVE-xxxx-xxxx, and more)
- Android security patch level: 1 October 2021 (merged)
20.7. changelog:
- add support for HDMI-CEC
- add built-in VNC server
- update to Mesa 21.1.5
- update to Linux 5.4.132 kernel and patch known vulnerabilities (CVE-xxxx-xxxx, and more)
- Android security patch level: 5 July 2021 (merged)
6.3. changelog:
- initial Android TV build
- update to Linux 5.4.102 kernel and patch known vulnerabilities (CVE-xxxx-xxxx, and more)
- Android security patch level: 5 March 2021 (merged)
Previous builds:
Donate to support my projects: 
Источник
Антон Штырляев
Избранное ★
Как поставить Android TV на Raspberry Pi 3
В данном гайде описывается способ установки на Raspberry Pi 3 рабочего Android и использование малинки в качестве андроид-приставки в связке с видео-сервисами. Такими как HD Videobox, 24h, Kinopub, EdemTV и прочими приложениями, позволяющие смотреть тв, сериалы и фильмы в одном месте.
Сборка Lineage OS 16.0 на базе Android 9 (Pie) вполне сносно работает этой модели мини-компьютера, что можно считать успехом и попробовать попользоваться андроидом, вместо OSMC и Kodi.
Прошивка образа
- Скачиваем образ Lineage OS для Raspberry Pi 3. ставить будем сборку для Android 9 (Pie).
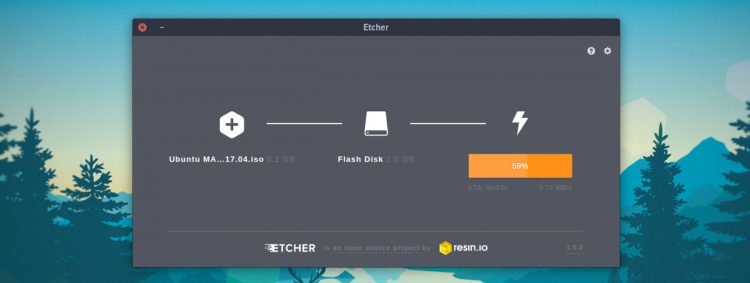
- Прошиваем полученный образ на MicroSD флешку с помощью Etcher: выбираем файл, указываем путь до флешки MicroSD и нажимаем кнопку Flash
- После окончания процесса записи образа, заходим в корень флешки, ищем там файл resolution.txt, меняем значение на разрешение вашего монитора или телевизора. например, 1920х1080, сохраняем файл.
- Также заодно можно поменять настройки самой малинки в файле config.txt, прописав информацию о купленном кодеке и параметры производительности.
Предварительная настройка
- Вытаскиваем флешку из компьютера и вставляем ее в Raspberry.
- Включаем питание малинки и дожидаемся полной загрузки Lineage OS.
- Подключаем мышку к малинке и проходим быстро мастер предварительной настройки установленной системы, можно в настройки не вникать, все равно потом придется их проставлять еще раз после установки Google Apps.
- Заходим в настройки Андроида: О системе -> Номер сборки, жмём 5 раз, чтобы включить возможности разработчика. Далее Система -> Developer Options -> Root Access -> App and ADB, соглашаемся с окном Allow root access?. Включаем локальный терминал в опции Local terminal (нужно передвинуть ползунок).
- Но лучше всё же настройки разрешения и малинки отложить и сделать это после запуска мастера предварительной настройки при первой загрузке системы, так как это позволит избавиться от зависаний и лагов в процессе.
Google Apps
Установка Google Apps замедляет работу системы, поэтому подумайте: может вам хватит возможностей чистого андроида?
- Теперь нужно скачать Google Apps. выбираем платформу ARM, версию 9.0, вариант Pico и жмем кнопку скачивания. Не выбирайте вариант tvstock, он довольно тяжелый и система потом может просто не загрузиться.
- Берем обычную USB-флешку, форматируем ее в FAT32, закидываем туда скачанный Google Apps и recovery2boot.zip, он понадобится для перезагрузки обратно в Lineage OS после TWRP.
- Свайпаем вверх на рабочем столе Lineage OS и запускаем терминал. В запросе на права доступа к файлам отвечаем утвердительно. Набираем сначала команду su для получения прав суперпользователя и нажимаем энтер, соглашаемся выдать рут-права. Далее выполняем команду rpi3-recovery.sh и затем reboot.
- После перезагрузки сразу загрузится рекавери, свайпаем в пункте Swipe to Allow Modifications. Выбираем пункты Install -> Select Storage -> USB-OTG. Запускаем файл open-gapps-arm-9.0-pico-xxxxxxxx.zip и свайпаем кнопку Swipe to confirm flash.
- После завершения установки кликаем в левом верхнем углу на логотип TWRP и переходим в главное меню, затем выбираем пункт Wipe и свайпаем Swipe to Factory Reset для сброса настроек.
- Снова кликаем по логотипу, в этот раз жмём на пункт Install и выбираем на USB-флешке файл lineage-16.0-rpi3-recovery2boot.zip, свайпаем для подтверждения прошивки. TWRP запустит скрипт для восстановления загрузки Lineage OS. После окончания нажимаем кнопку Reboot System
Lineage OS
- В это раз система будет грузиться дольше и после окончания процесса вновь запустится мастер предварительной настройки андроида, теперь можно спокойно выбрать русский язык и поставить все необходимые настройки.
- Если установка зависла на пункте «Проверка обновлений. », то просто нажмите кнопку назад внизу экрана, как на телефоне.
- Мастер попросит вас залогиниться в аккаунт Google, сделайте это если считайте нужным и хотите синхронизировать данные со всех своих гугловских приложений.
- Если вы отказались от установки Google Apps, то в системе отсутствует приложение Play Market и файлы приложений придется устанавливать с флешки, предварительно разрешив установку из неизвестных источников в андроиде. Еще APK-файлы можно скачать с сайта apkmirror.
- Для того, чтобы лаунчер был похож на Android TV, скачиваем с 4PDA или Play Market ATV Launcher и запускаем его
Управление
Для управления с клавиатуры в системе предусмотрены следующие кнопки:
F1 = Домой
F2 = Назад
F3 = Список приложений
F4 = Меню
F5 = Питание
F11 = Уменьшение громкости
F12 = Увеличение громкости
Источник


