- Android Testing part 1: Unit testing 0 to 1
- Better Android unit testing with MVVM
- This is continuation of my series on Android Testing:
- Espresso tests from 0 to 1
- This is part 3 of my series of articles on Android testing.
- Why write tests?
- Why unit tests first?
- The 3 types of tests in Android Testing
- My personal take on this popular topic, specific concerning Android testing.
- Ok, we want to start unit test our code, how do we start?
- The app
- The code
- From MVC to MVP
- Write your first unit tests
- Run your (unit) tests with Android Studio
- Conclusion
- Developing Android unit and instrumentation tests — Tutorial
- 1. Introduction into Android testing
- 1.1. Testing Android applications
- 1.2. What to test on Android applications
- 1.3. Tooling support for Android testing
- 1.4. Android project organization for tests
- 2. Android unit testing
- 2.1. Unit testing in Android
- 2.2. Required dependencies in the Gradle build file
- 2.3. Running the unit tests
- 2.3.1. Using Gradle
- 2.3.2. Using Android Studio
- 2.4. Location of test reports
- 2.5. Activating default return values for mocked methods in android.jar
- 3. Exercise: Create unit test
- 3.1. Preparation: Create Android project
- 3.2. Add JUnit dependency
- 3.3. Create test
- 3.4. Run unit tests
- 4. Writing tests to run on the Android device
- 4.1. Instrumentation tests
- 4.2. How the Android system executes tests
- 4.3. Mocking objects in Android
- 4.4. Location of instrumentation tests
- 4.5. Define dependencies and testInstrumentationRunner in the Gradle build file
- 4.6. Using the @RunWith(AndroidJUnit4.class)
- 4.7. Run the tests on Android
- 4.8. Location of test reports
- 4.9. How to replace the application for instrumentation tests
Android Testing part 1: Unit testing 0 to 1

Nov 16, 2017 · 5 min read

Part 1: This article
Better Android unit testing with MVVM
This is continuation of my series on Android Testing:
Espresso tests from 0 to 1
This is part 3 of my series of articles on Android testing.
You have been developing Android apps for a couple of years. You want to start writing tests for but unsure how to start?
Rejoice, this tutorial is here to the rescue!
Make no mistake, the first step is the hardest. I know because I’ve recently gone “from 0 to 1″ in unit testing. Now I want you to embark on this fantastic journey and enjoy the success with me.
The important questions
Why write tests?
- Improve and maintain product quality with less QA’s manual effort
- Increase confidence when shipping
- Perform routine checks humans can’t perform, fast
- Help you write better code
Why unit tests first?
- Fast to run
- Easy to write, run and measure coverage
The 3 types of tests in Android Testing
My personal take on this popular topic, specific concerning Android testing.
Ok, we want to start unit test our code, how do we start?
- Step 1: Refactor your code from MVC (Model-View-Controller — reads “everything in Activity”) to MVP (Model-View-Presenter — easiest to start with; testing the ViewModel in MVVM (Model-View-ViewModel) is the same as testing the Presenter in MVP, refactoring takes more effort though). That is, separate your (testable) app logics from Android specific (difficult-to-test) stuffs like Activity and Fragment.
- Step 2: Write tests! And run tests (and measure test coverage) and profit 🙂
You’ll only need to remember 1 thing:
separate your (testable) app logics from Android specific (difficult-to-test) stuffs
Read more about MVP architecture here
The app
The app developed f or this tutorial is GitHub Search. I assume that everyone here uses GitHub. Isn’t it awesome that this app let you search all the repositories on GitHub?
This app is definitely not “Foo bar” or “Hello World” kind of app. It’s not bloated with stuffs like RxJava (which you should learn in a separate tutorial) either.
The code
master branch contains MVC code. This is your starting point now and my starting point a year ago (No shame there 😀 Our apps work fine and our bosses are happy right?)
step-1-mvp branch contains the code after refactoring to MVP. Refactoring your code to MVP (or MVVM + data binding in a later part) separates your testable logics from stuffs that contains little to zero logic, platform specific and very difficult to test such as Activity and Fragment.
step-2-unit-tests branch contains the tests you all been waiting for. These tests may be humble but don’t all great things have small beginnings?
Getting from no unit tests to having some proper unit tests is tough. You’ll be writing hundreds and thousands of tests in no time. What could be more exciting than getting your test coverage increase week by week? Just imagine how proud you would be showing your unit testing success to your fellow Android engineers and employers.
From MVC to MVP
Our big fat MainActivity in its “glorious” MVC form
Our Activity is huge (
70 lines for our very simple screen) this way and the logics are not testable!
Let’s move the logics to its own place, namely the Presenter (and test it yay)!
But first, let establish the contract between the View (our MainActivity) and the Presenter (SearchPresenter) through 2 interfaces:
defines what the Presenter do — searchGitHubRepos() in this case
defines what the View do: displaySearchResults() and displayError()
Here comes the Presenter:
The “repository” here is the essence of the Data Layer in MVP Architecture. Technically, I’m presenting to you a simplified version of MVP Architecture here. It’s necessary to introduce the repositories in our projects to avoid bloating our presenters — multiple presenters can share the same repository and 1 presenter can call multiple repositories e.g. GitHub repositories, Twitter repositories (for users to follow the authors of the popular GitHub repos for example)
Look at our MainActivity! It’s so much slimmer (
40 lines vs. original
70 lines), so much cleaner now 😀
Write your first unit tests
Unit tests are supposed to be isolated. Therefore, in each test we only want to test 1 class. We need to either stub or mock the external dependencies.
For example, in our SearchPresenterTest (testing SearchPresenter logics), we will mock the Repository and ViewContract here.
When possible, use stubs as they execute faster compared to mocks.
Test the Presenter:
Run your (unit) tests with Android Studio
Right click on the test class or package and select “Run ‘Tests in ‘packagename’’ with coverage” (Coverage is optional of course)

Won’t you look at those green stuffs of satisfaction and 😄? There are nothing quite like the moment you run your tests and they all pass!

Conclusion
The automated testing journey starts here. After reading my article, the hardest part is already over. Now, you should have no excuse to procrastinate your duty to write tests.
I can’t promise writing unit tests will always be easy but I promise it’s going to be worth it.
Any comments, questions or suggestions are welcome. I’ve got a lot more to learn about unit testing Android apps so let’s help each other to improve.
Источник
Developing Android unit and instrumentation tests — Tutorial
This tutorial describes how to write unit and instrumentation tests for your Android application. It describes how to execute these tests via Android studio and Gradle. This tutorial assumes that you are familiar with Android programming in general.
1. Introduction into Android testing
1.1. Testing Android applications
Android applications run on a variety of devices. Also the Android framework and the surrounding open source frameworks evolve at a high speed. To ensure that you application works well, it is import to write software tests. This helps you to enhance and maintain the Android application.
Unit testing for Android can be classified into:
Local unit tests — tests which can run on the JVM.
Instrumented unit tests — tests which require the Android system.
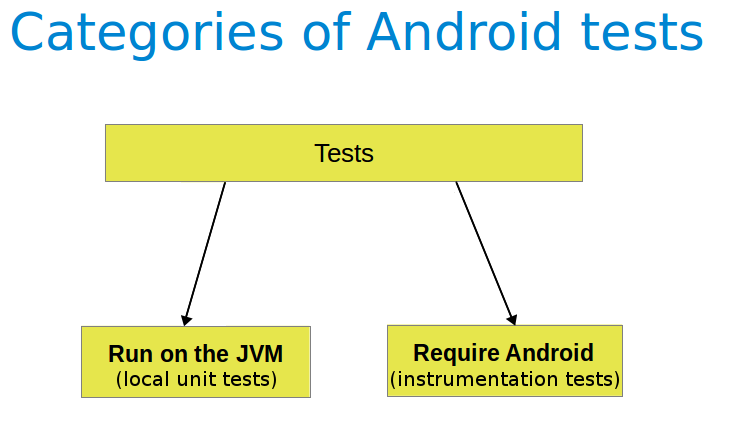
Local unit tests run much faster compared to the time required to deploy and run tests on an Android device. Prefer writing local unit tests and only run tests on Android, if you require a real Android system.
If you write local unit test and have dependencies to Android API, you need to replace them, e.g., via a mocking framework like Mockito.
1.2. What to test on Android applications
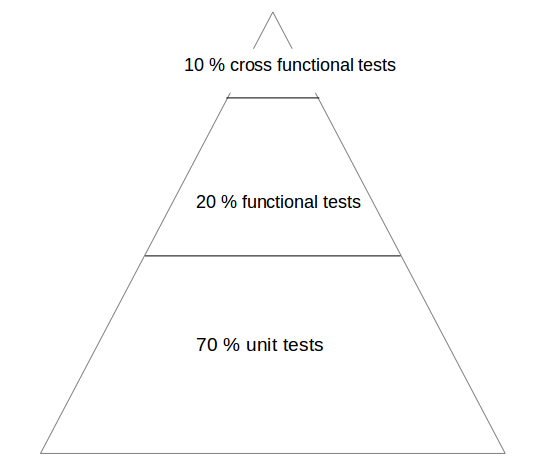
Your test should focus on the business logic of your application. A good rule of thumb is to have the following distribution of tests:
70-80 % unit tests to ensure stability of your code basis
20-30 % functional tests to ensure that the application really works
some cross functional tests if your application integrates intensively with other Application components
You should test your application at least on one device with the lowest possible configuration. In addition you should test on one device with the highest available configuration, e.g., pixel density, screen resolution to ensure that it works fine on these devices.
1.3. Tooling support for Android testing
The Android Testing Support library (ATSL) project from Google provides tooling for Android testing. For example, it ( AndroidJUnitRunner ).
If you run local unit tests, a special version of the android.jar (also known as the Android mockable jar ) is created by the tooling. This modified JAR file is provided to the unit test so that all fields, methods and classes are available. Any call to the Android mockable JAR results, by default, in an exception, but you can configure Android to return default values. See Activating default return values for mocked methods in android.jar for details.
The library provides a JUnit 4-compatible test runner ( AndroidJUnitRunner ), the Espresso test framework and the UI Automator test framework. Espresso test framework can be used to test the User Interface of your application. UI Automator allows to write cross application functional tests.
AndroidJunitRunner provides access to the instrumentation API, via the InstrumentationRegistery .
InstrumentationRegistry.getInstrumentation() , returns the Instrumentation currently running.
InstrumentationRegistry.getContext() , returns the Context of this Instrumentation’s package.
InstrumentationRegistry.getTargetContext() , returns the application Context of the target application.
InstrumentationRegistry.getArguments() , returns a copy of arguments Bundle that was passed to this Instrumentation. This is useful when you want to access the command line arguments passed to the instrumentation for your test.
It also gives access to the life cycle via the ActivityLifecycleMonitorRegistry .
1.4. Android project organization for tests
The following is the default directory structure for your application and test code:
app/src/main/java — for your source code of your main application build
app/src/test/java — for any unit test which can run on the JVM
app/src/androidTest/java — for any test which should run on an Android device
If you follow this conversion, the Android build system runs your tests on the correct target (JVM or Android device).
If you receive the following error message: «error duplicate files in path. Path in archive: LICENSE.txt» you can add the following to your app/gradle.build file.
2. Android unit testing
2.1. Unit testing in Android
A unit test verifies in isolation the functionality of a certain component. For example, assume a button in an Android activity is used to start another activity. A unit test would determine, if the corresponding intent was issued, not if the second activity was started
A unit tests for an Android application can be:
local unit test — which runs on the JVM
Android unit test — which runs on the Android runtime
If they run on the JVM, they are executed against a modified version of the android.jar Android library. In this version all final modifiers have been stripped off. This makes it easier to use mocking libraries, like Mockito.
The local unit tests of an Android project should be located in the app/src/test folder.
2.2. Required dependencies in the Gradle build file
To use JUnit tests for your Android application, you need to add it as dependency to your Gradle build file.
2.3. Running the unit tests
2.3.1. Using Gradle
Run your unit tests with the gradlew test command.
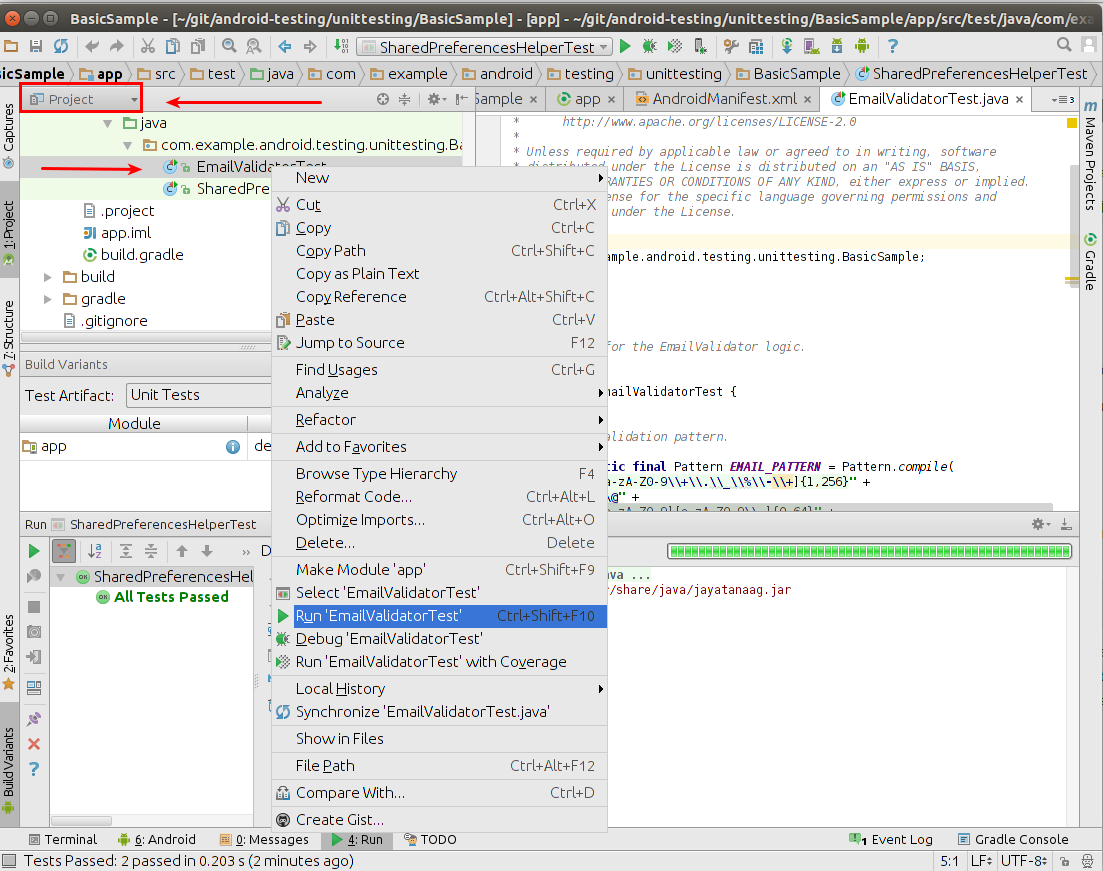
2.3.2. Using Android Studio
To run a unit test, right-click on your test class in the Project window and select Run.
2.4. Location of test reports
The Test reports are created in the app/build/reports/tests/debug/ directory. The index.html gives an overview and links to the individual test pages.
2.5. Activating default return values for mocked methods in android.jar
By default, all calls to methods in the modified android.jar file throw exceptions. This default should ensure that your unit tests only test your code and do not depend on any particular behavior of the Android platform. If you want to configure a certain behavior, you can use a mocking framework to replace these call.
You can also instruct the Gradle build system to return default values for method calls in the `android.jar`with the following configuration in your Gradle build file.
3. Exercise: Create unit test
In this exercise you learn how to create a simple JUnit4 test for an Android project.
3.1. Preparation: Create Android project
Create the Android project as described in Android temperature converter.
3.2. Add JUnit dependency
Ensure you have the dependency to Junit in your app/build.gradle file.
3.3. Create test
In your app/src/test directory create the following two test methods for the ConverterUtil class.
3.4. Run unit tests
Ensure your unit tests are correctly implemented by running test tests. They should run successfully.
4. Writing tests to run on the Android device
4.1. Instrumentation tests
The Android testing API provides hooks into the Android component and application life cycle. These hooks are called the instrumentation API and allow your tests to control the life cycle and user interaction events.
Under normal circumstances your application cannot control the life cycle events and the user drives the application. For example, if Android creates your activity the onCreate() method is called. Or if the user presses a button your corresponding code is called. Via instrumentation you can control these events via your test code. For example, your instrumentation test can start the activity. Afterwards, it can call the finish() and restart the activity to test if the instance state of the activity is correctly restored.
Instrumented unit tests are unit tests that run on Android devices and emulators instead of running on the Java virtual machine. These tests have access to the real device and its resources and are useful to unit test functionality which cannot be easily mocked by mocking frameworks. An example is a test which validates a Parcelable implementation.
An instrumentation-based test class allows you to send key events (or touch events) to the application under test.
With user interface testing framework like Espresso, the developer rarely has to use the instrumentation API directly.
4.2. How the Android system executes tests
The InstrumentationTestRunner is the base test runner for Android tests. This test runner starts and loads the test methods. Via the instrumentation API it communicates with the Android system. If you start a test for an Android application, the Android system kills any process of the application under test and then loads a new instance. It does not start the application, this is the responsibility of the test methods. The test method controls the life cycle of the components of the application.
The test runner also calls the onCreate() method of the application and activity under test during its initialization.
4.3. Mocking objects in Android
The mocking framework Mockito can also be used for instrumentation tests. This allows you to replace parts of the Android system which are not interesting for the test. The Android framework provided in the past specialized mocking classes but these are not necessary anymore.
4.4. Location of instrumentation tests
As described in Android project organization for tests the unit tests of an Android project should be located in the app/src/androidTest/java folder.
4.5. Define dependencies and testInstrumentationRunner in the Gradle build file
To use JUnit tests for your Android application you need to add the dependency to JUnit to your Gradle build file. You also need to specify android.support.test.runner.AndroidJUnitRunner as testInstrumentationRunner in the build file.
4.6. Using the @RunWith(AndroidJUnit4.class)
It is also recommended annotating the test with the @RunWith(AndroidJUnit4.class) annotation. AndroidJUnit4 extends JUnit4, so if you use pure Junit4 syntax and ActivityTestRule it is not required. But you need it, if you want to run, i.e., Espresso tests with ActivityTestRule and JUnit4.
4.7. Run the tests on Android
Run your local unit tests via Gradle with the gradlew connectedCheck command.
To run your local unit tests via Android Studio, right-click on your test class in the Project window and select Run.
4.8. Location of test reports
The test reports are created in the app/build/reports/androidTests/connected/ directory. The index.html gives an overview and links to the individual test pages.
4.9. How to replace the application for instrumentation tests
You can replace the application class for the instrumentation tests by overriding the AndroidJUnitRunner and its newApplication method.
Источник


