- How to Check for Updates on Your Android Phone
- Check for a system update to get the latest version of Android
- What to Know
- How to Check for Android Updates
- How Android Updates Work
- Best 5 Ways to Solve Android Stuck on Checking for Updates
- Solution 1: 2 Steps to Go Past Android Stuck on Checking for Updates
- Solution 2: Force Restart Android Phone
- Solution 3: Hard Reset Your Android Phone
- Solution 4: Empty the Android Cache
- Solution 5: Contact Phone Support
- Extra Tip: How to Skip Checking for Updates Android Samsung Phone
- Conclusion
- Implement In-app Update In Android
- Make sure every user of your app is on the new version.
- What is In-App Update:
- Flexible Update:
- Benefits:
- Android update check now
How to Check for Updates on Your Android Phone
Check for a system update to get the latest version of Android
:max_bytes(150000):strip_icc()/MarziahBioPic-57fc61e83df78c690f7dd0a7-e388c9f1295b4bdc9a8001547e9aca6f.png)
:max_bytes(150000):strip_icc()/jonfishersquare-93eb80e77a004035887f56816d3623c5.jpg)
What to Know
- On most Android phones: Settings >System >About Phone >System updates >Check for update and tap to start.
- The update takes a few minutes and restarts the phone.
This article describes how to check for updates on your Android phone on most recent versions of Android; instructions might vary slightly among manufacturers.
How to Check for Android Updates
Following these steps will also tell you which version of Android your smartphone is running.
Open the Settings app.
Samsung devices may display a Software Update notification. If not, tap Settings > Software Update to see if updates are available.
Tap System. On some phones, tap About phone, then skip to Step 4. On some Samsung phones, tap System updates, then skip to Step 5.
Tap About phone.
:max_bytes(150000):strip_icc()/001_check-updates-for-android-1616953-1aa6b57111c64f21a70debbf91e99002.jpg)
On some Android Phones, tap Advanced, then select System Update.
Tap System updates. The phone may display different phrasing, such as in this LineageOS example.
:max_bytes(150000):strip_icc()/002_check-updates-for-android-1616953-fe8f845948384c7887d1407c3bf418dd.jpg)
The screen shows if the system is up to date and when the update server was last checked. Select Check for update to check again.
If an update is available, tap to start the installation.
Leave the phone in a charger during a firmware update so there’s less chance of running out of battery power mid-upgrade and potentially breaking the phone.
The update takes a few minutes and restarts the phone.
How Android Updates Work
Google periodically pushes upgrades to the firmware on an Android phone by sending the updated information through a cellular or Wi-Fi connection. When the phone is turned on, notification of the available update appears on the screen.
These updates are rolled out in waves by device makers and carriers, so updates aren’t available to everyone at once. That’s because firmware updates must be specifically compatible with the hardware on a phone, unlike apps, which work with a wide variety of devices. Firmware updates require permission, time, and a device restart.
Because Android is a fragmented operating system — different device manufacturers and cellular carriers configure it separately — updates roll out at different times to different customers. The first recipients of any new upgrade are Google Pixel users because updates are pushed directly by Google without being reviewed or modified by a carrier.
Users who have rooted their phones (that is, modified the device on a basic operating system level) may not be eligible for over-the-air carrier updates and must reflash the phone to update to the newest Android version that is optimized for their device.
A firmware upgrade is unrelated to app upgrades pushed through the Google Play Store. App updates do not require vetting by device manufacturers or cellular carriers.
Источник
Best 5 Ways to Solve Android Stuck on Checking for Updates
by Sophie Green Updated on 2020-11-09 / Update for Fix Android
A large chunk of mobile users prefers Android phones because of high stability and ease of use. But it’s far from perfect. Android stuck issues are very common and almost all of us have been there sometime.
Lately, many users are complaining that their phone is stuck on Checking for Updates screen after you performed a reset. It means you cannot get access to the main screen which becomes even more stressful when you don’t know how to fix this issue and complete the updates installation process.
We have compiled a practical guideline to help our readers fix the checking for updates stuck android issue permanently.
Solution 1: 2 Steps to Go Past Android Stuck on Checking for Updates
Many users have reported that android stuck on checking for software updates after factory reset issue can be fixed by following the below two steps:
Step 1: Don’t Insert SIM Card or Remove it
- Open the SIM port of your Android phone and take out SIM card.
- Then, restart your mobile and again check if the issue persists.
Step 2: Don’t Connect to Wi-Fi Network
- Skip all the Wi-Fi or mobile data connectivity options while your phone is restarting after a reset.
It will automatically skip the Checking for Update screen and brings you to the Home screen.

Once you go to the Home screen, connect to a Wi-Fi network, and Check for Updates in the Settings — and install them if any available.
Solution 2: Force Restart Android Phone
It is probably the first and must-do method to get rid of checking for updates stuck android issue. A force restart removes any temporary bug in the Android OS that may have caused the stuck issue in the first place. To force restart an Android phone:
- Press and hold volume down and power keys for a few seconds until you see the device logo on the screen.
Then, again press and hold the power button to switch your phone.
(This method is not applicable to every Android mobile phone. It works for most mobiles.)
Solution 3: Hard Reset Your Android Phone
A hard reset erases all the information from your device and restores it to the original state. That’s how it fixes android stuck on «»checking for updates»» error. So, backup your mobile first and then follow the below steps to hard reset your Android mobile:
- Switch off the mobile and press and hold the Volume Up and the Home keys simultaneously to switch on your phone.
- Then, release the power key when you see the device logo on the screen.
- Keep pressing the volume up key until you see the Android system recovery menu .
- Use Volume down key to highlight ‘Wipe data/factory reset’ and use the Power key to select it.
- Again, use Volume down key to highlight ‘Yes — delete all user data’ and select it using Power key to start the master reset.
- Your mobile will take some time to complete the hard reset and automatically highlight the ‘Reboot system now’.
Finally, press the Power key to reboot your Android mobile.
Solution 4: Empty the Android Cache
Another effective method to get rid of this issue is by clearing the cache files. Deleting the cache files creates extra space and also removes any bug hidden in the temporary files that may have caused the android stuck on checking for updates in the first place.
To clear cache on an Android phone stuck on screen: (method may change for your mobile).
- Switch off your device.
- Press and hold power and volume up key (in some cases, both volume keys) until you see device logo.
- Here, release the power key and keep pressing the volume key.
- On the recovery screen, use the volume down key to highlight Wipe cache partition option and press the power key to select it.
Once it clears the cache, reboot your mobile using the power key.
Clearing the cache files manually consume too much time and you may not know the exact procedure of deleting cache partition in every mobile version. That’s why you should use Tenorshare ReiBoot for Android to clear cache with easy steps.
Solution 5: Contact Phone Support
If you have implemented all the above methods and still can’t get rid of checking for updates stuck android, then you have to contact the phone store. Go to any mobile repairing mall or official customer support service of your mobile brand and get it repaired.
Extra Tip: How to Skip Checking for Updates Android Samsung Phone
If you’re having the same issue then Tenorshare ReiBoot for Android is at your service. This tool has been in the market for quite some time and has won acclaim as the best Samsung repairing software around the world. This tool is super quick, intuitive, and convenient to use even for the novice.
No matter what the underlying issue is, you can fix android stuck on checking for updates issue with just a few clicks.


Download and install ReiBoot for Android on your computer and double-click on ReiBoot icon to launch it. Then, connect your Samsung phone via original cable and hit on Repair Android System.
When it recognizes your Samsung mobile, click on Fix Now to continue.
Then, you need to fill in the information of your Samsung device. Use the drop-down arrow to enter the details.
Now, ReiBoot will download the latest firmware package corresponding to your Android device. Browse a location on your computer to save it and don’t disconnect the phone during the downloading process.
Once the firmware package is downloaded, click on Repair Now to start repairing your Samsung mobile.
Then you need to enter into download mode by following the instructions on the screen corresponding to your Samsung mobile version i.e., is it with or without home button.
The software will take a few minutes to completely repair your mobile phone. Once it is completed, click on Done and your mobile will restart and function properly.
Conclusion
Nothing is more frustrating than a smartphone stuck on a screen as it renders it completely useless. To help our readers, we have discussed how you can troubleshoot android stuck on checking for updates issue while sitting at home. You just have to implement the aforementioned solutions one by one to overcome this bug.
However, Tenorshare ReiBoot for Android offers you a quick and reliable way to repair your mobile and get rid of this issue once and for all.
Updated on 2020-11-09 / Update for Fix Android
Источник
Implement In-app Update In Android
Make sure every user of your app is on the new version.

Apr 6, 2020 · 8 min read

In this article, we will learn about the In-app update feature in Android what is all about In-app update, what are the benefits of using the In-app update in your android application. Recently I’ve been working on a product in which I need to Implement an In-app update Why we need to Implement this?.
As a Developer we always want our users to have the updated version of their application but there are a lot of people who actually turned off their auto update from google play store and he/she doesn’t know about any update available or not.
To overcome the problem Google Introduced this feature called In-app update from this feature you can easily prompt the user to update the application and with the user permission you can update the application also while updating the app user can be able to interact with the application. Now the user doesn’t need to go to google play store to check there is any update available or not.
What is In-App Update:
An In-app update was Introduced as a part of the Play Core Library, which actually allows you to prompts the user to update the application when there is any update available on the Google Play Store.
There are two modes of an In-app update.
- Flexible Update
- Immediate Update
Flexible Update:
In Flexible update, the dialog will appear and after the update, the user can interact with the application.
This mode is recommended to use when there is no major change In your application like some features that don’t affect the core functionality of your application.
The update of the application is downloading in the background in the flexible update and after the completion of the downloading, the user will see the dialog in which the user needs to restart the application. The dialog will not automatically show, we need to check and show to the user and we will learn how later.
Benefits:
The major benefit of the flexible update is the user can interact with the application.
Источник
Android update check now
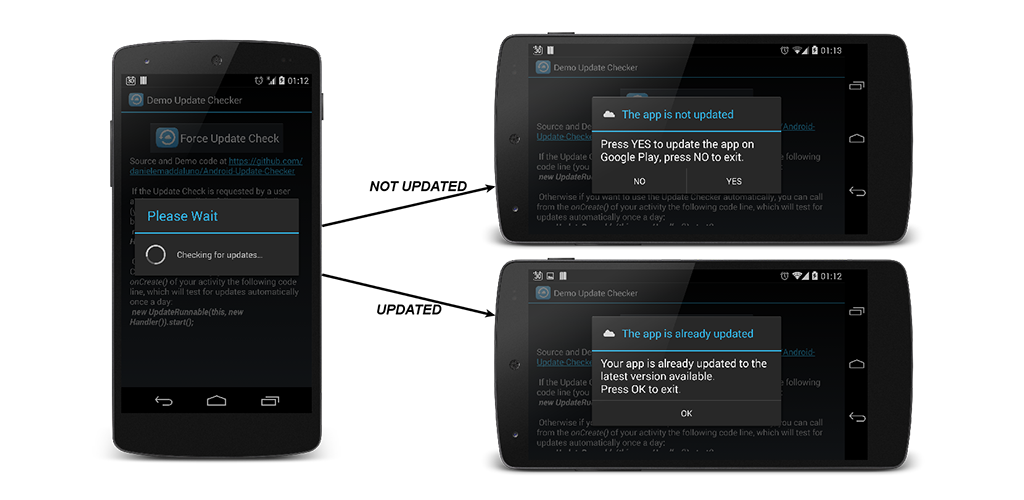
 Android Update Checker
 ![]()
The project aims to provide a reusable instrument to check asynchronously if exists any newer released update of your app on the Store.
It uses the Java HTML Parser Jsoup to test if a new update really exists parsing the app page on the Google Play Store.
1. Include library
Automatically (  ):
):
Automatically with Gradle
Remember to replace «1.0.2» with the latest version available.
If you want to automatically take the latest version, you could use this:
Automatically with Maven
Manual — Using Android Studio:
- Download the UpdateCheckerLib folder and import to your root application folder. You can manually achieve this step with 3 steps:
- Paste the folder UpdateCheckerLib into your application at the same level of your app, build and gradle folder
- Add to your settings.gradle file the following code line: «include ‘:app’, ‘:UpdateCheckerLib'»
- Rebuild the project
- File → Project Structure → in Modules section click on «app» → Click on tab «Dependecies» → Click on the green plus → Module Dependecy → Select «:UpdateCheckerLib»
- Done =)
Manual — Using Eclipse ADT
- Download the UpdateCheckerLib folder and import into the workspace
- Right click on the project imported → Properties → Android → Check the box «Is Library»
- Right click on the Main Project → Properties → Android → Add → Select UpdateCheckerLib → OK
2. Android Manifest
3. Activity class
If you are using Proguard you have to add the following lines to your Proguard rules:
Applications using Android Update Checker
Источник


