Android usb camera github
AndroidUSBCamera
AndroidUSBCamera is developed based on the saki4510t/UVCCamera, the project of USB Camera (UVC equipment) and the use of video data acquisition are highly packaged, and it can help developers using USB Camera devices easily by a few simple APIs. By using AndroidUSBCamera,you can detect and connect to a USB Camera simply.And you also can use it to realize taking picture,recording mp4,switching resolutions ,getting h.264/aac/yuv(nv21) stream and setting camera’s contrast or brightness,supporting 480P、720P、1080P and higher,etc.supporting overlay and record device’s mic.
Supporting Android 5.0,6.0,7.0,8.0,9.0,10.0
1.Add to your Android Studio project
Step 1. Add the JitPack repository to your build file.Add it in your root build.gradle at the end of repositories:
Step 2. Add the dependency
2. APIs Introduction
(1) In order to using it correctly,the following four steps must be achieved:
To be attention,mCallback is a object of interface CameraViewInterface.Callback,and it’s used to be listenering surfaceView created or detoryed.mDevConnectListener is a object of interface UVCCameraHelper.OnMyDevConnectListener,and it’s used to be listenering to detect and conntect USB device.Here is the coding order:

(2) Capturing JPG Images
(3) Recording Mp4,supporting close voice and save file automatic.
(4) setting camera’s brightness and contrast.
 (5) switch resolutions and camera.

At last,remember adding permissions:
3. Solving Problems
Please checking your preview format and change YUV to MJPEG or MJPEG to YUV,because some usb devices only supporting YUV
confirm your phone support otg
get a file from your sd card named failed-device.txt in the path of root sd card/UsbCamera/failed-device.txt and tell me
if your device is Android 10(Q),please change your versionTarget to 27 and below, because these is a bug in Android Q SDK.
2020.01.15 version 2.3.2
- support adding time overlay(attention: overlay only support armeabi-v7a & arm64-v8a);
- support recording device mic;
- update to androidx and update commonLibVersion from 2.14.2 to 4.1.1;
- fix saving files failed.
2020.04.14 version 2.3.4
- fix pull version 2.3.2 failed.
- fix android 9.0 sometimes can not preview. 3.fix pull out crash 1.
- update to all so files to new.
2021.03.16 version 2.3.5
- fix stop preview crash.
- open UVCCamera NDK Library project—-UVCCameraLib
2021.04.08 version 2.3.6
2021.11.17 version 2.3.7
- fix download common library failed, and use aar instead.
In order to display the functions, I develop a simple released apk,which is based on version 2.3.1,and the build version is 28.0.3.Here is my configs and if you have any questions please issues to me ,I will follow it do my best.


Other Library about Android Camera
OkCamera Android Camera univsersally operation.
AndroidRecordMp4 Using MediaCodec realize record mp4.
AndroidYuvOsd YUV data operation.
Lame4Mp3 pcm to mp3 and pcm to aac.
About
Universal UVCCamera library,supporting recording,pushing,etc. // USB摄像头(UVC)视频录制和图片抓拍,支持边推流边录像
Источник
Android usb camera github
Still under development.
This is a Android Studio Project. It connects to a usb camera from your Android Device. (OTG cabel or OTG Hub needed) (It works with Micro Usb and Usb Type C devices)
This Project was built to perform an Isochronous Video Stream from all Android Devices (Above 4.0.4 Ice Cream Sandwich)(Mediathek Devices too).
The app connects to USB Cameras via variable, different input values for the camera driver creation. In most cases you won’t need to set up your own camera driver, because other apps may do this for you automatically, but for some Android devices it could help to watch videos from Usb Cameras.
- LibUsb Support Added: LibUsb raises the performance of the standard Usb Device Driver.
(Some OTG cabels doesn’t work —> I’ll found one which is an extern powered more Port USB-C OTG cable and doesn’t work . ) (An non working OTG cable doesn’t show the right interfaces and endpoints of you camera: —> When you click on ‘List Up The Camera’ Button)
Since Android 9 Google made a mistake granting the Usb Permissions for Usb Cameras, so this app may not works on Android 9 + Devices —> https://issuetracker.google.com/issues/145082934
Explaination: Before you start with entering the Camera values, your Android device have to detect the Camera: So you click the Button and then the Button . The app will ask you for granting the permissions.

In the Picture above a camera was found and the Permissions to the Camera are granted. If no Camera is detected, you can nott use this app. (except of the WebRTC function). Next you have read out the camera Interfaces, to see if your camera is UVC complient. So you click the Button: :

Here you can see a sucessful return of an UVC compliant camera. The first Interface is always the ControlInterface and the second is always the Stream Interface. This Controlinterface (1st) has only 1 Endpoint. The StreamInterface could have more than one Endpoints (depends on the supported resolution of the camera). Here the Endpoint of the StreamInterface has a maxPacketSize of 3072 bytes (You need such a value later). (It could be, that your camera has an audio output, or Sd-Card output too, than see more than 2 Interfaces for your device). If those two Buttons work correctly, you can start to set up the UVC values: Click the Button to start the camera setup. You have two pissibilies: The and the Method. The method is in beta stadium for now, so if this button fails, you choose the method next time! The automatic method should find working camera values for its own, but this values may not be optimal for video transmission. To choose the right values for your own, you click on the Button.
Manual Method Explained: First you choose you Maximal Packet Size: You Camera may supports more Values for the MaxPacketSize, so you can test out each of them, which works best. If your phone uses a Mediathek Chipset you may choose the smallest value, but normaly you choose the highest value! Click on and proceed to the Packets Per Request selection: The Values you select builds the size of the Stream. This means if you select higher Values (such as 32 or more ..) you stream gets bigger, but there may could result error from your device or the camera because of a too large amount of data. For the start you select 1 for this Value. (This would be definitly to less, but you can raise it later) .. Next Sceen shows the ActiveUrbs (actice Usb Request Blocks) —> This is also a value which represents the size of the camera stream. One Block of the activeUrbs is exactly the maxPacketSize x packetsPerRequest. You can select 1 for the start (You will have to raise it later ..) Then the Setup Method will ask you for the Camera Format, which your camera supports. If there is only one format, you click on , if there were more, you select one (does not matter which one) (eventually MJpeg if present) and click on . Next you have to select you Camera Resolution, which you camera supports with the Format (perhaps your camera supports other resolutions, with the other Format . ). Select something . and click on Then you have to select the Frame Interval, which your camera supports. You can click on a Value (maybe the lowest on displayed on the screen, because it is better for the setup. You can save your Entries now: Click on to save this values (you do not need to run the method again, if you have finished the setup and found some working values . If you click on in the next screen —> an automatic name will be taken from the camera to save the file. You can also enter a unique name or enter the value, which is displayed on the bottom, to choose an existing file.

The picture shows the output of the sucessful setup: Now you want to know, if your Camera works with your selected Values. So you start the comunication with your camera by clicking on the Button and then you select the first entry
![]()
If you output is the same like on the Picture above, you have sucessfuly initialized your camera with your selected values. If you do not get a sucessful output of this Button (Video Probe-Commit Control) you can not use the app with your phone / camera. If this output fails, you may contact the developer or try to run the manual Uvc setup method again. If you were sucessful, then you can proceed with reading out the camera frames (first only over the Text View, because your frames may be corrupted or too short or .. To receive some data from your camera, your press the Button again and then on and then on . You then should receive the first frame data from your camera.

The first data which was received on the picture above, were 39950 byte in this case. This means that the camera communicats with the android device and trys to submit the frame data. But the data received above is much to less for a frame Image of a sample size of 640 x 480. So tbe Values «ActiveUrbs» and «PacketsPerRequest» should be raised to get a better output: in my case to 16 Packets and 16 Urbs. If you were not able to get the frame data from your camera, then re-run the manual setup method and change same values. (lower the maxPacketSize, raise activeUrbs, raise packetsPerRequest). To raise the vales for (packetsPerRequest and activeUrbs) you can re-run the setup method or you click on the Button There you should only change the values for these two values (packetsPerRequest and activeUrbs). If you re-run the manual method, you can keep your values by clicking on done, or type in new values to change em.

Here you see, that the frame now gots larger —> 614400 —> this is exact the size of imageWidth x ImageHight x 2 —> 640 x 480 x 2. So in the shown case, the correct setting was found and now the camera setup is finished! Sometimes cameras compresses the frames they send to the devices, so in some cases you have to receive frames with a nearly same size too each other (use the 2nd method from the testrun menu —> «Frames for 5 seconds») When all frames are identically (or nearly) and also all methods above were sucessful, you have sucessfuly finish the setup. You will sure have to spend more time to figure out the right values, but if you have found them, save them and later you can easy restore them any time. If you want to delete some savefiles you will have to manually do this with a file explorer (but only this one you do not need any more) To the Button «Frames for 5 secound»: Have a look at your frames: If they are all identically and big enougth, than you can proceed to start the camera stream with the button from the main screen. Otherwise you have to edit some values for your camera: Perhaps -PacketsPerRequest- or -ActiveUrbs-, or something else. Click the —> Button to start the transmission. If everything works, you can watch the video of your camera.
Descripton of the Camera Values:
Alt-Setting: The Alt-Setting is a camera specific setting which defines which interface of your camera shall be used for the isochronous data transfer.
Maximal-Packet-Size: Each Alt-Setting has its own Maximal-Packet-Size. The Maximal-Packet-Size is byte Number which defines how many bytes each Packet of the iso transfer maximal contains.
Format-Index: Your Camera can support different Format Indexs. This could be MJPEG, or uncompressed (YUV) or .
Videoformat: This is a helper value, which has to be set to your selected Format-Index. You have to enter YUV, or MJPEG, or .
Frame-Index: Each Format-Index of your camera can have different Frame Indexs. This is a number which represents the camera resolution (1920×1020, or 640×480)
Image-Width, Image-Hight: This are helper values, which have to be set to your selected Frame-Index. For Example: Image-Width = 640 and Image-Hight = 480
Frame-Interval: The Frame-Interval is a number which defines, on how much nano secounds each new frame will be sent from the camera to your device.For example: 666666 means each 0,066 Secounds a frame is sent. 666666 = 15 frames per secound.333333 are 30 Frames per secound
Packets-Per-Request: This is a value wich defines how many Packet will be sent from your camera to your device in one cycle of the transfer.
Active-Urbs: And this value defines have many cycles are running paralell to each other in the data steam between camera and Android device.
Источник
Android usb camera github
Краткое описание:
Подключение USB-камеры(смартфон,планшет,тв) через USB,OTG-Кабель
Описание:
Описание USB-камеры
*** Pro-версия содержит некоторые дополнительные функции (например, ‘картинка в картинке’, ‘отображать видео на экране блокировки», » авто-рекорд за подключение и т. д.) Из общих настроек и без рекламы ***
Совет:
Поддерживает следующие устройства:
1) УФ-камера с микрофоном (поддержка H. 264, для работы с mjpg, yuy2 и т. д.)
2) УФ-граббер видео с аудио-входом (до 1080p через HDMI, поддерживает H. 264, с mjpg, yuy2 и т. д.)
3) позволяет, в том числе аудио с UTV007 / HTV600 / HTV800 чипсетов
4) позволяет в том числе аудио с STK1160 + SAA7113/GM7113 + AC97 чипсетов (аудио 48 кГц стерео версия)
5) Позволяет в том числе аудио с STK1160 + SAA7113/GM7113 (аудио 8кгц моно версия)
6) позволяет в том числе аудио с EM2860 + SAA7113/GM7113 + AC97 чипсетов
7) позволяет в том числе аудио с SMI2021 + SAA7113/GM7113 + ES7240/CS5340 чипсетов
Нажмите значок USB на панели инструментов, чтобы открыть диалоговое окно устройства, чтобы открыть устройство, если система не может обнаружить устройство.
Пожалуйста переключите видео-стандарт (PAL/NTSC) если видео-замораживание при использовании EasyCap.
Пожалуйста используйте кабель хорошего качества OTG и обеспечьте что электропитание
используя HEVC для видеозаписи требует Андроида 7.0 или выше, и прибор должен поддержать кодек HEVC.
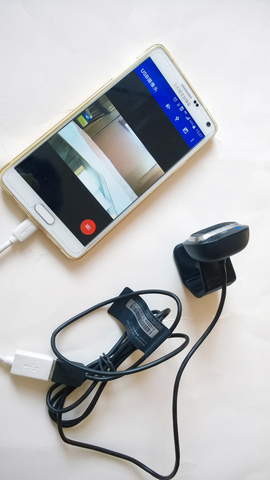
«USB-камера» позволяет вашему android-устройству подключаться к веб-камере USB или карте видеозахвата через USB-OTG. Вы можете записывать видео или захватывать снимок, или превратить ваш телефон в беспроводную IP-камеру для мониторинга безопасности с двунаправленной поддержкой звука, вы можете использовать браузер для просмотра, конечно, включите приложение «IP-камера».
«USB-камера» может передавать видео и аудио на RTMP Live media server (например, Push на YouTube, Facebook) и использовать для сетевого вещания. Вы можете включить его с сервера IP-камеры.
«USB камера» поддерживает бок о бок (SBS) вид и он может работать с картоном. (например, FPV goggle)
«USB-камера» может добавлять информацию GPS на видеокадры во время записи и может использовать гарнитуру или Bluetooth-гарнитуру для захвата снимка и записи видео. Он также поддерживает кнопку снимка веб-камеры.
«USB камера» поддерживает запись петли. Можно установить автосегмент при записи и автоматически удалять старые видеоархивы, когда недостаточно памяти. «USB-камера «может использоваться в качестве» Dash Cam «
USB-камера может бесшовное переключение между передним и задним планом. Просто нажмите «Enter background» из меню. Запись не прерывается во время переключения!
Она поддерживает автоматическую видеозапись которая основала на обнаружении движения и видеозапись можно загрузить к серверу FTP автоматически и сообщить вас через электронную почту!
Для двунаправленного звука требуется приложение IP Camera, его можно получить по адресу https://play.google.co…enyaocn.android.WebCam
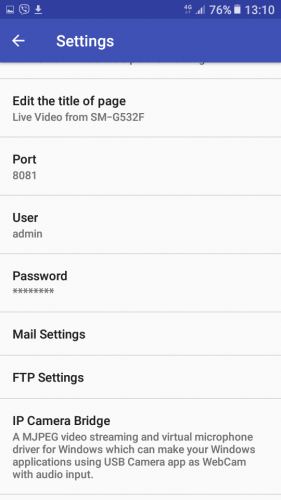
IP Camera Bridge — Драйвер потокового видео и виртуального микрофона MJPEG для Windows, который позволяет вашим приложениям Windows использовать USB-камеру в качестве веб-камеры с аудиовходом.
https://github.com/shenyaocn/IP-Camera-Bridge
Требуется Android: 4.3+
Русский интерфейс: Нет
Скачать:
Версия: 9.6.2 PRO (moorware)
версия: 9.4.0  USB Camera Connect EasyCap or USB WebCam 9.4.0.apk ( 17.79 МБ )
Скачать APK
Источник


