- Монтирование в Android
- Монтирование флешек в Android
- Монтирование файлов образов
- Монтирование папок
- A Full Guide to Use a Flash Drive on Android Phone [Partition Magic]
- Summary :
- Quick Navigation :
- How to Use a Flash Drive on Android
- How to Use a Flash Drive on Android
- Check Your Android USB Port
- Check If Your Android Supports USB On-The-Go (OTG)
- Prepare a USB OTG Cable
- Prepare a Flash Drive Formatted as FAT32
- How to Connect a USB Flash Drive to Android
- How to Safely Disconnect an Android Flash Drive
- Bottom Line
- Получение пути к карте памяти SD Card на Android
- Терминология
- Результаты поиска
- Описание кода
- Пример использования
- Заключение
Монтирование в Android

Если вы пользовались операционной системой Linux, а потом у вас появилось устройство Android у вас наверное возникал вопрос как использовать такую полезную функцию как монтирование в Android. Поскольку Android основан на ядре Linux он поддерживает большинство его функций, но не все они открыты обычному пользователю, а для некоторых необходим root доступ. В этой инструкции я опишу монтирование флешек, файлов и папок в Android.
Монтирование флешек в Android
Это делается очень просто с помощью меню Настройки. Откройте настройки системы, затем перейдите в пункт Память:

В низу есть пункт подключить карту памяти, он станет активным при подключении флешки:

Вот так это делается. Но если вы хотите примонтировать флешку из терминала, возникнут кое какие проблемы. Первое — в системе по умолчанию нет приложения терминала, но его не сложно установить из GooglePlay. Второе — нужно узнать имя файла флешки, в Linux имена стандартны, но в Android для каждой прошивки флешка может называться по разному. Третье — стандартная команда mount имеет не совсем привычный синтаксис.
И так приступим. Откройте GooglePlay и установите Android Terminal Emulator если еще этого не сделали. Затем нам нужно будет узнать имя файла флешки. Самый надежный способ это сделать снимок каталога /dev/block/ со вставленной флешкой и без нее, а затем сравнить эти файлы:
Делаем первый снимок:
Вынимаем флешку и делаем второй снимок:
Сравнивать файлы вручную дело трудное, казалось бы можно использовать стандартную в Linux утилиту diff, но в Android по умолчанию ее нет. Можно установить BusyBox, который добавляет джентельменский набор консольных утилит в систему. Или можно использовать андроид приложение для сравнения файлов например DiffTool
Сравниваем с помощью diff:
Или с помощью Diff Tools:

Здесь mmcnlk1 — имя устройства флешки, mmcnlk1p1 -имя раздела на флешке, такой себе аналог sda и sda1 для андроид. У вас может выглядеть по другому. Теперь когда мы знаем имя флешки можно монтировать:
Перед вводом команды необходимо получить права рут с помощью команды su. Файловую систему указывать обязательно, иначе получите ошибку синтаксиса. Доступны еще опции -r — монтировать в режиме только чтение, -w монтирование в режиме записи, -o дополнительные опции, аналогичны таковым в linux.
Монтирование файлов образов
Иногда возникает необходимость посмотреть содержание образа диска на телефоне, но сделать это на первый взгляд не так то просто. Монтировать образы в Android можно с помощью консоли или Android приложения. Для монтирования с помощью терминала наберите:
$ mount -t iso9660 -o ro,loop /имя_файла.iso /точка_монтирования
Но здесь есть один нюанс — ядро должно поддерживать монтирование loop устройств. Как и в предыдущем случае необходимо получить root права с помощью команды su, -t — это файловая система образа.
Также можно просматривать образы с помощью приложения ISO Extractor.
Монтирование папок
Наверное это самое легкое в этой статье. Для монтирования из терминала наберите:
Также существует множество утилит для монтирования папок например FolderMount.
Теперь вы знаете какие чудеса можно творить с помощью консоли в Android. Но это еще только маленькая частичка. Консоль Android не смотря на все ограничения позволяет делать очень интересные вещи, но об этом уже в следующих статьях.
Источник
A Full Guide to Use a Flash Drive on Android Phone [Partition Magic]
By Irene | Follow | Last Updated January 29, 2021
Summary :
Do you know how to connect a USB flash drive to your Android phone? If you don’t know, this article from MiniTool will show you some tips about how to use a USB flash drive on an Android phone.
Quick Navigation :
Sometimes, you may need to connect a flash drive to your Android. As we all know, the USB port on your Android does not match that of a flash drive. How can you make it? Well, this article will give you some instructions on how to use such a drive with Android.
How to Use a Flash Drive on Android
- Check your Android USB port
- Check if your Android supports USB On-The-Go (OTG)
- Prepare a USB OTG cable
- It should be formatted as FAT32
- Connect it to Android
- Tab the pop-up file manager on Android to browse the files on the USB
How to Use a Flash Drive on Android
You can connect a USB drive to an Android so that you can use it on Android and transfer files at ease. The question is: how to connect the USB drive to an Android? Well, the way to connect the flash drive to your Android may depend on what types of USB port your Android has.
Check Your Android USB Port
If you have an Android with a USB Type-C port and you have USB drive with both a USB-C interface and a USB-A interface, you can use the USB drive on Android without the need for an adapter. If you are using the traditional USB-A flash drive, you will need an adapter such as the USB On-The-Go (OTG) cable.
However, currently, most Android use Micro USB interface (USB Micro-B) for data migration and charging. Although USB type-C port appears on some android nowadays with the maturity of technology, Micro USB interface is still widely used in various mobile portable devices including Android.
So, generally speaking, when people asking how to connect a flash drive to an Android, the USB interface of the Android refers to the Micro USB interface. For these Android users, they have to resort to a USB OTG cable.
In conclusion, if you have an Android with a USB-C port, you can buy a new flash drive with both a USB-C interface and an A interface or adopt the USB OTG cable if you are using the traditional USB-A drive. If your Android has the traditional Micro USB port, you have no choice but to use the adapter USB OTG cable to make the connection.
No matter what, a USB OTG cable is vital, but what’s more important is that your Android should support USB OTG.
Check If Your Android Supports USB On-The-Go (OTG)
USB On-The-Go enables your Android to act as a USB host, allowing your Android to connect additional hardware such as flash drive, keyboard and so on.
However, not all Android support USB On-The-Go. So before applying this method, you should check if your Android supports USB OTG first. There are many USB OTG Checker apps, which can quickly scan your Android to check it supports USB OTG. You can download one via the Google Play store.
You can also visit your Android’s manufacturer’s website. If you see USB OTG listed in the specifications, it means the device supports USB OTG. If your Android is not compatible, you are unable to use the USB OTG cable to connect your USB drive to Android.
Prepare a USB OTG Cable
The USB OTG cable has a male Micro USB connector on one side and female USB-A jack on the other, which enables you to connect the USB drive to the Android.
You can plug your USB drive into the USB A jack, and then plug the other end of the USB OTG cable into your Android. In this case, the USB drive can be connected to your Android, which is very convenient.
If your Android supports USB OTG, you can connect your drive to your Android via USB OTG cable. However, most Android don’t come with a USB OTG cable. If you do not have one, you can buy a USB OTG cable from Amazon.
Prepare a Flash Drive Formatted as FAT32
Prepare a USB drive to be used on your Android. If the USB drive is formatted as NTFS, you need to format it to FAT32, as NTFS doesn’t work properly with Android.
If you don’t know how to format USB drive to FAT32 file system, you can keep reading.
Format your Android Flash Drive to FAT32
To make sure the flash drive can be read on your Android, a proper file system is vital. If you want to use it with Android, the file system for the USB drive should be FAT32.
If you need to format Android flash drive to FAT32, MiniTool Partition Wizard Free Edition is recommended.
MiniTool Partition Wizard Free Edition is an all-in-one partition manager. It can help you move/resize partition, extend partition, format partition, convert FAT to NTFS, convert MBR to GPT disk, migrate OS to SSD/HD, backup partition and so on.
With its simple procedures, powerful features and user-friendly interface, it has become the most popular partition manager for Windows users. So if you want to format USB drive to FAT32, MiniTool Partition Wizard Free Edition is your best choice.
Before you format USB drive to FAT32, you need to connect the Android flash drive that you need to format to your computer. Then you can follow the detailed guide below.
Step 1. Download MiniTool Partition Wizard Free Edition by clicking the following button. Install it on your computer and launch it to get the main interface.
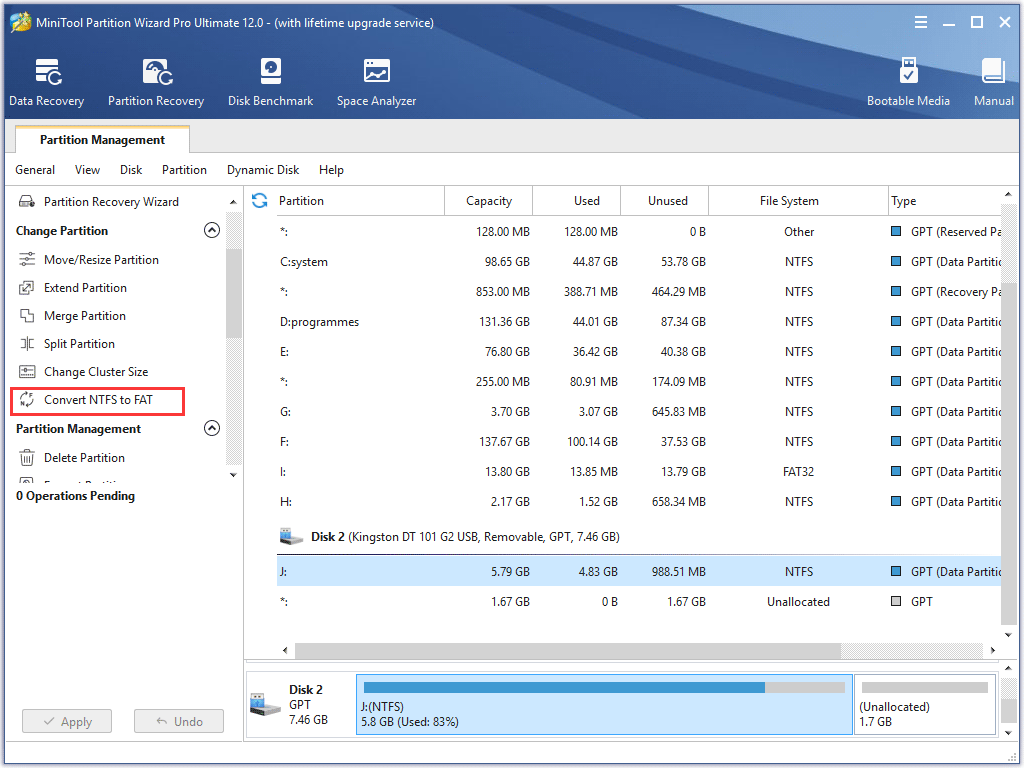
Step 2. Select the target partition, and then choose Format from the left action pane.
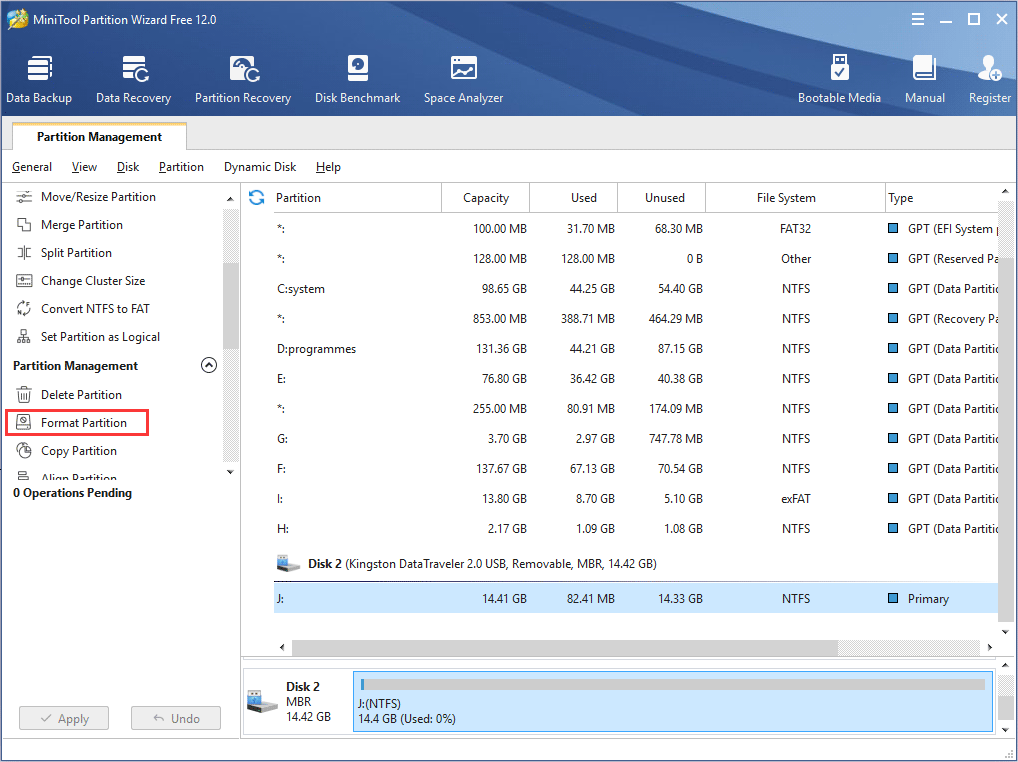
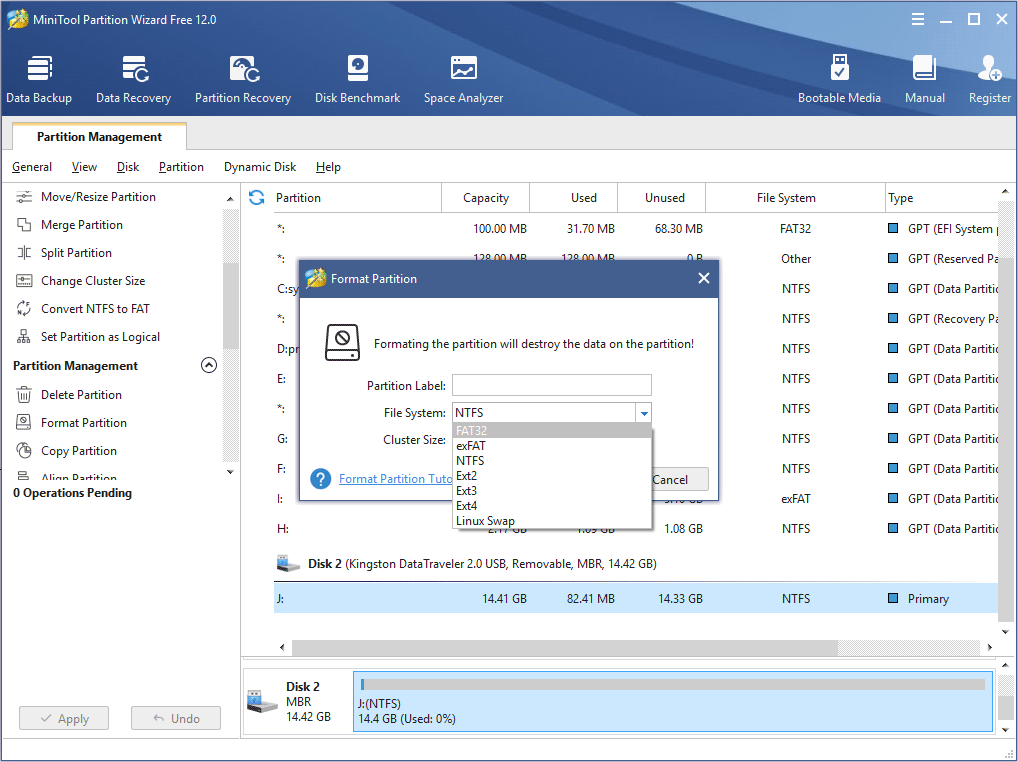
Step 3. On the Format partition page, choose FAT32 file system and click OK button.
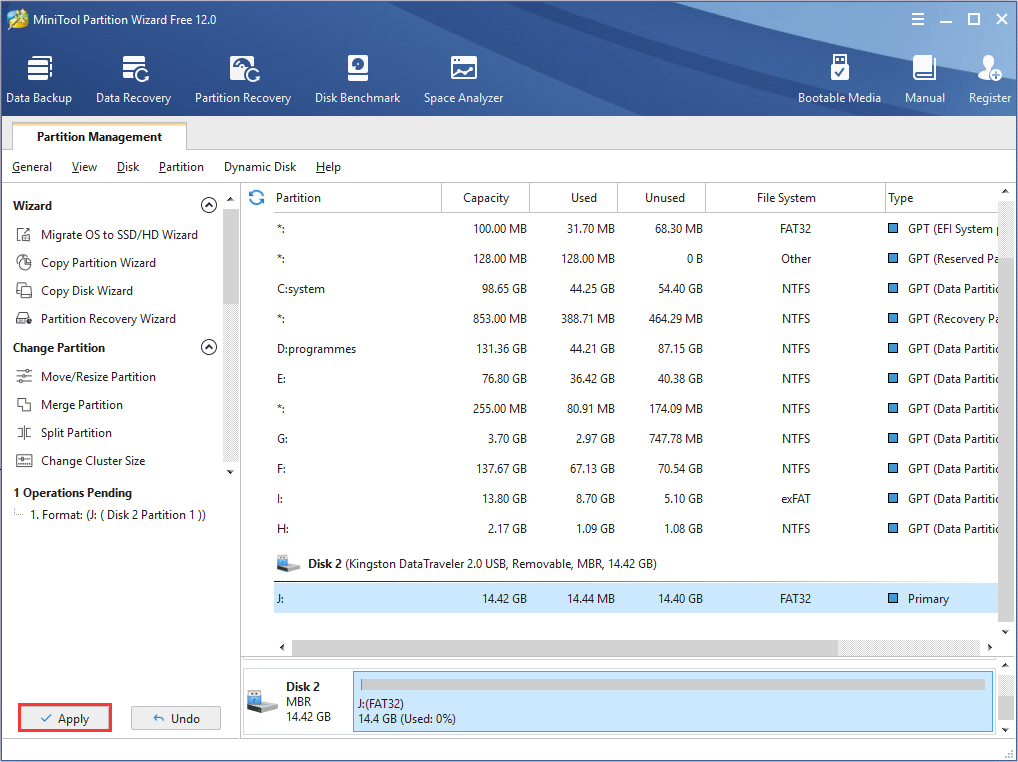
Step 4. At last, click Apply button on the top left corner to allow the change.
If there is no important file on the Android flash drive, you can format it to FAT32 using the following method. However, if there are important files stored on your USB drive, such as loads of movies that you want to play after connecting the USB drive to your Android device, what should you?
You can move them to another drive and restore them after formatting, but it consumes much time. If your Android flash drive is formatted as NTFS, here is another method for you: convert NTFS to FAT32 without data loss.
Convert Android Flash Drive from NTFS to FAT32
In most cases, a USB drive will be formatted to NTFS by default. If it is NTFS, you can convert the USB drive to FAT32 with MiniTool Partition Wizard Pro Edition.
Like the above steps, you just need to get MiniTool Partition Wizard Pro Edition by clicking the button. After installing the partition manager, select the USB drive and choose Convert NTFS to FAT32. At last, follow the prompts to apply the pending operation.
So if formatting is not a good idea for you, you can convert NTFS to FAT32 without data loss with MiniTool Partition Wizard Pro.
How to Connect a USB Flash Drive to Android
After having a USB OTG cable and formatting or converting the USB drive to FAT32, you can connect the drive to your Android. If you don’t know how to make the connection, this guide is helpful.
Step 1. Plug your cable into your Android.
Step 2. Plug your USB drive into the female connector of the cable.
Step 3. Then the file explorer on your Android should automatically pop up after detecting the USB drive.
Step 4. If the USB drive is not properly formatted, it will require you to erase and format your drive. If your USB drive is properly formatted with MiniTool Partition Wizard, you are able to tab the notification and open the file explorer to view the contents of the drive as if they were originally stored on your Android.
Then you are able to transfer files from android to this removable drive and play media files from the USB drive. Remember that do not remove the storage device while using it, as this will cause unexpected data loss on the USB drive.
If you need to copy and paste certain files from the flash drive to your Android device, you can long-press on the items you want to move and perform the proper operation. If you want to remove the Android USB drive, to avoid data loss, you should safely disconnect the Android flash drive.
How to Safely Disconnect an Android Flash Drive
When you don’t need the Android USB drive, you can follow this instruction below to safely disconnect the USB drive.
Step 1. Swipe down from the top of the screen.
Step 2. Tap the USB mass storage connected. Then you can now safely disconnect your flash storage device.
Now you should know how to safely disconnect the Android flash drive. It is not a difficult thing to connect and disconnect a flash drive to your Android.
After knowing how to connect a flash drive to an Android, you can use the USB drive on Android at ease no matter if you want to transfer files or play media files stored on the USB drive.
Bottom Line
After reading this post, you should know how to connect and use a USB drive on Android.
If you have any question about how to format Android flash drive or how to use such a drive on Android, you can leave a message in the following comment zone and we will reply as soon as possible. If you need any help when using MiniTool software, you may contact us via [email protected] .
Источник
Получение пути к карте памяти SD Card на Android
Разрабатывая приложение для проведения соревнований, я столкнулся с проблемой хранения базы данных. Проблема состояла в том, как мне определить внешнюю карту памяти. В целом поиск в сети точного ответа не дал. Поэтому, объединив все найденные результаты, я собрал свой класс. Если кому интересно, смотрим под катом.
Итак, начнем с теории.
Терминология
Гугл нам говорит, что есть следующие понятия:
- Внутренняя (internal) память — это часть встроенной в телефон карты памяти. При ее использовании по умолчанию папка приложения защищена от доступа других приложений (Using the Internal Storage).
- Внешняя (external) память — это общее «внешнее хранилище», т.е. это может быть как часть встроенной памяти, так и удаляемое устройство. Обычно это часть встроенной памяти, как удаляемое устройство я видел в последний раз на андройде 2.2, где встроенная память была около 2Гб, и подключаемая память становилась внешней (Using the External Storage).
- Удаляемая (removable) память — все хранилища, которые могут быть удалены из устройства без «хирургических» вмешательств.
До версии KitKat 4.4 API не предоставляло функционала для получения путей к внешней памяти. Начиная с этой версии (API 19) появилась функция public abstract File[] getExternalFilesDirs (String type), которая возвращает массив строк с путями к внутренней и внешней памяти. Но как же быть с нашей SD Card, которая вставлена в слот? Путь к ней мы опять не можем получить.
Результаты поиска
Чтобы ответить на поставленный вопрос я обратился к всезнающему гуглу. Но и он мне не дал четкого ответа. Было рассмотрено множество вариантов определения от использования стандартных функций, которые ведут к внешней памяти, но ничего общего с удаляемыми устройствами хранения данных они не имеют, до обработки правил монтирования устройств (Android же на ядре Linux работает). В последних случаях были использованы «зашитые» пути к папке с примонтироваными устройствами (в различных версиях эта директория разная). Не стоит забывать, что от версии к версии правила монтирования меняются.
В конечном итоге я решил объединить все полученные знания и написал свой класс, который может нам вернуть пути к внешним и удаляемым устройствам.
Описание кода
Был создан класс MountDevice, который содержит в себе путь к устройству, тип устройства и некий хэш.
Типов устройств выделено два (внутреннюю память я не стал трогать, так как к ней доступ можно получить через API системы).
И был создан класс StorageHelper, который и осуществляет поиск доступных карт памяти.
В классе StorageHelper реализовано два способа поиска — через системное окружение (Environment) и с использованием утилиты Linux mount, а точнее результата ее выполнения.
Способ первый — Environment
При работе с окружением я использую стандартную функцию getExternalStorageDirectory() для получения информации о внешней памяти. Чтобы получить информацию о удаляемой памяти, я использую переменную окружения «SECONDARY_STORAGE«.
Внешняя память всегда одна и обычно всегда есть, поэтому проверяем ее на читаемость, вычисляем хэш и запоминаем. Удаляемой памяти может быть много, поэтому необходимо полученную строку разбить по разделителю и проверять каждое значение.
Вариант решения взят со stackoverflow. Ответ где-то там внизу.
Способ второй — mount
Так как у меня долго не получалось заставить систему мне сказать путь к удаляемой памяти, я решил искать в сторону примонтированных устройств. В системе есть файлы конфигурации, в которых описаны правила монтирования внешних устройств. Все бы хорошо, но на Android версии 4.* к этому файлу простым смертным доступа нет, поэтому рассматривать этот способ не буду.
Вернемся к утилите mount. При запуске без параметров команда возвращает список смонтированных файловых систем. Удаляемые устройства имеют обычно формат файловой системы FAT, то будем выделять строки, в которых есть характеристика «fat«. Внешняя память будет характеризоваться параметром «fuse«.
Примечание: при использовании такого способа не всегда корректно (скорее всего я что-то не учел) определяются типы смотнтированных устройств. Разницу замечал на разных версиях Android. Поэтому этот способ можно использовать как дополнительный.
Вариант решения взят со stackoverflow. Ответов там несколько примерно одинаковых.
Про дублирование
Многие замечали в директории монтирования устройств такую картину:
И что самое интересно, все это одна и та же внешняя карта памяти. Такое дробление начинается с версии Jelly Bean и сделано это для поддержки многопользовательского режима работы системы. Более подробно тут. И вот, чтобы не получать одну и туже карту памяти как различные устройства, необходим способ определения идентичности. Если бы был доступ к конфигурации монтирования, то и вопросов не было. Но доступа нет. Поэтому я тут подсмотрел решение с расчетом хэша для каждого устройства:
- создаем StringBuilder
- записываем в него общий размер устройства и размер используемого пространства устройства
- обходим содержимое корня устройства
- записываем имя каталога
- записываем имя файла и размер
- вычисляем hash
Пример использования
Заключение
Подробные рассуждения по этому вопросу понимания памяти в Android, некоторые советы можно прочитать тут.
Исходный код всего класса расположен еще нигде не расположен. На днях постараюсь разместить на gitHub.
Источник


