- Android Certificate: Generate, Sign And Verify An Apk App
- Looking At A Decompile APK File
- Generating An Android Certificate
- Method 1:
- Method 2:
- Method 3:
- Signing An Android Applicaiton
- Verifying An Android Application
- 🤔Adding SSL Certificates into your Android App with Retrofit
- 🏁 Intro
- 📄 Let’s talk about the certificates
- 🥺 What is the difference?
- 😬 Give me the implementation!
- 🏃♂️ Let’s get started!
- 💻 The Code
- 🏆 Conclusion
- Авторизация с помощью клиентских SSL сертификатов в IOS и Android
Android Certificate: Generate, Sign And Verify An Apk App

Apk signing has been a part of Android from the beginning of the Android evolution, and android requires all Apks should be signed before it can be installed on the device, There have been numerous articles regarding on how to generate a key and also how to sign an Apk, but we will be looking at it from a Security Perspective, After you decompile or reverse-engineer an Apk file, What file should you look into, To get more info about the Developer who originally sign the app.
Looking At A Decompile APK File
After you unzip the file or using apktool, depending on how you decompile the file, if you unzip the file, The file structure will look like this.
We are looking at the META-INF folder,
Looking at a decompile Apk using Apktool, It includes the certificates details about the developer and the type of hashing algorithm used and so on in the original folder and checking the META-INF folder.
Using keytool to check for the certificate while you are still currently in the META-INF folder.
depending on the name of your certificate alias name, You will see different information of the Owner, Country, Issuer, Certificate Validity from both the date the certificate is issue and when the certificate is set to be expired.
Certificate fingerprints in MD5, SHA1 and SHA256 and also the Signature algorithm used.

Before, I talk about Generating a certificate, lets look at it from security perspective, In analyzing an Android application which you download from third party web site, You can decompile the App and look at the certificate and compare it with the original App, Look at the hashing algorithm used, compare it if probably the application has been modified or tamper with, I wont be talking about analyzing an APK file but may be later.
Generating An Android Certificate
If you decompile your android application and compile it back, You will need to sign the app, and if you don’t sign it the Application wont be installed on the user device. There are different ways of generating a certificate but, we will look at three ways to generate a certificate using keytool.
Method 1:
Open your terminal:
where awwal — is the keystore name, alias — hafsa is the certificate alias name, which after you use it will be added to META-INF folder, -keysize 2048 , but you can use 4096 size, but there are issues regarding that from devices or so. but just use 2048, validity is in days.
Method 2:
Using apk-signer.jar which can be downloaded here https://shatter-box.com/knowledgebase/android-apk-signing-tool-apk-signer/
This is a GUI written in Java that allows generating a certificate and also signing an apk file. Though there’s also an Android App for that in Playstore.

Method 3:
I created a bash script that automate the task of using method 1, As method might require you installing Java Runtime, Just run the script i created which uses keytool and jarsigner.
Download the script here: https://github.com/ShehuAwwal/Apk-Signer

After that follow the instruction which will be prompted to generate your key.
Signing An Android Applicaiton
After you already generate your android application, we will look at how to sign the app, run your terminal:
Where -sigalg is the signature algorithm used, You can find some Apps using MD5 but use SHA1 as when you are verifying the app it will tell you the hashing algorithm used and how weak the algorithm used is.
keystore — awwal is the name of the keystore name used when generating the certificate, and hafsa is the alias name of the certificate, and medium.apk is the name of the app to be sign.
Note: if you MD5 the application will be treated as an unsign app because the algorithm use to sign the App is weak.
And the easier way is to use the Apk-signer.sh which i wrote to make the task easier.
Run the script, and press 2 for signing the app, Also completes also work there for file name and certificate name.

Or also you can make use of the apk-signer.jar also provide the options to sign the app.
Verifying An Android Application
Verify the app using jarsigner, to see the list of resources sign, the hashing algorithm with keysize.
Open your terminal:
where verify only will show either it is sign or unsign and using the verbose options to see the full details of the certificate.
Or you can use Apk-signer to verify the App with auto completion of file name.
Источник
🤔Adding SSL Certificates into your Android App with Retrofit

When this task was assigned to me in the project I’m working, I thought: this will be easy and it was 🙂, but it wasn’t 🙃, because I didn’t find a lot of posts on how to add my certificate.
You can always read the Official Android SSL Documentation (you should), but the implementation wasn’t clear enough to me, so I decided to create this post to simplify it for anyone who is going through the same problem 👍.
🏁 Intro
In this post I’m going to explain how to add certificates to our Android app when we have a .pfx file, not only the .crt , and of course, it will include a brief explanation of what those files are.
So after reading this tutorial we’re going to be familiarized with:
This tutorial is going to be based on a project using Retrofit to make calls to an API, but you can always adapt it for your specific case.
📄 Let’s talk about the certificates
A certificate authority (CA) is a company or organization that acts to validate the identities of entities (such as websites, email addresses, companies, or individual persons) and bind them to cryptographic keys through the issuance of electronic documents known as digital certificates.
So basically the CAs give us a way to authenticate us by serving as credentials to validate our identity, encrypt our data for secure communication over the insecure networks such as the internet, and give us a way to be sure nothing has been altered by a third party in transit because of the signature of the certificate.
Typically, an applicant for a digital certificate will generate a key pair consisting of a private key and a public key, along with a certificate signing request (CSR). A CSR is an encoded text file that includes the public key and other information that will be included in the certificate (e.g. domain name, organization, email address, etc.). Key pair and CSR generation are usually done on the server or workstation.
The .crt and the .pfx files are CSR encoded.
🥺 What is the difference?
CER (or .CRT) files: CER file is used to store X.509 certificate. Normally used for SSL certification to verify and identify web servers security. The file contains information about certificate owner and public key.
PFX files: Personal Exchange Format, is a PKCS12 file. This contains a variety of cryptographic information, such as certificates, root authority certificates, certificate chains and private keys. It’s cryptographically protected with passwords to keep private keys private and preserve the integrity of the root certificates.
Basically, the PFX contains more information than the CRT.
😬 Give me the implementation!
Okay, if you already know something about the CAs you probably just want to know how to implement them. So, let’s get into it.
If you have tried to add your certificate with a .crt file and Retrofit, you may have found this class in some post or documentation. I’m actually going to use code of that class for the implementation, but I’m going to break it down for easier reading, and to show the small changes we need to add when we’re using a .pfx file so you can use whichever you need.
The source code is gonna be at the end of the post.
🏃♂️ Let’s get started!
In order to add our certificates we’re going to create a method that generates an OkHttpClient. We only need to follow these simple steps:
- Add our file into our project as a raw resource.
2. Create a method that returns an OkHttpClient .
3. Create a KeyStore containing our trusted CAs.
5. Create an SSL Context that contains our trusted CAs.
6. Add our socket factory to our builder.
7. Use the generated OkHttpClient as usual.
- Add our file into our project as a raw resource (in the raw folder).
We can just drag and drop the file into the raw folder or go to our project directory and create it inside the app/src/main/res and then paste our file.

2. Create a method that returns an OkHttpClient .
This method is where we’re going to add our certificate to our OkHttpClient so we can use it to make calls to an API. In this example, I’m going to simplify, but you can always add custom settings.

3. Create a KeyStore containing our trusted CAs.
The KeyStore class is going to help us to store our certificates, but the type of instance is very important, that’s going to make the difference between using a .crt file or a .pfx .
.CRT → the default type is gonna work for you. KeyStore.getInstance(KeyStore.getDefaultType())
.PFX → you need to use PKCS12, this is a special format to place the certificate (includes its “intermediate”) with the private key.
KeyStore.getInstance(«PKCS12»)
The password is the one you need to use when you want to read your file. In this code I’m setting it as a String , but you should always keep it secure, so you better use a file with it or as a Build Config Field.

4. Create a KeyManagerFactory so we can have keyManagers with the algorithm of our certificate.
We’re getting an instance of an X509 Factory because that’s the standard of my public key certificate and it’s the most used one.

5. Create an SSL Context that contains our trusted CAs.
In this case we’re using an instance of a TLS Context because our server required so, and as TLS is basically a newer version of SSL we can use it as default.

6. Finally, add our socket factory to our builder.
Just use the socketFactory of the sslContext that we created in the last step and set it to the builder.

7. Use the generated OkHttpClient as usual.
Now that we added our trusted CAs to an OkHttpClient we can proceed to use it with a Retrofit instance as usual.

And just like that we’ll be able to make some calls to our API 🎉.
💻 The Code
🏆 Conclusion
Adding our trusted CAs in our Android app is not complicated and can be very useful when we have multiple flavors or build types with different API environments and some of those are secured with a CA.
Remember to remove your Development certificate when you’re building a Release version of your app; you don’t wanna give it away 😅. I also suggest deleting the file from Git for security reasons.
This post was made to try to simplify the explanation of the implementation that you probably are gonna find on the internet.
Источник
Авторизация с помощью клиентских SSL сертификатов в IOS и Android
Протокол безопасной передачи данных SSL (Secure Sockets Layer) помимо обеспечения безопасной передачи данных так же позволяет реализовать авторизацию клиентов при помощи клиентских SSL сертификатов. Данная статья является практическим руководством по реализации данного вида авторизации в мобильных приложениях на IOS и Android.
Процесс организации работы сервера обеспечивающего такой вид авторизации в статье не рассматривается, однако в конце приведены ссылки по данной тематике.
Процесс авторизации выглядит следующим образом. При переходе клиента в закрытую область сервер запрашивает у клиента сертификат, если проверка прошла успешно то клиент получает доступ к закрытому контенту в ином случае клиент может получить ошибку “No required SSL certificate was sent”.
Для организации подключения мы сгенирировали клиентский сертификат, а так же создали запрос на подписание сертификата в результате чего получили файл client.csr. Далее мы отправили данный файл поставщику услуг и получили наш подписанный клиентский сертификат необходимый для аутентификации на удаленном сервере.
Тестирование подключения может быть осуществлено при помощи утилиты curl.
curl cert client.crt key client.key k someserive.com
Однако стоит заметить, что в последняя версия curl 7.30.0 в OS X сломана и не может быть использована для организации тестирования (http://curl.haxx.se/mail/archive-2013-10/0036.html).
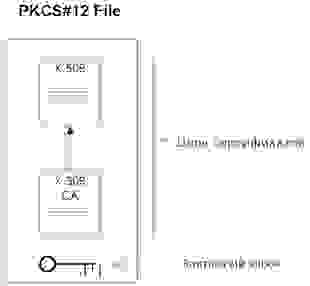
Для передачи клиентского сертификата мы будем использовать файл в формате PKCS#12. В файлах PKCS#12 хранятся одновременно и закрытый ключ, и сертификат (разумеется в зашифрованном виде). Примерная организация PKCS#12 файла показана на рисунке.
Сконвертировать Ваш client.crt в файл формата PKCS#12 можно при помощи следующей команды:
openssl pkcs12 export in client.crt inkey client.key out client.p12
После того как мы получили файл в формате PKCS#12 можно переходить к разработке и тестированию нашего мобильного приложения. Начнем с IOS.
1. Реализуем IOS версию приложения
Необходимо подключить к Вашему проекту Security.Framework
Для осуществления запроса нам необходимо извлечеть из PKCS#12 цифровой сертификат и ассоциированный с ним приватный ключ (SecIdentityRef). Наличие данного объекта позволит нам получить соответствующий NSURLCredential.
Итак реализуем функецию extractIdentityAndTrust.
Производим извлечение при помощи функции SecPKCS12Import, незабываем указать пароль к серитификату.
Далее реализуем делегат canAuthenticateAgainstProtectionSpace, вызов данного делегата позволяет нам определить свойства сервера, а именно протокол, механизм авторизации. У нас реализация этого делегата будет простой, укажем, что обрабатываем любой способ аутентификации представленный сервером.
Обработаем возможные ошибки:
Теперь перейдем к реализации непосредственно механизма аутентификации. Реализуем делегат didRecieveAuthentificationChallenge:
Загружаем наш сертификат, извлекаем из него нужные нам данные, создаем NSURLCredential, передаем нужную информацию, сохраняем данные аутентификации только в контексте текущей сессии.
Ну и для полноты картины приведу код подготавливающий NSURLConnection:
Реализацию делегата didReceiveData приводить не буду.
2. Реализуем Android версию приложения
Начну сразу с кода:
Получаем экземпляр соответствующего KeyStore в нашем случае это (PKCS12), загружаем из ресурсов наш сертификат, вторым аргументом указываем пароль. Далее создаем экземпляр SSLSocketFactory, использую собственную реализацию SSLSocketFactory, позволяющую инициализировать SSL контекст с использованием нашего сертификата. Код фабрики приведен чуть ниже. Далее конфигурируем параметры подключения, регистрируем нашу фабрику, указываем порт на который будем посылать запрос, формируем соответсвующий POST и выполняем запрос.
Заключение.
Мы рассмотрели как производить авторизацию по SSL с использованием клиентского сертификата.
Источник


