- How to Create User Interface Login & Register with Android Studio
- Adjustment of several layouts :
- Connect fragments with viewpager
- The Android Lifecycle cheat sheet — part I: Single Activities
- Part I: Activities
- Single Activity — Scenario 1: App is finished and restarted
- Single Activity — Scenario 2: User navigates away
- Single Activity — Scenario 3: Configuration changes
- Single Activity — Scenario 4: App is paused by the system
- Android users be like
- OmarFromBurgerKing
- InsertDeadMemeHere
- InvalidPerson1245
- FaZecookie
- Sharing Content between Android apps
- Sharing text
- Sharing HTML text
- Receiving text
- Sharing files and images
- Receiving files
- The Support Library is your friend
How to Create User Interface Login & Register with Android Studio
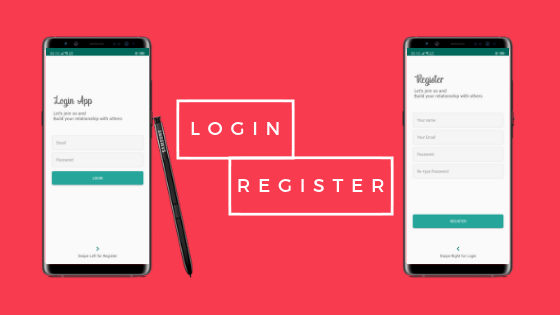
ok, this is my first article in Medium. In this section, I want to share with you about the User Interface on Android and we will create a Login page and a Register page. Some components that I will use:
1. Viewpager
2. Fragment
3. Edittext
4. Button
5. Textview
6. Imageview
What about the results? let’s coding (follow step by step)
- Of course we must already have an Android Studio. if not, you can download it first on the official Android Studio website. If you already have one, please open your Android studio.
2. We create a new project by clicking “Start a new Android Studio project”. Fill in the application name column with “LoginApp”, then click next.

3. Select the minimum SDK you need or want, then click next.


4. Select “Empty Activity” and click next. After that, the “Activity Name” and “Layout Name” columns will appear, in this section just leave it like that, then click finish.

After you click finish, Android Studio will make you an Application with the name “LoginApp”.
After the application is successfully built, you can simply make adjustments to the following sections:
Open the colors.xml file in app/res/values/colors.xml, and change it like this:
Create a folder with the name “font” in the res folder, by right clicking on the res directory, select new / directory and name it “font”. After that, copy this font into font directory. (download the font 1 and font 2).
Create some Drawable Resource File in the drawable directory, by right-clicking on the drawable directory, select new / Drawable Resource File.
After that open file styles.xml and change like this :
Add the theme property in the Main Activity in the manifest, in the app / manifests / AndroidManifest.xml folder
So the AndroidManifest.xml file will be as follows:
After all the steps above are done, then make 2 fragments with the name fragment_login and fragment_register in the layout directory, by right-clicking on the layout directory, New/Fragment/Fragment (Blank)

Uncheck:
include fragment factory methods? and include interface methods?

Adjustment of several layouts :
change the activity_main.xml layout, fragment_login.xml and fragment_register.xml so that it will be as below
Open the strings.xml file in the res / values / strings.xml directory and change it to something like the following :
So that the overall structure of the project will be as follows :

Connect fragments with viewpager
Create an inner class in the MainActivity.java class with the name AuthenticationPapterAdapter. This class is a derivative of the FragmentPagerAdapter class and serves to connect Fragments with ViewPager,
Then call the class in the onCreate() method in MainActivity.java and connect with viewpager
So the MainActivity.java class will be like this
The display of the final application will be like this
Источник
The Android Lifecycle cheat sheet — part I: Single Activities

Android is designed to empower users and let them use apps in a intuitive way. For example, users of an app might rotate the screen, respond to a notification, or switch to another task, and they should be able to continue using the app seamlessly after such an event.
To provide this user experience, you should know how to manage component lifecycles. A component can be an Activity, a Fragment, a Service, the Application itself and even the underlying process. The component has a lifecycle, during which it transitions through states. Whenever a transition happens, the system notifies you via a lifecycle callback method.
To help us explain how lifecycles work, we’ve defined a series of scenarios which are grouped according to the components that are present:
Part I: Activities — single activity lifecycle (this post)
The diagrams are also available as a cheat sheet in PDF format for quick reference.
Note: these diagrams apply to Android P / Jetpack 1.0 behavior.
The following scenarios showcase the default behavior of the components, unless otherwise noted.
If you find errors or you think something important is missing, report it in the comments.
Part I: Activities
Single Activity — Scenario 1: App is finished and restarted
- The user presses the Back button, or
- The Activity.finish() method is called
The simplest scenario shows what happens when a single-activity application is started, finished and restarted by the user:

- onSaveInstanceState is not called (since the activity is finished, you don’t need to save state)
- onCreate doesn’t have a Bundle when the app is reopened, because the activity was finished and the state doesn’t need to be restored.
Single Activity — Scenario 2: User navigates away
- The user presses the Home button
- The user switches to another app (via Overview menu, from a notification, accepting a call, etc.)

In this scenario the system will stop the activity, but won’t immediately finish it.
When your activity enters the Stopped state, the system uses onSaveInstanceState to save the app state in case the system kills the app’s process later on (see below) .
Assuming the process isn’t killed, the activity instance is kept resident in memory, retaining all state. When the activity comes back to the foreground, the activity recalls this information. You don’t need to re-initialize components that were created earlier.
Single Activity — Scenario 3: Configuration changes
- Configuration changes, like a rotation
- User resizes the window in multi-window mode

Configuration changes like rotation or a window resize should let users continue exactly where they left off.
- The activity is completely destroyed, but the state is saved and restored for the new instance.
- The Bundle in onCreate and onRestoreInstanceState is the same.
Single Activity — Scenario 4: App is paused by the system
- Enabling Multi-window mode (API 24+) and losing the focus
- Another app partially covers the running app (a purchase dialog, a runtime permission dialog, a third-party login dialog…)
- An intent chooser appears, such as a share dialog

This scenario doesn’t apply to:
- Dialogs in the same app. Showing an AlertDialog or a DialogFragment won’t pause the underlying activity.
- Notifications. User receiving a new notification or pulling down the notification bar won’t pause the underlying activity.
Источник
Android users be like

OmarFromBurgerKing
Top 0.0001% Member

InsertDeadMemeHere
Top 0.0001% Member

InvalidPerson1245
IPhone users be like
hol up let me charge my phone
plugs charge into phone but doesn’t work
wait bro hold on
plugs charge into phone but doesn’t work
plugs charge into phone but doesn’t work

FaZecookie
play omori (he/him)
IPhone users be like
hol up let me charge my phone
plugs charge into phone but doesn’t work
wait bro hold on
plugs charge into phone but doesn’t work
plugs charge into phone but doesn’t work
android users be like
hol up can you give me your charger?
this is an iphone charger
oh sorry i don’t use trash 
Источник
Sharing Content between Android apps


Sharing is caring, as they say, but sharing on Android means something perhaps slightly different. ‘Sharing’ is really shorthand for sending content such as text, formatted text, files, or images between apps.
So if ‘sharing’ == sending content, it makes slightly more sense that it is implemented using ACTION_SEND (or ACTION_SEND_MULTIPLE) Intents and its dozen extras.
While that approach is perfectly valid, I prefer to use ShareCompat, a set of classes in the v4 Support Library designed to make it easy to build intents for sharing content.
Sharing text
Sharing plain text is, as you might imagine, a good place to start. In fact, there’s not a whole lot to it:
ShareCompat.IntentBuilder uses a fluent API where you can chain together multiple method calls, using only the ones you need. For sharing, one of the most important parts is picking the right mime type — this is how apps filter what type of content they can receive. By using text/plain, we signify that our Intent will only contain plain text. Then, of course, setText() is how we actually add the CharSequence to the Intent to send. And while you can certainly send styled text using setText(), there’s no guarantee that the receiving app will honor that styling, so you should ensure that the text is legible with or without styling.
You’ll note we then use resolveActivity() before calling startActivity(). As mentioned in Protecting Implicit Intents with Runtime Checks, this is critical to prevent an ActivityNotFoundException when there is no Activity available to handle the mime type you have selected. While probably not as much of a concern with text/plain, it may be much more common with other types.
Note: when you use startActivity(shareIntent), that respects any default apps the user has set (i.e., if they’ve previously selected sharing all “text/plain” items to a certain app). If you’d like to instead always show a disambiguation chooser, use the intent generated from IntentBuilder.createChooserIntent() as explained in the ACTION_CHOOSER documentation.
Sharing HTML text
Some apps, most notably email clients, also support formatting with HTML. The changes, compared to plain text, are fairly minor:
The differences here are that we use of setHtmlText() in place of setText() and a mime type of text/html replacing text/plain. Here ShareCompat actually does a little bit extra: setHtmlText() also uses Html.fromHtml() to create a fallback formatted text to pass along to the receiving app if you haven’t previously called setText() yourself.
Given that many of the apps that can receive HTML text are email clients, there’s a number of helper methods to set the subject, to:, cc:, and bcc: email addresses as well — consider adding at least a subject to any share intent for best compatibility with email apps.
Of course, you’ll still want to call resolveActivity() just as before — nothing changes there.
Receiving text
While the focus so far has been on the sending side, it is helpful to know exactly what is happening on the other side (if not just to build a simple receiving app to install on your emulator for testing purposes). Receiving Activities add an intent filter to the Activity:
The action is obviously the more critical part — without that there’s nothing that would denote this as an ACTION_SEND (the action behind sharing). The mime type, same as with our sending code, is also present here. What isn’t as obvious are the two categories. From the element documentation:
Note: In order to receive implicit intents, you must include the CATEGORY_DEFAULT category in the intent filter. The methods startActivity() and startActivityForResult() treat all intents as if they declared the CATEGORY_DEFAULT category. If you do not declare it in your intent filter, no implicit intents will resolve to your activity.
So CATEGORY_DEFAULT is required for our use case. Then, CATEGORY_BROWSABLE allows web pages to natively share into apps without any extra effort required on the receiving side.
And to actually extract the information from the Intent, the useful ShareCompat.IntentReader can be used:
Similar to IntentBuilder, IntentReader is just a simple wrapper that make it easy to extract information.
Sharing files and images
While sending and receiving text is straightforward enough (create text, include it in Intent), sending files (and particularly images — the most common type by far) has an additional wrinkle: file permissions.
The simplest code you might try might look like
And that almost works — the tricky part is in getting a Uri to the File that other apps can actually read, particularly when it comes to Android 6.0 Marshmallow devices and runtime permissions (which include the now dangerous READ_EXTERNAL_STORAGE and WRITE_EXTERNAL_STORAGE permissions).
My plea: don’t use Uri.fromFile(). It forces receiving apps to have the READ_EXTERNAL_STORAGE permission, won’t work at all if you are trying to share across users, and prior to KitKat, would require your app to have WRITE_EXTERNAL_STORAGE. And really important share targets, like Gmail, won’t have the READ_EXTERNAL_STORAGE permission — so it’ll just fail.
Instead, you can use URI permissions to grant other apps access to specific Uris. While URI permissions don’t work on file:// URIs as is generated by Uri.fromFile(), they do work on Uris associated with Content Providers. Rather than implement your own just for this, you can and should use FileProvider as explained in the File Sharing Training.
Once you have it set up, our code becomes:
Using FileProvider.getUriForFile(), you’ll get a Uri actually suitable for sending to another app — they’ll be able to read it without any storage permissions — instead, you are specifically granting them read permission with FLAG_GRANT_READ_URI_PERMISSION.
Note: we don’t call setType() anywhere when building our ShareCompat (even though in the video I did set it). As explained in the setDataAndType() Javadoc, the type is automatically inferred from the data URI using getContentResolver().getType(uriToImage). Since FileProvider returns the correct mime type automatically, we don’t need to manually specify a mime type at all.
If you’re interested in learning more about avoiding the storage permission, consider watching my Forget the Storage Permission talk or at least go through the slides, which covers this topic in depth at 14:55 (slide 11).
Receiving files
Receiving files isn’t too different from text because you’re still going to use ShareCompat.IntentReader. For example, to make a Bitmap out of an incoming file, it would look like:
Of course, you’re free to do whatever you want with the InputStream — watch out for images that are so large you hit an OutOfMemoryException. All of the things you know about loading Bitmaps still apply.
The Support Library is your friend
With both ShareCompat (and its IntentBuilder and IntentReader) and FileProvider in the v4 Support Library, you’ll be able to include sharing text, HTML text, and files in your app with the best practices by default.
Источник


