- User Interface (UI) Design in Android App
- How to Develop User Interface (UI) in Android App?
- What is (User Interface) UI in Android?
- Android Interface Definition Language (AIDL)
- In this document
- See also
- Defining an AIDL Interface
- 1. Create the .aidl file
- 2. Implement the interface
- 3. Expose the interface to clients
- Passing Objects over IPC
- Calling an IPC Method
User Interface (UI) Design in Android App
How to Develop User Interface (UI) in Android App?
This tutorial explains how to design User Interface (UI) for Android Android Application. It’s one of the more fun and also one of the more easier to understand topics.
What is (User Interface) UI in Android?
User Interface in an Android Application can be build using the layouts (ViewGroup objects) and widgets (View objects).
Various types of pre-installed UI components like the structured layout, objects and UI controls are provided in Android Studio which enables user to build a Graphical User Interface (GUI) for their Android app.
UI modules for special interfaces like dialog box, notifications box, menus etc are also provide by Android
Please follow the steps below in order to design UI (User Interface) for Android
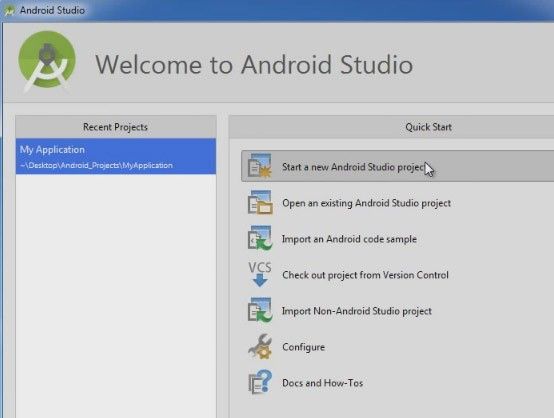
So from here what I want to do is — click start a new Android studio project.
And you can actually name this — anything you want for example I’m going to name mine ‘Hamblaster’.
.jpg)
.jpg)
This is still good, we are still making something through the phone. Now, instead choosing the blank activity, what this would do is it would make that one default blank screen, but I wanna show you guys how to add activities manually. So, instead of that choose to add no activity.
.jpg)
So, when you click finish what’s gonna happen is it’s gonna load up and you’re pretty much gonna have an empty, completely empty project. I meanit’ss gonna have those core files, but check it out. Alright, so when it’s done setting up this is what you get.
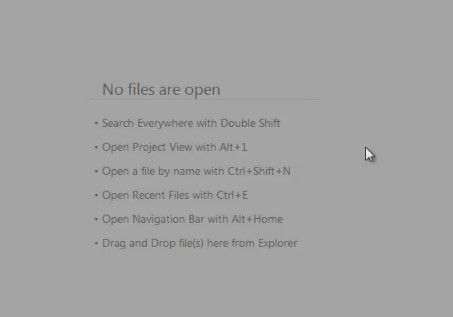
Now, obviously if we click on project on the left-hand side, we can see that it does indeed have some files created for us but definitely no activities or screens anywhere and well, our app would be pretty stinking useless if the user didn’t have any screen to look at.

So let’s go ahead and do that first. So, make sure you’re in Android view, you can actually look at project view if you want, but I’m gonna be in Android view.
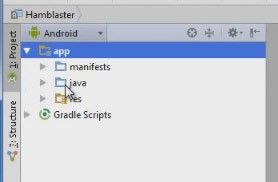
and in your app expand that and go to java, expand that as well and now remember this is where we are gonna be building the activity, if you remember from last time, this is actually where that file was.
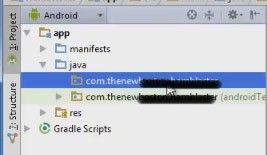
So now, if you right click it and select new; scroll down to activity and we’ll just choose blank activity.
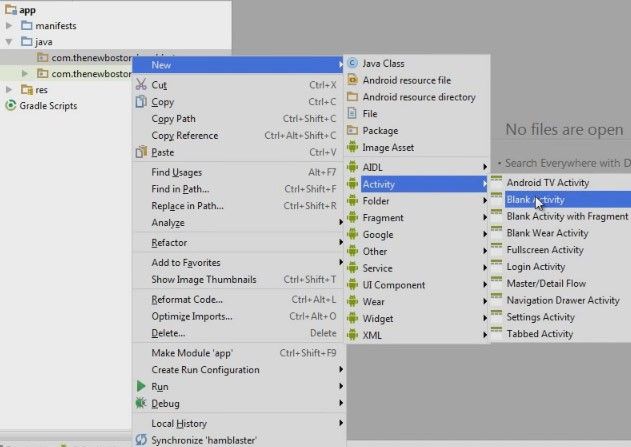
So again, once we’re looking at the screen — what this is, is basically if we click blank activity whenever we are setting up our project then this is where we would be but that’s how you do it manually and also whenever you add additional activities to whatever projects you’re working on in the future that’s how you do it.
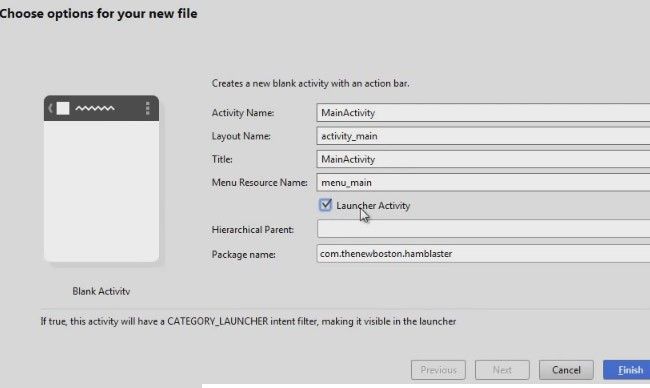
Now, for right now, this example is only going to have one activity so I really don’t need to give anything like a name because I’m not really gonna get disorganised with one activity. However, since this is the only activity, its very important that you choose this — launcher activity.
Now, remember, the launcher activity is the very first screen that whenever android is trying to open your app its gonna look for this. So, without it if you have a bunch of activities and none of them are the launcher activity, then your app is not going to open correctly.
So, since this is your only activity we need to make it the launcher activity, aka the starting point.
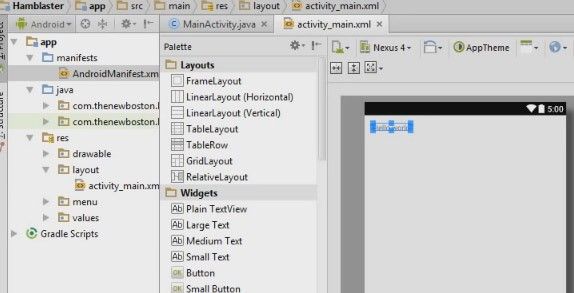
So as soon as you create an activity what android studio is gonna do is it’s gonna create those 2 files first.
Below is the main activity, the job of the brains behind our activity.
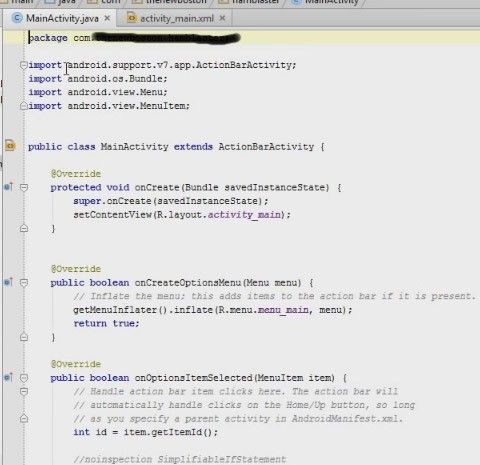
And the interface.
No need to discuss everything because you guys already know what all that means. So, one other thing I want to point out is that there was one more thing that all of my activities had to be taken care of in the manifest so just look at the manifest and you probably have to do something here — open and check it out — Android studio actually took care of all of that for us, whenever we just created that new activity.
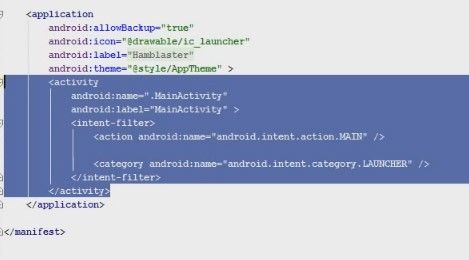
Again in the manifest, this is where all your activities have to be declared, it did everything for us. That is one of the reasons I love Android Studio.
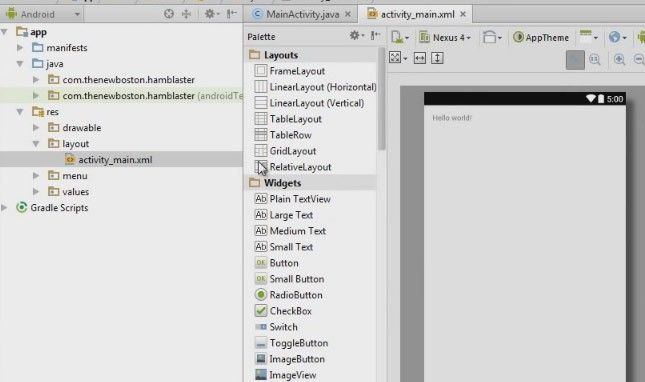
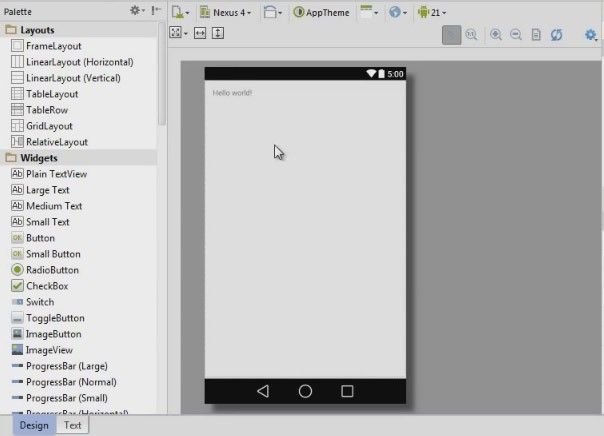
Now just close out of that and we can continue with the good stuff. So over an ‘activity_main.xml’ the first thing I want to do is delete this little thing right here — this text.
So just go ahead select it like before and just delete it.
Now, just for this example, this is just to demonstrate a few things, so I’m building the very first page to the social network so what we need are a couple of things.
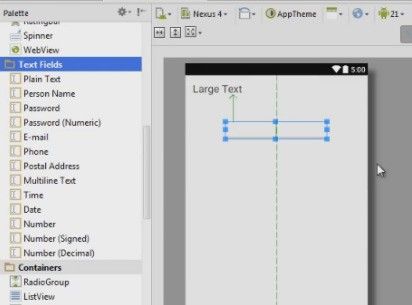
The first thing is this ‘Large Text’.
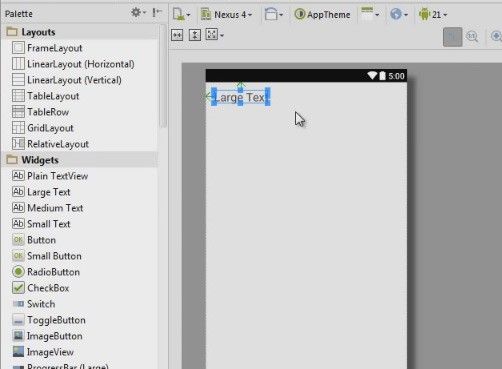
Alright, so that’s a little bit easier to read, I’m just gonna organize everything before I start customizing any of these widgets. So drag in ‘Large Text’ — it’ll say — “sign in or log in”, so this will be the log in screen. So under this, of course, we need two little input areas for the user to enter their log in information — an email and a password. So first, lets get the email, we should go down, its actually under text fields, so click that if its not expanded and for email — just drag that over and we can tell when its aligned with the middle because of this little green line. So drop that right there.
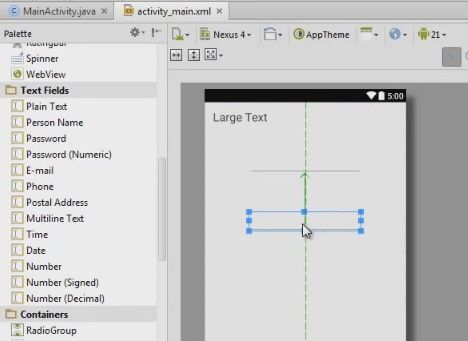
Alright looks pretty good. Now, under here we will have a password field, so drag that and drop it.
Now of course, if I was actually designing this then what I would do is I would have to make a little text area here that says — email and password. But for right now, just demonstrating some stuff.
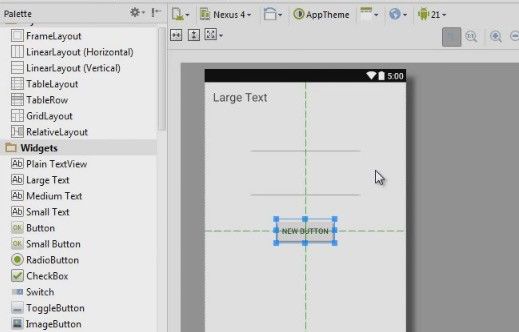
Now, after they are done typing in their information they need some button to click on, so if you scroll way back up, its no way back up — its like 2 inches away but we are going to select this button and drag it right underneath here and you know what actually align this in the dead center of your app by using those little alignment things and alright, looking pretty good.
So, what I wanna do now, is I actually wanna change the text on this right here and also on the button.So select this ‘Large Text’,
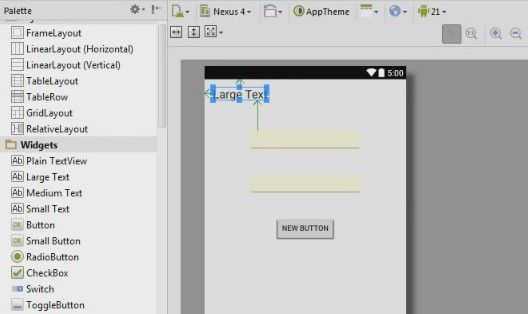
and if we scroll down to a property called Text then what we can see is, it says ‘Large Text’ that’s the text that displays, what we actually wanna do is click on this and we’ll change it to something like ‘Sign In’ and hit enter.
Источник
Android Interface Definition Language (AIDL)
In this document
See also
AIDL (Android Interface Definition Language) is similar to other IDLs you might have worked with. It allows you to define the programming interface that both the client and service agree upon in order to communicate with each other using interprocess communication (IPC). On Android, one process cannot normally access the memory of another process. So to talk, they need to decompose their objects into primitives that the operating system can understand, and marshall the objects across that boundary for you. The code to do that marshalling is tedious to write, so Android handles it for you with AIDL.
Note: Using AIDL is necessary only if you allow clients from different applications to access your service for IPC and want to handle multithreading in your service. If you do not need to perform concurrent IPC across different applications, you should create your interface by implementing a Binder or, if you want to perform IPC, but do not need to handle multithreading, implement your interface using a Messenger. Regardless, be sure that you understand Bound Services before implementing an AIDL.
Before you begin designing your AIDL interface, be aware that calls to an AIDL interface are direct function calls. You should not make assumptions about the thread in which the call occurs. What happens is different depending on whether the call is from a thread in the local process or a remote process. Specifically:
- Calls made from the local process are executed in the same thread that is making the call. If this is your main UI thread, that thread continues to execute in the AIDL interface. If it is another thread, that is the one that executes your code in the service. Thus, if only local threads are accessing the service, you can completely control which threads are executing in it (but if that is the case, then you shouldn’t be using AIDL at all, but should instead create the interface by implementing a Binder).
- Calls from a remote process are dispatched from a thread pool the platform maintains inside of your own process. You must be prepared for incoming calls from unknown threads, with multiple calls happening at the same time. In other words, an implementation of an AIDL interface must be completely thread-safe.
- The oneway keyword modifies the behavior of remote calls. When used, a remote call does not block; it simply sends the transaction data and immediately returns. The implementation of the interface eventually receives this as a regular call from the Binder thread pool as a normal remote call. If oneway is used with a local call, there is no impact and the call is still synchronous.
Defining an AIDL Interface
You must define your AIDL interface in an .aidl file using the Java programming language syntax, then save it in the source code (in the src/ directory) of both the application hosting the service and any other application that binds to the service.
When you build each application that contains the .aidl file, the Android SDK tools generate an IBinder interface based on the .aidl file and save it in the project’s gen/ directory. The service must implement the IBinder interface as appropriate. The client applications can then bind to the service and call methods from the IBinder to perform IPC.
To create a bounded service using AIDL, follow these steps:
This file defines the programming interface with method signatures.
The Android SDK tools generate an interface in the Java programming language, based on your .aidl file. This interface has an inner abstract class named Stub that extends Binder and implements methods from your AIDL interface. You must extend the Stub class and implement the methods.
Implement a Service and override onBind() to return your implementation of the Stub class.
Caution: Any changes that you make to your AIDL interface after your first release must remain backward compatible in order to avoid breaking other applications that use your service. That is, because your .aidl file must be copied to other applications in order for them to access your service’s interface, you must maintain support for the original interface.
1. Create the .aidl file
AIDL uses a simple syntax that lets you declare an interface with one or more methods that can take parameters and return values. The parameters and return values can be of any type, even other AIDL-generated interfaces.
You must construct the .aidl file using the Java programming language. Each .aidl file must define a single interface and requires only the interface declaration and method signatures.
By default, AIDL supports the following data types:
- All primitive types in the Java programming language (such as int , long , char , boolean , and so on)
- String
- CharSequence
- List
All elements in the List must be one of the supported data types in this list or one of the other AIDL-generated interfaces or parcelables you’ve declared. A List may optionally be used as a «generic» class (for example, List ). The actual concrete class that the other side receives is always an ArrayList , although the method is generated to use the List interface.
All elements in the Map must be one of the supported data types in this list or one of the other AIDL-generated interfaces or parcelables you’ve declared. Generic maps, (such as those of the form Map are not supported. The actual concrete class that the other side receives is always a HashMap , although the method is generated to use the Map interface.
You must include an import statement for each additional type not listed above, even if they are defined in the same package as your interface.
When defining your service interface, be aware that:
- Methods can take zero or more parameters, and return a value or void.
- All non-primitive parameters require a directional tag indicating which way the data goes. Either in , out , or inout (see the example below).
Primitives are in by default, and cannot be otherwise.
Caution: You should limit the direction to what is truly needed, because marshalling parameters is expensive.
Here is an example .aidl file:
Simply save your .aidl file in your project’s src/ directory and when you build your application, the SDK tools generate the IBinder interface file in your project’s gen/ directory. The generated file name matches the .aidl file name, but with a .java extension (for example, IRemoteService.aidl results in IRemoteService.java ).
If you use Eclipse, the incremental build generates the binder class almost immediately. If you do not use Eclipse, then the Ant tool generates the binder class next time you build your application—you should build your project with ant debug (or ant release ) as soon as you’re finished writing the .aidl file, so that your code can link against the generated class.
2. Implement the interface
When you build your application, the Android SDK tools generate a .java interface file named after your .aidl file. The generated interface includes a subclass named Stub that is an abstract implementation of its parent interface (for example, YourInterface.Stub ) and declares all the methods from the .aidl file.
Note: Stub also defines a few helper methods, most notably asInterface() , which takes an IBinder (usually the one passed to a client’s onServiceConnected() callback method) and returns an instance of the stub interface. See the section Calling an IPC Method for more details on how to make this cast.
To implement the interface generated from the .aidl , extend the generated Binder interface (for example, YourInterface.Stub ) and implement the methods inherited from the .aidl file.
Here is an example implementation of an interface called IRemoteService (defined by the IRemoteService.aidl example, above) using an anonymous instance:
Now the mBinder is an instance of the Stub class (a Binder ), which defines the RPC interface for the service. In the next step, this instance is exposed to clients so they can interact with the service.
There are a few rules you should be aware of when implementing your AIDL interface:
- Incoming calls are not guaranteed to be executed on the main thread, so you need to think about multithreading from the start and properly build your service to be thread-safe.
- By default, RPC calls are synchronous. If you know that the service takes more than a few milliseconds to complete a request, you should not call it from the activity’s main thread, because it might hang the application (Android might display an «Application is Not Responding» dialog)—you should usually call them from a separate thread in the client.
- No exceptions that you throw are sent back to the caller.
3. Expose the interface to clients
Once you’ve implemented the interface for your service, you need to expose it to clients so they can bind to it. To expose the interface for your service, extend Service and implement onBind() to return an instance of your class that implements the generated Stub (as discussed in the previous section). Here’s an example service that exposes the IRemoteService example interface to clients.
Now, when a client (such as an activity) calls bindService() to connect to this service, the client’s onServiceConnected() callback receives the mBinder instance returned by the service’s onBind() method.
The client must also have access to the interface class, so if the client and service are in separate applications, then the client’s application must have a copy of the .aidl file in its src/ directory (which generates the android.os.Binder interface—providing the client access to the AIDL methods).
When the client receives the IBinder in the onServiceConnected() callback, it must call YourServiceInterface.Stub.asInterface(service) to cast the returned parameter to YourServiceInterface type. For example:
For more sample code, see the RemoteService.java class in ApiDemos.
Passing Objects over IPC
If you have a class that you would like to send from one process to another through an IPC interface, you can do that. However, you must ensure that the code for your class is available to the other side of the IPC channel and your class must support the Parcelable interface. Supporting the Parcelable interface is important because it allows the Android system to decompose objects into primitives that can be marshalled across processes.
To create a class that supports the Parcelable protocol, you must do the following:
- Make your class implement the Parcelable interface.
- Implement writeToParcel , which takes the current state of the object and writes it to a Parcel .
- Add a static field called CREATOR to your class which is an object implementing the Parcelable.Creator interface.
- Finally, create an .aidl file that declares your parcelable class (as shown for the Rect.aidl file, below).
If you are using a custom build process, do not add the .aidl file to your build. Similar to a header file in the C language, this .aidl file isn’t compiled.
AIDL uses these methods and fields in the code it generates to marshall and unmarshall your objects.
For example, here is a Rect.aidl file to create a Rect class that’s parcelable:
And here is an example of how the Rect class implements the Parcelable protocol.
The marshalling in the Rect class is pretty simple. Take a look at the other methods on Parcel to see the other kinds of values you can write to a Parcel.
Warning: Don’t forget the security implications of receiving data from other processes. In this case, the Rect reads four numbers from the Parcel , but it is up to you to ensure that these are within the acceptable range of values for whatever the caller is trying to do. See Security and Permissions for more information about how to keep your application secure from malware.
Calling an IPC Method
Here are the steps a calling class must take to call a remote interface defined with AIDL:
- Include the .aidl file in the project src/ directory.
- Declare an instance of the IBinder interface (generated based on the AIDL).
- Implement ServiceConnection .
- Call Context.bindService() , passing in your ServiceConnection implementation.
- In your implementation of onServiceConnected() , you will receive an IBinder instance (called service ). Call YourInterfaceName.Stub.asInterface((IBinder)service) to cast the returned parameter to YourInterface type.
- Call the methods that you defined on your interface. You should always trap DeadObjectException exceptions, which are thrown when the connection has broken; this will be the only exception thrown by remote methods.
- To disconnect, call Context.unbindService() with the instance of your interface.
A few comments on calling an IPC service:
- Objects are reference counted across processes.
- You can send anonymous objects as method arguments.
For more information about binding to a service, read the Bound Services document.
Here is some sample code demonstrating calling an AIDL-created service, taken from the Remote Service sample in the ApiDemos project.
Источник


