- Интеграция карт в ваше Android-приложение
- Yandex
- Определение собственной позиции
- Google MAPs API в android или как работать с картами быстрее
- Принцип работы Google MAPs API
- А как вообще работать с этой страшной штукой?
- Подключение библиотеки
- Встраиваем карту в приложение
- Пишем всякие интересности
- Using the Google Maps API in your application
- Google Maps API prerequisites
- Obtain a Google Maps API Key
- Install the Google Play Services SDK
- Install the Xamarin.GooglePlayServices.Maps package from NuGet
- Specify the required permissions
- Create an Emulator with Google APIs
- The GoogleMap Class
- Adding a MapFragment to an Activity
- Map types
- GoogleMap properties
- Interacting with the GoogleMap
- Changing the Viewpoint
- Drawing on the Map
- Markers
- Info windows
- GroundOverlays
- Lines, Circles, and Polygons
- Responding to user events
- Marker click events
- Marker Drag events
- Info Window Click events
Интеграция карт в ваше Android-приложение
Есть много разных идей, для реализации которых могут понадобиться карты на мобильных устройствах.
Возможности таких устройств позволяют довольно оперативно получать информацию о местоположении, графические данные и графические преобразования для отображения объёма ландшафта.
В данном статье я расскажу как интегрировать возможность просмотра карт для мобильных устройств на основе Android, на примере Yandex Карт и Google Maps.
Функционал библиотек этих компаний позволяет:
- Перемещать карту
- Изменять масштаб
- Изменять виды карт
- Получать события от карты

Начнём с отечественного производителя.
Yandex
Библиотеку Yandex MapKit можно скачать с GitHub’а, там же есть версия и для iOS.
Но прежде чем начать использовать, нам надо получить API-key, для этого идём на почту и пишем письмо в support@mobmaps.yandex.ru, указав в заголовке «Map Kit запрос API-ключа». В ответ вам пришлют письмо с указанием дополнительных ссылок на документацию, на правила использования и собственно с самим ключом в теле письма (а могут и не прислать, кстати).
Пока ждём письмо, берём библиотеку и прикрепляем её к проекту.
После долгого ожидания с кружкой кофе, знакомимся с содержимым письма и информации по ссылкам, берём ключик и пишем в вашем layout’е приложения следующий код:
где заместо «you are key» вставляем полученный ключ. Всё, карта есть.
Далее код показывает, как перемещать карту на заданную координату и использовать зум:
Для использования Google Maps надо совершить куда более изощрённые действия. Я расскажу, как получить debug-key для использования карт, но процесс получения release версии похоже несколько замороченней, но я release ещё не получал.
Для получения debug-key, надо найти ваше хранилище ключей, для отладки.
По-умолчанию, путь будет выглядеть примерно так:
Затем открываем командную строку, переходим в каталог, куда установлена Java:
где путь_до_хранилища_ключей — свой путь до debug.keystore (осторожно, возможны проблемы с пробелами в пути).
После чего в том же окне будет выведен md5-ключ после «Certificate fingerprint (MD5)».
Идём по ссылке и регистрируем код.
После чего Google сгенерирует с нужным кодом для layout и встроенным кодом, берём его и вставляем к себе в layout.
Далее нам, надо наш Activity представить в примерно следующем виде:
Замечу, что Activity наследован должен быть от MapActivity хранящийся в com.google.android.maps.MapActivity.
А в манифесте прописать между тегами вставить:
И не забыть, про разрешение доступа в интернет для приложения:
В остальном функционал GoogleMaps и YandexMapKit весьма схож:
Как можно видеть, процесс интеграции карт в приложения довольно простой, а спектр использования довольно широк.
Более подробно можно ознакомиться ниже.
Определение собственной позиции
Чтобы немного расширить пример, приложу кусок кода:
Но для использования этого кода, в манифесте следует указать следующее разрешение:
Источник
Google MAPs API в android или как работать с картами быстрее
Принцип работы Google MAPs API
Вся документация для работы с картами приведена на (логично) официальном сайте google maps api. Сегодня я рассматриваю только Directions API (документация). Для того что бы получить какую-либо информацию от большого числа, вам необходимо сделать запрос. Ответ прийдет в формате JSON.
Общий вид запроса:
Пример: https://maps.googleapis.com/maps/api/directions/json?origin=55.754724,%2037.621380&destination=55.728466,%2037.604155&key=»Your MAPs API key»
В качестве ответа нам (ожидаемо) пришел JSON с большим набором разных точек с координатами и названиями этих мест.
А как вообще работать с этой страшной штукой?
Если вы только начинаете работать с Android, то советую вам почитать про такую замечательную библиотеку Retrofit, которая превращает работу с запросами в код из 2 строк. Рассматривать сейчас я её не буду.
Но я сегодня хочу рассмотреть пример использования библиотеки Java Client for Google Maps Services. Библиотека как по мне замечательная, освобождает от необходимости писать (пусть даже очень короткие) запросы вручную и отлично подходит в случаях когда нужно писать очень быстро, как например на хакатоне. Я хочу показать живой пример использования данной библиотеки на примере работы с Directions API.
Подключение библиотеки
Для начала нам потребуется получить ключ для нашего приложения. Топаем на оф. сайт, находим сверху кнопку «получить ключ», создаем новый проект, нажимаем далее и готово!
UPD: теперь бесплатно получить нельзя. С лета 2018 года Google обновили план и необходимо ввести данные своей карты для получения 200$ для запросов каждый месяц бесплатно. Этого должно хватать, но конечно тенденция не радует.
Firebase
Для правильной работы приложения нам необходимо получить файл google-service.json. Идем на firebase выбираем наш проект и добавляем его. Далее нам нужно выбрать Android проект, ввести название пакета, регистрируем приложение. Скачиваем файл и перетаскиваем в папку app. К слову её не будет видно в дереве проекта, для этого надо в Android Studio поменять отображение с Android на Project или залезть в наш проект через файловый менеджер. Далее следуем инструкциям где какой код писать.
Включаем в консоли
Так же нам необходимо включить Directions API (или любую другую необходимую вам API) в консоли, для этого идем сюда, выбираем наше приложение и включаем Directions API.
Gradle
В Gradle файлы так же необходимо добавить еще пару строк. В итоге новые строки выглядят вот так:
Обязательно проверяйте, актуальная ли это сейчас версия!
Встраиваем карту в приложение
Google map в андроид реализовывается как фрагмент (или как MapView, но об этом в другой раз, нам сейчас особой разницы нет). Просто встраиваем его в наш layout. В нашем классе, который работает с картой, необходимо найти эту карту и заимплементить интерфейс.
Код для фрагмента выглядит вот так. Я буду работать с MainActivity, соответственно если вы используете другой класс вам необходимо поменять контекст.
Отлично, фрагмент встроили, Android Studio на нас не ругается, едем дальше. Переходим в MainActivity.class и имплементим интерфейс OnMapReadyCallback.
В onCreate пишем
Так же идем в Manifests и прописываем вот такие штуки внутри тэга application
Где вместо @string/google_maps_key должен подставиться ваш ключ для карт, который мы получили ранее. Соответственно вам нужно создать нужный ресурс в файле string.
Пишем всякие интересности
Отлично, карта у нас есть, давайте наконец напишем хоть что-нибудь интересное. Пусть нашей целью будет нарисовать маршрут по Москве через несколько точек:
- Гум (55.754724, 37.621380)
- Большой театр (55.760133, 37.618697)
- Патриаршие пруды (55.764753, 37.591313)
- Парк культуры (55.728466, 37.604155)
Кладу все наши места в List и делаю это как глобальную переменную.
Для начала создадим по маркеру на каждое место. Маркер это просто объект, которому передаются координаты, а затем они накладываются на карту. Код:
Далее мы пишем вот такой код все в том же методе onMapReady
При запуске приложения мы получили вот такую картину:
Хм, Москва, конечно, весьма запутанная, но не настолько же. Почему же такой странный маршрут нам вернул Google? Потому что он построил маршрут для автомобилей, который идет по умолчанию, но мы можем это изменить. Чтобы построить маршрут для пешеходов, меняем код на:
Теперь наш маршрут выглядит вот так
Существует еще множество настроек, о всех них можно прочитать в документации. Просто мы все параметры будем добавлять не в сырой запрос, а в код, поскольку методы библиотеки имеют те же названия что и просто в запросах.
Источник
Using the Google Maps API in your application
Using the Maps application is great, but sometimes you want to include maps directly in your application. In addition to the built-in maps application, Google also offers a native mapping API for Android. The Maps API is suitable for cases where you want to maintain more control over the mapping experience. Things that are possible with the Maps API include:
- Programmatically changing the viewpoint of the map.
- Adding and customizing markers.
- Annotating a map with overlays.
Unlike the now-deprecated Google Maps Android API v1, Google Maps Android API v2 is part of Google Play Services. A Xamarin.Android app must meet some mandatory prerequisites before it is possible to use the Google Maps Android API.
Google Maps API prerequisites
Several steps need to be taken before you can use the Maps API, including:
Obtain a Google Maps API Key
The first step is to get a Google Maps API key (note that you cannot reuse an API key from the legacy Google Maps v1 API). For information about how to obtain and use the API key with Xamarin.Android, see Obtaining A Google Maps API Key.
Install the Google Play Services SDK
Google Play Services is a technology from Google that allows Android applications to take advantage of various Google features such as Google+, In-App Billing, and Maps. These features are accessible on Android devices as background services, which are contained in the Google Play Services APK.
Android applications interact with Google Play Services through the Google Play Services client library. This library contains the interfaces and classes for the individual services such as Maps. The following diagram shows the relationship between an Android application and Google Play Services:
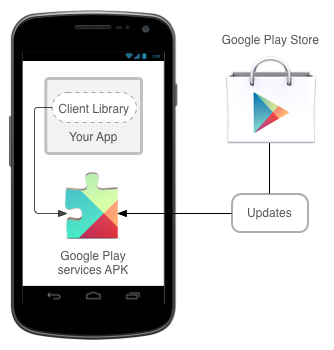
The Android Maps API is provided as a part of Google Play Services. Before a Xamarin.Android application can use the Maps API, the Google Play Services SDK must be installed using the Android SDK Manager. The following screenshot shows where in the Android SDK Manager the Google Play services client can be found:
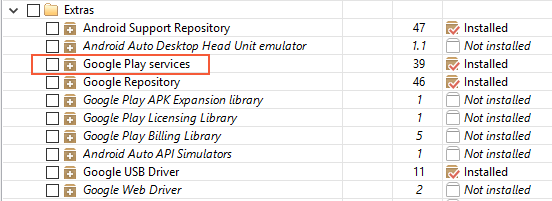
The Google Play services APK is a licensed product that may not be present on all devices. If it is not installed, then Google Maps will not work on the device.
Install the Xamarin.GooglePlayServices.Maps package from NuGet
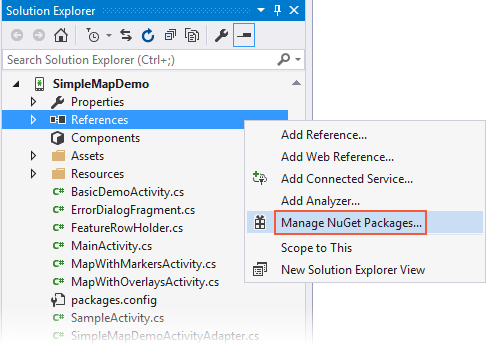
The Xamarin.GooglePlayServices.Maps package contains the Xamarin.Android bindings for the Google Play Services Maps API. To add the Google Play Services Map package, right-click the References folder of your project in the Solution Explorer and click Manage NuGet Packages. :
This opens the NuGet Package Manager. Click Browse and enter Xamarin Google Play Services Maps in the search field. Select Xamarin.GooglePlayServices.Maps and click Install. (If this package had been installed previously, click Update.):
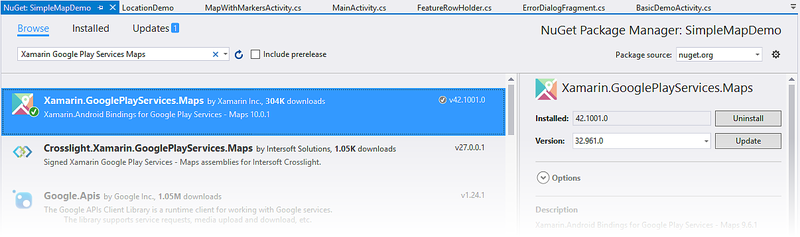
Notice that the following dependency packages are also installed:
- Xamarin.GooglePlayServices.Base
- Xamarin.GooglePlayServices.Basement
- Xamarin.GooglePlayServices.Tasks
Specify the required permissions
Apps must identify the hardware and permission requirements in order to use the Google Maps API. Some permissions are automatically granted by the Google Play Services SDK, and it is not necessary for a developer to explicitly add them to AndroidManfest.XML:
Access to the Network State – The Maps API must be able to check if it can download the map tiles.
Internet Access – Internet access is necessary to download the map tiles and communicate with the Google Play Servers for API access.
The following permissions and features must be specified in the AndroidManifest.XML for the Google Maps Android API:
OpenGL ES v2 – The application must declare the requirement for OpenGL ES v2.
Google Maps API Key – The API key is used to confirm that the application is registered and authorized to use Google Play Services. See Obtaining a Google Maps API Key for details about this key.
Request the legacy Apache HTTP client – Apps that target Android 9.0 (API level 28) or above must specify that the legacy Apache HTTP client is an optional library to use.
Access to the Google Web-based Services – The application needs permissions to access Google’s web services that back the Android Maps API.
Permissions for Google Play Services Notifications – The application must be granted permission to receive remote notifications from Google Play Services.
Access to Location Providers – These are optional permissions. They will allow the GoogleMap class to display the location of the device on the map.
In addition, Android 9 has removed the Apache HTTP client library from the bootclasspath, and so it isn’t available to applications that target API 28 or higher. The following line must be added to the application node of your AndroidManifest.xml file to continue using the Apache HTTP client in applications that target API 28 or higher:
Very old versions of the Google Play SDK required an app to request the WRITE_EXTERNAL_STORAGE permission. This requirement is no longer necessary with the recent Xamarin bindings for Google Play Services.
The following snippet is an example of the settings that must be added to AndroidManifest.XML:
In addition to requesting the permissions AndroidManifest.XML, an app must also perform runtime permission checks for the ACCESS_COARSE_LOCATION and the ACCESS_FINE_LOCATION permissions. See the Xamarin.Android Permissions guide for more information about performing run-time permission checks.
Create an Emulator with Google APIs
In the event that a physical Android device with Google Play services is not installed, it is possible to create an emulator image for development. For more information see the Device Manager.
The GoogleMap Class
Once the prerequisites are satisfied, it is time to start developing the application and use the Android Maps API. The GoogleMap class is the main API that a Xamarin.Android application will use to display and interact with a Google Maps for Android. This class has the following responsibilities:
Interacting with Google Play services to authorize the application with the Google web service.
Downloading, caching, and displaying the map tiles.
Displaying UI controls such as pan and zoom to the user.
Drawing markers and geometric shapes on maps.
The GoogleMap is added to an Activity in one of two ways:
MapFragment — The MapFragment is a specialized Fragment that acts as host for the GoogleMap object. The MapFragment requires Android API level 12 or higher. Older versions of Android can use the SupportMapFragment. This guide will focus on using the MapFragment class.
MapView — The MapView is a specialized View subclass, which can act as a host for a GoogleMap object. Users of this class must forward all of the Activity lifecycle methods to the MapView class.
Each of these containers exposes a Map property that returns an instance of GoogleMap . Preference should be given to the MapFragment class as it is a simpler API that reduces the amount boilerplate code that a developer must manually implement.
Adding a MapFragment to an Activity
The following screenshot is an example of a simple MapFragment :

Similar to other Fragment classes, there are two ways to add a MapFragment to an Activity:
Declaratively — The MapFragment can be added via the XML layout file for the Activity. The following XML snippet shows an example of how to use the fragment element:
Programmatically — The MapFragment can be programmatically instantiated using the MapFragment.NewInstance method and then added to an Activity. This snippet shows the simplest way to instantiate a MapFragment object and add to an Activity:
It is possible to configure the MapFragment object by passing a GoogleMapOptions object to NewInstance . This is discussed in the section GoogleMap properties that appears later on in this guide.
The MapFragment.GetMapAsync method is used to initialize the GoogleMap that is hosted by the fragment and obtain a reference to the map object that is hosted by the MapFragment . This method takes an object that implements the IOnMapReadyCallback interface.
This interface has a single method, IMapReadyCallback.OnMapReady(MapFragment map) that will be invoked when it is possible for the app to interact with the GoogleMap object. The following code snippet shows how an Android Activity can initialize a MapFragment and implement the IOnMapReadyCallback interface:
Map types
There are five different types of maps available from the Google Maps API:
Normal — This is the default map type. It shows roads and important natural features along with some artificial points of interest (such as buildings and bridges).
Satellite — This map shows satellite photography.
Hybrid — This map shows satellite photography and road maps.
Terrain — This primarily shows topographical features with some roads.
None — This map does not load any tiles, it is rendered as an empty grid.
The image below shows three of the different types of maps, from left-to-right (normal, hybrid, terrain):
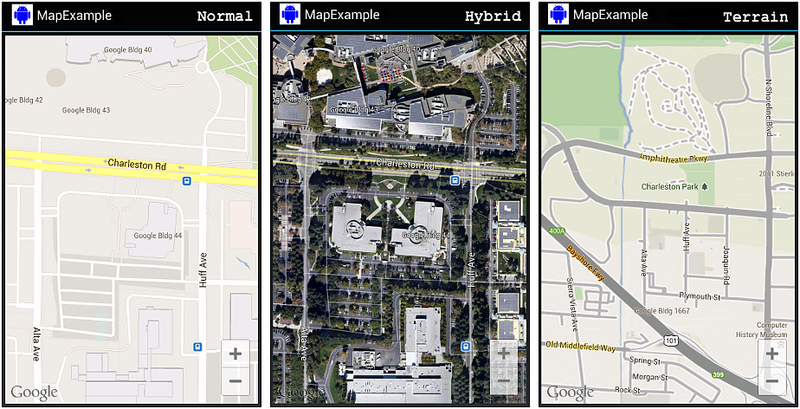
The GoogleMap.MapType property is used to set or change which type of map is displayed. The following code snippet shows how to display a satellite map.
GoogleMap properties
GoogleMap defines several properties that can control the functionality and the appearance of the map. One way to configure the initial state of a GoogleMap is to pass a GoogleMapOptions object when creating a MapFragment . The following code snippet is one example of using a GoogleMapOptions object when creating a MapFragment :
The other way to configure a GoogleMap is by manipulating properties on the UiSettings of the map object. The next code sample shows how to configure a GoogleMap to display the zoom controls and a compass:
Interacting with the GoogleMap
The Android Maps API provides APIs that allow an Activity to change the viewpoint, add markers, place custom overlays, or draw geometric shapes. This section will discuss how to accomplish some of these tasks in Xamarin.Android.
Changing the Viewpoint
Maps are modelled as a flat plane on the screen, based on the Mercator projection. The map view is that of a camera looking straight down on this plane. The position of the camera can be controlled by changing the location, zoom, tilt, and bearing. The CameraUpdate class is used to move the camera location. CameraUpdate objects are not directly instantiated, instead the Maps API provides the CameraUpdateFactory class.
Once a CameraUpdate object has been created, it is passed as a parameter to either the GoogleMap.MoveCamera or GoogleMap.AnimateCamera methods. The MoveCamera method updates the map instantly while the AnimateCamera method provides a smooth, animated transition.
This code snippet is a simple example of how to use the CameraUpdateFactory to create a CameraUpdate that will increment the zoom level of the map by one zoom level:
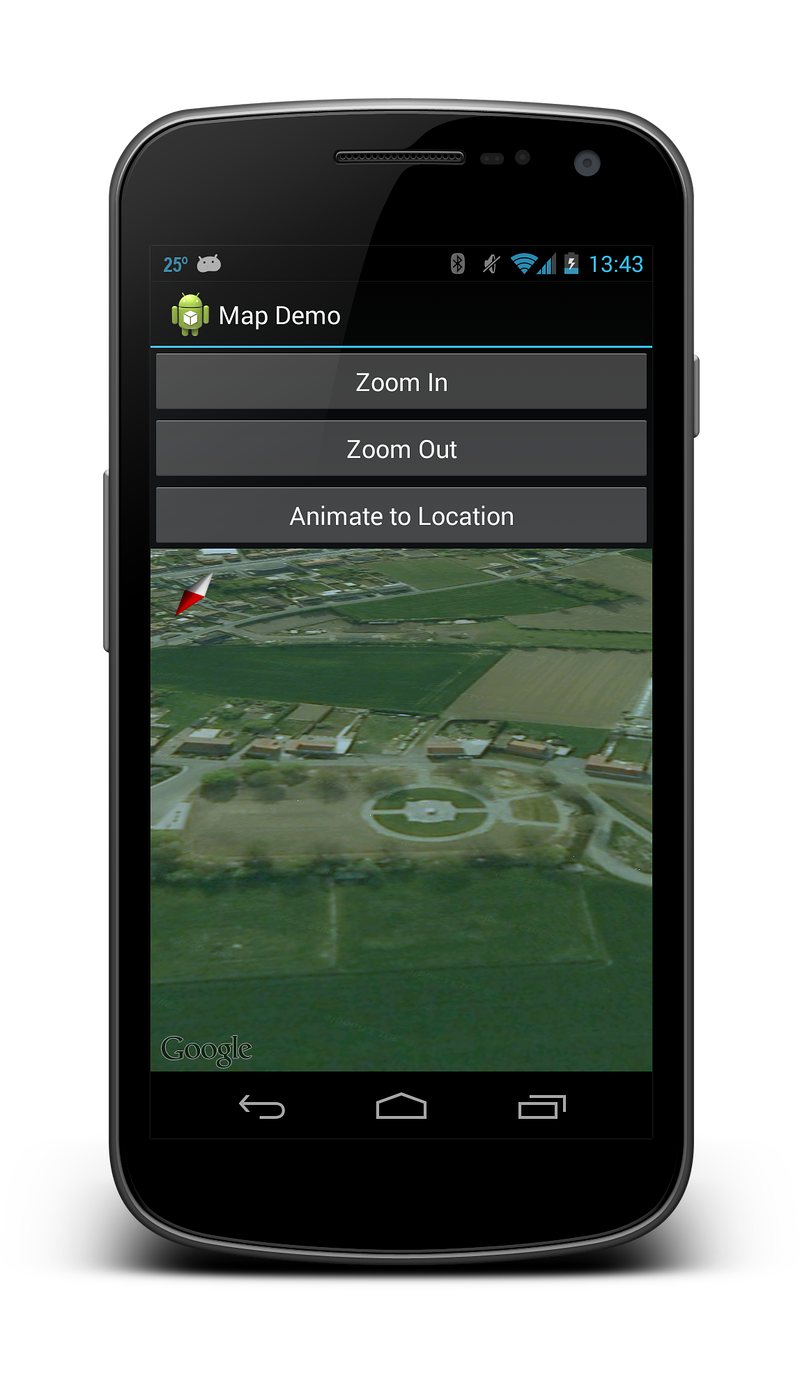
The Maps API provides a CameraPosition which will aggregate all of the possible values for the camera position. An instance of this class can be provided to the CameraUpdateFactory.NewCameraPosition method which will return a CameraUpdate object. The Maps API also includes the CameraPosition.Builder class that provides a fluent API for creating CameraPosition objects. The following code snippet shows an example of creating a CameraUpdate from a CameraPosition and using that to change the camera position on a GoogleMap :
In the previous code snippet, a specific location on the map is represented by the LatLng class. The zoom level is set to 18, which is an arbitrary measure of zoom used by Google Maps. The bearing is the compass measurement clockwise from North. The Tilt property controls the viewing angle and specifies an angle of 25 degrees from the vertical. The following screenshot shows the GoogleMap after executing the preceding code:
Drawing on the Map
The Android Maps API provides API’s for drawing the following items on a map:
Markers — These are special icons that are used to identify a single location on a map.
Overlays — This is an image that can be used to identify a collection of locations or area on the map.
Lines, Polygons, and Circles — These are APIs that allow Activities to add shapes to a map.
Markers
The Maps API provides a Marker class which encapsulates all of the data about a single location on a map. By default the Marker class uses a standard icon provided by Google Maps. It is possible to customize the appearance of a marker and to respond to user clicks.
Adding a Marker
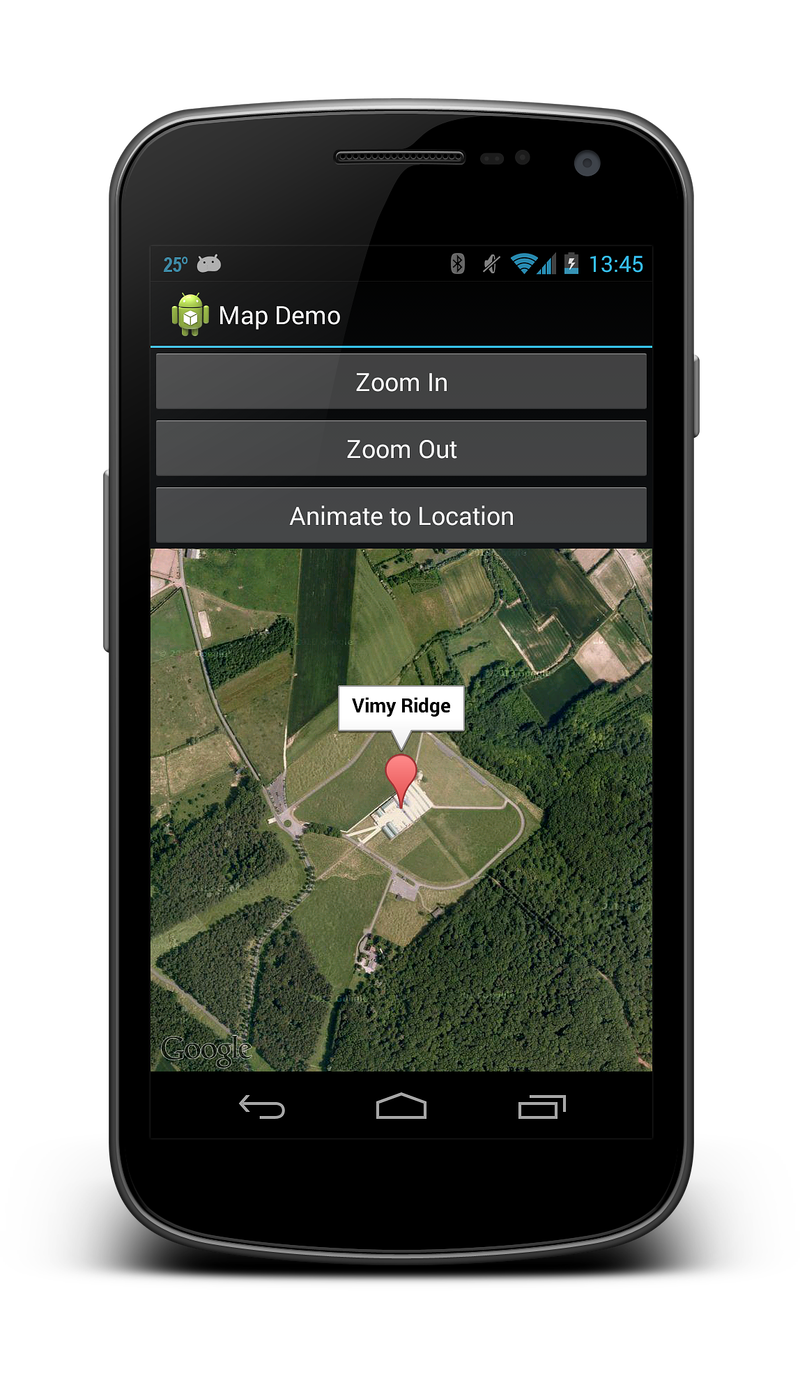
To add a marker to a map, it is necessary create a new MarkerOptions object and then call the AddMarker method on a GoogleMap instance. This method will return a Marker object.
The title of the marker will be displayed in an info window when the user taps on the marker. The following screenshot shows what this marker looks like:
Customizing A Marker
It is possible to customize the icon used by the marker by calling the MarkerOptions.InvokeIcon method when adding the marker to the map. This method takes a BitmapDescriptor object containing the data necessary to render the icon. The BitmapDescriptorFactory class provides some helper methods to simplify the creation of a BitmapDescriptor . The following list introduces some of these methods:
DefaultMarker(float colour) – Use the default Google Maps marker, but change the colour.
FromAsset(string assetName) – Use a custom icon from the specified file in the Assets folder.
FromBitmap(Bitmap image) – Use the specified bitmap as the icon.
FromFile(string fileName) – Create the custom icon from the file at the specified path.
FromResource(int resourceId) – Create a custom icon from the specified resource.
The following code snippet shows an example of creating a cyan coloured default marker:
Info windows
Info windows are special windows that popup to display information to the user when they tap a specific marker. By default the info window will display the contents of the marker’s title. If the title has not been assigned, then no info window will appear. Only one info window may be shown at a time.
It is possible to customize the info window by implementing the GoogleMap.IInfoWindowAdapter interface. There are two important methods on this interface:
public View GetInfoWindow(Marker marker) – This method is called to get a custom info window for a marker. If it returns null , then the default window rendering will be used. If this method returns a View, then that View will be placed inside the info window frame.
public View GetInfoContents(Marker marker) – This method will only be called if GetInfoWindow returns null . This method can return a null value if the default rendering of the info window contents is to be used. Otherwise, this method should return a View with the contents of the info window.
An info window is not a live view — instead Android will convert the View to a static bitmap and display that on the image. This means that an info window cannot respond to any touch events or gestures, nor will it automatically update itself. To update an info window, it is necessary to call the GoogleMap.ShowInfoWindow method.
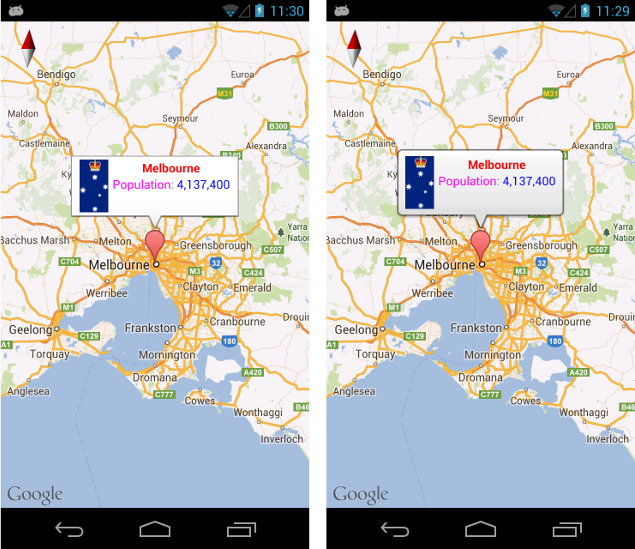
The following image shows some examples of some customized info windows. The image on the left has its contents customized, while the image on the right has its window and contents customized with rounded corners:
GroundOverlays
Unlike markers, which identify a specific location on a map, a GroundOverlay is an image that is used to identify a collection of locations or an area on the map.
Adding a GroundOverlay
Adding a ground overlay to a map is similar to adding a marker to a map. First, a GroundOverlayOptions object is created. This object is then passed as a parameter to the GoogleMap.AddGroundOverlay method, which will return a GroundOverlay object. This code snippet is an example of adding a ground overlay to a map:
The following screenshot shows this overlay on a map:

Lines, Circles, and Polygons
There are three simple types of geometric figures that can be added to a map:
Polyline — This is a series of connected line segments. It can mark a path on a map or create a geometric shape.
Circle — This will draw a circle on the map.
Polygon — This is a closed shape for marking areas on a map.
Polylines
A Polyline is a list of consecutive LatLng objects which specify the vertices of each line segment. A polyline is created by first creating a PolylineOptions object and adding the points to it. The PolylineOption object is then passed to a GoogleMap object by calling the AddPolyline method.
Circles
Circles are created by first instantiating a CircleOption object which will specify the center and the radius of the circle in metres. The circle is drawn on the map by calling GoogleMap.AddCircle. The following code snippet shows how to draw a circle:
Polygons
Polygon s are similar to Polyline s, however they are not open ended. Polygon s are a closed loop and have their interior filled in. Polygon s are created in the exact same manner as a Polyline , except the GoogleMap.AddPolygon method invoked.
Unlike a Polyline , a Polygon is self-closing. The polygon will be closed off by the AddPolygon method by drawing a line which connects the first and last points. The following code snippet will create a solid rectangle over the same area as the previous code snippet in the Polyline example.
Responding to user events
There are three types of interactions a user may have with a map:
Marker Click — The user clicks on a marker.
Marker Drag — The user has long-clicked on a mparger
Info Window Click — The user has clicked on an info window.
Each of these events will be discussed in more detail below.
Marker click events
The MarkerClicked event is raised when the user taps on a marker. This event accepts a GoogleMap.MarkerClickEventArgs object as a parameter. This class contains two properties:
GoogleMap.MarkerClickEventArgs.Handled – This property should be set to true to indicate that the event handler has consumed the event. If this is set to false then the default behaviour will occur in addition to the custom behaviour of the event handler.
Marker – This property is a reference to the marker that raised the MarkerClick event.
This code snippet shows an example of a MarkerClick that will change the camera position to a new location on the map:
Marker Drag events
This event is raised when the user wishes to drag the marker. By default, markers are not draggable. A marker can be set as draggable by setting the Marker.Draggable property to true or by invoking the MarkerOptions.Draggable method with true as a parameter.
To drag the marker, the user must first long-click on the marker and then their finger must remain on the map. When the user’s finger is dragged around on the screen, the marker will move. When the user’s finger lifts off the screen, the marker will remain in place.
The following list describes the various events that will be raised for a draggable marker:
GoogleMap.MarkerDragStart(object sender, GoogleMap.MarkerDragStartEventArgs e) – This event is raised when the user first drags the marker.
GoogleMap.MarkerDrag(object sender, GoogleMap.MarkerDragEventArgs e) – This event is raised as the marker is being dragged.
GoogleMap.MarkerDragEnd(object sender, GoogleMap.MarkerDragEndEventArgs e) – This event is raised when the user is finished dragging the marker.
Each of the EventArgs contains a single property called P0 that is a reference to the Marker object being dragged.
Info Window Click events
Only one info window can be displayed at a time. When the user clicks on an info window in a map, the map object will raise an InfoWindowClick event. The following code snippet shows how to wire up a handler to the event:
Recall that an info window is a static View which is rendered as an image on the map. Any widgets such as buttons, check boxes, or text views that are placed inside the info window will be inert and cannot respond to any of their integral user events.
Источник


