- View Binding in Android: Activities, Fragments, Dialogs, and RecyclerView Adapters
- Долгожданный View Binding в Android
- Как включить
- Как использовать
- Отличия от других подходов
- Использование в RecyclerView.ViewHolder
- Урок 22. Android Data Binding. Adapter. Conversion.
- Binding Adapter
- Conversion
- How to use View Binding in Android using Kotlin
- Enabling View Binding
- Using View Binding in Activities
- Using View Binding in Fragments
- • Inflate method
- • Bind method
- Using View Binding in RecyclerView Adapter
- View Binding in Android
- Getting started with View Binding
- Using View Binding in Fragments
- Start using View Binding
- One-Liner ViewBinding Library
View Binding in Android: Activities, Fragments, Dialogs, and RecyclerView Adapters

Jun 16, 2020 · 3 min read

Whenever we start a project the most monotonous work is to initialize each of the views from our layout files and using findViewById again and again. For a long time, we have been doing this but now ViewBinding can save your time.
What is View Binding? According to the official documentation
View binding is a feature that allows you to more easily write code that interacts with views. Once view binding is enabled in a module, it generates a binding class for each XML layout file present in that module. An instance of a binding class contains direct references to all views that have an ID in the corresponding layout.
In short its a replacement for our old friend findViewById.
Why use View Binding:
To use View Binding in your projects your Android Studio version should be at least 3.6.
In your build.gradle file add the following code:
From Android Studio version 4.0 use the following code:
Let’s see how itis implemented.
I am adding all the XML files here and you can see that I haven’t done anything special here everything is what we do normally.
Источник
Долгожданный View Binding в Android
Пару дней назад Google выпустил Android Studio 3.6 Canary 11, главным нововведением в которой стал View Binding, о котором было рассказано еще в мае на Google I/O 2019.

View Binding — это инструмент, который позволяет проще писать код для взаимодейтсвия с view. При включении View Binding в определенном модуле он генерирует binding классы для каждого файла разметки (layout) в модуле. Объект сгенерированного binding класса содержит ссылки на все view из файла разметки, для которых указан android:id .
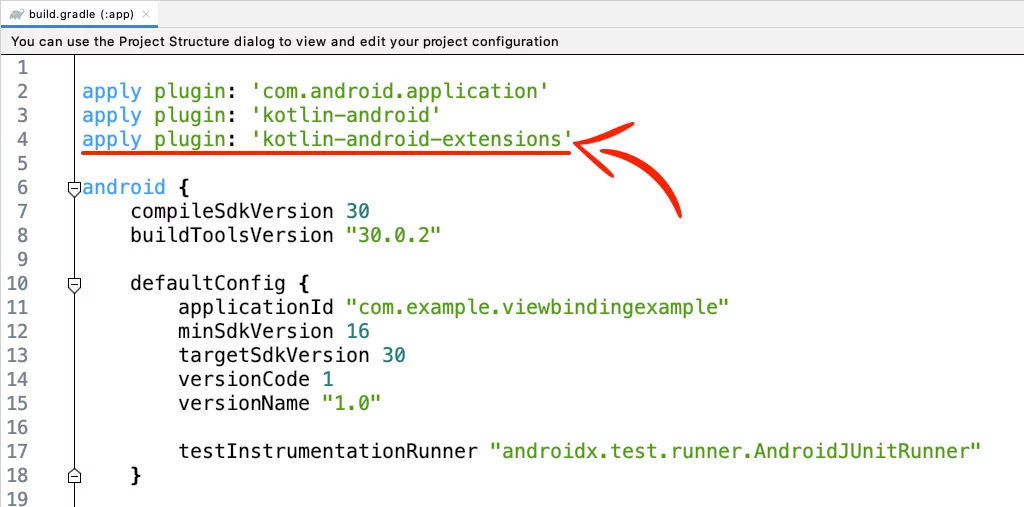
Как включить
Чтобы включить View Binding в модуле надо добавить элемент в файл build.gradle :
Также можно указать, что для определенного файла разметки генерировать binding класс не надо. Для этого надо указать аттрибут tools:viewBindingIgnore=»true» в корневой view в нужном файле разметки.
Как использовать
Каждый сгенерированный binding класс содержит ссылку на корневой view разметки ( root ) и ссылки на все view, которые имеют id. Имя генерируемого класса формируется как «название файла разметки», переведенное в camel case + «Binding».
Например, для файла разметки result_profile.xml :
Будет сгенерирован класс ResultProfileBinding , содержащий 2 поля: TextView name и Button button . Для ImageView ничего сгенерировано не будет, как как оно не имеет id . Также в классе ResultProfileBinding будет метод getRoot() , возвращающий корневой LinearLayout .
Чтобы создать объект класса ResultProfileBinding , надо вызвать статический метод inflate() . После этого можно использовать корневой view как content view в Activity :
Позже binding можно использовать для получения view:
Отличия от других подходов
Главные преимущества View Binding — это Null safety и Type safety.
При этом, если какая-то view имеется в одной конфигурации разметки, но отсутствует в другой ( layout-land , например), то для нее в binding классе будет сгенерировано @Nullable поле.
Также, если в разных конфигурациях разметки имеются view с одинаковыми id, но разными типами, то для них будет сгенерировано поле с типом android.view.View .
(По крайней мере, в версии 3.6 Canary 11)
А вообще, было бы удобно, если бы сгенерированное поле имело наиболее возможный специфичный тип. Например, чтобы для Button в одной конфигурации и TextView в другой генерировалось поле с типом TextView ( public class Button extends TextView ).
При использовании View Binding все несоответствия между разметкой и кодом будут выявляться на этапе компиляции, что позволит избежать ненужных ошибок во время работы приложения.
Использование в RecyclerView.ViewHolder
Ничего не мешает использовать View Binding при создании view для RecyclerView.ViewHolder :
Однако, для создания такого ViewHolder придется написать немного бойлерплейта:
Было бы удобнее, если при работе с RecyclerView.ViewHolder метод inflate(. ) не будет иметь параметр layoutInflater , а будет сам получать его из передаваемого parent .
Тут нужно ещё упомянуть, что при использовании View Binding поиск view через findViewById() производится только один раз при вызове метода inflate() . Это дает преимущество над kotlin-android-extensions , в котором кеширование view по умолчанию работало только в Activity и Fragment , а для RecyclerView.ViewHolder требовалась дополнительная настройка.
В целом, View Binding это очень удобная вещь, которую легко начать использовать в существующих проектах. Создатель Butter Knife уже рекомендует переключаться на View Binding.
Немного жаль, что такой инструмент не появился несколько лет назад.
Источник
Урок 22. Android Data Binding. Adapter. Conversion.
В этом уроке разберем, как можно расширить возможности биндинга с помощью Binding Adapter и Binding Conversion.
Полный список уроков курса:
Binding Adapter
Android Data Binding предоставляет нам возможность вмешиваться в процесс биндинга и самим определять действие, которое будет выполнено при передаче нового значения в какой-либо атрибут View.
Рассмотрим пример, как биндингом можно сделать загрузку изображений из Internet.
Предположим, что у объекта Employee есть поле avatarUrl, в котором находится ссылка на картинку. Используем это поле в биндинге ImageView.
Для ImageView мы добавили свой кастомный атрибут url и туда будем передавать значение из avatarUrl.
Если сейчас попытаться запустить приложение, то получим ошибку: Cannot find the setter for attribute ‘app:url’ with parameter type java.lang.String on android.widget.ImageView.
Биндинг сообщает, что не может найти setter для атрибута app:url. Давайте создадим такой setter.
Создаем статический public метод в любом классе. Можно выделить под это отдельный класс BindingAdapters, например.
В аннотации BindingAdapter указываем атрибут, для которого хотим сделать setter. Первым параметром метода идет ImageView, с которым биндинг будет работать. А вторым параметром придет значение, которое придет атрибут из employee.avatarUrl.
Этот метод будет вызван, когда для app:url будет выполняться биндинг. Мы используем Picasso, чтобы подгрузить картинку в ImageView.
Setter может работать сразу с несколькими атрибутами. Например, добавим drawable, который должен отображаться в случае, если Picasso не удалось загрузить изображение.
Добавляем атрибут errorImage и передаем туда drawable.
В аннотации пишем оба своих атрибута, и в параметрах метода указываем, что ожидаем String и Drawable. В Picasso добавляем использование Darawable в методе error.
Conversion
Conversion удобно использовать, если View ожидает один тип данных, а у вас есть другой, и вам надо выполнить конвертацию.
Рассмотрим пример со списком хобби работника:
Hobby — это отдельный класс с полем name.
Мы хотим выводить список хобби одной строкой в TextView.
Если мы сделаем так:
То получим ошибку: Cannot find the setter for attribute ‘android:text’ with parameter type java.util.List on android.widget.TextView
Биндинг сообщает, что не может поместить List в атрибут android:text. Нам надо научить биндинг конвертировать List в String.
Напишем конвертер. Для этого нужен статический метод с аннотацией BindingConversion. На вход этот метод будет принимать List . А на выходе метод должен вернуть String, чтобы TextView смог это значение принять.
В методе просто все значения из списка помещаем в одну строку.
Биндинг найдет этот конвертер, преобразует список в строку и поместит ее в TextView.
Присоединяйтесь к нам в Telegram:
— в канале StartAndroid публикуются ссылки на новые статьи с сайта startandroid.ru и интересные материалы с хабра, medium.com и т.п.
— в чатах решаем возникающие вопросы и проблемы по различным темам: Android, Kotlin, RxJava, Dagger, Тестирование
— ну и если просто хочется поговорить с коллегами по разработке, то есть чат Флудильня
— новый чат Performance для обсуждения проблем производительности и для ваших пожеланий по содержанию курса по этой теме
Источник
How to use View Binding in Android using Kotlin
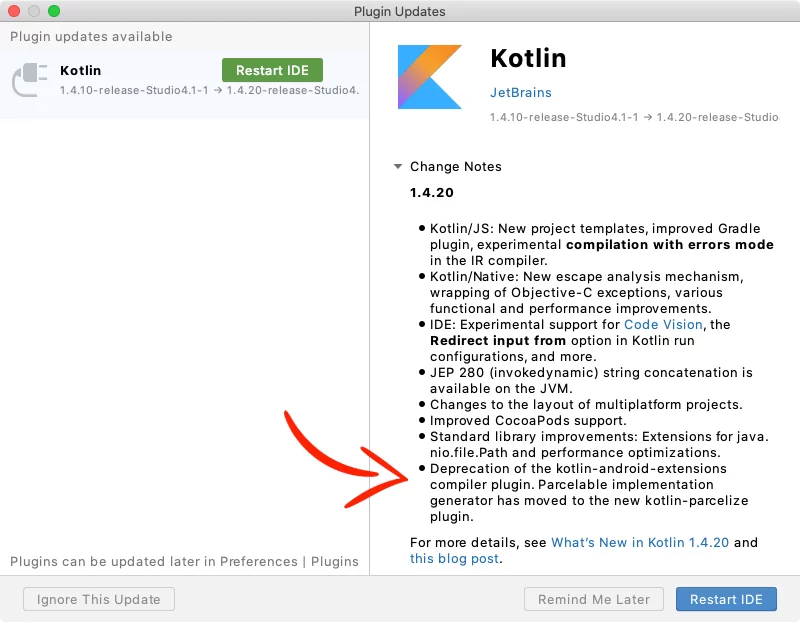
In Android Studio 4.1+, when you create a new Kotlin project and try to connect an XML layout file with your .kt file using Kotlinx synthetic, you’ll see you can’t do it anymore.
This is because they removed the plugin ‘Kotlin Android Extensions‘ as JetBrains deprecated it in the 1.4.20 version of Kotlin.
Now, the alternatives are:
- ButterKnife
- findViewById()
- View Binding
In this tutorial, I’ll show you how to implement View Binding in:
Enabling View Binding
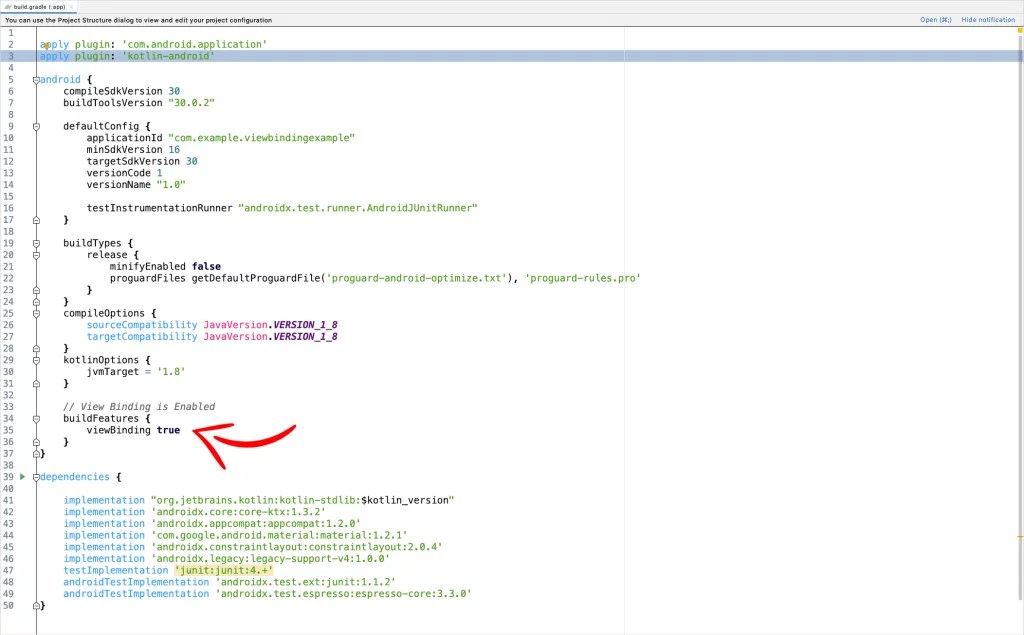
In your module-level build.gradle file, add the following code to enable view binding.
This automatically will create binding classes for each XML file present in that module.
For example, if an XML file name is activity_main.xml, the generated binding class will have the name of this file in Pascal case and the word ‘Binding‘ at the end.
So the binding class will be ActivityMainBinding
If you don’t want to generate a binding class for a specific XML file, add the attribute tools:viewBindingIgnore=»true» in the root layout like that:
Using View Binding in Activities
To use View Binding in Activity, create an instance of the binding class, get the root view, and pass it to setContentView().
Now, you can reference your views like that:
Using View Binding in Fragments
There are two methods to use View Binding in Fragments:
• Inflate: You do the layout inflation and the binding inside the onCreateView method.
• Bind: You use an alternative Fragment() constructor that inflates the layout, and you do the binding inside the onViewCreated method
• Inflate method
In the onCreateView method, inflate your layout file and create the binding instance:
Because Fragments continue to live after the View has gone, it’s good to remove any references to the binding class instance:
• Bind method
At the top of your file, in the Fragment() constructor add your XML layout file, and create the binding inside the onViewCreated method (NOT the onCreateView):
Like I said before in the Inflate method, remove any references in the fragment’s onDestroyView() method:
Using View Binding in RecyclerView Adapter
To use View Binding in your RecyclerView adapter, add the binding class in your ItemViewHolder, and set the root layout:
Next, in the onCreateViewHolder method, do the layout inflation and return the ItemViewHolder with the binding.
And at the end, on the onBindViewHolder, you can reference any of the views through the binding of the holder:
If you have any questions, please feel free to leave a comment below
Источник
View Binding in Android

We have learnt that every time we need to access a view from our XML layout into our Java or Kotlin code, we must use findViewById(). It was okay for small/personal projects where we use 5 to 6 views in a layout. But for larger projects we have comparatively more views in a layout, and accessing each view using the same findViewById() is not really comfortable.
What is View Binding?
View binding is a feature that allows you to more easily write code that interacts with views. Once view binding is enabled in a module, it generates a binding class for each XML layout file present in that module
Simply put, this allows us to access the views from the layout file in a very simple way by linking variables of our Kotlin or Java code with the XML views. When a layout is inflated, it creates a Binding object, which contains all the XML views that are casted to the correct type. This makes it really easier for us since we can retrieve all views in one line of code.
Getting started with View Binding
- Let’s start by enabling view binding in our project:
In build.gradle(:app) add the code in -> android
2. Before the onCreate() method, we create our binding object
3. Perform the following steps in onCreate() method:
- Call the inflate() method to create an instance of the binding class for the activity to use.
- Get reference to the root view
- Pass the root view to setContentView() [setContentView(binding.root)] instead of layout [setContentView(R.id.activity_main)]
4. To get reference of any view, we can use the binding object:
Using View Binding in Fragments
We follow the same steps:
- Before the onCreateView() method, we create our binding object
2. Initialize our binding object in onCreateView()
3. To get reference of any view, we can use the binding object
Note: The name of the binding class is generated by converting the name of the XML file to camel case and adding the word “Binding” to the end. Similarly, the reference for each view is generated by removing underscores and converting the view name to camel case . For example, activity_main.xml becomes ActivityMainBinding, and you can access @id/text_view as binding.textView.
View binding has important advantages over using findViewById():
- Null safety: Since view binding creates direct references to views, there’s no risk of a null pointer exception due to an invalid view ID.
- Type safety: The fields in each binding class have types matching the views they reference in the XML file. This means that there’s no risk of a class cast exception.
Start using View Binding
If you’re intrigued by View Binding and want to learn more about it, here’s some resources for you to learn:
One-Liner ViewBinding Library
You would have noticed that to use View Binding, we need to call the static inflate() method included in the generated binding class ( which creates an instance of the binding class for the activity or fragment )
Yesterday I came across an awesome library that makes ViewBinding one-liner ( By removing the boilerplate code and easily set ViewBindings with a single line )
One-liner ViewBinding Library : [Click Here]
Источник


