- Быстрый старт Data Binding в Android
- Введение
- Начало
- Настройка Layout
- Привязка данных
- Конвертеры
- Обратная связь и Binding
- ObservableFields
- Из View в Model
- View Binding Tutorial for Android: Getting Started
- Version
- Using Different Approaches
- Getting Started
- Project Structure
- Using ViewBinding
- Migrating From findViewById
- Migrating From Kotlin Synthetic Properties
- Migrating From Databinding
- View Binding Internals
- Disabling View Binding
- View Binding Coexisting With Data Binding
- Where to Go From Here?
Быстрый старт Data Binding в Android
Введение
Профессионально андроид-разработкой занимаюсь чуть больше года, до этого разрабатывал по Windows Phone и мне понравилась возможность связывать данные из вью модели с самим View при помощи механизма Bindings. А после изучения RX, многие задачи стали решаться более чисто, вью-модель полностью отделилась от View. Она стала оперировать только моделью, совсем не заботясь о том, как она будет отображаться.
В Android такой строгости я не заметил, Activity или Fragment как простейшие представители контроллера чаще всего имеют полный доступ как ко View, так и к модели, зачастуя решая, какой View будет видим, решая таким образом чисто вьюшные задачи. Поэтому я довольно радостно воспринял новость о появлении Data Binding в Android на прошедшем Google IO.
Пока что это только бета релиз, но уже можно протестировать функционал и увидеть направление, в котором двигаются разработчики из Google.
Начало
Я использую Android Studio 1.3. Data binding поддерживает Android 2.1 и выше (API level 7+).
Для сборки используется новый android плагин для Gradle (нужна версия 1.3.0-beta1 и старше). Так как связи отрабатываются во время компиляции, нам понадобиться ещё один плагин к Gradle ‘com.android.databinding:dataBinder:1.0-rc0’. В отличие от того же Windows Phone где механизм привязок реализован глубоко по средством DependencyProperty и в RealTime, в Android эта функция реализуется как бы поверх обычных свойств, во время компиляции и дополнительной кодогенерации, поэтому в случае ошибок будьте готовы разбирать ответ от компилятора.
Итак, заходим в файл build.gradle, который лежит в корневом каталоге проекта (в нём идут настройки Gradle для всего проекта). В блоке dependencies вставляем:
Теперь подключим плагин к конкретному модулю, откроем build.gradle файл, который лежит внутри модуля. По умолчанию app/build.gradle и добавим строчку:
Настройка Layout
Мы должны обернуть наш внешний View в тег
Уже сейчас можно начать его использовать класс Binding для доступа к элементам интерфейса, без использования findViewById. В MainActivity добавим поле и перепишем метод onCreate:
Название поля берётся из Id View, без Id в биндере поле не появиться, если изменить Id View, то поле в биндере сразу же переметнуться. Если с зажатым CTRL нажать на название поля View, то сразу перейдешь к нему в файле разметки. Как по мне так уже одного такого функционала достаточно для того чтобы начать использовать биндинги.
Привязка данных
Например у нас есть карточка пользователя имя и возраст.
Изменим Layout, заменим содержимое LinearLayout на:
И в onCreate заменим последнюю строку на:
Запускаем. Всё работает.
Наверное у всех проектах в активити или в фрагментах встречается такие строчки:
Тут то мы и начинаем использовать непосредственно привязки данных. Перепишем модель:
И добавим в Layout:
На красные выделения студии игнорируем.
Так как мы используем класс View, то его нужно импортировать, добавим в ноду
Или используем его вместе с названием пакета:
Так же возможно в ноде
Конвертеры
Импорт в свою очередь даёт возможность писать конвертеры. Добавим в модель поле с датой рождения и удалим возраст:
Импортируем его в разметку:
Обратная связь и Binding
Попробуем сменить имя пользователя.
Добавим в Layout:
Запускаем и кликаем, тост всплыл, но имя не изменилось. Это случилось из-за того, что модель ни как не известила binder о своём изменении.
Можно создать новую модель и вставить её, но с точки зрения памяти это расточительно:
Или вытащить старую, заменить данные и вставить опять:
Но тогда обновятся все View, связанные с этой моделью. Лучшим вариантом будет связать модель с binder, чтобы она могла его оповестить о своём изменении. Для этого перепишем класс модели, добавив геттеры и сеттеры,
помечая геттеры атрибутом @Bindable, и добавив в сеттеры вызов notifyPropertyChanged(BR.lastName);
Видим новый класс BR, в котором содержатся идентификаторы полей, чьи геттеры помечены атрибутом @Bindable . В Layout оставляем android:text=»@
ObservableFields
В пакете android.databinding есть классы, которые могут упростить нотификацию binder об изменении модели:
- Обёртки над элементарными типами
- ObservableField
- ObservableArrayMap
- ObservableArrayList
Попробуем изменить модель:
По коллекциям аналогично, единственное приведу пример обращения ко ключу к Map:
Из View в Model
Теперь попробуем взять новое имя из UI, привязав EditText к некоторой модели. Так как внутри EditText крутится Editable, то и привязать будет к
Изменю MainActivity:
А в разметку добавлю:
Вот тут возникает проблема, если привязать ObservableField к EditText, то всё будет работать только в сторону View. Как я понял, проблема в том, что Editable, который лежит внутри ObservableField, отличается от того, который лежит внутри EditText.
Если у кого есть идеи — делитесь.
Очень любопытно было увидеть библиотеку для поддержки Data Binding в Android от Google. В документации тоже нет информации про обратную связь данных, но я надеюсь на скорую её реализацию. После официального выхода стабильной версии можно будет посмотреть на интеграцию с JavaRX.
[ Оффициальная документация ]
[ Ссылка на мой простенький пример ]
Источник
View Binding Tutorial for Android: Getting Started
In this View Binding tutorial for Android, you’ll learn how to use View Binding to find and configure your views and how to migrate from other alternatives.

Version

In this tutorial, you’ll learn how to use View Binding to find and configure your views.
Since its origins, the Android framework has provided a way to find and configure views. You can achieve this by using findViewById() in Activities, Fragments and Views.
On one hand, while there’s nothing wrong with that method, and you can still use it in your code. On the other, there are alternatives that are used more than this built-in Android mechanism nowadays. Finally, each of these alternatives have pros and cons for elegance, compile time safety or build speed impact. You’ll explore and compare them to findViewById() .
Using Different Approaches
So, what are all the approaches to working with Views? Well, I’m glad you asked! Here’s a quick breakdown of the various approaches as well as some of their pros and cons.
- findViewById: It’s verbose and thus not elegant. In the past, this method returned a View object, and you had to explicitly cast it to a specific type. As a result, it didn’t provide compile-time safety.
In Android 8, API 26, Google made a change to the findViewById() signature. findViewById() now uses generic typing, and instead of returning a plain View object, it returns a type that extends from View .
That means that you can return any concrete type without having to cast the result explicitly. Using findViewById() also isn’t null safe since this method can return null if the referenced view is not available for use at the time of access. Using such a View, without adding null checks can lead to a NullPointerException .
A good thing about findViewById() is that it doesn’t have any impact on build speed, because it works in the runtime.
ButterKnife: This is an annotation-based approach, where you can annotate all the Views you want to bind. Similar to Dagger2, or Room, the compiler then generates the required code, to bind these views.
While this approach provides an elegant interface, it doesn’t give you compile-time safety, as you can bind any view ID to any View type. Moreover, if you bind the wrong type, you’ll get an exception in the runtime. It also impacts the build speed because it runs an annotation processor to generate code. You can check out this approach at the following link.
Additionally, ButterKnife’s development is coming to an end. Jake Wharton, the creator of this library, is deprecating it in favor of View Binding.
It should take all the best parts of each of the other approaches while avoiding their flaws. View Binding’s impact on build speed is almost negligible.
According to Google, this new approach has the best of all the worlds. So, you should use it wherever you can.
But, it’s not the best choice for one specific case. You’ll see an example later in the sample project.
Getting Started
To get started, download the begin and end projects by clicking the Download Materials button at the top or bottom of the tutorial.
Throughout this tutorial, you’ll work with an app called BMICalc. By providing height and weight, BMICalc lets the user calculate his or her Body Mass Index (BMI). It also shows a color indicating if the user is either healthy or overweight.
To use View Binding, you need to upgrade to the Android Gradle Plugin version 3.6.0-alpha11 or later. This version of the Android Gradle Plugin requires Gradle 5.6.1 or higher. Also, you need to use Android Studio 3.6 Canary 11+ or newer because older versions of Android Studio won’t open a project that uses the Android Gradle Plugin version 3.6.0-alpha11 or higher.
You’ll find BMICalc already configured using the appropriate versions.
For the tutorial, you’ll use the canary version of Android Studio 4.0. Since the canary versions may change from the time of writing the tutorial, make sure you have the latest installed. If you haven’t already, click here to download that version. Once downloaded, open the begin project, from the materials, by selecting Open an existing Android Studio project from the welcome screen.
Build and run BMICalc and become familiar with it:
Set up your profile and add a few weight logs.
Project Structure
The project contains the following main files:
- MainActivity.kt contains the main screen. It shows all the weight logs with their calculated BMIs.
- LogActivity.kt lets the user to create a new weight log.
- ProfileActivity.kt lets the user to provide his or her birthdate and height.
- BMIApplication.kt provides a dependency for the activities, in your case a Repository .
- Person.kt and WeightLog.kt represents the data of a person as well as his or her weight logs.
- PersonAdapter.kt adapts the person’s data and his or her weight logs so they show in the main screen.
- Repository.kt saves and retrieves the user and his or her weight logs data.
- MainViewModel.kt, LogViewModel.kt and ProfileViewModel.kt have operations called by their associated activities, which observe LiveData s exposed by the ViewModels.
Notice that some Activities use findViewById() . Others use Data Binding and Kotlin synthetic properties to find and configure views.
You’ll migrate these to ViewBinding later in the tutorial. First, you’ll enable View Binding.
Using ViewBinding
Add the following to your app’s build.gradle to enable the View Binding feature:
This enables View Binding only for the app module. In a multi-module project, you need to add this in every module, or in a project level build.gradle file. After that, you can use View Binding in all modules.
Sync and build the project. Everything should still be working. Now that you’ve enabled View Binding, you can migrate from the findViewById.
Migrating From findViewById
Open ProfileActivity.kt. Notice that this file is using findViewById() . So, to migrate to ViewBinding, remove the following:
And add this instead:
It’ll prompt you to import the following:
Now, replace setContentView() with the following:
Remove all the findViewById() calls:
Replace editTextBirthdate with binding.editTextBirthdate . Then add the binding. prefix to the rest of the views marked in red by the IDE.
Build and run the app to see that everything is still working. Next, you’ll migrate from Kotlin Synthetic properties.
Migrating From Kotlin Synthetic Properties
Open PersonAdapter.kt. Notice it uses Kotlin synthetic properties. To start migrating them, replace the contents of onCreateViewHolder() with the following:
It’ll prompt you to import the following:
Notice it’ll mark in red the parameter you’re passing to the constructor. So, change the WeightViewHolder constructor to the following:
Finally, stop using Kotlin synthetic properties by replacing the following way to fetch the Views:
With the following:
Build and run the app. Make sure it still works as expected. Finally, you’ll migrate from DataBinding to View Binding.
Migrating From Databinding
Open MainActivity.kt and activity_main.xml.

Observe that the XML file has a layout tag. That means it’s using Data Binding. To migrate to View Binding, remove the opening and closing layout tags.

Build and run the app to make sure this screen is still working.
Now, open LogActivity.kt and activity_log.xml.

The XML file has a layout tag. So, it’s also using Data Binding. But, it also has a data tag, associating the views to the LogViewModel. You can see some of the viewModel data bindings in the XML:
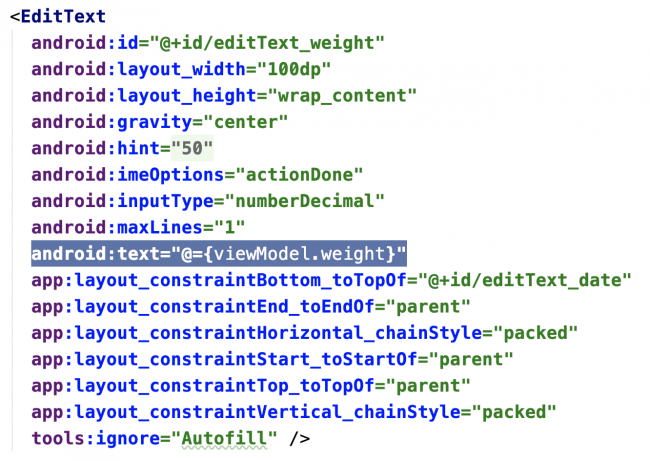

You can see that sometimes Data Binding does more than find views. It can also bind the EditTexts and Button to a viewModel, automatically inserting pieces of data into them. This is why it’s called DataBinding.
In this case, migrating to View Binding wouldn’t be a good choice. Without the bindings Data Binding provides, you could lose important behavior. You’d have to refactor your Activity and ViewModel to maintain the expected behavior, so leaving DataBinding here might be a better approach, if you don’t have the time or resources to refactor everything.
View Binding Internals
You enabled View Binding in your app’s build.gradle and built the project. By doing so, the View Binding compiler generated a Java class file for each XML file you have in the project. These files help with bindings of Views, as you saw in the tutorial. Classes like ActivityLogBinding.java connect all the views internally, and all you have to do is create an instance of the class, setting its content in setContentView() .
Switch to the Project view.

Open the file located at app ‣ build ‣ generated ‣ data_binding_base_class_source_out ‣ debug ‣ out ‣ com ‣ raywenderlich ‣ android ‣ bmicalc ‣ databinding ‣ ActivityMainBinding.java.

Note: The view binder complier created the name of this file. It took the XML filename, converted it to camel-case, removed the underscores and appended the Binding suffix. So, if you had a file called my_super_activity_example.xml, the generated class would be MySuperActivityExampleBinding.java.
Check its contents:

Notice it has a comment stating the view binder compiler generated this file. Also, noticed that it implements an interface called ViewBinding . Moreover, if you continue investigating the file, you’ll see a lot of View properties. These properties correspond to the ids of the views in activity_main.xml. Notice they’re annotated as @NonNull .
Furthermore, suppose you had another activity_main.xml file, for example, one for landscape, and you didn’t have one of the views. In that case, the compiler would annotate it with @Nullable instead. This provides your code with null-safety. So, you’d have to use the Kotlin ? operator.
Continue reading the file. Find inflate() you call from the MainActivity:

As you can see, it inflates the corresponding XML file. Finally, scroll a little more and you will find the following:

These are the good old findViewByIds() calls, which you now don’t have to write yourself! :]
Disabling View Binding
If for any reason you want to disable View Binding on a specific layout, you can open it up and add the following statement:
This prevents the view binder compiler from generating the associated binding class.
View Binding Coexisting With Data Binding
As you’ve seen, there’s no reason you can’t use both Data Binding and View Binding on the same project. By default, the view binder compiler generates a binding class for each XML file. But, if you want to use Data Binding instead, you have to add the layout tag, as root, to the XML file.
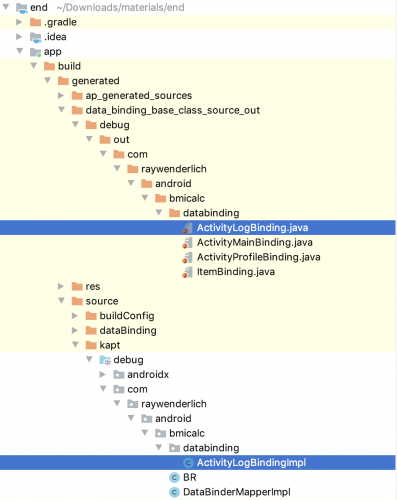
Remember that you didn’t change activity_log.xml, which was using Data Binding. You can find the generated files from the data binding compiler in the following packages, within the project structure:
Where to Go From Here?
Congratulations! You now know how to use View Binding! :]
You can download the begin and end projects by using the Download Materials button at the top or bottom of the tutorial, if you haven’t already, and explore both the projects.
Furthermore, if you want to learn more about the subject, please check the following references:
I hope you enjoyed this introduction to View Binding in Android tutorial. If you have any questions, comments or awesome modifications to this project app, please join the forum discussion below! Happy binding! :]
Источник


