- Некоторые возможности использования Intent’ов
- Введение
- Android Receiving SMS Example
- Receive SMS Permissions
- Intent Filter to receive SMS
- Broadcast Receiver
- Main Activity
- Complete manifest XML
- Run the application
- Android — Sending SMS
- Example
- Using Built-in Intent to send SMS
- Intent Object — Action to send SMS
- Intent Object — Data/Type to send SMS
- Intent Object — Extra to send SMS
- Example
Некоторые возможности использования Intent’ов

Введение
Объекты типа Intent могут быть использованы для общения между отдельными частями Android приложения, либо между различными приложениями системы. Мощь механизма интентов заключается в том, что с его помощью можно обращаться к любому установленному в системе приложению. Это позволяет повторно использовать некоторые компоненты и значительно сократить время на разработку.
В этой статье я покажу некоторые возможности использования класса Intent для обращения к системным приложениям.
Итак, что можно сделать с помощью Intenta:
1. Позвонить
Необходимо также добавить разрешение совершать звонки:
Либо разрешение для экстренных вызовов:
Звонки можно также совершать, указав интенту первый параметр как ACTION_DIAL. При этом будет открываться телефонная книга с указанным номером, но сам звонок автоматически совершаться не будет. Этому параметру не нужны разрешения в манифесте.
2. Отправить смс
Т.к. этот код не отправляет смс напрямую, а запускает стандартное активити для отправки смс, то никаких разрешений указывать не нужно.
3. Получить контакт из телефонной книги
Этот код откроет стандартное приложение контактов. Метод startActivityForResult позволяет получить uri выбранного контакт из параметра Intent data переопределенного метода onActivityResult.
Приведенный выше код показывает в приложении контактов сразу все контакты пользователя, включая почтовые. Если необходимо выбрать только контакт из телефонной книги, можно воспользоваться следующим кодом:
Для чтения списка контактов необходимо также добавить в манифест разрешение:
4. Открыть ссылку в браузере
Данный код откроет переданную в параметре ссылку в одном из установленных браузеров. При этом пользователь сможет сам выбрать браузер для просмотра. Eсли ссылка ведет на YouTube, то можно сразу открыть видео стандартным YouTube приложением.
С помощью этого интента можно также открыть стандартный клиент Android Market с ссылкой на какое-либо приложение. Для этого необходимо в параметр uri передать ссылку вида market://search?q=search query, где search query необходимо заменить соответствующим поисковым запросом.
Разрешения на интернет указывать не нужно, т.к. сеть используется не напрямую, а через приложение браузер.
5. Расшарить контент/написать письмо
Интенту можно задать тему и текст контента, который необходимо разшарить. Метод Intent.createChooser() создает диалог выбора соответствующего приложения.
Если необходимо разшарить медиа контент (изображение/видео), то нужно указать соответствующий тип контента в методе setType, например mailIntent.setType(«image/png»);, а также добавить сам контент в extra интента:
С помощью этого интента можно также отправить электронную почту по конкретному адресу:
6. Открыть карту по определенным координатам либо запросу
Uri при этом можно модифицировать, указывая другие параметры:
- geo:latitude,longitude
- geo:latitude,longitude?z=zoom Параметр z — уровень зума при отображении карты (от 0 до 23)
- geo:0,0?q=my+street+address
- geo:0,0?q=business+near+city
7. Сделать снимок с камеры
Этот код запускает стандартное приложение камеры. Полученное с камеры изображение можно обработать в методе onActivityResult:
Изображение, полученное с камеры при этом можно сохранить в конкретной директории, добавив параметр в интент:
Для использования этого интента не нужно разрешения android.permission.CAMERA, т.к. камера используется не напрямую, а всего лишь вызывается встроенное приложение камеры. Однако рекомендуется добавить в AndroidManifest следующую строку:
Таким образом, люди с девайсами без встроенной камеры (судя по всему, такое тоже бывает) не будут видеть ваше приложение на маркете.
8. Позвонить какому-либо контакту через Skype
Для совершения звонка через скайп интенту необходимо указать конкретное имя активити и пакета, к которым он будет обращаться. Это немного усложняет код, т.к. в двух разных версиях скайпа имена пакетов отличаются. Необходимо выполнять проверку того, какая версия скайп клиента установлена в системе, и установлена ли она вообще. Для проверки можно использовать следующий метод:
Этот метод проверяет в системе наличие приложения, способного ответить на конкретный интент. С использованием этого метода код звонка через скайп будет выглядеть следующим образом:
Более простым методом проверки наличия приложения в системе является перехват ActivityNotFoundException, которое будет вылетать в методе startActivity. Однако это позволит всего лишь среагировать на проблему, но не предотвратить ее. Например, используя вышеприведенный метод isIntentAvailable можно вовремя сделать соответствующий контрол неактивным, либо перенаправить пользователя на Android Market для установки соответствующего приложения.
9. Использовать Speech to Text для распознавания голоса
Этот код запускает приложение распознавания речи. Если произнести что-либо, система обработает голос и вернет результат в метод onActivityResult:
Источник
Android Receiving SMS Example
In the last article, I showed you how to send SMS in android. In this article, we will see how to receive SMS messages. We can add the interested phone numbers in the settings.
We will start with the permissions required.
Receive SMS Permissions
We only need receive permission android.permission.RECEIVE_SMS . In case you also want to read SMS messages from the Inbox then you need android.permission.READ_SMS .
Intent Filter to receive SMS
We also need to tell Android that we want to handle incoming SMS messages. In order to do this, we will add a to register a broadcast receiver to the manifest XML. We will also add an to let Android know that we want to launch a specific class when an SMS comes in.
Add the below in AnrdoidManifest.xml:
Broadcast Receiver
SMSReceiver is a BroadcastReceiver . When SMS is received, onReceive will be called. Here we will look into the interested numbers based on a setting. If the message has originated from one of those numbers, we will launch a new Activity, and pass the phone number and the SMS message to the activity.
Main Activity
In the main activity, we will get the SMS data from the intent and set the text fields.
Layout will have couple of text fields, one for phone number and the other for the message.
Complete manifest XML
Let’s have a look at the android manifest XML.
Run the application

SMS Receive Main Screen
Set the interested phone numbers in the settings. If more than one, enter them comma separated.

Enter phone numbers
Open ‘Emulator Control’ to send spoof SMS. To open the ‘Emulator Control’, Go to Windows->others->Android->’Emulator Control’. 
Источник
Android — Sending SMS
In Android, you can use SmsManager API or devices Built-in SMS application to send SMS’s. In this tutorial, we shows you two basic examples to send SMS message −
Built-in SMS application
Of course, both need SEND_SMS permission.
Apart from the above method, there are few other important functions available in SmsManager class. These methods are listed below −
| Sr.No. | Method & Description | |||||||||||||||||||||||||||
|---|---|---|---|---|---|---|---|---|---|---|---|---|---|---|---|---|---|---|---|---|---|---|---|---|---|---|---|---|
| 1 |
| Step | Description |
|---|---|
| 1 | You will use Android Studio IDE to create an Android application and name it as tutorialspoint under a package com.example.tutorialspoint. |
| 2 | Modify src/MainActivity.java file and add required code to take care of sending sms. |
| 3 | Modify layout XML file res/layout/activity_main.xml add any GUI component if required. I’m adding a simple GUI to take mobile number and SMS text to be sent and a simple button to send SMS. |
| 4 | No need to define default string constants at res/values/strings.xml. Android studio takes care of default constants. |
| 5 | Modify AndroidManifest.xml as shown below |
| 6 | Run the application to launch Android emulator and verify the result of the changes done in the application. |
Following is the content of the modified main activity file src/com.example.tutorialspoint/MainActivity.java.
Following will be the content of res/layout/activity_main.xml file −
Here abc indicates about tutorialspoint logo
Following will be the content of res/values/strings.xml to define two new constants −
Following is the default content of AndroidManifest.xml −
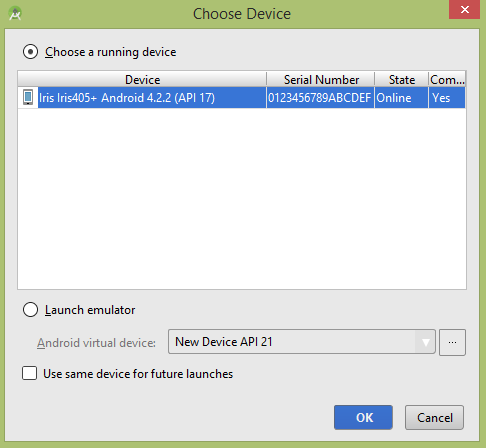
Let’s try to run your tutorialspoint application. I assume you have connected your actual Android Mobile device with your computer. To run the app from Android studio, open one of your project’s activity files and click Run  icon from the toolbar. Before starting your application, Android studio installer will display following window to select an option where you want to run your Android application.

Now you can enter a desired mobile number and a text message to be sent on that number. Finally click on Send SMS button to send your SMS. Make sure your GSM/CDMA connection is working fine to deliver your SMS to its recipient.
You can take a number of SMS separated by comma and then inside your program you will have to parse them into an array string and finally you can use a loop to send message to all the given numbers. That’s how you can write your own SMS client. Next section will show you how to use existing SMS client to send SMS.
Using Built-in Intent to send SMS
You can use Android Intent to send SMS by calling built-in SMS functionality of the Android. Following section explains different parts of our Intent object required to send an SMS.
Intent Object — Action to send SMS
You will use ACTION_VIEW action to launch an SMS client installed on your Android device. Following is simple syntax to create an intent with ACTION_VIEW action.
Intent Object — Data/Type to send SMS
To send an SMS you need to specify smsto: as URI using setData() method and data type will be to vnd.android-dir/mms-sms using setType() method as follows −
Intent Object — Extra to send SMS
Android has built-in support to add phone number and text message to send an SMS as follows −
Here address and sms_body are case sensitive and should be specified in small characters only. You can specify more than one number in single string but separated by semi-colon (;).
Example
Following example shows you in practical how to use Intent object to launch SMS client to send an SMS to the given recipients.
To experiment with this example, you will need actual Mobile device equipped with latest Android OS, otherwise you will have to struggle with emulator which may not work.
| Step | Description |
|---|---|
| 1 | You will use Android studio IDE to create an Android application and name it as tutorialspoint under a package com.example.tutorialspoint. |
| 2 | Modify src/MainActivity.java file and add required code to take care of sending SMS. |
| 3 | Modify layout XML file res/layout/activity_main.xml add any GUI component if required. I’m adding a simple button to launch SMS Client. |
| 4 | No need to define default constants.Android studio takes care of default constants. |
| 5 | Modify AndroidManifest.xml as shown below |
| 6 | Run the application to launch Android emulator and verify the result of the changes done in the application. |
Following is the content of the modified main activity file src/com.example.tutorialspoint/MainActivity.java.
Following will be the content of res/layout/activity_main.xml file −
Here abc indicates about tutorialspoint logo
Following will be the content of res/values/strings.xml to define two new constants −
Following is the default content of AndroidManifest.xml −
Let’s try to run your tutorialspoint application. I assume you have connected your actual Android Mobile device with your computer. To run the app from Android studio, open one of your project’s activity files and click Run icon from the toolbar. Before starting your application, Android studio will display following window to select an option where you want to run your Android application.
Select your mobile device as an option and then check your mobile device which will display following screen −
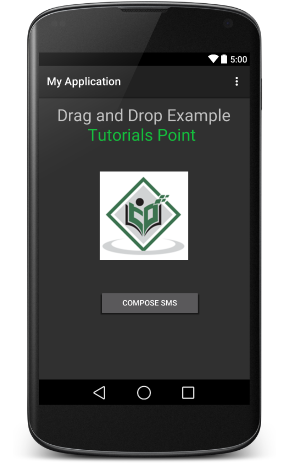
Now use Compose SMS button to launch Android built-in SMS clients which is shown below −
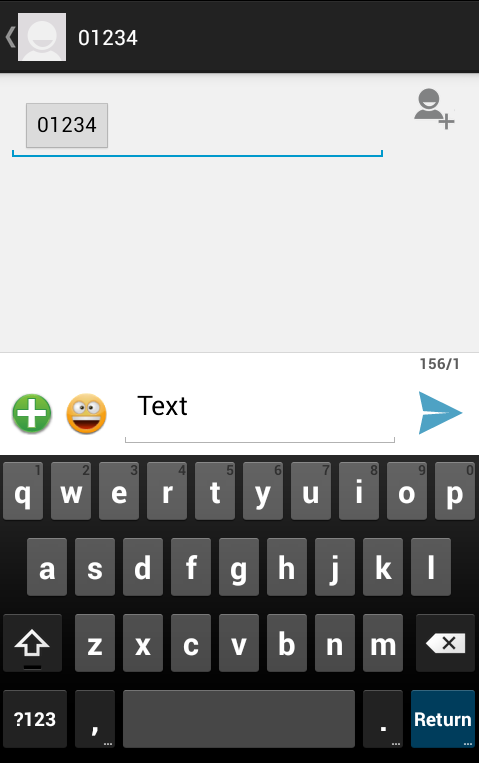
You can modify either of the given default fields and finally use send SMS button to send your SMS to the mentioned recipient.
Источник


