- Android Webview | Progress Bar Dialog, Back Navigation, JavaScript
- 1. Android WebView With Progress Bar
- Step2: Updating AndroidManifest.xml file
- Step 3: Update activity_main.xml file
- Step 4: Prepare MainActivity.java class
- Step 5: Description of MainActivity.java class
- 2. Android WebView with Navigation Buttons
- Step 2: Updating AndroidManifest.xml file
- Step 3: Update activity_main.xml file
- Step 4: Prepare MainActivity.java class
- Step 5: Description of MainActivity.java class
- 3. Load HTML and JavaScript in Android WebView
- Step 2: Making assets folder
- Creating JavaScript file
- Step 3: Creating HTMLActivity
- Step 4: Creating JavaScriptActivity
- Step 5: Update MainActivity
- Loading/Splash Screen for WebView in Android Studio
- It works! But we’re not done yet…
- ProgressBar while Loading WebView in Android
- 1. Determinate Progress Bar Example
- 2. Indeterminate Progress Bar Example
- Android webview loading progress
- Android webview loading progress
Android Webview | Progress Bar Dialog, Back Navigation, JavaScript
Hello, Geeks. Welcome to Android Webview Tutorial with Example.
WebView is specially designed to load a any website into your android application.
You can control the layout into which a particular web address(URL) will be loaded.
Webview gives us full control like Linearlayout or Relativelayout, so that we can defined how many portion of screen will be covered by WebView.
1. Android WebView With Progress Bar
You will learn how to load URL into WebView of Android app in WebView progress bar dialog Android tutorial.
We will show a progress bar as a loading indicator in WebView.
First check output of tutorial then develops the example.
Step2: Updating AndroidManifest.xml file
add required permissions between …. tag.
Step 3: Update activity_main.xml file
Copy and paste below source code in activiry_main.xml file
Step 4: Prepare MainActivity.java class
Add following source code in MainActivity.java
Step 5: Description of MainActivity.java class
Following will initialize WebView instance
Below class contains three methods
The First method is calling when URL has started loading
The Second method will override URL loading. We will set progressBar to visible in this method.
The Third method will be called when URL has finished loading.
We will set progressBar’s visibility to GONE here.
You can defined all the logic which you want to get run when URL is completely loaded.
Here we have remove the progress bar.
If you are finding any difficulties implementing this tutorial, then you can ask your question in the comment section.
So all for Webview progress bar dialog android studio programmatically example. Thank you.
2. Android WebView with Navigation Buttons
Hello, learners. Welcome to Android Webview Back Button Navigation In Android Studio example.
You will implement Webview with a previous and next buttons in this Android Webview Back Button Navigation In Android Studio tutorial.
If you want to load the whole website in WebView, then navigation buttons are useful.
If you follow this tutorial, you will not have any questions like webview back button not working or so.
First, check the output of Android Webview Back Button Navigation tutorial and then we will develop it.
Step 2: Updating AndroidManifest.xml file
add required permissions between …. tag.
Step 3: Update activity_main.xml file
Copy and paste below source code in activiry_main.xml file
Step 4: Prepare MainActivity.java class
Add following source code in MainActivity.java
Step 5: Description of MainActivity.java class
Following will initialize WebView instance
Logic to go to the previous page is as below
It will check whether WebView can go to the previous page or not. If able, then it will perform the previous operation.
Logic to go to next page is as below. It will check whether WebView can go to next page or not. If it is able, then it will go to next page.
Below class contains three methods
The First method is calling when URL has started loading
The Second method will override URL loading. We will set progressBar to visible in this method.
The Third method will be called when URL has finished loading.
We will set progressBar’s visibility to GONE here.
Feel free to revert back to comment section for any queries.
So all for Webview With Back And Next Navigation Button In Android Studio example. Thank you.
3. Load HTML and JavaScript in Android WebView
Android Geeks, Welcome to Android Load HTML And Javascript In Webview From Assets tutorial.
Load HTML And Javascript In Webview Android example guide you to load HTML and JavaScript from local assets.
There will be situations where design of app can not be done with only xml file. You will need to implement html and css for better designing. Here, you will need to load html from asset.
We will also learn how can we integrate functions between android and JavaScript.
You will learn how to load HTML into Android WebView from String.
First, check the output of the tutorial then we will develop it.
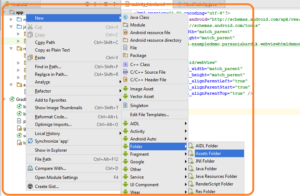
Step 2: Making assets folder
Execute Rigth click on left menu bar->New Folder->Assets Folder as per below image
Creating JavaScript file
make new file and name it as load_JS_Demonuts.html
Copy below source code into it
put above file into assets folder.
We will fetch this file into Webview.
Step 3: Creating HTMLActivity
Make a new activity named HTMLActivity
put following code into activity_html.xml
Paste below source code into HTMLActivity.java
In the above source code, we have store an HTML code into string variable. This string variable is loaded into the WebView with following code
Step 4: Creating JavaScriptActivity
Create a new activity named JavaScriptActivity
put below code into activity_java_script.xml
Paste below source code into JavaScriptActivity.java
Step 5: Update MainActivity
Put below code in activity_main.xml
Update MainActivity.java as per following
So that is all for Android WebView HTML JavaScript example.
Источник
Loading/Splash Screen for WebView in Android Studio

Apr 14, 2017 · 3 min read
I wrote an article on making a website appear in a WebView component for an Android application. In an effort to maintain simplicity, here’s a separate article teaching how to displaying a loading (“splash”) screen while the webpage loads.
The goal: have an animated progress bar spin until the page loads; and have it disappear once the page does finish loading. You could apply this concept to “Loading” text or an image (ex. app logo).
Previously, we used the WebViewClient component to display a webpage. The WebViewClient only provides basic functionality. To do extra things with it (ex. “detect when the page is finished loading”), we need to extend this class. By “extending,” we are making a copy of it but giving additional functionality.
To start with, add the following (3) imports at the top of your MainActivity.java:
I n side of the MainActivity class, add in the ProgressBar (we’ll call it a “spinner”). Put it after the WebView.
Then add this part in, inside of the MainActivity class. Put it after the onCreate() and before the final “>”
Here’s the placement of the code up to this point:

Next, we need to use this new “CustomWebViewClient” instead of the original “WebViewClient”. Inside the onCreate(), reference this new one instead. While we’re at it, let’s define a spinner variable.
Here’s the copy-and-paste friendly code:
And here’s the visual placement of where it goes:

Here’s the final version of the MainActivity.java up to this point:
Now we need to add the progress bar into the activity_main.xml:
Note, I’ve changed the layout to “Relative” since the previous article:
It works! But we’re not done yet…
Try it; it works. But when you go to a new webpage (i.e. click on a link from with the app), the screen goes black. What’s happening is that the splash screen is re-loading; and not displaying the spinner/progress bar (as, we already hid it).
The solution is to create a new variable and give it a default value. Every time a webpage loads, we check the value of the variable to see if we should show the splash screen or not.
When the app first runs, and the variable has the default value, we’ll show the splash screen. After it loads and we hide the progress bar, we’ll change the value of the variable. Then on every subsequent webpage we load, we’ll check the value of the variable: because it will have a different value, we will chose to not show the splash screen.
Источник
ProgressBar while Loading WebView in Android
This tutorial demonstrate the usage of ProgressBar while Loading WebView contents in android. This example explains horizontal ProgressBar and ProgressBar dialog with WebView.
Progressbar is a visual indicator of progress in some operation. Displays a bar to the user representing how far the operation has progressed; the application can change the amount of progress (modifying the length of the bar) as it moves forward. There is also a secondary progress displayable on a progress bar which is useful for displaying intermediate progress, such as the buffer level during a streaming playback progress bar.
A progress bar can also be made indeterminate. In indeterminate mode, the progress bar shows a cyclic animation without an indication of progress. This mode is used by applications when the length of the task is unknown. The indeterminate progress bar can be either a spinning wheel or a horizontal bar
![]()
1. Determinate Progress Bar Example
Here is my layout
Do the following changes in your java code
Output of the above program is
![]()
2. Indeterminate Progress Bar Example
In the above layout xml file, do the following changes
Источник
Android webview loading progress
![]()
![]()
![]()
![]()
Beautiful and customizable Android Activity that shows web pages within an app.
- Builder pattern
- Material design & Pre-made icons
- Webview listeners
- Custom themes & Custom transition animations
- Support collapsing toolbar & contextual actionbar
- SwipeRefreshLayout & Progressbar
- Device rotation
- Gradient divider
- Custom typeface & translation
- Supports Right to Left

Default theme & Copied to clipboard

Back and forward & More options

FinestWebView Demo Video — YouTube

You can download the latest sample APK from this repo here: sample-release.apk
It’s also on Google Play:
![]()
Gradle Dependency (jcenter)
Easily reference the library in your Android projects using this dependency in your module’s build.gradle file.
FinestWebView is basically and Android activity with webview, toolbar and etc.
You have to add FinestWebViewActivity in your AndroidManifest.xml
There are 2 ways to customize FinestWebView.
You can use your own Theme for FinestWebView. If you want to use pre-defined theme, use android:theme=»@style/FinestWebViewTheme» or android:theme=»@style/FinestWebViewTheme.Fullscreen»
2. Builder Options
Load data or Show url
WebView Listener Options
Right to Left Options
FinestWebView has its own listeners to listen event from WebView
Status Bar Color & Toolbar Color
Status bar color will be set as colorPrimaryDark of FinestWebViewActivity’s theme.
Toolbar color will be set as colorPrimary of FinestWebViewActivity’s theme.
But, you can override theses settings using builder option statusBarColor , statusBarColorRes , toolbarColor , toolbarColorRes .
Disable Toolbar Collapsing
Collapsing Toolbar vs WebView BuiltInZoomControls
If you enable BuiltInZoomControls webViewBuiltInZoomControls(true) , it will automatically disable toolbar collapsing.
Full Screen Mode
You can use some pre-defined animations from this library or your own animations.
Pre-defined animation sets
Use configChange, screenOrientation to customize your orientation options
You can make your divider gradient. If you do, webview will be under the gradient. If you disable gradient divider, webview will be below the divider.
You can use your own typeface for title, url, and menus. You have to add your font file in assets/fonts folder.
You can use your own String resources to translate strings.
You can support right to left by setting android:supportsRtl=»true» in AndroidManifest.xml or rtl(true) .
WebView Desktop Mode
You can force WebView to show in desktop mode by setting webViewUserAgentString(«Mozilla/5.0 (X11; U; Linux i686; en-US; rv:1.9.0.4) Gecko/20100101 Firefox/4.0») .
Источник
Android webview loading progress
![]()
![]()
![]()
![]()
Beautiful and customizable Android Activity that shows web pages within an app.
- Builder pattern
- Material design & Pre-made icons
- Webview listeners
- Custom themes & Custom transition animations
- Support collapsing toolbar & contextual actionbar
- SwipeRefreshLayout & Progressbar
- Device rotation
- Gradient divider
- Custom typeface & translation
- Supports Right to Left
Default theme & Copied to clipboard
Back and forward & More options
FinestWebView Demo Video — YouTube
You can download the latest sample APK from this repo here: sample-release.apk
It’s also on Google Play:
![]()
Gradle Dependency (jcenter)
Easily reference the library in your Android projects using this dependency in your module’s build.gradle file.
FinestWebView is basically and Android activity with webview, toolbar and etc.
You have to add FinestWebViewActivity in your AndroidManifest.xml
There are 2 ways to customize FinestWebView.
You can use your own Theme for FinestWebView. If you want to use pre-defined theme, use android:theme=»@style/FinestWebViewTheme» or android:theme=»@style/FinestWebViewTheme.Fullscreen»
2. Builder Options
Load data or Show url
WebView Listener Options
Right to Left Options
FinestWebView has its own listeners to listen event from WebView
Status Bar Color & Toolbar Color
Status bar color will be set as colorPrimaryDark of FinestWebViewActivity’s theme.
Toolbar color will be set as colorPrimary of FinestWebViewActivity’s theme.
But, you can override theses settings using builder option statusBarColor , statusBarColorRes , toolbarColor , toolbarColorRes .
Disable Toolbar Collapsing
Collapsing Toolbar vs WebView BuiltInZoomControls
If you enable BuiltInZoomControls webViewBuiltInZoomControls(true) , it will automatically disable toolbar collapsing.
Full Screen Mode
You can use some pre-defined animations from this library or your own animations.
Pre-defined animation sets
Use configChange, screenOrientation to customize your orientation options
You can make your divider gradient. If you do, webview will be under the gradient. If you disable gradient divider, webview will be below the divider.
You can use your own typeface for title, url, and menus. You have to add your font file in assets/fonts folder.
You can use your own String resources to translate strings.
You can support right to left by setting android:supportsRtl=»true» in AndroidManifest.xml or rtl(true) .
WebView Desktop Mode
You can force WebView to show in desktop mode by setting webViewUserAgentString(«Mozilla/5.0 (X11; U; Linux i686; en-US; rv:1.9.0.4) Gecko/20100101 Firefox/4.0») .
Источник


