- Layouts, Attributes, and you
- What is a layout?
- Layout_ Attributes
- Common Android Layouts
- LinearLayout
- FrameLayout
- RelativeLayout
- PercentFrameLayout and PercentRelativeLayout
- GridLayout
- CoordinatorLayout
- Layouts, layouts, layouts
- Basics of Android layouts and views
- What is a ViewGroup?
- Types of ViewGroups
- Основы верстки для нативных андроид приложений
- FrameLayout
- LinearLayout
- RelativeLayout
- TableLayout
- Alternate Layouts
- Стили
Layouts, Attributes, and you

That age old question:
Knowing how that picture in your mind (or that wireframe a designer gave you) translates into actual layouts and Views is one of those key skills that every Android developer can benefit from.
What is a layout?
Just looking through developer.android.com for layouts, you’ll find plently of classes ending in ‘Layout’. What do they all have in common? They’re all subclasses of ViewGroup — a View that supports adding child Views (commonly referred to as children).
As you might expect, one of the main responsibilities of a ViewGroup is laying out those children: picking how large each View is (the ‘measure’ phase) and placing the Views within the ViewGroup (the ‘layout’ phase).
Note: that isn’t to say that’s all a ViewGroup is responsible for. It can certainly have its own custom behavior, draw things itself, add its own children. Toolbar, for example, has quite a bit of built-in functionality, in addition to supporting child Views.
So it should come as no surprise that if you’re looking for a certain way that child Views are laid out, picking the right layout is going to play a big part. The wrong layout may make a certain pattern impossible or perform horribly, while another layout may simplify things.
Layout_ Attributes
Now just like any View, a ViewGroup can use XML attributes, like LinearLayout’s android:orientation, to change how they lay out their children, but these are global changes that affect every child. To change things on a child-by-child basis, layouts use a different mechanism in the form of layout_ attributes, which are added to child Views. These attributes are different because layout_ attributes are instructions for the parent ViewGroup, not for the View itself. Let’s take an example from a previous pro-tip I wrote:
If you look at Toolbar, you won’t find anything about layout_scrollFlags. Nor will you find anything if you look at AppBarLayout. Those layout_ attributes are actually stored in LayoutParams (specifically, in this case, the AppBarLayout.LayoutParams subclass). Each View, when attached to a parent, has its own LayoutParams that serves as a storage place for basically anything the parent ViewGroup wants to keep track of. By default, that’s just a width and height (that layout_width and layout_height you’ve seen on practically every View), but each ViewGroup has the opportunity to declare new attributes in their own subclass of LayoutParams (as helpfully described in the documentation).
Note: This is also the #1 reason why inflating a view from XML without including a parent (i.e., passing null as the root in LayoutInflater.inflate() ) is a horrible idea — without any parent, there’s no one to parse and create a proper LayoutParams object, effectively meaning all of those attributes are thrown away — probably not what you want.
Common Android Layouts
Just knowing about LayoutParams and the layout_ attributes explained in the documentation might be enough to help you choose the right layout for you, but a quick summary can’t hurt.
LinearLayout
LinearLayout has one goal in life: lay out children in a single row or column (depending on if its android:orientation is horizontal or vertical).
However, even with that single focus, it still has a trick up its sleeve with the layout_weight attribute, which allows a child to expand its size to fill the remaining space — useful if you have a few wrap_content elements and a few others that need as much space as possible.
FrameLayout
FrameLayout acts quite differently compared to LinearLayout: here all children are drawn as a stack — overlapping or not. The only control on positioning is the layout_gravity attribute — pushing the child towards a side or centering it within the FrameLayout.
RelativeLayout
RelativeLayout is not nearly as simple as the previous two: a look at RelativeLayout.LayoutParams shows a large number of attributes all focused around positioning children relative to the edges or center of RelativeLayout (similar to FrameLayout in fact), but also relative to one another — say, one child layout_below another child.
This has an advantage of being very, very powerful (laying out arbitrary children in relation to one another), but watch your performance!
PercentFrameLayout and PercentRelativeLayout
As members of the Percent Support Library, PercentFrameLayout and PercentRelativeLayout add onto their namesakes with the addition of percentage-based dimensions and margins, allowing you to use layout_widthPercent=”50%” in place of guessing at the appropriate layout_width would have to be.
They also contain one of most exciting features: aspect ratio support, making it possible to declare only a single dimension (either height or width) and basing the other on a fixed aspect ratio. This even works if one dimension is wrap_content or match_parent!
GridLayout
GridLayout was introduced in Ice Cream Sandwich back in 2011, but is also available as part of its own Support Library (to support back to API 7). Designed to place items in arbitrary rows and columns and supporting the same weights as LinearLayout, it allows you to flatten your view hierarchy considerably while avoiding some of the complex arrangements of elements that affects the performance of RelativeLayout.
Unlike most layouts, GridLayout does not require layout_height and layout_width for each View — columns and rows (and hence their contained children) grow and shrink as needed based on the Alignment of each. I’d strongly recommend reading over the GridLayout.LayoutParams documentation and the blog post (noting that it was written before GridLayout gained the layout_weight attribute) if you’d like to delve into this component.
CoordinatorLayout
CoordinatorLayout, part of the Android Design Support Library, is a subclass of FrameLayout and therefore inherits its use of layout_gravity to position children, but also includes the concept of a Behavior.
Attaching a Behavior to a view either by using the @DefaultBehavior annotation on the class, using the layout_behavior attribute, or using setBehavior() allows that Behavior to intercept just about everything before the underlying View: measurement, layout, nested scrolling, touch events, changes to specified dependent Views, and window insets.
Layouts, layouts, layouts
Even with just the few layouts described above, you can build a rich UI that is both performant and easy to maintain. Next time you are struggling with a particular layout, consider taking a step back and seeing if there’s an easier way to do thing by using a different layout or if building your own custom layout (and taking on the responsibilities that entails — not insignificant) is the best approach.
Either way, use the right layout and the right layout_ attributes to #BuildBetterApps
Источник
Basics of Android layouts and views

What is a ViewGroup?
A viewgroup is a parent class of all the views. It holds all the children views (and viewgroups) within, as depicted by the structure above.
Types of ViewGroups
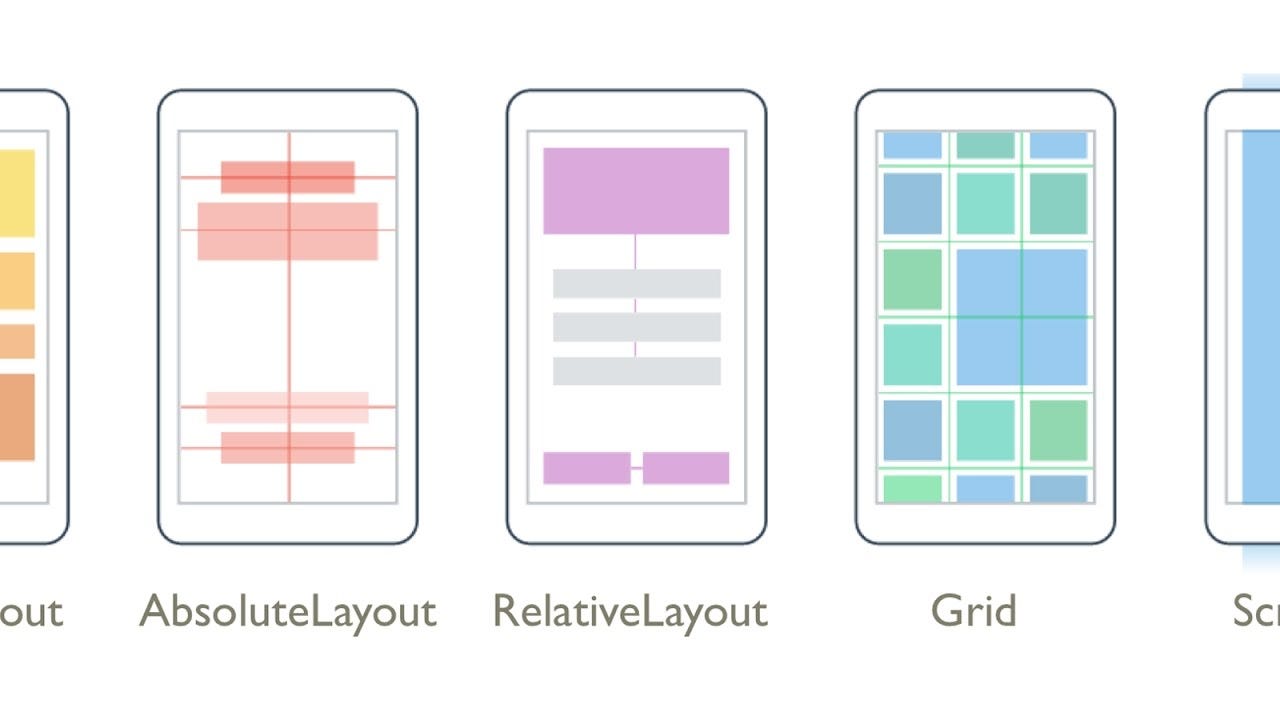
- Absolute Layout
- By using an Absolute Layout, you can specify the exact locations (x/y coordinates) of its children.
- They are less flexible and harder to maintain, rarely used nowadays.
- One needs to remember too many coordinate values for placing a view at a position, it would rather be much easier to remember a view with respect to which one needs to place a view on screen.
- It is usually used to block out an area on the screen and display only a single child on screen.
- If multiple children are used within it then all the children are placed on top of each other.
- Position of children can only be controlled by assigning gravity to them.
- Usually used to display single fragments on screen.
- Aligns the children views either horizontally or vertically.
- The attribute android:orientation specifies wheher to horizontally or vertically align children views.
- We usually use the attribute android:weight in the children views/viewgroups to decide what percentage of the available space they should occupy.
- An attribute android:weightSum defines the maximum weight sum, and is calculated as the sum of the layout_weight of all the children if not specified explicitly.
TRIVIA : What would happen if the weightSum is less than the sum of weights given to children explicitly?
- Relative Layout enables you to specify how child views are positioned relative to each other.
- The position of each view can be specified as relative to sibling elements or relative to the parent.
Some common attribute usages in relative layout:
Difference between android:layout_alignRight and android:layout_toRightOf : android:layout_alignRight is used to align a view’s rightmost edge to the rightmost edge of the specified view, whereas android:layout_toRightOf is used to place a view to the right of the specified view ie the left edge of a view is postioned to the right of the specified view.
Why to prefer android:layout_toEndOf instead of android:layout_toRightOf :
The views have LTR(left-to-right) orientation by default ie they start from left and end towards their righ, butthis orientation can be changed to RTL(right-to-left) where views start from right and end towards left. In suchcses,the views with the attribute android:layout_toEndOf will correctly align to the end w.r.t the view specifiedwhereas android:layout_toRightOf will still align it towards the right.
- Read more about Relative Layout here and here.
TRIVIA: Relative Layout measures a view twice, whereas Linear Layout measures only once (if weights are not used)!
Sources: Stack Overflow and Medium
- Instead of specifying the width and height of a child, we can provide a percentage of screen width or height to use.
- It is very useful in scaling layouts to various screen sizes.
- The PercentSupportLayout supports two pre-built layout — PercentRelativeLayout and PercentFrameLayout .
- Find an example for this here.
- ScrollView
- It is a subclass of FrameLayout, as the name says it is used when your contents do not fit the screen and tend to overflow.
- ScrollView can hold only one direct child. This means that you need to wrap all your views into a single viewgroup in order to use it within a ScrollView.
- ScrollView only supports vertical scrolling. Use HorizontalScrollView if you want to have horizontal scrolling.
- It is advised not to use ScrollView with ListView , GridView and Recycler View as they take care of their own vertical scrolling.
Источник
Основы верстки для нативных андроид приложений
( пользоваться не рекомендуется, deprecated )
AbsoluteLayout — означает что каждый элемент верстки будет иметь абсолютную позицию относительно верхнего левого угла экрана задаваемую с помощью координат x и y. Т.е. верхнийлевый угол экрана при AbsoluteLayout имеет координаты x = 0, y = 0.
Позиция указывается в атрибутах элемента android:layout_x и android:layout_y.
Пример кода:

FrameLayout
FrameLayout — тип верстки внутри которого может отображаться только один элемент в строке. Т.е. если внутри FrameLayout вы поместите несколько элементов, то следующий будет отображаться поверх предыдущего.
Пример кода:
LinearLayout
LinearLayout — тип верстки при котором область верстки делится на строки и в каждую строку помещается один элемент. Разбиение может быть вертикальное или горизонтальное, тип разбиения указывается в атрибуте LinearLayout android:orientation. Внутри верстки возможно комбинировать вертикальную и горизонтальную разбивки, а кроме того, возможна комбинация нескольких разных типов верстки например использование LinearLayout внутри FrameLayout.
Пример вертикальной разбивки LinearLayout:
Пример горизонтальной разбивки LinearLayout:
Комбинация нескольких LinearLayout:
RelativeLayout
RelativeLayout — тип верстки при котором позиционирование элементов происходит относительно друг друга и относительно главного контейнера.
За то, каким образом будут позиционироваться элементы отвечают следующие атрибуты:
Атрибуты позиционирования относительно контейнера
- android:layout_alignParentBottom – Низ элемента находится внизу контейнера
- android:layout_alignParentLeft – Левая часть элемента прилегает к левой части контейнера
- android:layout_alignParentRight – Правая часть элемента прилегает к правой части контейнера
- android:layout_alignParentTop – Элемент находится в верхней части контейнера
- android:layout_centerHorizontal – Элемент позиционируется по центру относительно горизонтального размера контейнера
- android:layout_centerInParent – Элемент позиционируется по центру относительно горизонтального и вертикального размеров размера контейнера
- android:layout_centerVertical – Элемент позиционируется по центру относительно вертикального размера контейнера
Атрибуты позиционирования относительно других элементов.
В качестве значений этих атрибутов ставятся id элемента относительно которого будет производится позиционирование.
android:layout_above – Распологает элемент над указанным
android:layout_below – Распологает элемент под указанным
android:layout_toLeftOf – Распологает элемент слева от указанного
android:layout_toRightOf – Распологает элемент справа от указанного
Выравнивание относительно других элементов.
android:layout_alignBaseline – Выравнивает baseline элемента с baseline указаннго элемента
android:layout_alignBottom – Выравнивает низ элемента по низу указанного элемента
android:layout_alignLeft – Выравнивает левый край элемента с левым краем указанного элемента
android:layout_alignRight – Выравнивает правый край элемента с правым краем указанного элемента
android:layout_alignTop – Выравнивает верхнюю часть элемента в соответствие с верхней частью указанного элемента
TableLayout
TableLayout — табличная верстка.
Организует элементы в строки и столбцы таблицы.
Для организации строк служит таг
Alternate Layouts
Alternate Layouts — альтернативная верстка. Позволяет использовать различную верстку для различных ориентаций экрана.
XML для альтернативной верстки помещается в папки проекта:
res/layout-land – альтернативная верстка для landscape UI
res/layout-port –альтернативная верстка для portrait UI
res/lauout-square – альтернативная верстка для square UI
и перед тем как получить макет из res/lauout система проверяет наличие файлов в этих папках.
И в завершении немного о стилях.
Стили
Во первых стили элемента могут быть описаны в атрибутах самого элемента.
Например:
Кроме того стили можно вынести в отдельный xml файл и сохранить его в папке res/values/
Напимер:
Если мы вынесем стили в отдельный файл, то для описания стилей элемента будем использовать атрибут style.
Источник


