- How to stop Android apps running in the background
- Update your device! Get to Android 10 or better if you can
- Check what’s draining your phone
- Battery
- Stop the app, kill it, or uninstall your background apps
- Find the app in Developer Options and stop it
- Find the background app, Force Stop or Uninstall
- Limit problematic background apps
- What next?
- Android Application Launch explained: from Zygote to your Activity.onCreate()
- When does Android process start?
- Zygote : Spawning new life, new process
- When a user clicks an app icon in Launcher …
- There are three distinct phases of process launch :
- Thanks for reading through 🙌🏼. If you found this post useful, please applaud using the 👏 button and share it through your circles.
How to stop Android apps running in the background
Having your battery drain faster than expected is one of the biggest headaches with any Android phone. Tracking down a charger and plugging in shortly after a full charge overnight is always a sad feeling. If you’re ready to thwart your battery woes, a simple culprit may be to blame. Here’s what you need to know to conquer background apps.
These apps can sap your battery and precious resources, but there may be a few different causes for your problems. Some apps might not be well optimized, some might be malware, or some might have a bug. All you need now is a little know-how, and we’ll have you living the charged life shortly.
Ready for a little extra juice at no cost? Let’s get into the best battery improvements.
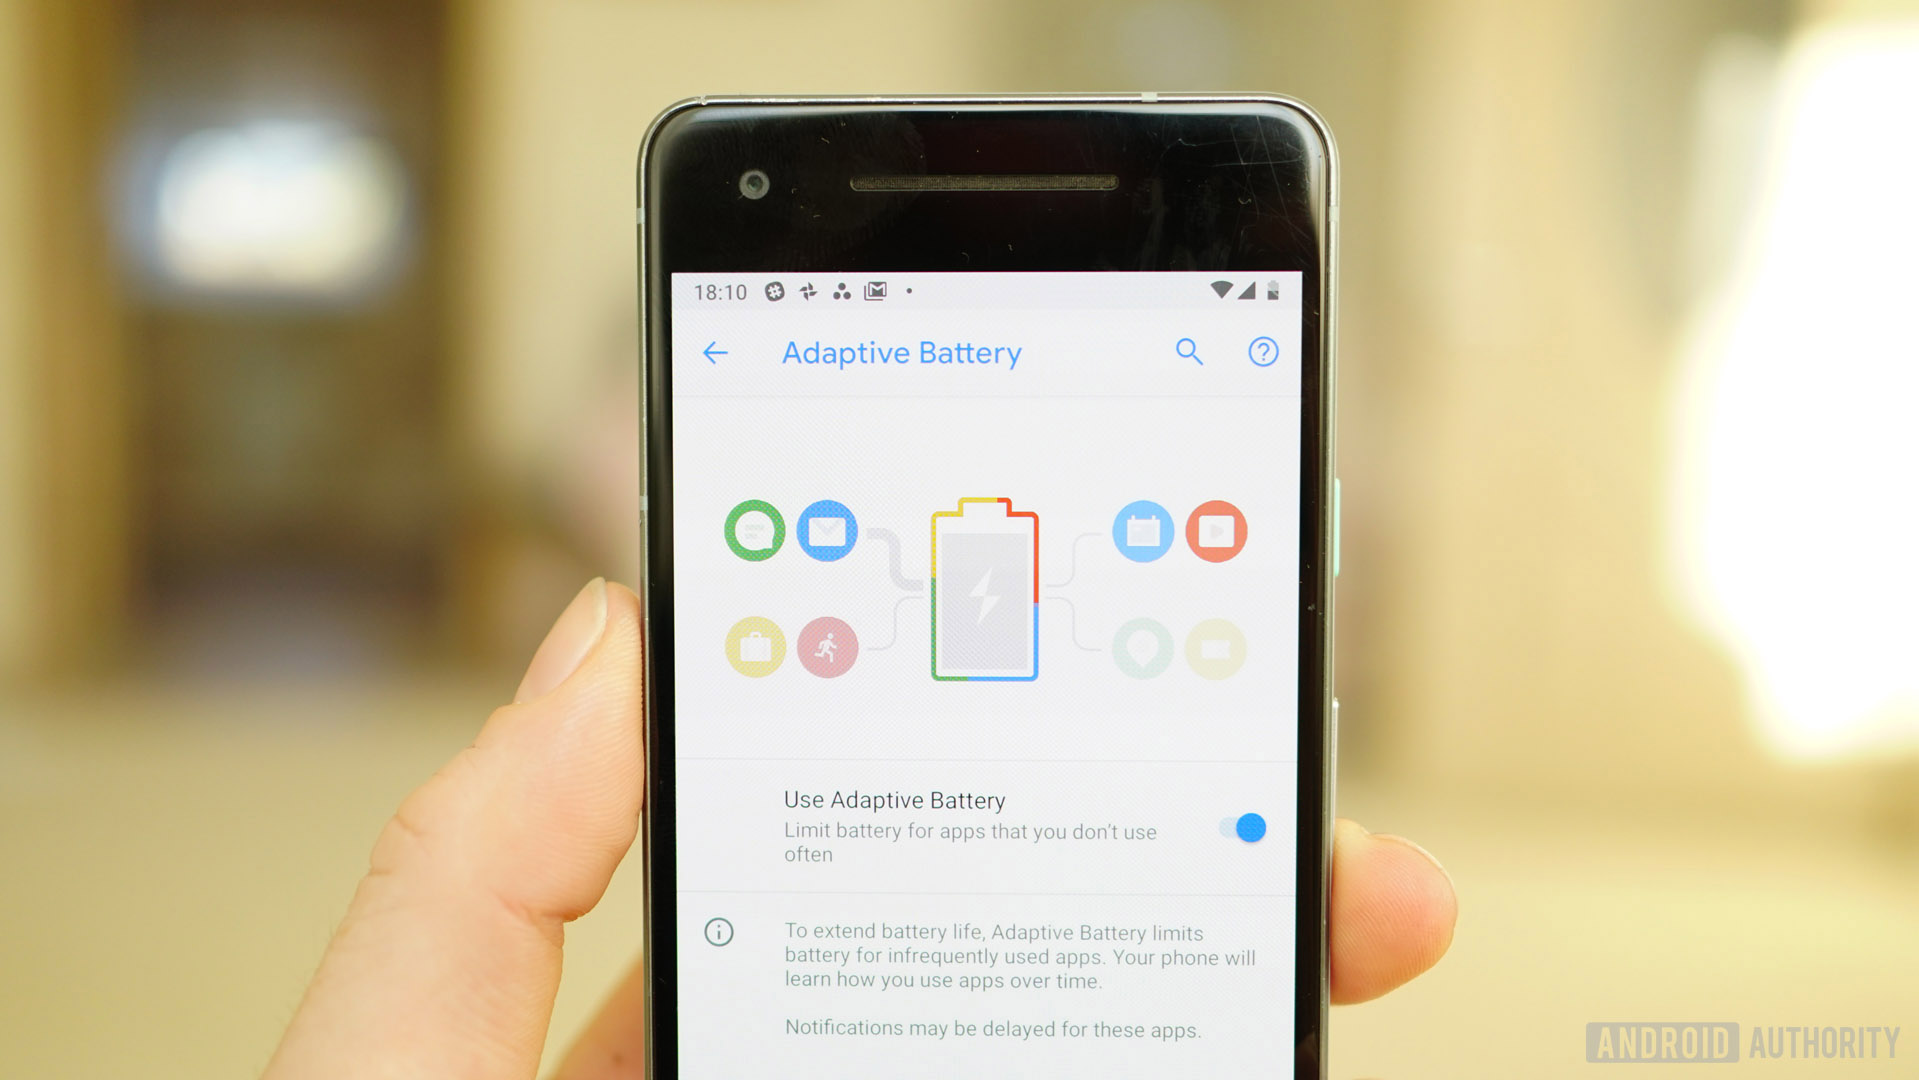
Update your device! Get to Android 10 or better if you can
Many phones are still running on Android 10 even though Android 11 has been out for a while. Luckily, that’s good news for users. Android 10 has great power management features that place limits on background apps and therefore extend your phone’s battery life. One of them is called Adaptive Battery, which uses machine learning to figure out which apps you’ll use in the next few hours and which ones you won’t use until later, if at all today. Based on your usage patterns, it places each app into one of the five App Standby Buckets: Active, Working set, Frequent, Rare, and Never. Each of these buckets has its limitations for how much resources the apps it contains can use.
To put it simply, an app placed in the Never bucket is hardly ever used, which is why the system will limit its access to resources like the CPU. This means it will use less battery. On the other hand, apps in buckets like Active are the ones you use the most and will get full access to the system’s resources, so you can expect to get all your notifications on time.
The process is automatic and dynamic, which means the system learns your usage pattern over time and moves the apps from one bucket to the other accordingly.
Check what’s draining your phone

Battery
Since battery life is so important, it’s well monitored by your Android OS. To look at the apps guzzling power, go to Settings > Battery > Battery Usage. You’ll get a list accurate to two decimal points of what’s draining your battery. Depending on your device and software, the apps will be split into either system or non-system apps or by hardware and software to make things even easier.
The more you use certain apps, the higher on the list they’ll sit. Look out for any apps you don’t recognize using more than a tiny percentage of your battery. Any app using over a few percent is worth looking into — saving five percent here or four percent there will add up. Anything that’s a Google app or service is probably not something to worry about and just a natural part of Android and Google Mobile Services.
Using Developer options, you can also check out which apps dominate your phone’s limited memory, also known as RAM. It may be that an app is not using a lot of battery, but when you’re only working with 2GB of RAM and an app you’re not using is taking up a few hundred MB, leaving you short on available memory.
You can check this out in a few different ways, but here’s the sure-fire winner that works in new Android versions:
- Go to Settings >System > About phone.
- Scroll down and find “Build number” and then tap it seven times. This will enable “Developer options” on your device, and you’ll see a notification that this has happened.
Now go back to Settings > System, and you’ll be able to select “Developer options” from there.
Then go Settings > Developer Options > Processes (or Settings > System > Developer Options > Running services.)
Here you can view which processes are running, your used and available RAM, and which apps are using it up. Again, some of these services are essential to keep your phone running. You should be primarily looking for demanding apps you’ve downloaded personally.
If this method doesn’t work to unlock developer options, a quick Google search of your phone model and “developer options unlock” should help.
Stop the app, kill it, or uninstall your background apps
Once you’ve found your culprit, you have to know what to do next. Luckily, you have a few options to choose from if you don’t want to remove the app entirely.
Find the app in Developer Options and stop it
The first involves the Developer Options > Running services method we described above.

Find the background app, Force Stop or Uninstall
Once you’ve identified your background apps, it might be worth checking out all the apps you have installed and giving them a once over.
Go to Settings > Apps & Notifications > Apps.
You’ll see your apps load in alphabetical order, and from here, you can click into any app and decide to Force Stop or Uninstall it. As with before, Force Stop might cause a crash, but you’ll be OK following a reboot.

Limit problematic background apps
If you want to keep using an app that appears to have high demand, you might be able to limit what it can do.
Some Samsung and Huawei phones include OS options to manage background apps. In Battery Settings, Huawei offers an “App launch” option, which allows you to identify specific apps, restrict launches, and target power-saving measures. Samsung also offers a power-saving option to help manage apps.
If you don’t have access to a proprietary built-in option, there are, of course, good apps to help. The perennial favorite is Greenify, which offers fine controls over apps and places them in hibernation. If you have a rooted phone, you’ll have even more control, but it works well with standard devices too.
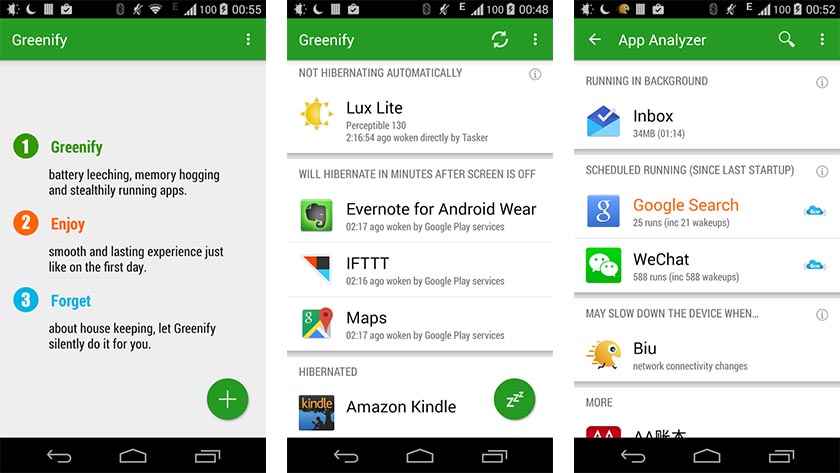
One problem with apps like this is intentionally introducing another app to monitor your device. In our popular post titled 13 tricks and hacks to speed up Android, our own Adam Sinicki noted that while background apps can kill the battery, background app killers can slow you down as well:
What next?
Android 11 is landing for most people, and we expect Google to continue upgrading Android’s ability to quash any apps that make your life harder. We’ll probably hear more as the update hits even more devices, and Android 12, which is currently in beta, should offer improvements in the future as well.
Источник
Android Application Launch explained: from Zygote to your Activity.onCreate()

Apr 30, 2018 · 6 min read
This article explains how Android launches your application when a user clicks an app icon. The Android system does a lot of heavy lifting behind the curtains to make your launch activity visible to a user. This article covers this process in detail by highlighting the important phases and call sequences.
Android applications are unique in two ways:
- Multiple Entry points: Android apps are composed of different components and they can invoke the components owned by other apps. These components roughly correspond to multiple entry points for any application. Hence, they differ from traditional applications which have a single entry point like main() method.
- Own Little World: Every Android application lives in its own world, it runs in a separate process, it has its own Dalvik VM instance and is assigned a unique user ID.
When does Android process start?
An Android process is started whenever it is required.
Any time a user or some other sys t em component requests a component (could be a service, an activity or an intent receiver) that belongs to your application be executed, the Android system spins off a new process for your app if it’s not already running. Generally processes keep running until killed by the system. Application processes are created on demand and a lot of things happen before you see your application’s launch activity up and running.
Every app runs in its own process: By default, every Android app runs in its own Android process which is nothing but a Linux process which gets one execution thread to start with. For example, when you click on a hyper-link in your e-mail, a web page opens in a browser window. Your mail client and the browser are two separate apps and they run in their two separate individual processes. The click event causes Android platform to launch a new process so that it can instantiate the browser activity in the context of its own process. The same holds good for any other component in an application.
Zygote : Spawning new life, new process
Let’s step back for a moment and have a quick look on system start-up process. Like the most Linux based systems, at startup, the boot loader loads the kernel and starts the init process. The init then spawns the low level Linux processes called “daemons” e.g. android debug daemon, USB daemon etc. These daemons typically handle the low level hardware interfaces including radio interface.
Init process then starts a very interesting process called ‘ Zygote ’.
As the name implies it’s the very beginning for the rest of the Android application. This is the process which initializes a very first instance of Dalvik virtual machine. It also pre-loads all common classes used by Android application framework and various apps installed on a system. It thus prepares itself to be replicated. It stats listening on a socket interface for future requests to spawn off new virtual machines (VM)for managing new application processes. On receiving a new request, it forks itself to create a new process which gets a pre-initialized VM instance.
After zygote, init starts the runtime process.
The zygote then forks to start a well managed process called system server. System server starts all core platform services e.g activity manager service and hardware services in its own context.
At this point the full stack is ready to launch the first app process — Home app which displays the home screen also known as Launcher application.
When a user clicks an app icon in Launcher …
The click event gets translated into startActivity(intent) and it is routed to ActivityManagerService via Binder IPC. The ActvityManagerService performs multiple steps
- The first step is to collect information about the target of the intent object. This is done by using resolveIntent() method on PackageManager object. PackageManager.MATCH_DEFAULT_ONLY and PackageManager.GET_SHARED_LIBRARY_FILES flags are used by default.
- The target information is saved back into the intent object to avoid re-doing this step.
- Next important step is to check if user has enough privileges to invoke the target component of the intent. This is done by calling grantUriPermissionLocked() method.
- If user has enough permissions, ActivityManagerService checks if the target activity requires to be launched in a new task. The task creation depends on Intent flags such as FLAG_ACTIVITY_NEW_TASK and other flags such as FLAG_ACTIVITY_CLEAR_TOP.
- Now, it’s the time to check if the ProcessRecord already exists for the process.If the ProcessRecord is null, the ActivityManager has to create a new process to instantiate the target component.
As you saw above many things happen behind the scene when a user clicks on an icon and a new application gets launched. Here is the full picture :

There are three distinct phases of process launch :
- Process Creation
- Binding Application
- Launching Activity / Starting Service / Invoking intent receiver …
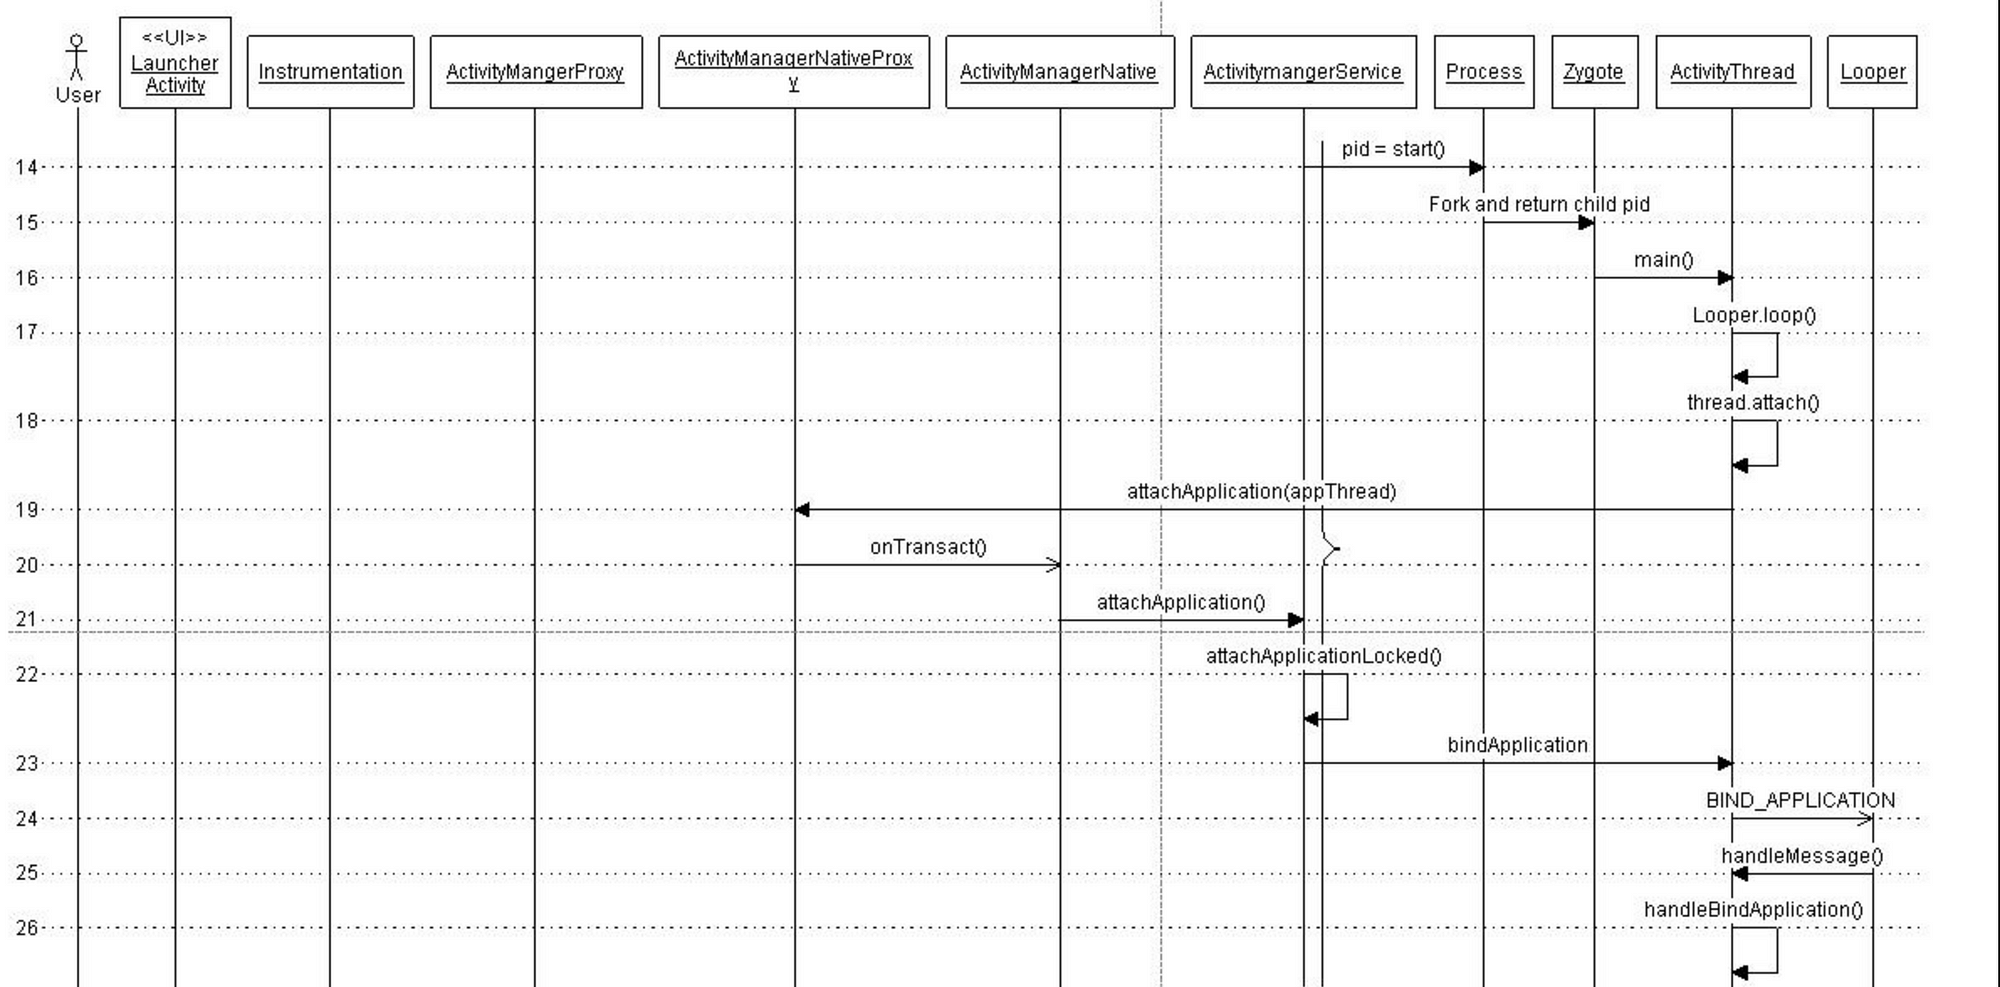
ActivityManagerService creates a new process by invoking startProcessLocked() method which sends arguments to Zygote process over the socket connection. Zygote forks itself and calls ZygoteInit.main() which then instantiates ActivityThread object and returns a process id of a newly created process.
Every process gets one thread by default. The main thread has a Looper instance to handle messages from a message queue and it calls Looper.loop() in its every iteration of run() method. It’s the job of a Looper to pop off the messages from message queue and invoke the corresponding methods to handle them. ActivityThread then starts the message loop by calling Looper.prepareLoop() and Looper.loop() subsequently.
The following sequence captures the call sequence in detail —

The next step is to attach this newly created process to a specific application. This is done by calling bindApplication() on the thread object. This method sends BIND_APPLICATION message to the message queue. This message is retrieved by the Handler object which then invokes handleMessage() method to trigger the message specific action — handleBindApplication(). This method invokes makeApplication() method which loads app specific classes into memory.
This call sequence is depicted in following figure.
Launching an Activity:
After the previous step, the system contains the process responsible for the application with application classes loaded in process’s private memory. The call sequence to launch an activity is common between a newly created process and an existing process.
The actual process of launching starts in realStartActivity() method which calls sheduleLaunchActivity() on the application thread object. This method sends LAUNCH_ACTIVITY message to the message queue. The message is handled by handleLaunchActivity() method as shown below.
Assuming that user clicks on Video Browser application. the call sequence to launch the activity is as shown in the figure.
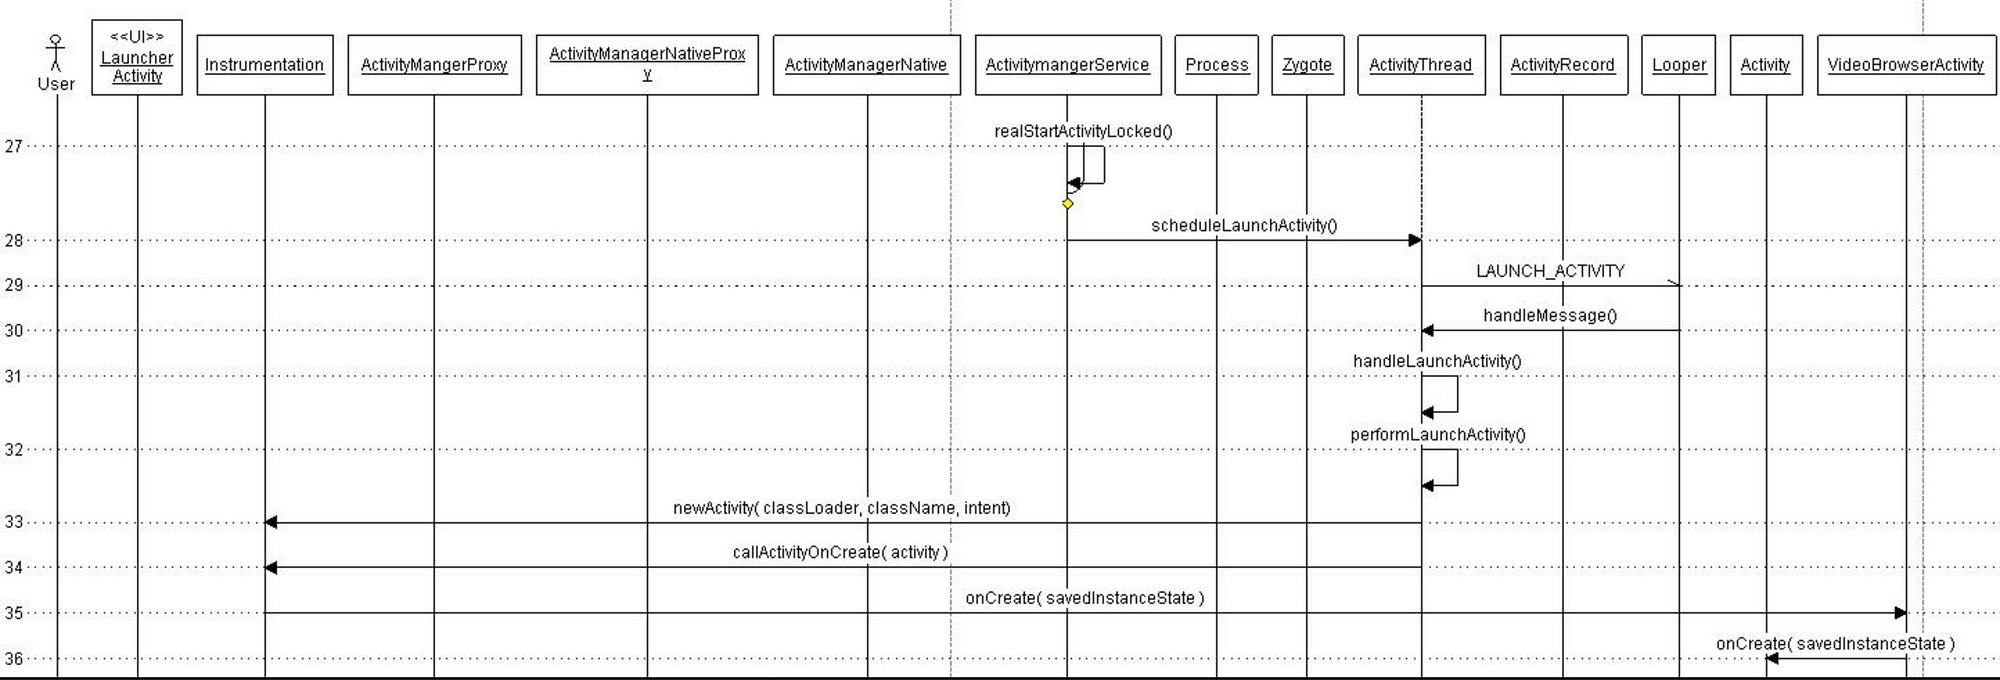
The Activity starts its managed lifecycle with onCreate() method call. The activity comes to foreground with onRestart() call and starts interacting with the user with onStart() call.
Thanks for reading through 🙌🏼. If you found this post useful, please applaud using the 👏 button and share it through your circles.
This article was initially published as two part series (Part 1 and Part 2) on my blog ./ mult-core-dump in 2010. These articles have been cited in multiple documents including the very famous Introduction to the Android Graphics Pipeline
Источник


