- Change Device Name on Android for WiFi / Bluetooth / Hotspot
- Change Android Device Name from Settings
- Changing Bluetooth Name
- Change WiFi Direct Name on Android
- Change WiFi Hotspot Name on Android
- Wi-Fi Direct
- In this document
- Related Samples
- API Overview
- Creating a Broadcast Receiver for Wi-Fi Direct Intents
- Creating a Wi-Fi Direct Application
- Initial setup
- Discovering peers
- Connecting to peers
- Transferring data
Change Device Name on Android for WiFi / Bluetooth / Hotspot

In this tutorial, we’ll see how we can change Android device name under device settings. Besides, we’ll also be describing the way to change WiFi Direct and Hotspot network name and the Bluetooth connection name for Android devices.
Wi-Fi and Bluetooth are the most used modes of connectivity features on smartphones for sharing internet data and transferring files from one device to another. If you scan for a Wi-Fi or Bluetooth connection with your Android phone or tablet, you will see either a generic or customized name of the detected devices. If you are new to Android, this little tutorial will help you assign a customized name for your Android phone or tablet that will be shown when other devices scan for yours. Let’s see how we can change device name for WiFi, Bluetooth, mobile hotspot or tethering.
There is nothing twisted about setting up a device name for WiFi and Bluetooth connection and that’s why I call it a beginner’s guide. If you are a smart Android user, please do not cross beyond this point. All options are already existing under phone settings, I will just be telling you how to dig into it.
Change Android Device Name from Settings
The easiest way to change the device name of your Android device is by doing it from the About phone screen itself. Open Settings on your phone or tablet, scroll to About phone or device and tap on it. On the next screen, tap on Device Name, and then type the desired name for your device in the text field and select OK.
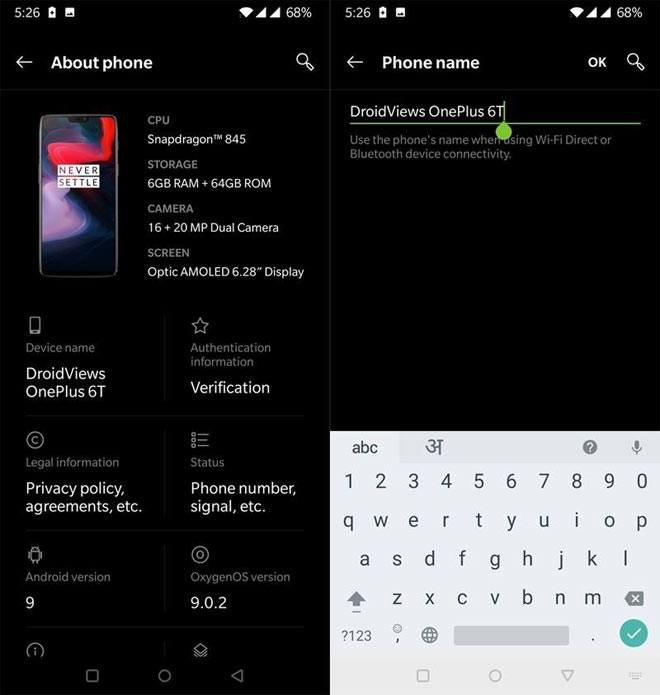 Change Android Device Name – OnePlus 6
Please Note: If you have a Samsung Galaxy device, you need to change the device name only and your Bluetooth name and WiFi Direct name will be automatically set. Go to Settings> About Phone and tap the Edit option under the device name. Type your custom device name and select Done.
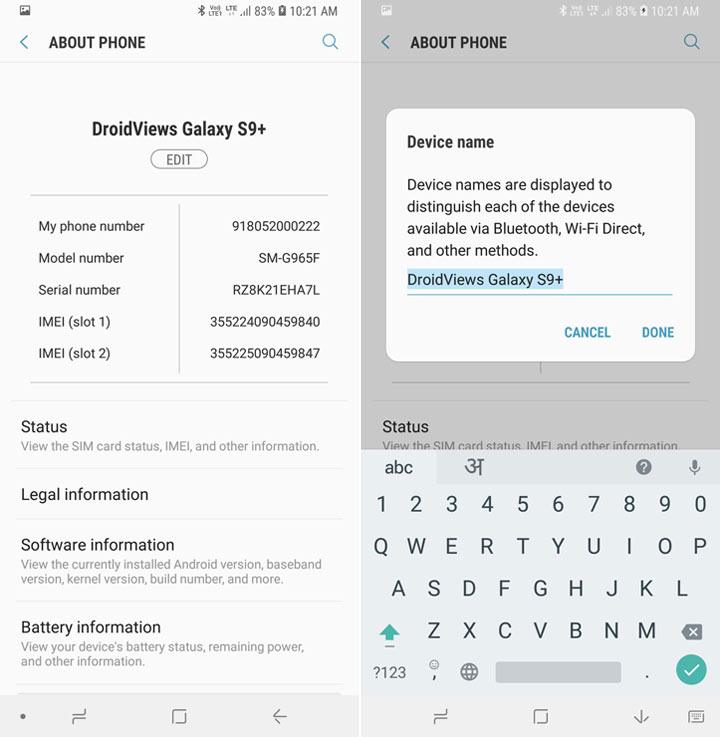 Change Android Device Name – Samsung Galaxy S9+
Changing Bluetooth Name
- To be able to edit the settings for Bluetooth, you will have to turn it on first. Bluetooth can also be enabled by tapping on the slider from Settings> Bluetooth.
- Open Settings on your Android device and tap on Bluetooth option.
- Tap the Device name and enter the new name for your phone or tablet and tap OK. On OnePlus devices, you’ll be able to see the Device name after selecting Pair new device option. On some Android devices other you need to tap the 3-dot vertical menu icon to see the device rename option.
 Change Bluetooth Name on Android
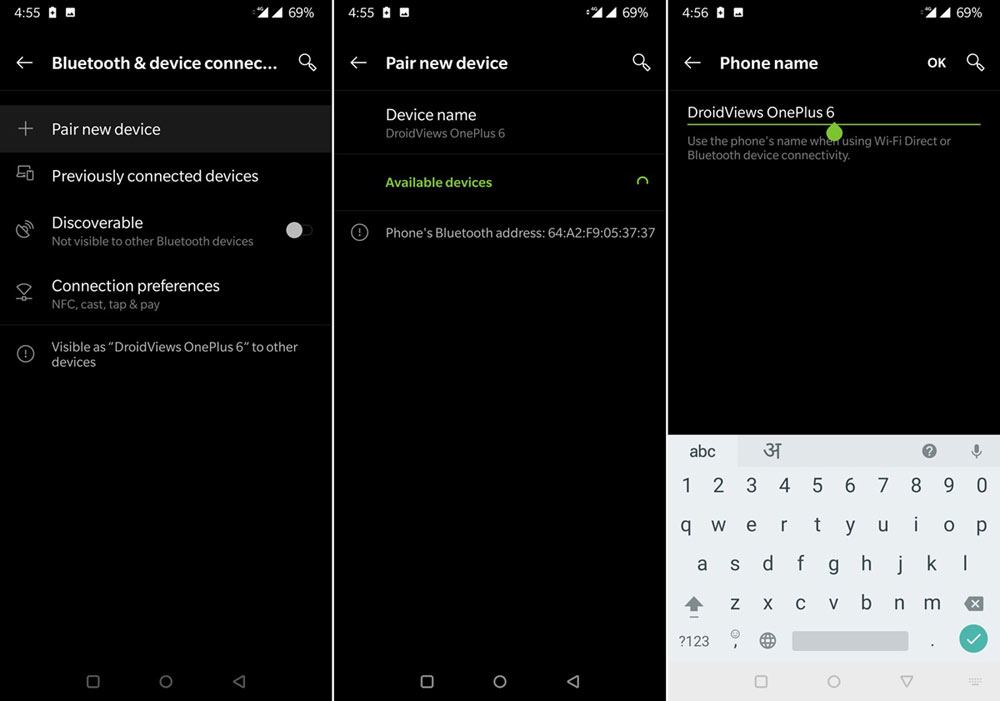 Change Bluetooth Name on Android
Change WiFi Direct Name on Android
Assigning the desired device name is pretty much the same as that of Bluetooth. Let’s see how you can do it.
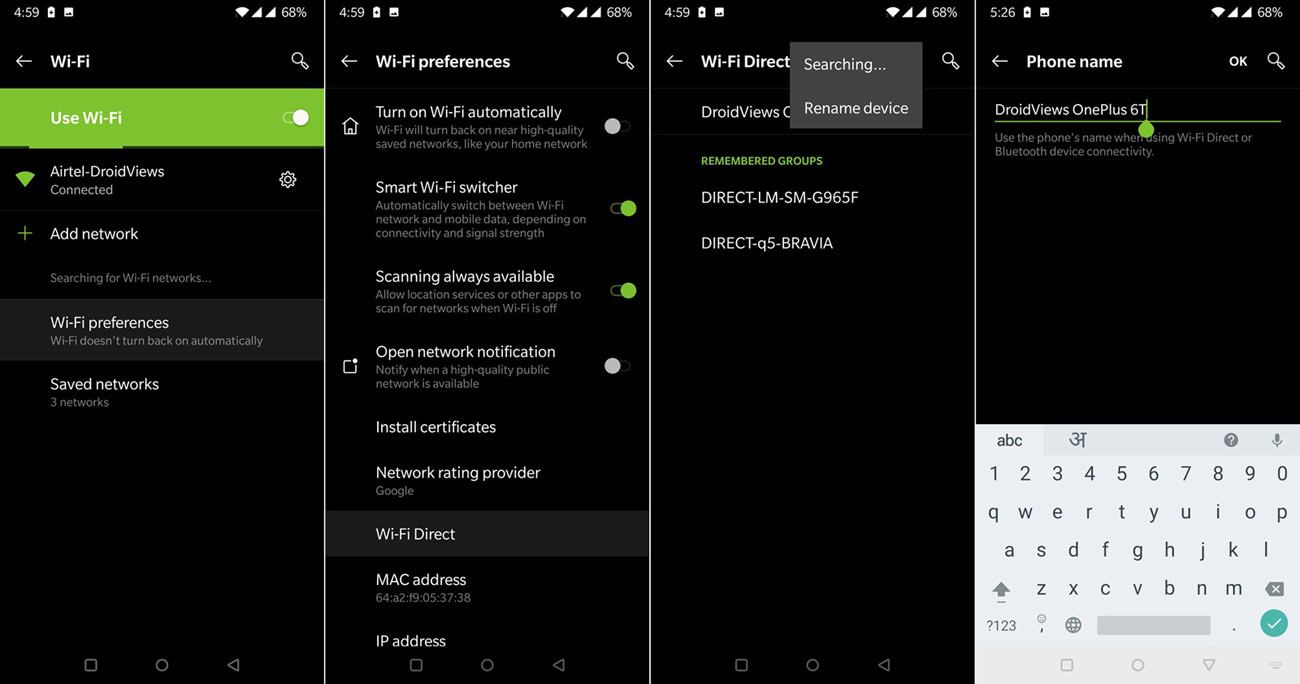
- Again, to edit WiFi settings, you will have to enable it first. Go to your device’s Settings panel and tap on the toggle slider to enable it
- Next, tap on the “Wi-Fi” text to see the configuration screen.
- Tap on “Wi-Fi Direct”, or launch options menu to see the “Wi-Fi Direct” option (for AOSP) and then tap on it.
- Now tap on the 3-vertical-dot menu icon to see the “Rename Phone” or “Rename Device” option.
- Type in the preferred name in the text box and select OK to save it. Change WiFi Direct Name on Android
 Change WiFi Direct Name on Android
Change WiFi Hotspot Name on Android
If you want to customize your Android phone’s name for WiFi hotspot and tethering, go to Settings> Mobile/Wi-Fi Hotspot and Tethering and turn it on. Then tap the Hotspot name option and type the name you want to show. On some Android phones, you need to tap the 3-dot menu icon and select Configure Mobile Hotspot option to replace the existing name with a name of your choice.
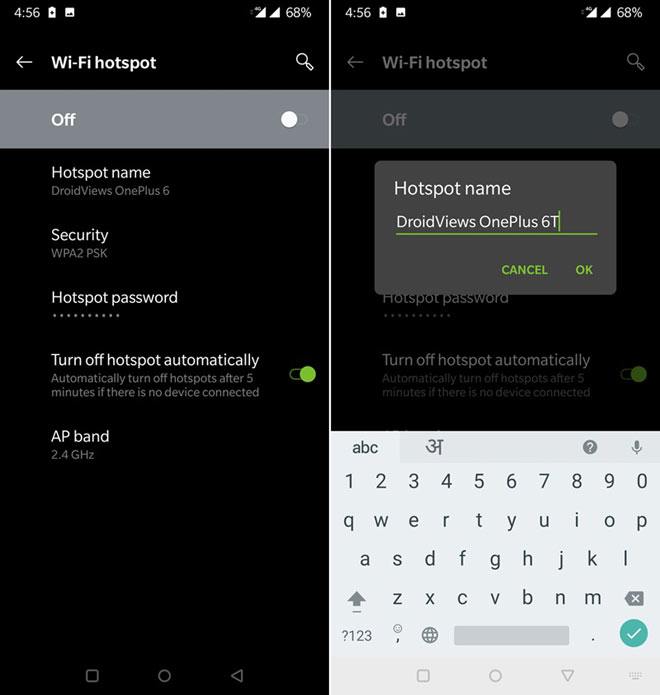 Change WiFi Hotspot Name on Android
So here ends our easy tutorial, if it really is, for beginners. We just hope it helps to change your Android device name. Bluetooth name, Hotspot name, and WiFi Direct name. For more useful tips and tricks for Android devices, do not forget to take a tour of our useful tutorials. Cheers!
Источник
Wi-Fi Direct
In this document
Related Samples
Wi-Fi Direct allows Android 4.0 (API level 14) or later devices with the appropriate hardware to connect directly to each other via Wi-Fi without an intermediate access point. Using these APIs, you can discover and connect to other devices when each device supports Wi-Fi Direct, then communicate over a speedy connection across distances much longer than a Bluetooth connection. This is useful for applications that share data among users, such as a multiplayer game or a photo sharing application.
The Wi-Fi Direct APIs consist of the following main parts:
- Methods that allow you to discover, request, and connect to peers are defined in the WifiP2pManager class.
- Listeners that allow you to be notified of the success or failure of WifiP2pManager method calls. When calling WifiP2pManager methods, each method can receive a specific listener passed in as a parameter.
- Intents that notify you of specific events detected by the Wi-Fi Direct framework, such as a dropped connection or a newly discovered peer.
You often use these three main components of the APIs together. For example, you can provide a WifiP2pManager.ActionListener to a call to discoverPeers() , so that you can be notified with the ActionListener.onSuccess() and ActionListener.onFailure() methods. A WIFI_P2P_PEERS_CHANGED_ACTION intent is also broadcast if the discoverPeers() method discovers that the peers list has changed.
API Overview
The WifiP2pManager class provides methods to allow you to interact with the Wi-Fi hardware on your device to do things like discover and connect to peers. The following actions are available:
Table 1.Wi-Fi Direct Methods
| Method | Description |
|---|---|
| initialize() | Registers the application with the Wi-Fi framework. This must be called before calling any other Wi-Fi Direct method. |
| connect() | Starts a peer-to-peer connection with a device with the specified configuration. |
| cancelConnect() | Cancels any ongoing peer-to-peer group negotiation. |
| requestConnectInfo() | Requests a device’s connection information. |
| createGroup() | Creates a peer-to-peer group with the current device as the group owner. |
| removeGroup() | Removes the current peer-to-peer group. |
| requestGroupInfo() | Requests peer-to-peer group information. |
| discoverPeers() | Initiates peer discovery |
| requestPeers() | Requests the current list of discovered peers. |
WifiP2pManager methods let you pass in a listener, so that the Wi-Fi Direct framework can notify your activity of the status of a call. The available listener interfaces and the corresponding WifiP2pManager method calls that use the listeners are described in the following table:
Table 2. Wi-Fi Direct Listeners
| Listener interface | Associated actions |
|---|---|
| WifiP2pManager.ActionListener | connect() , cancelConnect() , createGroup() , removeGroup() , and discoverPeers() |
| WifiP2pManager.ChannelListener | initialize() |
| WifiP2pManager.ConnectionInfoListener | requestConnectInfo() |
| WifiP2pManager.GroupInfoListener | requestGroupInfo() |
| WifiP2pManager.PeerListListener | requestPeers() |
The Wi-Fi Direct APIs define intents that are broadcast when certain Wi-Fi Direct events happen, such as when a new peer is discovered or when a device’s Wi-Fi state changes. You can register to receive these intents in your application by creating a broadcast receiver that handles these intents:
Table 3. Wi-Fi Direct Intents
| Intent | Description |
|---|---|
| WIFI_P2P_CONNECTION_CHANGED_ACTION | Broadcast when the state of the device’s Wi-Fi connection changes. |
| WIFI_P2P_PEERS_CHANGED_ACTION | Broadcast when you call discoverPeers() . You usually want to call requestPeers() to get an updated list of peers if you handle this intent in your application. |
| WIFI_P2P_STATE_CHANGED_ACTION | Broadcast when Wi-Fi Direct is enabled or disabled on the device. |
| WIFI_P2P_THIS_DEVICE_CHANGED_ACTION | Broadcast when a device’s details have changed, such as the device’s name. |
Creating a Broadcast Receiver for Wi-Fi Direct Intents
A broadcast receiver allows you to receive intents broadcast by the Android system, so that your application can respond to events that you are interested in. The basic steps for creating a broadcast receiver to handle Wi-Fi Direct intents are as follows:
- Create a class that extends the BroadcastReceiver class. For the class’ constructor, you most likely want to have parameters for the WifiP2pManager , WifiP2pManager.Channel , and the activity that this broadcast receiver will be registered in. This allows the broadcast receiver to send updates to the activity as well as have access to the Wi-Fi hardware and a communication channel if needed.
- In the broadcast receiver, check for the intents that you are interested in onReceive() . Carry out any necessary actions depending on the intent that is received. For example, if the broadcast receiver receives a WIFI_P2P_PEERS_CHANGED_ACTION intent, you can call the requestPeers() method to get a list of the currently discovered peers.
The following code shows you how to create a typical broadcast receiver. The broadcast receiver takes a WifiP2pManager object and an activity as arguments and uses these two classes to appropriately carry out the needed actions when the broadcast receiver receives an intent:
Creating a Wi-Fi Direct Application
Creating a Wi-Fi Direct application involves creating and registering a broadcast receiver for your application, discovering peers, connecting to a peer, and transferring data to a peer. The following sections describe how to do this.
Initial setup
Before using the Wi-Fi Direct APIs, you must ensure that your application can access the hardware and that the device supports the Wi-Fi Direct protocol. If Wi-Fi Direct is supported, you can obtain an instance of WifiP2pManager , create and register your broadcast receiver, and begin using the Wi-Fi Direct APIs.
Request permission to use the Wi-Fi hardware on the device and also declare your application to have the correct minimum SDK version in the Android manifest:
When you have obtained a WifiP2pManager.Channel and set up a broadcast receiver, your application can make Wi-Fi Direct method calls and receive Wi-Fi Direct intents.
You can now implement your application and use the Wi-Fi Direct features by calling the methods in WifiP2pManager . The next sections describe how to do common actions such as discovering and connecting to peers.
Discovering peers
To discover peers that are available to connect to, call discoverPeers() to detect available peers that are in range. The call to this function is asynchronous and a success or failure is communicated to your application with onSuccess() and onFailure() if you created a WifiP2pManager.ActionListener . The onSuccess() method only notifies you that the discovery process succeeded and does not provide any information about the actual peers that it discovered, if any:
If the discovery process succeeds and detects peers, the system broadcasts the WIFI_P2P_PEERS_CHANGED_ACTION intent, which you can listen for in a broadcast receiver to obtain a list of peers. When your application receives the WIFI_P2P_PEERS_CHANGED_ACTION intent, you can request a list of the discovered peers with requestPeers() . The following code shows how to set this up:
The requestPeers() method is also asynchronous and can notify your activity when a list of peers is available with onPeersAvailable() , which is defined in the the WifiP2pManager.PeerListListener interface. The onPeersAvailable() method provides you with an WifiP2pDeviceList , which you can iterate through to find the peer that you want to connect to.
Connecting to peers
When you have figured out the device that you want to connect to after obtaining a list of possible peers, call the connect() method to connect to the device. This method call requires a WifiP2pConfig object that contains the information of the device to connect to. You can be notified of a connection success or failure through the WifiP2pManager.ActionListener . The following code shows you how to create a connection to a desired device:
Transferring data
Once a connection is established, you can transfer data between the devices with sockets. The basic steps of transferring data are as follows:
- Create a ServerSocket . This socket waits for a connection from a client on a specified port and blocks until it happens, so do this in a background thread.
- Create a client Socket . The client uses the IP address and port of the server socket to connect to the server device.
- Send data from the client to the server. When the client socket successfully connects to the server socket, you can send data from the client to the server with byte streams.
- The server socket waits for a client connection (with the accept() method). This call blocks until a client connects, so call this is another thread. When a connection happens, the server device can receive the data from the client. Carry out any actions with this data, such as saving it to a file or presenting it to the user.
The following example, modified from the Wi-Fi Direct Demo sample, shows you how to create this client-server socket communication and transfer JPEG images from a client to a server with a service. For a complete working example, compile and run the Wi-Fi Direct Demo sample.
On the client, connect to the server socket with a client socket and transfer data. This example transfers a JPEG file on the client device’s file system.
Источник


