- Как скачать и исправить Android_winusb.inf (3-х шаговое руководство)
- Обзор файла
- Что такое сообщения об ошибках android_winusb.inf?
- Android_winusb.inf — ошибки «синего экрана» (BSOD)
- Крайне важно устранять ошибки «синего экрана»
- Как исправить ошибки android_winusb.inf — 3-шаговое руководство (время выполнения:
- Шаг 1. Восстановите компьютер до последней точки восстановления, «моментального снимка» или образа резервной копии, которые предшествуют появлению ошибки.
- Шаг 2. Если вы недавно установили приложение Adobe Flash Professional CC (или схожее программное обеспечение), удалите его, затем попробуйте переустановить Adobe Flash Professional CC.
- Шаг 3. Выполните обновление Windows.
- Если эти шаги не принесут результата: скачайте и замените файл android_winusb.inf (внимание: для опытных пользователей)
- Download Google USB Drivers for Windows 10/8.1/7 [Latest]
- Download Google USB Drivers
- Direct Download
- Download via Android Studio
- How to Install Google USB Drivers
- On Windows 10
- On Windows 7 and Windows 8/8.1
- How to Modify Google USB Drivers to Support Other Android Devices
- Step 1: Get the VID and PID of your Android Device
- Step 2: Modify ‘android_winusb.inf’ file
- Step 3: Install the Modified USB Drivers
Как скачать и исправить Android_winusb.inf (3-х шаговое руководство)
Последнее обновление: 07/02/2021 [Требуемое время для чтения: 3,5 мин.]
Файлы Setup Information, такие как android_winusb.inf, считаются разновидностью файла Драйвер (Setup Information). Они соотносятся с расширением INF, разработанным компанией Adobe Systems Incorporated для Adobe Flash Professional CC (not specified).
Файл android_winusb.inf изначально был выпущен с Adobe Flash Professional CC (not specified) 04/30/2010 для ОС Windows 10. Это не только самый последний выпуск от компании Adobe Systems Incorporated, но и, насколько известно, единственная существующая версия.
Продолжайте читать, чтобы найти загрузку правильной версии файла android_winusb.inf (бесплатно), подробные сведения о файле и порядок устранения неполадок, возникших с файлом INF.
Рекомендуемая загрузка: исправить ошибки реестра в WinThruster, связанные с android_winusb.inf и (или) Adobe Flash Professional CC.
![]()

Совместимость с Windows 10, 8, 7, Vista, XP и 2000
Средняя оценка пользователей
Обзор файла
| Общие сведения ✻ | ||||||||||||||||||||||||
|---|---|---|---|---|---|---|---|---|---|---|---|---|---|---|---|---|---|---|---|---|---|---|---|---|
| Имя файла: | android_winusb.inf | |||||||||||||||||||||||
| Расширение файла: | расширение INF | |||||||||||||||||||||||
| Тип файла: | Драйвер | |||||||||||||||||||||||
| Описание: | Setup Information | |||||||||||||||||||||||
| Пользовательский рейтинг популярности: | ||||||||||||||||||||||||
| Сведения о разработчике и ПО | |
|---|---|
| Программа: | Adobe Flash Professional CC (not specified) |
| Разработчик: | Adobe Systems Incorporated |
| Программное обеспечение: | Adobe Flash Professional CC |
| Версия ПО: | (not specified) |
| Сведения о файле | |
|---|---|
| Размер файла (байты): | 4224 |
| Дата первоначального файла: | 10/15/2019 |
| Дата последнего файла: | 10/15/2019 |
| Информация о файле | Описание |
|---|---|
| Размер файла: | 4.1 kB |
| Дата и время изменения файла: | 2019:10:15 14:59:32+00:00 |
✻ Фрагменты данных файлов предоставлены участником Exiftool (Phil Harvey) и распространяются под лицензией Perl Artistic.
Что такое сообщения об ошибках android_winusb.inf?
Android_winusb.inf — ошибки «синего экрана» (BSOD)
Существует ряд причин, по которым вы можете столкнуться с проблемами с android_winusb.inf. Большинство проблем с файлами INF связаны с ошибками «синего экрана» (BSOD). Эти типы ошибок android_winusb.inf могут быть вызваны аппаратными проблемами, устаревшей прошивкой, поврежденными драйверами или другими проблемами, связанными с программным обеспечением (например, обновление Adobe Flash Professional CC). В число этих ошибок входят:
- Не удается найти android_winusb.inf.
- Не удалось загрузить android_winusb.inf.
- Файл android_winusb.inf отсутствует или поврежден.
- Windows не удалось запустить — android_winusb.inf.

Обнаружена проблема, в результате которой ОС Windows завершила работу, чтобы предотвратить повреждение компьютера. По всей видимости, причиной проблемы стал следующий файл: android_winusb.inf.
🙁 На вашем ПК возникла проблема, которую не удалось устранить, и его необходимо перезагрузить. Сведения об ошибке можно найти в Интернете: [BSOD] (android_winusb.inf).
STOP 0x00000050: PAGE FAULT IN A NONPAGED AREA (android_winusb.inf)
STOP 0x0000000A: IRQL NOT LESS EQUAL (android_winusb.inf)
STOP 0x0000007E: SYSTEM THREAD EXCEPTION NOT HANDLED (android_winusb.inf)
STOP 0x0000001E: KMODE EXCEPTION NOT HANDLED (android_winusb.inf)
STOP 0x0000003B: SYSTEM SERVICE EXCEPTION (android_winusb.inf)
STOP 0×0000007A: KERNEL DATA INPAGE (android_winusb.inf)
Крайне важно устранять ошибки «синего экрана»
В большинстве случаев ошибки BSOD android_winusb.inf возникают после установки нового оборудования, программного обеспечения (Adobe Flash Professional CC) или выполнения неудачного обновления Windows. В остальных случаях к ошибке «синего экрана» android_winusb.inf может привести повреждение программного обеспечения, вызванное заражением вредоносным программным обеспечением. Таким образом, крайне важно, чтобы антивирус постоянно поддерживался в актуальном состоянии и регулярно проводил сканирование системы.

СОВЕТ ОТ СПЕЦИАЛИСТА: Как показывает опыт, целесообразно всегда создавать резервную копию системы Windows и (или) точку восстановления системы, прежде чем вносить какие-либо изменения в аппаратное или программное обеспечение на компьютере. Таким образом, в случае неблагоприятного поворота событий и возникновения связанной с файлом android_winusb.inf ошибки «синего экрана» после недавних изменений можно восстановить систему в предыдущее состояние.
Как исправить ошибки android_winusb.inf — 3-шаговое руководство (время выполнения:
Если вы столкнулись с одним из вышеуказанных сообщений об ошибке, выполните следующие действия по устранению неполадок, чтобы решить проблему android_winusb.inf. Эти шаги по устранению неполадок перечислены в рекомендуемом порядке выполнения.
Шаг 1. Восстановите компьютер до последней точки восстановления, «моментального снимка» или образа резервной копии, которые предшествуют появлению ошибки.
Чтобы начать восстановление системы (Windows XP, Vista, 7, 8 и 10):
- Нажмите кнопку «Пуск» в Windows
- В поле поиска введите «Восстановление системы» и нажмите ENTER.
- В результатах поиска найдите и нажмите «Восстановление системы»
- Введите пароль администратора (при необходимости).
- Следуйте инструкциям мастера восстановления системы, чтобы выбрать соответствующую точку восстановления.
- Восстановите компьютер к этому образу резервной копии.
Если на этапе 1 не удается устранить ошибку android_winusb.inf, перейдите к шагу 2 ниже.

Шаг 2. Если вы недавно установили приложение Adobe Flash Professional CC (или схожее программное обеспечение), удалите его, затем попробуйте переустановить Adobe Flash Professional CC.
Чтобы удалить программное обеспечение Adobe Flash Professional CC, выполните следующие инструкции (Windows XP, Vista, 7, 8 и 10):
- Нажмите кнопку «Пуск» в Windows
- В поле поиска введите «Удалить» и нажмите ENTER.
- В результатах поиска найдите и нажмите «Установка и удаление программ»
- Найдите запись для Adobe Flash Professional CC (not specified) и нажмите «Удалить»
- Следуйте указаниям по удалению.
После полного удаления приложения следует перезагрузить ПК и заново установить Adobe Flash Professional CC.
Если на этапе 2 также не удается устранить ошибку android_winusb.inf, перейдите к шагу 3 ниже.

Adobe Flash Professional CC (not specified)
Adobe Systems Incorporated
Шаг 3. Выполните обновление Windows.
Когда первые два шага не устранили проблему, целесообразно запустить Центр обновления Windows. Во многих случаях возникновение сообщений об ошибках android_winusb.inf может быть вызвано устаревшей операционной системой Windows. Чтобы запустить Центр обновления Windows, выполните следующие простые шаги:
- Нажмите кнопку «Пуск» в Windows
- В поле поиска введите «Обновить» и нажмите ENTER.
- В диалоговом окне Центра обновления Windows нажмите «Проверить наличие обновлений» (или аналогичную кнопку в зависимости от версии Windows)
- Если обновления доступны для загрузки, нажмите «Установить обновления».
- После завершения обновления следует перезагрузить ПК.
Если Центр обновления Windows не смог устранить сообщение об ошибке android_winusb.inf, перейдите к следующему шагу. Обратите внимание, что этот последний шаг рекомендуется только для продвинутых пользователей ПК.

Если эти шаги не принесут результата: скачайте и замените файл android_winusb.inf (внимание: для опытных пользователей)
Если ни один из предыдущих трех шагов по устранению неполадок не разрешил проблему, можно попробовать более агрессивный подход (примечание: не рекомендуется пользователям ПК начального уровня), загрузив и заменив соответствующую версию файла android_winusb.inf. Мы храним полную базу данных файлов android_winusb.inf со 100%-ной гарантией отсутствия вредоносного программного обеспечения для любой применимой версии Adobe Flash Professional CC . Чтобы загрузить и правильно заменить файл, выполните следующие действия:
- Найдите версию операционной системы Windows в нижеприведенном списке «Загрузить файлы android_winusb.inf».
- Нажмите соответствующую кнопку «Скачать», чтобы скачать версию файла Windows.
- Скопируйте этот файл в соответствующее расположение папки Adobe Flash Professional CC:
Если этот последний шаг оказался безрезультативным и ошибка по-прежнему не устранена, единственно возможным вариантом остается выполнение чистой установки Windows 10.
Источник
Download Google USB Drivers for Windows 10/8.1/7 [Latest]
Google USB Drivers are required to connect Google Pixel or Nexus devices to Windows PC using a USB cable. You will need these drivers to transfer files or sync data on your Pixel/Nexus device, and especially when working with the Android ADB and Fastboot tools.
You can download the latest Google USB Drivers from here and follow the instructions on how to manually install them on your Windows PC. Furthermore, we have also provided instructions on how to modify the ‘android_winusb.inf‘ file included in the drivers to support other Android devices.
Normally, the said USB drivers come bundled with SDK Manager in the Android Studio IDE, which IS constantly updated with the latest available drivers. But if you’re an average Android user, chances are that you might not have the IDE set up on your PC. That’s because it is used mostly by experienced developers and enthusiasts. In that case, you can use the standalone USB drivers, which as provided directly by Google for users who might face issues of Windows not recognizing their phone over a USB connection.
Google USB drivers also act as ‘Android ADB and Fastboot Drivers‘. So you can install them on your PC to use ADB (Android Debug Bridge) for debugging apps and ROMs, or use Fastboot to unlock the bootloader or flash factory images on your Pixel/Nexus device.
To sum up, the drivers are useful in various situations. With that in mind, go ahead to download the latest version of the USB Drivers from below and follow the instructions on how to install them on your Windows PC.
Download Google USB Drivers
Now, there are two different ways/methods to download the USB driver on Windows. You can either download the Google USB Driver ZIP file manually. Or, you can use the SDK Manager in the Android Studio to download it.
The latter gives an added benefit, that is the SDK Manager will automatically notify you when a newer version is available. The former method, on the contrary, will require you to manually check if a newer driver version is available and download it again.
In our personal experience, downloading the ZIP package directly is easier than using the Android Studio. But the choice is solely up to you. We have covered both the methods below.
Note: If you’re using macOS or Linux, you would not need these drivers.
Direct Download
Just click on the link below to download the Google USB Driver ZIP file to your PC.
Once downloaded, extract the ZIP file to a suitable location on your computer. The extracted ‘usb_drivers’ folder should contain the required ‘android_winusb.inf’ driver file.
Download via Android Studio
First of all, make sure that you have downloaded and installed the latest version of Android Studio on your Windows PC. Once you have it installed, follow the instructions below:
- Launch ‘Android Studio’ on your PC.
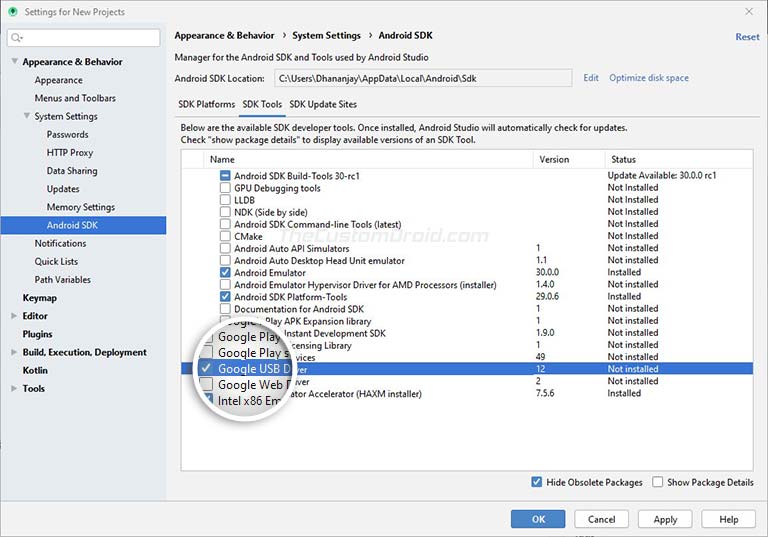
- Click on ‘Tools’ and select ‘SDK Manager’.
- Go to the ‘SDK Tools’ tab.
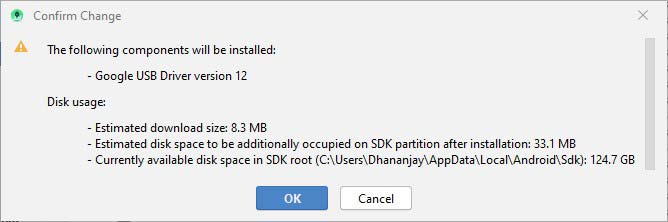
- Select ‘Google USB Driver’ and click on ‘Ok’.

- Finally, click on ‘Ok’ when prompted with the ‘Confirm change’ message.
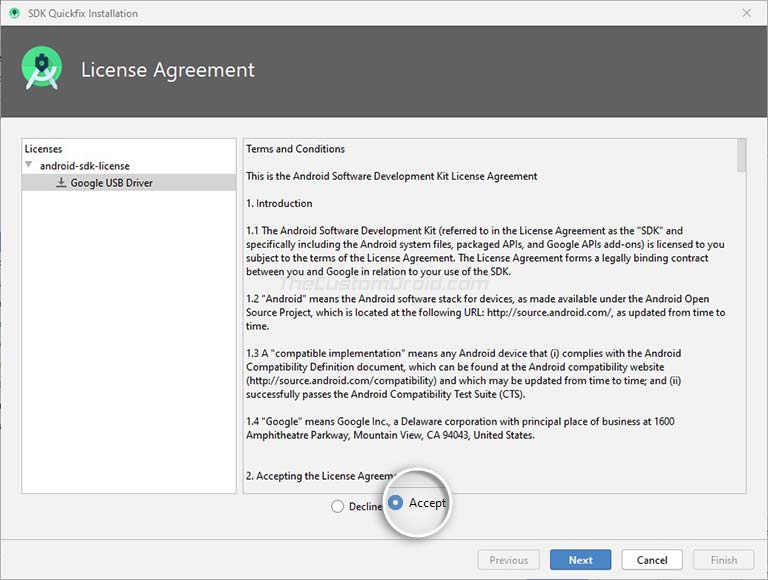
- You should see a ‘License Agreement’ message on the screen. Simply select ‘Accept’ and click on ‘Next’.
Android Studio will now download the Google USB drivers to ‘android_sdk\extras\google\usb_driver\‘ on your PC. Here ‘android_sdk’ is the folder where the Android SDK is installed on your PC.
How to Install Google USB Drivers
The Google USB Drivers come in the form of an ‘android_winusb.inf’ setup information file, rather than a Windows executable. So, you will need to manually install it on your Windows PC. The same steps can also be used to upgrade the existing drivers installed on your PC to the latest version available.
Now follow the installation guide below according to the Windows OS version you’re using. It’s quite easy and wouldn’t take more than a minute to install them.
On Windows 10
To install Google Android USB Drivers on Windows 10, follow the instructions below.
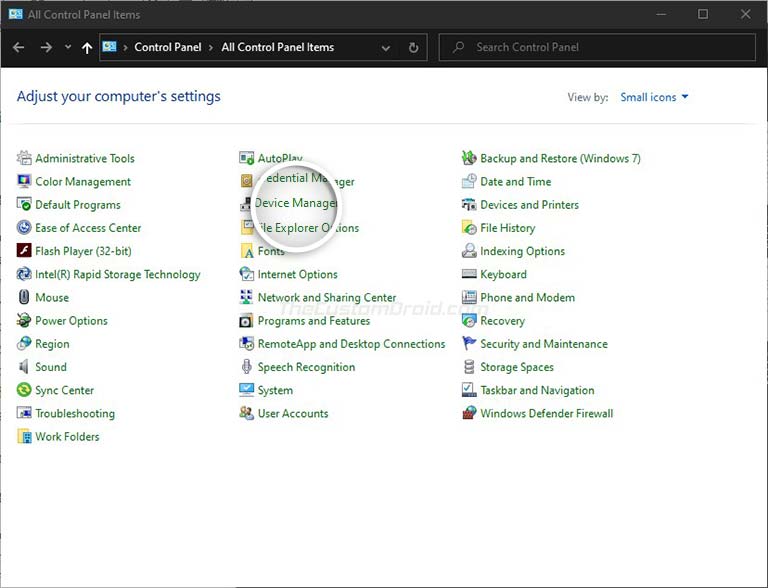
- First, connect your Android device to the PC’s USB port.
- Go to the ‘Control Panel‘ and click on ‘Device Manager‘. ‘Device Manager’ on your Windows 10 PC» width=»768″ height=»588″ srcset=»https://www.thecustomdroid.com/wp-content/uploads/2020/02/Install-Google-USB-Drivers-on-Windows-10-01.jpg 768w, https://www.thecustomdroid.com/wp-content/uploads/2020/02/Install-Google-USB-Drivers-on-Windows-10-01-300×230.jpg 300w» sizes=»(max-width: 768px) 100vw, 768px»/>
- Double-click on your device category to expand the list of connected devices.
- Right-click on your Android device’s name and click on ‘Update driver‘.
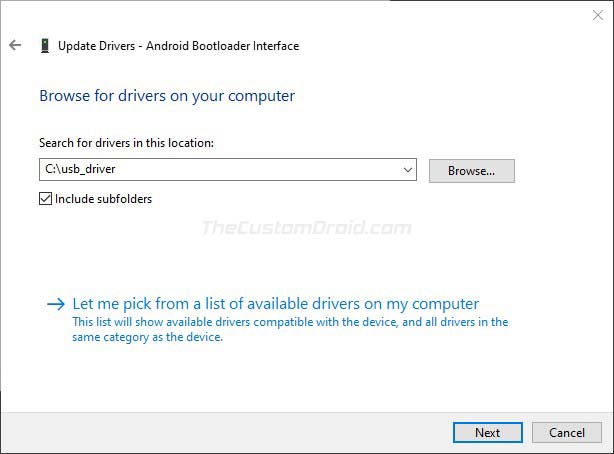
- Click on ‘Browse my computer for driver software‘ in the Hardware Update wizard.
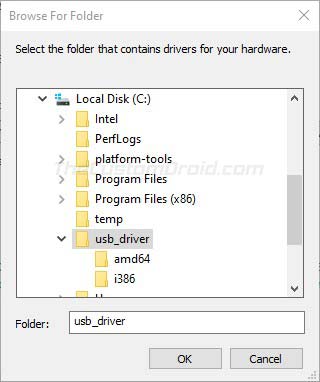
- Click ‘Browse‘ and select the ‘usb_driver‘ folder.
- For example: If you downloaded the drivers using Android Studio, the folder should be located in ‘android_sdk\extras\google\’ on the PC. Or, if you downloaded the ZIP file, then just locate the extracted ‘usb_driver’ folder.
- For example: If you downloaded the drivers using Android Studio, the folder should be located in ‘android_sdk\extras\google\’ on the PC. Or, if you downloaded the ZIP file, then just locate the extracted ‘usb_driver’ folder.
- Finally, click ‘Next‘ to install the drivers.
 ‘Device Manager’ on your Windows 10 PC» width=»768″ height=»588″ srcset=»https://www.thecustomdroid.com/wp-content/uploads/2020/02/Install-Google-USB-Drivers-on-Windows-10-01.jpg 768w, https://www.thecustomdroid.com/wp-content/uploads/2020/02/Install-Google-USB-Drivers-on-Windows-10-01-300×230.jpg 300w» sizes=»(max-width: 768px) 100vw, 768px»/>
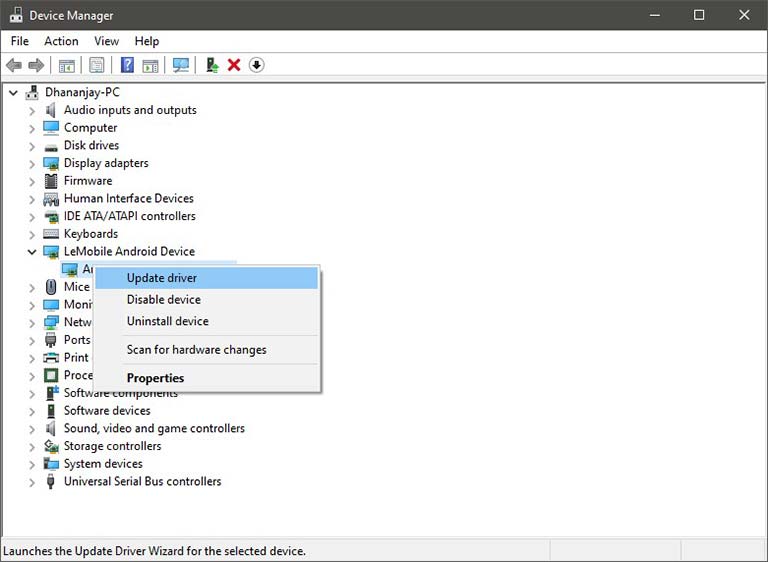
On Windows 7 and Windows 8/8.1
To install Google Android USB drivers on Windows 7, Windows 8, and Windows 8.1 PC, follow the instructions below.
- First, connect your Android device to the Windows PC’s USB port.
- Then right-click on ‘Computer‘ and select ‘Manage‘.
- Select Devices in the left pane.
- Double-click on ‘Other device‘ in the right pane to expand it.
- Right-click on the device name (e.g. Google Pixel) and select the ‘Update Driver‘ option.
- Click on ‘Browse my computer for driver software‘ in the Hardware Update wizard.
- Click ‘Browse‘ and locate the ‘usb_driver’ folder.
- Finally, click on ‘Next‘ to install the USB drivers.
You should now have the Google USB Drivers installed. Your Windows PC should now detect and recognize your Android device over the USB connection.
Important Note
If the drivers fail to install even after following the steps, OR the ADB/Fastboot commands do no work even if the drivers are installed, then it could be because you’re using a USB 3.0/3.1/3.2 port or an AMD based PC. This is an issue faced by a lot of users recently.
To fix it, simply try using a USB 2.0 port (If it’s not available, you can also use a USB 2.0 hub) on your PC. Also, try using an Intel-based PC for especially when using ADB/Fastboot tools.
How to Modify Google USB Drivers to Support Other Android Devices
Like we mentioned above, Google USB Drivers also work as ‘ADB Drivers’. But by default, they only support the Google Pixel and Nexus devices.
While Android OEMs do provide their own drivers, but it’s more often than they miss to include the required ADB USB drivers in them. In such cases, you can easily modify the ‘android_winusb.inf’ file in Google USB Drivers to support any other Android device to use the ADB and Fastboot tools.
In order for the drivers to support your non-Pixel/Nexus device, you will first need to acquire the Vendor ID (VID) and Product ID (PID) of your device. Once you have them, the second step is to edit the ‘android_winusb.inf’ file and add a new device section with the VID and PID of your own device. And finally, the third and last step is to install the modified drivers.
Sounds confusing? It’s quite simple actually. Just follow the step-by-step instructions below.
Step 1: Get the VID and PID of your Android Device
- First, connect your Android device to the PC using the USB cable.
- Go to ‘Control Panel‘ > ‘Device Manager‘ on the PC.
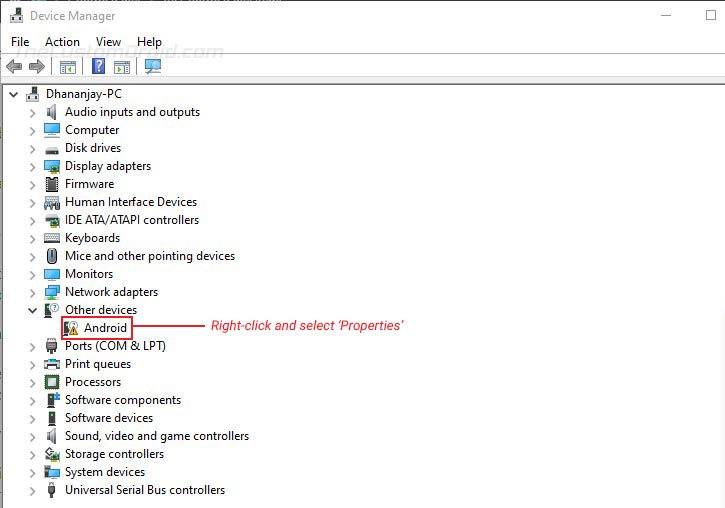
- Locate your unrecognized Android device. An unrecognized device can normally be located under the ‘Universal Serial Bus controllers‘ OR ‘Other devices‘ sections in Device Manager. You would see a yellow-colored triangle warning icon beside the connected device.
- Right-click on the device name and click on ‘Properties‘.
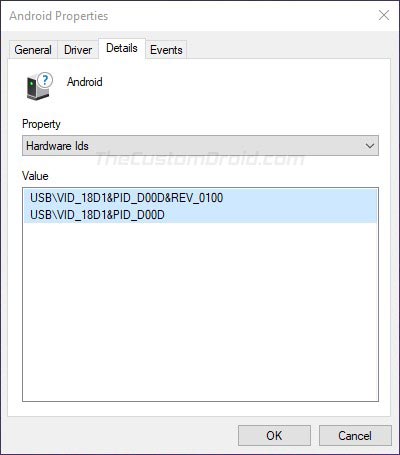
- Go to the ‘Details‘ tab and select ‘Hardware Ids‘ from the dropdown menu.
- You should now see the Vendor and Product IDs of your Android device.
Step 2: Modify ‘android_winusb.inf’ file
Now that you have the required IDs, you can modify/edit the ‘android_winusb.inf’ file to add your device to the supported list.
- First, locate the ‘usb_driver‘ folder on your PC. Inside the folder, you should have the ‘android_winusb.inf‘ file.
- Open the file using a text editor and locate the ‘[Google.NTx86]‘ section if your Windows PC is 32-bit (x86) or the ‘[Google.NTamd64]‘ section if your Windows PC is 64-bit (x64).
- In the said section, you will see a number of items with the following format:
- You can copy the above lines into the respective section and edit it accordingly.
- The first thing to do is to replace the ‘[device name]‘ item with your actual device name (Nothing specific, it could be anything).
- Next, you have to add your device’s VID and PID values to the %SingleAdbInterface% and %CompositeAdbInterface% items.
- In case your device also has a REV_xxxx ID, you will need to add two lines for the %SingleAdbInterface% item. One without and another with the REV ID. The line with the REV ID should look like:
- For the %CompositeAdbInterface% item, you will further need to add ‘MI_01‘ ID towards the end. With the MI_01 ID, the line should look like:
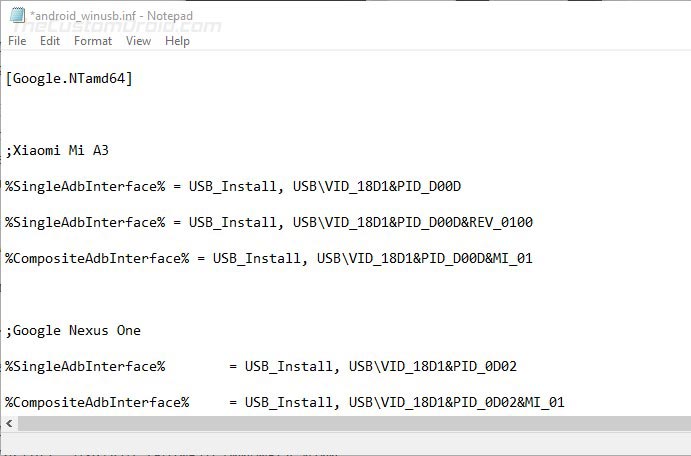
- For example, my Xiaomi Mi A3 has a VID and PID as ‘USB\VID_18D1&PID_D00D’ & ‘USB\VID_18D1&PID_D00D&REV_0100’. In that case, the lines should look like the following:
Once you have added the lines under the proper section (depending on your PC’s architecture), save the file and exit.
Step 3: Install the Modified USB Drivers
You have now successfully modified the Google USB Drivers to support your Android device. The last step is to install these modified drivers for your device.
To do so, go to ‘Control Panel’ > ‘Device Manager’ and right-click on your device’s name. Then select ‘Update drivers’ to launch the Hardware Update wizard. Simply click on ‘Browse my computer for driver software’ and select ‘Browse’. Now locate the ‘usb_driver’ folder that contains the modified android_winusb.inf file and select it.
Finally, click on ‘Next’ to install the modified drivers for your device. That’s it! Your Windows PC should now recognize your Android device over ADB or Fastboot.
Installing the Google USB Drivers is the easiest solution to make your Windows PC successfully recognize your Android device. And while it should work for most other Android devices too, it’s not a hundred percent guaranteed. And if this happens, you may want to install your device’s OEM specific drivers from this page or by clicking your device manufacturer link below.
For low-level firmware flashing, you could also use MediaTek or Qualcomm USB drivers.
If you face any issues installing the drivers on your PC, feel free to ask us through the comments.
Источник
 Когда к мобильному устройству присоединены наушникиОС Google Android развивается, и по всему видимому