- Wipe data factory reset: что это такое и как правильно сбросить настройки на Android
- Какие проблемы может решить Wipe data factory reset
- Как выполнить сброс настроек?
- Сброс через меню телефона
- Сброс с помощью recovery раздела
- How to Restore Android after Factory Reset
- Before We Restore Android devices:
- Part 1. What Is Android Factory Reset?
- Why do you need factory Reset?
- How to Perform Android Factory Reset?
- Using the Android Settings to perform Android factory reset:
- Using Hardware Keys to realize Android factory reset:
- Part 2. Restore Android Data after Factory Reset
- Manual Restore with SD card or PC
- Automatic Restore
- From Synced Google Account
- Part 3. How to Restore Android after Factory Reset Safe and Effective
- How to Restore Android Phone
- Step 1. Open FoneDog Toolkit- Android Data Recovery and Plugin Android device
- Step 2. Activate USB Debugging on Android
- Step 3. Select File Types to Scan
- Step 4. Scan Preview and Restore Android Data
- Video Guide: How to Restore Android Data after Factory Reset
- Part 4. Conclusions
Wipe data factory reset: что это такое и как правильно сбросить настройки на Android
Современные смартфоны представляет собой настоящие мини-компьютеры, со своей операционной системой, множеством настроек и большим выбором самых разных программ. А как известно, чем сложнее система, тем легче она может выйти из строя. По самым разным причинам телефон начинает работать медленнее, быстрее разряжается батарейка. В особо тяжелых случаях, телефон может зависать и самостоятельно перезагружаться. Многие пользователи начинают паниковать, обращаться к знакомым «программистам» или в различные сервисные центры. Однако, зачастую, есть возможность решить проблему самостоятельно. Если на телефоне установлен Android, можно попробовать восстановить аппарата самим с помощью специальной функции, которая называется Wipe data factory reset.
Действие этой функции напоминает процесс переустановки операционной системы Windows на обычном компьютере. Только в случае со смартфоном весь процесс занимает намного меньше времени. Обычно это процедура длится не больше 5-10 минут. И в отличии от той же переустановки «операционки» на компьютере, здесь не нужно будет долго и нудно ставить драйвера. Все необходимые программы и компоненты будут установлены сразу. После этой процедуры можно будет подключиться к сети интернет и проверить наличие обновления для вашего телефона, и если они есть – установить их. Простому человеку нужен перевод, что же такое wipe data и зачем нужно эти данные сбрасывать, об этом и расскажем ниже.
Какие проблемы может решить Wipe data factory reset
- Уменьшение автономной работы от аккумулятора;
- удаление вирусов;
- очистка внутренней памяти смартфона;
- зависания и подтормаживания в работе.
В общем-то, при любой неполадке телефона, первое, что нужно сделать – попробовать воспользоваться Wipe data factory reset. Единственное, что нужно помнить, что кроме вирусов, ненужных файлов и бесполезных программ, будут удалены и все настройки, контакты и полезные программы.
Как выполнить сброс настроек?
Английское слово wipe переводится как очистка. Иными словам, это очистка памяти о твсех данных. Обычно есть две варианта этого действия – полный wipe и частичный wipe.
При первом — удаляется информация всей памяти. С помощью частичного сброса — можно почистить отдельные разделы.
Отдельно хочется отметить, что перед выполнением процедуры нужно удостовериться, что аккумуляторная батарея телефона заряжена. Также, если это требуется, нужно сохранить всю важную информацию — контакты, фотографии и другие файлы. В процессе wipe data они будут удалены.
В случае с телефоном с Андроидом, есть несколько способов, как можно выполнить сброс настроек.
Сброс через меню телефона
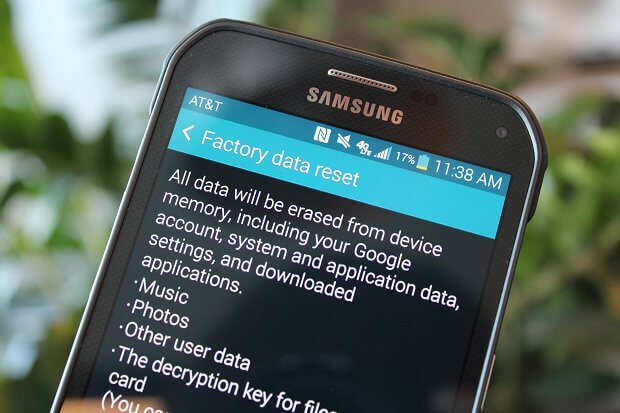
Если телефон загружается, можно попробовать выполнить сброс через меню «Настройки» — пиктограмма с изображением шестеренки. Здесь нужно найти пункт «Восстановление и сброс». Обычно он располагается в самом низу списка. На некоторых телефонах его можно найти в «Расширенные настройки телефона».
- Заходим в это меню, нажимаем пункт «Сброс к заводским настройкам»;
- затем «Очистить все». Система выдаст предупреждающую надпись, что информация будут удалена;
- после чего даем свое согласие.
На некоторых смартфонах, в целях безопасности, нужно ввести специальную цифровую комбинацию, которую выдаст сама система. Это сделано для предотвращения случайного нажатия и форматирования памяти. После запуска процесса восстановления, экран телефона гаснет, затем загорается снова. На экране отображается ход процесса восстановления. После завершения процесса, смартфон перезагружается. Затем откроется стартовый экран. Здесь нужно будет выполнить первичные настройки телефона – выбрать язык, указать данные аккаунта, выполнить подключение к Wi-Fi сети. Сложного ничего нет. Внимательно читаете, затем вносите данные. Большинство пунктов можно вообще пропустить, нажав кнопку «Далее».
Сброс с помощью recovery раздела
Этот способ посложнее, но и помогает он даже в тяжелых случаях. Нередко с его помощью можно оживить телефон, который вообще перестал загружаться или получить доступ к «Настройкам» не удается.
Для этого телефон нужно полностью выключить. Затем ищем кнопки регулировки громкости. Нажимаем на клавишу увеличение громкости и удерживаем ее. Затем, не отпуская эту кнопку, нажимаем на кнопку включения смартфона. После появления на экране заставки отпускаем обе кнопки. Если телефон поддерживает сброс настроек таким способом, на черном фоне появится специальное меню из нескольких пунктов. В этом режиме для управления телефоном нужно использовать кнопки регулировки громкости – для перемещения по пунктам меню и клавиши включения/выключения для подтверждения выбора.
Выбираем пункт Wipe data factory reset. Подтверждаем выбор, однократным нажатием на кнопку Включения. Телефон перезагрузится и на черном фоне начнут отображаться цифры и надписи, показывающие ход выполнения процесса. На восстановление уходит обычно несколько минут. Если все получилось, вскоре телефон перезагрузится и откроется экран начальных настроек, как в первом варианте. Иногда перезагружать устройство приходится вручную, выбрав пункт Reboot (Перезагрузить).
Если эта статья вам помогла, напишите в комментариях об этом пожалуйста. Также если есть проблемы и что-то не получилось, пишите, постараюсь помочь.
Источник
How to Restore Android after Factory Reset
By Gina Barrow, Last updated: October 21, 2021
«How to undo factory reset? Do you know how to restore Android after factory reset? I need to recover my phone data as soon as possible. Thanks!«
Yes! You have entered the right article on how to restore Android after factory reset. It is the recommended solution in 2021.
Before We Restore Android devices:
Having been writing applications for Android for several years, we have developed a tool that is powerful while simple to operate.
A tip here: Download FoneDog Android Data Recovery to easily retrieve your deleted data with a few clicks. If you want to try some other solutions, check below to find your own best solution.
Android Data Recovery Recover deleted messages, photos, contacts, videos, WhatsApp and so on. Quickly Find Lost and deleted data on Android with or without root. Compatible with 6000+ Android devices. Free Download Free Download 
Part 1. What Is Android Factory Reset?
A factory reset on Android is erasing all the information stored in the device and restores it back to its default or manufacturer set up. There are different types of reset that you can do on an Android device. There are Soft resets, Hard Resets, and Factory Resets. A soft reset is the easiest and the most basic form which is just to power cycle the device or turning it off then turning it back on.
A soft reset is done to attempt a quick refresh to all malfunctioning apps or Android settings usually done when apps are not performing well. A Factory reset cleans the operating system of the Android phone thus removing all downloaded and installed apps, settings and contents, just like a brand new device. A hard reset, on the other hand, fixes or resets any hardware in the system.
Why do you need factory Reset?
There are various reasons and situations wherein you might need a factory reset. As much as possible, you must perform factory resets as your last resort during any troubleshooting scenarios. Here are some of the most common scenarios why do you need factory reset:
- Selling your Android phone
- Troubleshooting damaged software
- Malware or Viruses
- Removing setting errors
- Mobile freezing or crashing
If you still get the chance to backup your phone data prior to doing any factory resets then do so. Backup all the information stored both in the internal and the external memory of the phone to make sure you still have everything you needed.

How to Perform Android Factory Reset?
The steps on how to do a factory reset depend on the make and model of the Android device. However, most of the Android devices have similar settings with just a few chances. They may only differ in which keys to use during the process but the entire purpose is the same.
Using the Android Settings to perform Android factory reset:
- Go to Settings
- Scroll down and find System (while on some Android, you can tap Backup & reset)
- Tap Factory Data Reset
To make sure you still have all the things you needed you can toggle on the Backup my Data and Automatic Restore. Set a Backup account or you can use the same Google account used on the device.
Using Hardware Keys to realize Android factory reset:
- Turn off the Android phone
- Boot the Android phone into Recovery Mode by pressing and holding down the вЂPower, Volume Up, and Home buttons’
- Navigate and tap on Wipe data/factory reset by using the volume keys
- Use Power button to enter/select
- Select YES to confirm the action
- Wait until the reset is complete.
- Select вЂReboot System Now’ by pressing the Power button
The process will be slightly different for different Android devices so you may refer to your phone’s specific factory reset steps to be sure. Once your Android phone boots up, it will ask you to set up the device like how you did when it was brand new. Complete the initial set up process and you can now restore your apps and settings from your backups.
Part 2. Restore Android Data after Factory Reset
Android being the flexible operating system has plenty of options on how to restore data after a factory reset. It can be manual, automatically or from the Google account. Learn how to do each of them below:
Manual Restore with SD card or PC
You can first backup your phone data to your SD card or the computer manually before doing a factory reset. You can export files to your SD card and easily remove it whenever doing the factory reset. Once done with the reset, you can insert back the SD card and restore files from there.
Another way is to copy them to the computer. Connect your Android phone to the computer using the USB cable and then open the folders where you have saved important files, apps, and data. Copy them to the computer by creating a new folder. You can update the backup from time to time if required. After the factory reset, you can move back all the files, apps, and data as you wish.
Automatic Restore
You can restore Android after a factory reset if you have checked the Automatic Restore option in settings.
- Launch Settings on the Android device
- Find and tap Backup & reset or you can tap System and then tap Reset for other devices
- Verify if the Automatic Restore box is checked
This will automatically restore backed up settings and data upon reinstalling an app.
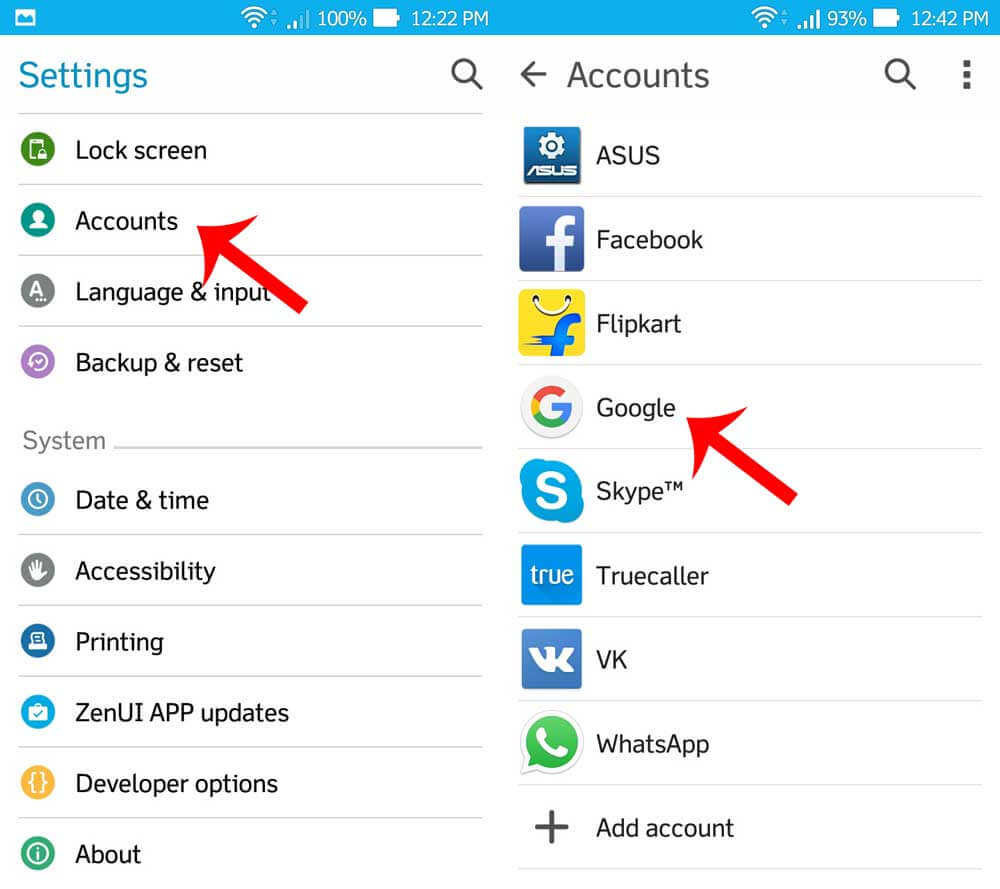
From Synced Google Account
If you have enabled the Google sync options then there will be no problem when you restore Android after factory reset. From the initial set up, you will be asked if you want to restore all the sync data from Google. Just simply confirm and wait until the entire data are applied. To know if you have synced your data before doing a factory reset, refer below:
- Go to Settings
- Find and tap Users & Accounts
- You can turn on and off the automatically sync data option
But what if you don’t have any backups? You might be surprised that your phone apps are all gone when you restore Android after factory reset.
Part 3. How to Restore Android after Factory Reset Safe and Effective
There is a safe and effective way to handle data loss whenever you are doing a factory reset. FoneDog Toolkit- Android Data Recovery has the ability to restore Android after factory reset safely and conveniently. This recovery program knows how to take care of your personal data and information so it handles your Android device perfectly and performs recovery smoothly. This tool is best for those who are not familiar with recovery technicalities. Here are some features you can see in FoneDog Toolkit- Android Data Recovery:
- Restores lost or deleted files like photos, videos, contacts, messages, call logs, documents, and much more from both the Android device and external SD card
- Available for both Windows and Mac computers with Free Trial
- Compatible with all Android devices including Samsung Galaxy S8, Note 8
- Recovers data from Android with or without root
- 100% safe, secure, and guaranteed effective
To learn how to effectively restore Android after a factory reset, follow these simple guides below:
How to Restore Android Phone
- Step 1. Open FoneDog Toolkit- Android Data Recovery and Plugin Android device.
- Step 2. Activate USB Debugging on Android.
- Step 3. Select File Types to Scan.
- Step 4. Scan Preview and Restore Android Data.
Step 1. Open FoneDog Toolkit- Android Data Recovery and Plugin Android device
The first thing you need to do to begin the recovery is to download FoneDog Toolkit- Android Data Recovery and install it on your computer. You may follow the installation guide which is click-through based as well. Once you have successfully downloaded and installed the program, launch FoneDog Toolkit- Android Data Recovery and connect the Android device to the computer using a USB cable. Wait for a few seconds before the software completely recognizes the connection.
Note:
If this is the first time you have connected the Android phone to the computer then it will ask you to install necessary drivers.

Connect Android Phone to Computer—Step 1
Step 2. Activate USB Debugging on Android
The next step is to enable the USB debugging on the Android device by referring to your Android phone’s settings and software version. Most of the Android devices have similar steps so you can refer below:
Android 4.2 and up
- Got to Settings
- Find and tap вЂAbout Phone’
- Tap вЂBuild Number’ seven times until you see вЂYou are under Developer mode’ message
- Go back to Settings
- Tap Developer Mode
- Enable USB Debugging
For Android 3.0 to 4.1
- Go to Settings
- Find and tap Developer Options
- Check USB Debugging
USB debugging is just a connection between the Android device and the computer and no harm will be done during this process. Click вЂOK’ on your computer screen to continue.
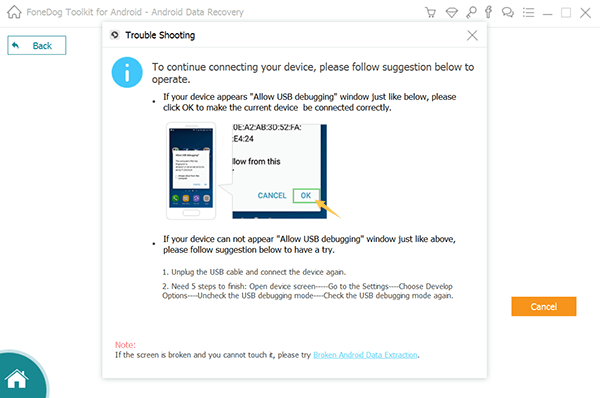
Enable USB Debugging on Android — Step 2
Step 3. Select File Types to Scan
The next screen will show you all the file categories that you can recover on the Android device. Mark all the files you needed to restore then click вЂNext’ to continue.
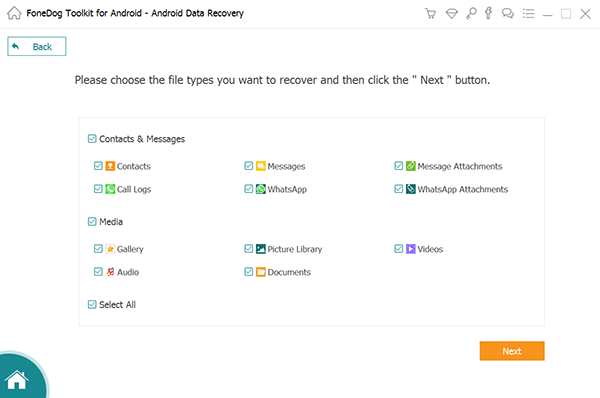
Choose File Types To Scan — Step 3
Step 4. Scan Preview and Restore Android Data
Before the scanning starts, make sure you have enough battery to support the recovery process. You must have at least 20% battery to proceed. The scanning may take a while depending on a total load of files being recovered in the Android phone. When it stops, it will display all the categories on the left side of the screen while you can preview all the recovered items on the right side. You can now restore Android after factory reset at this point. Remember you can recover all the files and download them to the computer and you can also selectively restore files you only needed. Mark them one by one if you must then set the folder destination and click the вЂRecover’ button at the bottom of the screen.
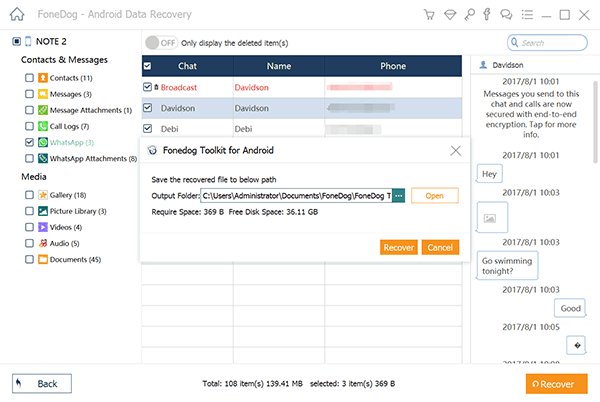
Preview and Restore Deleted Files on Android — Step4
Video Guide: How to Restore Android Data after Factory Reset
Part 4. Conclusions
There are many ways to restore Android after factory reset and the only thing you have to make sure is to avoid further data loss. Go for the process that will keep your information safe and secure just like FoneDog Toolkit- Android Data Recovery. You can recover any files on your Android device like contacts, messages, photos, videos, music, and much more.
Источник


