- Google made its best acquisition nearly 16 years ago: Can you guess what it was?
- Google buys Android: A history
- Why this was its best acquisition
- Developer guide
- Prerequisites
- Work profiles
- Key features of a work profile
- Work profile benefits on Android 5.0+
- Considerations for work profiles
- Prevent intents from failing between profiles
- Share files across profiles
- Implement managed configurations
- Best practices for implementing managed configurations
- When first launching the app
- Listen for changes to managed configurations
- Dedicated devices
- Set up single sign-on with Chrome custom tabs
- Requirements
- How do I implement SSO with custom tabs?
- Test your app
- Use Test DPC to test your Android app
- Provision a work profile
- Provision a fully managed device
- End-to-end testing
Google made its best acquisition nearly 16 years ago: Can you guess what it was?

Back in 2005, everyone thought of Google as just another ad-supported search company. However, nearly 16 years ago, on July 11, 2005, the company made what we think was its best acquisition to date. It purchased a little startup company called Android. At the time, there was no “Google buys Android” news headline to reveal the move; that would come a little later.
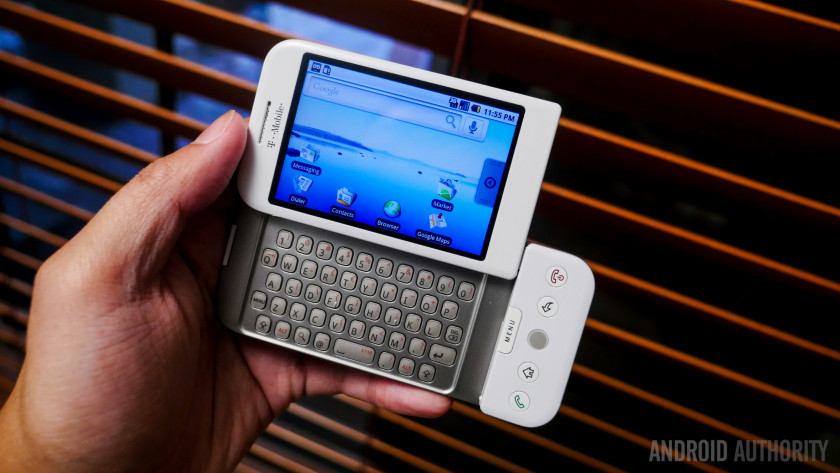
Of course, we all know the deal was a great success — this website wouldn’t exist if it wasn’t. Using the skills of its new Android team members, Google spent the next three years developing an operating system for mobile devices. This culminated in the launch of the first public version of Android in 2008, released on the T-Mobile G1/HTC Dream.
Today, Android is the most popular mobile OS in the world by a large margin. The latest estimates from the research firm Statista claim that Android was used in 71.93 percent of all new smartphones as of January 2021. Android also beat more established rivals like Microsoft’s Windows Phone (and Windows Mobile), Nokia’s Symbian, and most notably BlackBerry.
In May 2021, Google revealed there were over 3 billion monthly active Android devices. Besides smartphones, Android is used in smartwatches, tablets, smart TVs, and more. Perhaps more importantly, the launch of Android helped Google become one of the biggest and most influential companies in the world.
It wasn’t smooth sailing the whole time for Android, though.
Google buys Android: A history
Google bought Android from a standalone company called Android Inc. It was founded a couple of years before Google bought it, in the first half of 2003. The Palo Alto company’s most well-known co-founder was Andy Rubin, who had previously worked for companies like MSN and Apple. It was at Apple where Rubin reportedly got the “Android” nickname when his co-workers noticed his own love of robots.
In 1999, Rubin helped form the company Danger, which launched one of the first proto-smartphones, the Danger Hiptop (re-branded as the Sidekick when T-Mobile sold it in 2002). Rubin later departed Danger in 2003 to help form Android, along with the other co-founders Rich Miner, Nick Sears, and Chris White.
The original idea for the company was to create an operating system for digital cameras (read more about that below) and that’s how Android OS was initially pitched to early investors. That soon changed as by then the market for standalone digital cameras was shrinking, as consumers ditched them for mobile phones. Rubin and the team decided to switch their focus and make an open-source OS for phones.
However, for a while, it looked like Android as a company was close to shutting down entirely. At the lowest point, Rubin had to ask a friend, investor Steve Perlman, for some extra money. Perlman actually went to a bank and took out $10,000 cash, giving it directly to Rubin. The day after that cash transaction, Rubin wired an unknown amount of extra money to Android to keep it going.
As it turned out, that’s all Android Inc. needed to survive before its next deal. Google asked to meet the co-founders of Android in January 2005 to see if they could help the company.
In a second meeting later that year, the Android co-founders showed off a prototype of their mobile OS to Google’s Larry Page and Sergey Brin. It was apparently good enough because Google quickly offered to acquire Android. How much did Google buy Android for? The official documents state it was a mere $50 million.
As for why Google decided to buy Android, it’s likely that Page and Brin believed that a mobile OS would help greatly expand its core search and ad businesses well beyond its PC platform at that time.
The Android team officially moved to Google’s campus in Mountain View, California on July 11, 2005. That day is considered the official date for the acquisition of Android by Google. However, the news about Google purchasing Android didn’t become public until a few weeks later, in August 2005.
Why this was its best acquisition
The fact that Google bought Android for just $50 million is remarkable compared to its acquisitions in the 16 years that followed. In fact, the company spent just $130 million to buy companies in all of 2005. By comparison, only a little over a year later, Google spent a whopping $1.65 billion acquiring YouTube. There was much debate about whether YouTube was worth the money at the time, but it’s certainly paid off by now, though Android’s actually been even more successful.
Some of Google’s other acquisitions have not been as successful, however. The massive $12.5 billion purchase of Motorola in 2011 is often cited as one of Google’s biggest missteps, with the search giant selling the company to Lenovo for just $2.9 billion a little over three years later. You also only need to look at some of the plots in the Google Graveyard to see multiple examples of purchases that went sour.
Some of Google’s other purchases could still be considered works in progress. Nest Labs, which Google bought for $3.2 billion in 2014, was slow to take off, but with the move to bring Google and Nest devices under a single brand, there are clearly big plans ahead. There’s also the company’s recent purchase of Fitbit for a cool $2.1 billion. Who knows what will come of that — a Pixel Watch maybe?
Nevertheless, it’s highly unlikely Google will ever get a better return on its investment than it had with Android. While the company will no doubt continue buying and investing in other companies, there’s really no getting around how big of a win that $50 million startup became.
Источник
Developer guide
Android’s enterprise features provide organizations with a secure, flexible, and unified Android mobility platform—combining devices, applications, and management. Android apps are compatible with Android’s enterprise features by default. However, there are additional features you can use to make your app work best on managed Android devices:
- Work profile compatibility—Modify your Android app so it functions best on a managed device.
- Managed configurations—Modify your app to allow IT admins the option to specify custom settings for your apps.
- Dedicated devices—Optimize your app so that it can be deployed on an Android device as a kiosk.
- Single Sign-On (SSO)—Simplify the sign-on process for users signing in to different apps on their managed Android device.
Prerequisites
- You’ve created an Android app.
- You’re ready to modify your app so that it works best for organizations.
- Minimum version: Android 5.0 Lollipop recommended version: Android 6.0 Marshmallow and later.
Note: Android’s enterprise features are built into most Android 5.0 devices; however, Android 6.0 and later offers additional features, especially with regard to dedicated devices.
Work profiles
You can manage a user’s business data and applications through a work profile. A work profile is a managed corporate profile associated with the primary user account on an Android device. A work profile securely isolates work apps and data from personal apps and data. This work profile is in a separate container from the personal profile, which your user controls. These separate profiles allow organizations to manage the business data they care about, but leave everything else on a user’s device under the user’s control. For a deep dive into best practices, see the Work profiles guide. For an overview of those best practices, see below.
Key features of a work profile
- Separate and secure profile
- Managed Google Play for application distribution
- Separate badged work applications
- Profile-only management capabilities controlled by an admin
Work profile benefits on Android 5.0+
- Full device encryption
- One Android application package (APK) for both profiles when there’s a personal profile and a work profile present on the device
- Device policy controller (DPC) is limited to the work profile
- Device administration via the DevicePolicyManager class
Considerations for work profiles
- The Android system prevents intents from crossing profiles and IT admins can enable or disable system apps.
- A file path (Uniform Resource Identifier [URI]) that’s valid on one profile may not be valid on the other.
Prevent intents from failing between profiles
It’s difficult to know which intents can cross between profiles, and which ones are blocked. The only way to know for sure is by testing. Before your app starts an activity, you should verify that the request is resolved by calling Intent.resolveActivity() .
- If it returns null , the request doesn’t resolve.
- If it returns something, it shows that the intent resolves, and it’s safe to send the intent.
Note: For detailed testing instructions, see Prevent Failed Intents.
Share files across profiles
Some developers use URIs to mark file paths in Android. However, because there are separate file systems when a work profile is present, we recommend:
| Use: Content URIs |
|
| Don’t use: File URI |
|
Next steps: Once your app supports managed profiles, test it in a work profile. See Test your app.
Implement managed configurations
Managed configurations are a set of instructions that IT admins can use to manage their users’ mobile devices in a specific way. These instructions are universal and work across any EMM, allowing admins to remotely configure applications on their users’ phones.
If you’re developing apps for business or government, you may need to satisfy your industry’s specific set of requirements. Using managed configurations, the IT admin can remotely specify settings and enforce policies for their users’ Android apps; for example:
- Configure if an app can sync data via cellular/3G, or only Wi-Fi
- Allow or block URLs on a web browser
- Configure an app’s email settings
- Enable or disable printing
- Manage bookmarks
Best practices for implementing managed configurations
The Set up Managed Configurations guide is the key source for information on how to build and deploy managed configurations. After you’ve reviewed this documentation, see recommendations below for additional guidance.
When first launching the app
As soon as you launch an application, you can see if managed configurations are already set for this app in onStart() or onResume() . Additionally, you can find out if your application is managed or unmanaged. For example, if getApplicationRestrictions() returns:
- A set of application-specific restrictions—You can configure the managed configurations silently (without requiring user input).
- An empty bundle—Your application acts like it’s unmanaged (for example, how the app behaves in a personal profile).
- A bundle with a single key value pair with KEY_RESTRICTIONS_PENDING set to true—your application is being managed, but the DPC isn’t configured correctly. You should block this user from your app, and direct them to their IT admin.
Listen for changes to managed configurations
IT admins can change managed configurations and what policies they want to enforce on their users at any time. Because of this, we recommend you ensure that your app can accept new restrictions for your managed configuration as follows:
- Fetch restrictions on launch—Your app should call getApplicationRestrictions() in onStart() and onResume() , and compare against old restrictions to see if changes are required.
- Listen while running—Dynamically register ACTION_APPLICATION_RESTRICTIONS_CHANGED in your running activities or services, after you’ve checked for new restrictions. This intent is sent only to listeners that are dynamically registered, and not to listeners declared in the app manifest.
- Unregister while not running—In onPause() , you should unregister for the broadcast of ACTION_APPLICATION_RESTRICTIONS_CHANGED .
Dedicated devices
Dedicated devices are kiosk devices used for a single purpose, such as digital signage displays, ticket printing kiosks, or checkout registers.
When an Android device is configured as a dedicated device, the user sees an application locked to the screen with no Home or Recent Apps buttons to escape the app. Dedicated devices can also be configured to show a set of applications, such as a library kiosk with an app for the library catalog and a web browser.
Set up single sign-on with Chrome custom tabs
Enterprise users often have multiple apps on their device, and they prefer to sign in once to access all of their work applications. Typically, users sign in through a WebView; however, there are a couple reasons why this isn’t ideal:
- Users often need to sign in multiple times with the same credentials. The WebView solution often isn’t a true Single Sign-On (SSO) experience.
- There can be security risks, including malicious applications inspecting cookies or injecting JavaScript® to access a user’s credentials. Even trusted developers are at risk if they rely on potentially malicious third-party SDKs.
A solution to both problems is to authenticate users using browser Custom Tabs, instead of WebView. This ensures that authentication:
- Occurs in a secure context (the system browser) where the host app cannot inspect contents.
- Has a shared cookie state, ensuring the user has to sign in only once.
Requirements
Custom Tabs are supported back to API level 15 (Android 4.0.3). To use Custom Tabs you need a supported browser, such as Chrome. Chrome 45 and later implement this feature as Chrome Custom Tabs.
How do I implement SSO with custom tabs?
Google has open sourced an OAuth client library that uses Custom Tabs, contributing it to the OpenID Connect working group of the OpenID Foundation. To set up Custom Tabs for SSO with the AppAuth library, see the documentation and sample code on GitHub.
Test your app
After you’ve developed your app, you’ll want to test it—both in a work profile and on a fully managed device. See the instructions below.
Use Test DPC to test your Android app
We provide the Test DPC app to help Android developers test their apps in an enterprise environment. Using Test DPC, you can set EMM policies or managed configuration values on a device—as if an organization managed the device using an EMM. To install Test DPC on a device, choose one of the following methods:
- Install Test DPC from GooglePlay.
- Build from the source on GitHub.
For more information on how to configure Test DPC, see the instructions below and the Test DPC User Guide.
Provision a work profile
To test your app in a work profile, you need to first provision a work profile on device using the Test DPC app, as follows:
- Install Test DPC on the device.
- In the Android launcher, tap the Set up Test DPC app icon.
- Follow the onscreen instructions.
- Install your app on the device and test to see how it runs in the work profile.
Android creates a work profile and installs a copy of Test DPC in the work profile. You use this work-badged instance of Test DPC to set policies and managed configurations in the work profile. To learn more about setting up a work profile for development, read the developer’s guide Work profiles.
Provision a fully managed device
Organizations use fully managed devices because they can enforce a full range of management policies on the device. To provision a fully managed device, follow these steps:
- Install Test DPC on the device.
- Confirm that there are no other users or a work profile on the device.
- Confirm that there are no accounts on the device.
- Run the following Android Debug Bridge (adb) command in your terminal:
- Once you’ve completed provisioning the device owner, you can test your app on that device. You should specifically test how managed configurations and intents work on that device.
You can also use other provisioning methods—see the Test DPC User Guide. To learn how IT admins typically enroll and provision Android-powered devices, read Provision devices.
End-to-end testing
After you’ve finished testing your app in the environments above, you’ll likely want to test your app in an end-to-end production environment. This process includes the steps a customer needs to take to deploy your app in their organization, including:
- App distribution through Play
- Server-side managed configuration
- Server-side profile policy control
You need to access an EMM console to complete the end-to-end testing. The easiest way to get one is to request a testing console from your EMM. Once you have access, complete these tasks:
- Create a test version of your application with a new ApplicationId.
- Claim a managed Google domain and bind it to your EMM. If you already have a testing domain that’s bound to an EMM, you may need to unbind it to test it with your preferred EMM. Please consult your EMM for the specific unbinding steps.
- Publish your application to the private channel for their managed Google domain.
- Use the EMM console and EMM application to:
- Set up work devices.
- Distribute your application.
- Set managed configuration.
- Set device policies.
This process will differ based on your EMM. Please consult your EMM’s documentation for further details. Congrats! You’ve completed these steps and verified that your app works well for enterprise users.
Content and code samples on this page are subject to the licenses described in the Content License. Java is a registered trademark of Oracle and/or its affiliates.
Источник


