- Are there still any phones with a physical QWERTY keyboard?
- How to Change External Physical Keyboard Layout in Android
- How To Connect Bluetooth Keyboard to Android Device
- Bluetooth Keyboard to Android – Pairing
- MIUI 11 – Android 10
- Android 8 (Oreo)
- Other solutions
- Appendix
- How to Connect Desktop Keyboard to Android Device
- 1. Connect USB keyboard to Android Device
- Useful YouTube Keyboard Shortcuts
- 2. Connect Bluetooth keyboard Android
- 3. Connect PC keyboard to Android (WiFi)
- Ending words
- Кастомизируем раскладку внешней клавиатуры на Android без root
- Теория
- Key Layout файлы
- Key Character Map файлы
- Дополнительные клавиатурные раскладки
- Практика
- Описание проекта
- Кастомизация файла раскладки
- Добавляем раскладку с другим языком
- Установка
- Заключение
Are there still any phones with a physical QWERTY keyboard?
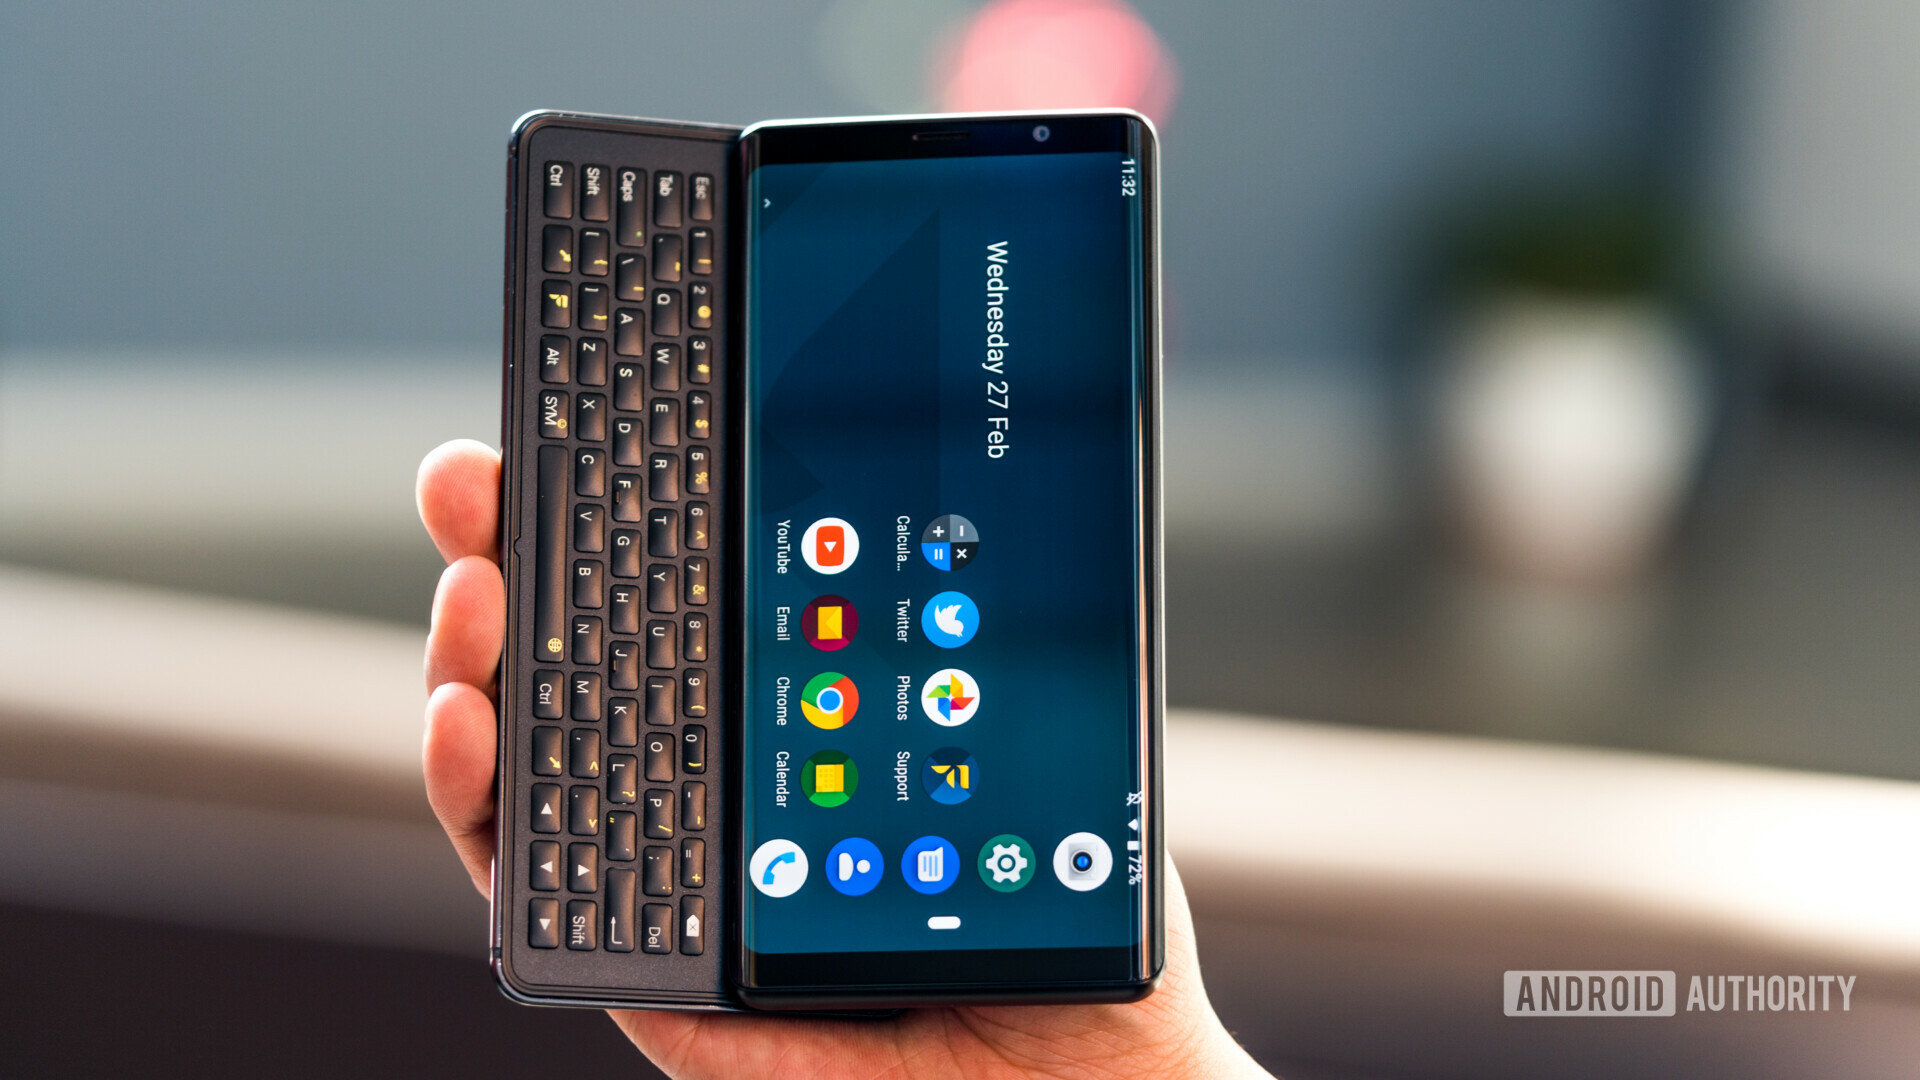
Just a few years ago, most of us had completely written off the idea of a phone with a physical keyboard, as the category was all but dead. Not wanting to let go, BlackBerry started pushing back. The revival of the physical keyboard began with the BlackBerry Priv but didn’t truly heat up until the BlackBerry KeyOne and Key2’s arrival. Unfortunately, it didn’t last, but there is fresh hope.
TCL stopped making Blackberry phones, which left the BlackBerry brand languishing, but it has a fresh new owner in OnwardMobility, which confirmed that it would offer a keyboard-toting 5G Blackberry phone this year. Their website reiterates that claim, but there have been no leaks or rumors surrounding the release of a new BlackBerry.
A crowdfunded phone in the Astro Slide 5G was successful in raising good money in 2020, with an expected October 2021 release date. Unfortunately, it seems like the device is still stuck in the prototype stage, so it looks like backers may have to wait longer. Fxtec will also be releasing the Pro1 X is expected to ship in November and is currently up for pre-order, so there’s definitely something to look forward to in 2021.
While we wait, you really only have some really old options available for now. If you really want a keyboard phone right now though, let’s take a closer look!
Источник
How to Change External Physical Keyboard Layout in Android
Android is very popular because it is highly customizable. It can do almost anything that you desire. It can be customized not only through the hundreds of thousands of the apps available over the Google Play Store, but also by adding external hardware through the USB OTG Host interface. For example, if you find it a little hard and slow to type with the touch keyboard available in Android, then you can add an external USB keyboard through a simple OTG (On the Go) cable. Having an external keyboard attached to your Android smartphone or tablet, not only makes it convenient to type, but you can also go through the Android OS using it.
When you connect an external USB keyboard to your Android device, it shows an “A” icon in the notification bar of Android – telling you that you have to set the keyboard layout for the attached keyboard. Setting a correct keyboard layout is necessary for typing correctly in word processing applications like WDS Office (Kingsoft Office) etc.
Here is how you can setup or change the keyboard layout for an external USB keyboard in Android:
- If you have attached the USB keyboard for the very first time, then you can pull down the notification bar and touch the notification that reads Select Keyboard Layout. It will open the appropriate section of Android settings. Alternatively, you can also open Settings → Language & Input section in Android settings.

- On the Language & Input screen tap on the USB Keyboard under Physical Keyboard section. I used a cheap keyboard so it is showing “USB USB Keyboard” as the keyboard name. For you, it could be something else.
- A popup shall show up displaying the current keyboard layout. You have to touch on Set up keyboard layouts.
- A whole list of keyboard layouts will be displayed. From here, you can choose one or more keyboard layouts as you seem fit for your external USB keyboard.
- That’s it. Now you can enjoy typing using your correct keyboard layout and your external UBS keyboard will work on Android as intended.


Attaching an external USB keyboard may drain the battery power faster. So you may want to use an externally powered USB hub to connect the keyboard. There are also external physical keyboards specially designed for using in Android devices that use very little power and do not make you recharge the Android device battery so often.
Источник
How To Connect Bluetooth Keyboard to Android Device
The virtual keyboard is working nicely on Android. But there are some cases when you really need to connect Bluetooth keyboard to Android device. Here are some examples:
- when you want to write documents in Google Docs or similar apps
- when you manage WordPress sites and you need to easily write plenty of text
- when you are working in Command Line of a terminal application (Termux is a great example)
There are some differences in each Android version and in Android devices with Xiaomi MIUI. I have tried two bluetooth keyboards, a generic one and a Belkin keyboard.
The major difference is that you cannot add multiple keyboard layouts (for different languages) in (pure) Android, only one at a time. On the contrary, in MIUI devices you can.
At least until Android 8 (Oreo) which I have in my tablet.
Here is my experience with two devices I use:
Bluetooth Keyboard to Android – Pairing
You can pair a bluetooth keyboard easily, as you pair any bluetooth device.
- First, go to Settings and enable Bluetooth in your device.
- Then, your phone or tablet will detect the available Bluetooth keyboard and pairing will be done almost automatically.
- A message will appear with a code you need to type in the keyboard to complete the pairing process.
See the videos in the Appendix.
MIUI 11 – Android 10
Settings→ Additional settings → Languages & input → Keyboard, mouse, and trackpad
There is an option to show/hide the virtual android keyboard when an external keyboard is connected. It is very important, as you have more space available on the screen.
Tap on the Physical keyboard to select keyboard layouts.
You can easily activate many keyboard layouts. In my case, English and Greek.
- MI physical keyboard layout en
- MI physical keyboard layout el
 MI physical keyboard layout en
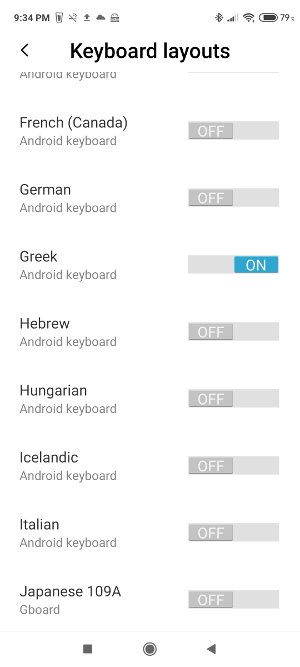 MI physical keyboard layout el
Multiple Keyboard layouts in Physical keyboard
You can easily change language with
CTRL + SPACE
Android 8 (Oreo)
Since you can set only one keyboard layout to the Physical keyboard, you have to change this every time you want to change the language. Not at all convenient …
The workaround I found is to set up a second Android keyboard, for example, Microsoft SwiftKey Keyboard.
I set English (US) layout to default Gboard keyboard and the second layout (Greek in my case) to Swiftkey.
When you have installed more than one keyboards, you can switch between them using a “keyboard” icon at the bottom right of the screen.
So, to write in English, first I choose Gboard.
Then I can write in English.
To write in Greek, I choose Swiftkey.
Then I can write in Greek.
Other solutions
External Keyboard app and External Keyboard Helper Pro app claim that they support multiple keyboard layouts. I have not tried them.
Appendix
Entrepreneur | Full-stack developer | Founder of MediSign Ltd. I have over 15 years of professional experience designing and developing web applications. I am also very experienced in managing (web) projects.
Источник
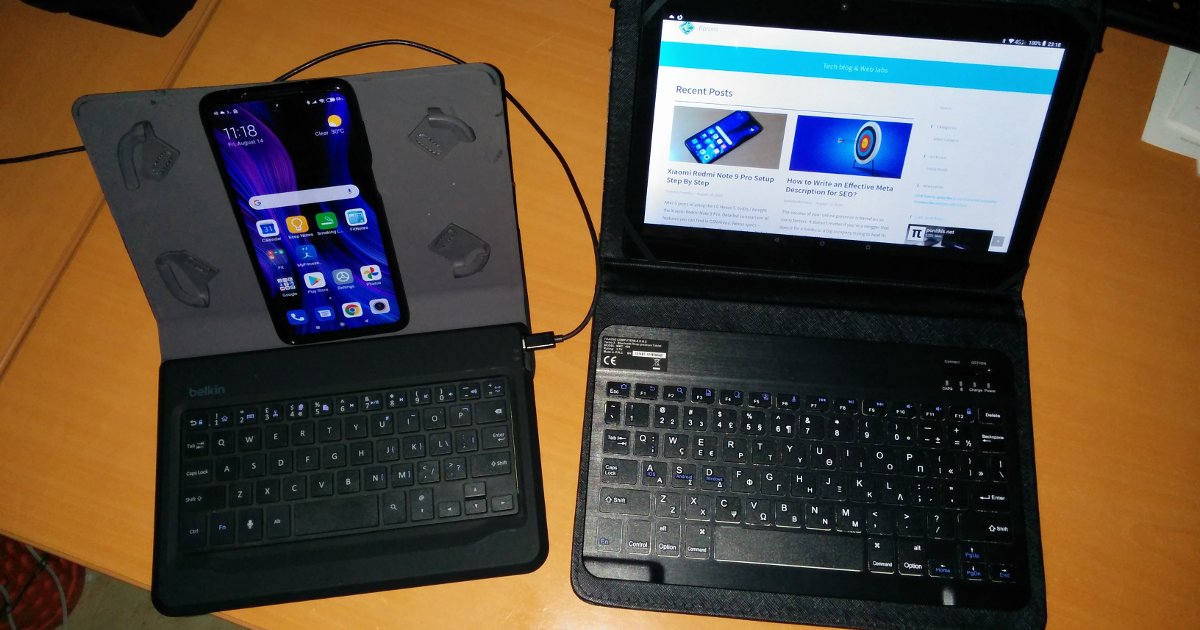
How to Connect Desktop Keyboard to Android Device
Touch typing might be fun, but your options are still a bit limited as compared to typing on a physical keyboard – the one we use with PC. But wait, how about if you can connect your desktop keyboard with your smartphone or tablet?
Yes, you can connect a full-size physical keyboard to your Android device and in this post, I will show you 3 different ways how to do just that. Let’s check it out.
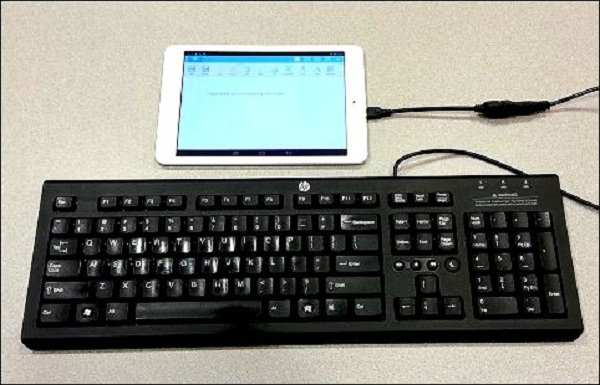
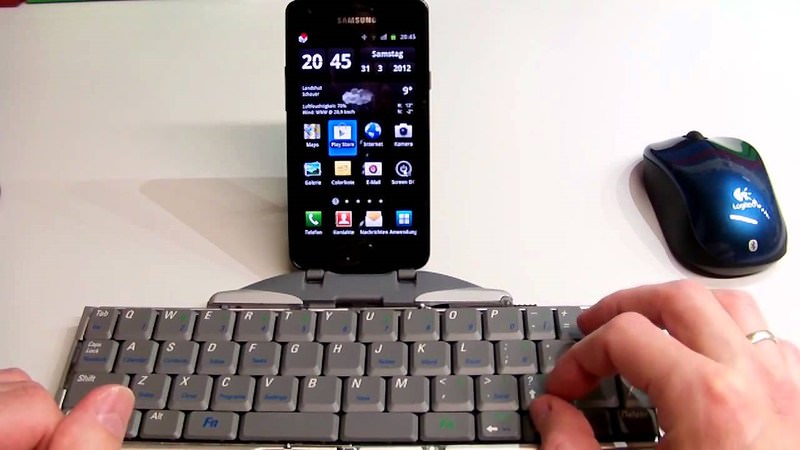
1. Connect USB keyboard to Android Device
You can connect a USB Keyboard to an Android device via a USB OTG (On-The-Go) adapter, provided that your device is USB OTG-supported. If you bought your Android devices in the last 3 years, chances are, it will support using USB OTG.
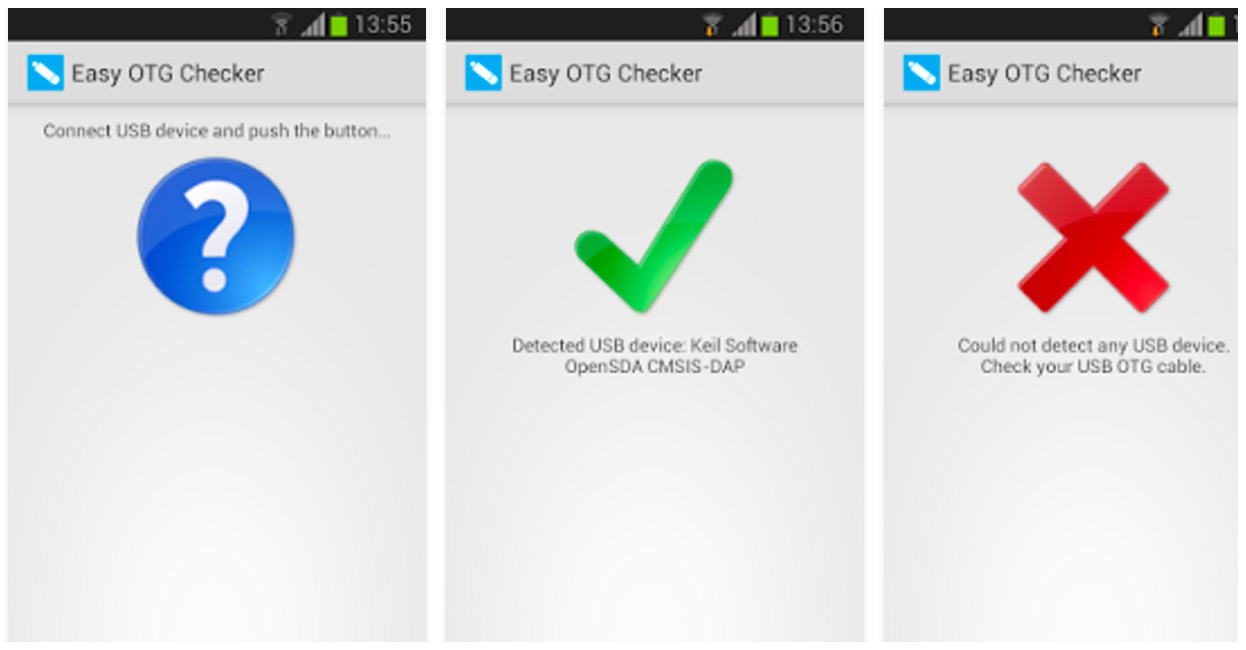
However, if you are unsure, you can confirm it with this app – Easy OTG Checker. This app automatically detects required USB OTG hardware and software API.
Alternatively, you can also get the USB OTG adapter online for as low as $5. I would recommend UGREEN Micro USB and Ksmile USB Host.
With the USB OTG, do the following:
- Connect the keyboard to the USB connector and your phone to the micro-USB connector.
- The keyboard will automatically connect just as it connects to your PC.
- Open any app and start typing on the keyboard and the text will start appearing.
Once it’s successfully connected, you can use all keys (Page up Page Down, etc) and shortcuts ( Ctrl + A ) the way you want.
Useful YouTube Keyboard Shortcuts
Many people today spend most of their time on YouTube, whether for learning purpose or watching some cat. Read more
2. Connect Bluetooth keyboard Android
A Bluetooth Keyboard can also be connected to your Android phone and is more convenient and easier to set up. Here’s how you do it:
- Turn on Bluetooth on both devices.
- From the list of nearby Bluetooth devices, select the keyboard. If asked, provide a pin code. Usually, it’s “0000“.
- The keyboard will connect and you can start typing.
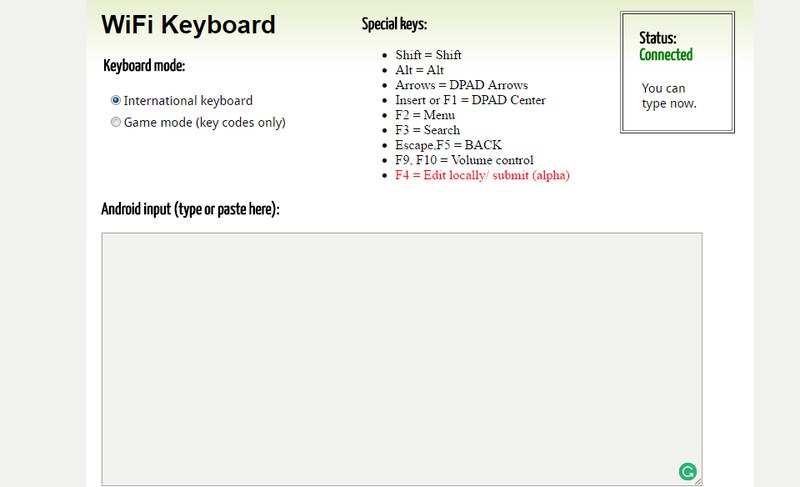
3. Connect PC keyboard to Android (WiFi)
Using an app, you can connect your PC and Android phone over Wi-Fi, and transfer text from the PC to the phone. This method is probably good when you need to type a lengthy text on your phone.
I recommend WiFi Keyboard app for this that allows you to transfer text using a browser window. Once installed, you need to set it as the default input method.
- Go to Settings and tap on Language & Input.
- Tap on Current keyboard option and then tap on Choose your keyboard.
- Here, enable WiFi Keyboard.
- Tap on the Current keyboard option again and choose WiFi Keyboard.
- Now, open the WiFi Keyboard app and you’ll see two addresses (can also be accessed from notification bar). You can enter any of these addresses in your PC’s browser window to open WiFi keyboard web interface.


Anything you type in the web interface text field will appear on your phone. In my testing, the typing was very responsive, but there is no text preview. So you need to preview the input on your phone.
Tip: Make sure you disconnect keyboard after use as it drains phone battery faster (no matter which method you use).
Ending words
If you have a Bluetooth keyboard, then connecting it to your Android device won’t be a problem. However, connecting over Wi-Fi is a great option if you don’t want to spend any extra cash. Do let me know which method worked for you, simply in the comment section below.
Источник
Кастомизируем раскладку внешней клавиатуры на Android без root
Мне нравится раскладка клавиатур на Mac: Cmd(Ctrl) под большим пальцем и возможность, без шаманства, прямо в настройках изменить поведение CapsLock. Такого же результата легко добиться в Linux с помощью setxkbmap в консоли или, например, gnome-tweak-tool в UI. Но что делать, если клавиатура подключается к Android?
В Android существует несколько способов кастомизировать внешнюю клавиатуру:
- Установка сторонней клавиатуры. Например, External Keyboard Helper.
- Правка/добавление kl или kcm файлов (требуется root). Как, например, в этом посте.
- Установка приложения, которое добавляет дополнительные клавиатурные раскладки.
Устанавливать стороннюю клавиатуру не хочется. Рутовать телефон — тоже. Остаётся третий вариант.
Теория
Вкратце пробежимся по основным понятиям со ссылками на документацию.
Key Layout файлы
Key layout (.kl) файлы отображают линуксовые коды клавиш (Linux Key Code), т.е. код, который производит конкретная клавиша на клавиатуре, на андродовские клавиши (Android Key), т.е. TAB, ENTER или просто буква F. Отображение по-умолчанию можно посмотреть здесь. Узнать, какая клавиша на клавиатуре какой код производит, можно, например, с помощью Gamepad Tester.
Key Character Map файлы
Key Character Map (.kcm) файлы позволяют задать поведение для сочетания клавиш, а также нужны для добавления раскладок, отличных от English(US).
Дополнительные клавиатурные раскладки
Начиная с версии 4.1 в Android стало возможным устанавливать вместе с приложением дополнительные раскладки клавиатуры. После установки раскладки доступны в Settings -> Language & input -> Physical keyboard . Минус этого подхода в том, что раскладки неизменяемы, и нет возможности кастомизировать их «на лету».
Практика
Вот что я хочу получить для моей клавиатуры:
- Esc вместо CapsLock.
- Поменять Ctrl/Win/Alt на Win/Alt/Ctrl слева и Alt/PrintScreen/Ctrl на Ctrl/Alt/Ctrl справа.
- Поменять переключение приложений с Alt+Tab на Ctrl+Tab.
- Скриншот на Ctrl+Shift+3.
- Переключение языков по Win+Space.
- Поддержка английской и русской раскладок.
Описание проекта
Т.к. мои вкусы весьма специфичны (Ты же хочешь Ctrl вместо CapsLock, мой дорогой любитель Vim?), а раскладки неизменяемы «на лету», я не предоставляю готовый apk-файл. Вместо этого создан custom-keyboard-layout — проект основа для кастомизации раскладки внешней клавиатуры на Android.
Клонируем проект к себе
Манифест приложения app/src/main/AndroidManifest.xml :
Приложение состоит из одного reciever . Забавно, что само наличие класса с заданным именем (в нашем случае InputDeviceReceiver ) не требуется — всё работает и без него, но имя мы задать обязаны. Этот reciever предоставляет список клавиатурных раскладок, хранящийся в app/src/main/res/xml/keyboard_layouts.xml :
В списке только одна раскладка — keyboard_layout_en_us .
Кастомизация файла раскладки
Файл раскладки app/src/main/res/raw/keyboard_layout_en_us.kcm состоит из одной строки, задающей тип раскладки:
Про этот тип ничего не сказано в документации, но опытным путём выяснено, что раскладка с таким типом по-умолчанию берёт значения из Generic.kcm. Т.е. мы уже получили английскую раскладку и всё что остаётся — это добавить наши правила.
Но сперва небольшое отступление про Key Layout файлы. Раскладки задаётся как kcm-файл, но для того чтобы поменять местами, например, Ctrl и Alt необходим kl-файл. Тут на помощь приходит ещё одна незадокументированная фича: с помощью команды map можно добавлять правила из kl-файла в kcm-файл.
Файл keyboard_layout_en_us.kcm с моими правилами:
К сожалению, у меня не получилось задать переключение языков по Win+Space — такое правило просто не срабатывало.
Добавляем раскладку с другим языком
Для добавления раскладки другого языка, отличного от English(US), нужно сперва составить kcm-файл с раскладкой этого языка, затем добавить к нему наши правила. Взять готовый файл для своего языка можно отсюда. Берём keyboard_layout_russian.kcm, кладём в app/src/main/res/raw/ и, соответственно, добавляем ещё одну раскладку в app/src/main/res/xml/keyboard_layouts.xml :
Не забываем добавить keyboard_layout_ru_label в app/src/main/res/values/strings.xml .
Теперь можно добавить наши правила, как в примере с английской раскладкой, но с небольшим изменением. В русской раскладке уже есть правило для ‘3’, поэтому нужно лишь изменить его, а не добавлять новое:
Состояние проекта после этой кастомизации можно посмотреть в ветке Vendor_17ef_Product_6048.
Установка
Собираем и устанавливаем наше приложение. Проще всего это сделать с помощью Android Studio следуя официальной документации.
Если всё сделано правильно, то в Settings -> Language & input -> Physical keyboard появятся наши раскладки, а в списке приложений — Custom Keyboard Layout .
Заключение
Кастомизация внешней клавиатуры без root возможна. Не все хотелки при этом достижимы: переключение языков по Win+Space так и не заработало, но это может быть проблемой прошивки.
Статья нарочно сделана краткой — все подробности можно найти по ссылкам.
Источник


