- Android — Network Connection
- Checking Network Connection
- Performing Network Operations
- Example
- Взаимодействие Android-устройств в локальной сети
- О чем это и для кого это?
- Какие возможные способы решения существуют?
- Android Networking — Tutorial
- 1. Overview of network access on Android
- 1.1. Accessing the network in Android
- 1.2. Permission to access the network
- 1.3. Check the network availability
- 2. Web Sockets
- Using Mobile Networking on Android Phones
- Android offers many ways to connect
- Mobile Phone Data Usage
- Bluetooth Settings on Android Phones
- NFC Settings on Android Phones
- Mobile Hotspots and Tethering on Android Phones
- Advanced Mobile Settings on Android Phones
Android — Network Connection
Android lets your application connect to the internet or any other local network and allows you to perform network operations.
A device can have various types of network connections. This chapter focuses on using either a Wi-Fi or a mobile network connection.
Checking Network Connection
Before you perform any network operations, you must first check that are you connected to that network or internet e.t.c. For this android provides ConnectivityManager class. You need to instantiate an object of this class by calling getSystemService() method. Its syntax is given below −
Once you instantiate the object of ConnectivityManager class, you can use getAllNetworkInfo method to get the information of all the networks. This method returns an array of NetworkInfo. So you have to receive it like this.
The last thing you need to do is to check Connected State of the network. Its syntax is given below −
Apart from this connected states, there are other states a network can achieve. They are listed below −
| Sr.No | State |
|---|---|
| 1 | Connecting |
| 2 | Disconnected |
| 3 | Disconnecting |
| 4 | Suspended |
| 5 | Unknown |
Performing Network Operations
After checking that you are connected to the internet, you can perform any network operation. Here we are fetching the html of a website from a url.
Android provides HttpURLConnection and URL class to handle these operations. You need to instantiate an object of URL class by providing the link of website. Its syntax is as follows −
After that you need to call openConnection method of url class and receive it in a HttpURLConnection object. After that you need to call the connect method of HttpURLConnection class.
And the last thing you need to do is to fetch the HTML from the website. For this you will use InputStream and BufferedReader class. Its syntax is given below −
Apart from this connect method, there are other methods available in HttpURLConnection class. They are listed below −
| Sr.No | Method & description | |||||||||||
|---|---|---|---|---|---|---|---|---|---|---|---|---|
| 1 |
| Steps | Description |
|---|---|
| 1 | You will use Android studio IDE to create an Android application under a package com.tutorialspoint.myapplication. |
| 2 | Modify src/MainActivity.java file to add Activity code. |
| 4 | Modify layout XML file res/layout/activity_main.xml add any GUI component if required. |
| 6 | Modify AndroidManifest.xml to add necessary permissions. |
| 7 | Run the application and choose a running android device and install the application on it and verify the results. |
Here is the content of src/MainActivity.java.
Here is the content of activity_main.xml.
Here is the content of Strings.xml.
Here is the content of AndroidManifest.xml
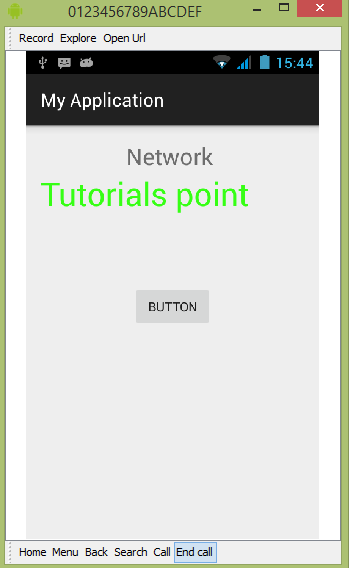
Let’s try to run your application. I assume you have connected your actual Android Mobile device with your computer. To run the app from android studio, open one of your project’s activity files and click Run  icon from the tool bar. Before starting your application, Android studio will display following window to select an option where you want to run your Android application.

Select your mobile device as an option and then check your mobile device which will display following screen −
Now just click on button, It will check internet connection as well as it will download image.
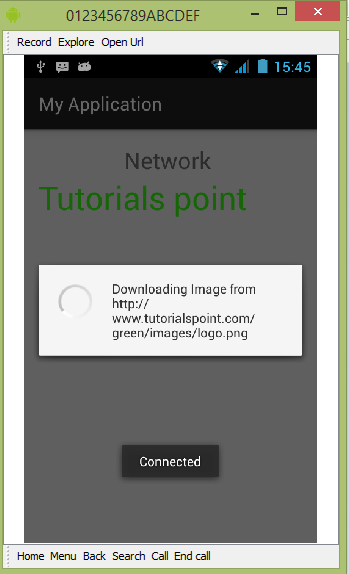
Out would be as follows and it has fetch the logo from internet.
Источник
Взаимодействие Android-устройств в локальной сети

Предположим, мы пишем игру для Android, которая подразумевает некое сетевое взаимодействие между устройствами. Причем наши устройства находятся в одной сети и мы хотим, чтобы взаимодействие между ними осуществлялось быстро, а значит вариант с обменом данными через интернет нам не подходит. Ах да, еще одна маленькая ложка дегтя — мы хотим охватить максимально возможную аудиторию, для чего нам необходимо поддерживать Android 2.3.
Что же нам делать? Давайте поговорим об этом, а заодно рассмотрим относительно новые возможности Android SDK для соединения двух и более устройств.
О чем это и для кого это?
Как-то раз, уйдя с предыдущего места работы и погрузившись в заслуженный отдых, я принялся писать сетевую игру, в которую могут играть люди, находящиеся в одной локальной сети. И сразу же столкнулся с тем, что для нормального функционирования подобной игры нам мало соорудить сетевое взаимодействие — нам нужно сделать нормальное и быстрое обнаружение устройств в сети. Собственно, в данной статье я поделюсь своим опытом в реализации решения для данной задачи.
Сразу оговорюсь, что статья предназначена в большей мере для тех, кто имеет опыт Android-разработки, написал несколько приложений и хочет расширить свой кругозор, а также улучшить профессиональные навыки.
Какие возможные способы решения существуют?
- Android Network Service Discovery. Простой и эффективный способ обнаружения устройств. На Android Developer есть пошаговое руководство по подключению NSD, есть пример NsdChat, который можно скачать там же. Но есть один существенный минус — данный метод поддерживается только начиная с API Level 16, то есть с Android 4.1 Jelly Bean;
- Второе решение, предлагаемое нам на сайте Android Developer — Wi-Fi Peer-to-Peer. Проблема этого метода та же самая — поддерживается он только начиная с API Level 16;
- Есть странное решение, которое предлагается некоторыми программистами на Stack Overflow — самостоятельно сканировать локальную сеть на предмет наличия сервера. То есть проходить по всем адресам сети. Это уже сейчас звучит как странный велосипед, а теперь представьте, что порт нашего сервера назначается автоматически. Таким образом, сканирование даже самую небольшой сети становится достаточно долгой и трудоемкой задачей;
- Наконец, мы можем обратить внимание на Java-библиотеки и написать что-нибудь с их использованием. Например, JmDNS.
Последний способ выглядит вполне адекватным и, кажется, может обеспечить нас требуемой скоростью и удобством обнаружения устройств в сети для конечного пользователя.
Я вооружился JmDNS и решил попробовать соорудить несколько классов, которые по максимуму упростят написание описанных выше приложений. Но для начала пришлось немного повырезать дубликаты .class-файлов из jar-пакета JmDNS (проблема описана здесь):
Далее я взял исходный код NsdChat с Android Developer и изменил его служебный класс, который отвечает за инициализацию сокетов и организацию сетевого взаимодействия. Также я написал wrapper для JmDNS
Здесь размещены 4 основные функции для работы Network Discovery:
- startServer для создания сервера и регистрации соответствующего сервиса в локальной сети;
- findServers для поиска серверов;
- reset для окончания работы с Network Discovery и последующего освобождения ресурсов;
- wifiLock для запроса блокировки Wi-Fi.
В завершении я написал универсальный класс ConnectionWrapper для полноценной организации обнаружения, а также обмена сообщениями в локальной сети. Таким образом, создание сервера в конечном приложении выглядит следующим образом:
А вот и mServerHandler, использующийся для приема и обработки сообщений:
Отправка сообщений еще проще:
И, наконец, метод для обнаружения и подключения к серверу:
Как видите, все очень просто. А главное, все это работает в любой версии Android для максимум двух устройств. Но сделать так, чтобы это работало для условно неограниченного числа устройств очень легко, и очевидное решение придет к вам почти сразу после детального изучения класса Connection. Пусть это будет в качестве домашнего задания.
Ах, да, весь код доступен для изучения и использования всеми желающими в моем репозитории на GitHub.. И, конечно, не исключаю то, что некоторые вещи можно сделать лучше и проще, поэтому не стесняйтесь форкать и делать pull request’ы.
Источник
Android Networking — Tutorial
Performing HTTP operations with Android. This article describes how to access web resources via HTTP in Android.
1. Overview of network access on Android
1.1. Accessing the network in Android
Within an Android application you should avoid performing long running operations on the user interface thread. This includes file and network access.
The Android system crashes your application with a NetworkOnMainThreadException exception, if you access network is accessed from the main thread.
Android contains the standard Java network java.net package which can be used to access network resources. The base class for HTTP network access in the java.net package is the HttpURLConnection class.
Performing network operations with standard Java API can be cumbersome. You have to open and close a connections, enable caches and ensure to perform the network operation in a background thread.
To simplify these operations several popular Open Source libraries are available. The most popular ones are the following:
OkHttp for efficient HTTP access
Retrofit for REST based clients
Glide for image processing
Prefer using OkHttp over the usage of HttpURLConnection . It is faster than the standard Java library and has a better API.
1.2. Permission to access the network
To access the Internet your application requires the android.permission.INTERNET permission. On modern Android API versions, this permission is automatically granted to your application.
1.3. Check the network availability
The network on an Android device is not always available. To check the network state your application requires the android.permission.ACCESS_NETWORK_STATE permission. You can check the network is currently available via the following code.
This requires the ACCESS_NETWORK_STATE permission.
2. Web Sockets
Web Sockets are a standard based on HTTP for asynchronous message-based communication between a client and a server. To start a web socket communication, you create a HTTP GET request with a special HTTP headers. If the server accepts this request, the client and the server can send each other messages.
Messages can be text or binary data and should be relatively small, as the web socket protocol is intended to be used with small payloads in the data.
It is good practice to use JSON as data format for the messages.
Источник
Using Mobile Networking on Android Phones
Android offers many ways to connect
Your Android phone makes working with mobile networking easy using a few different methods. Here’s how to navigate the network settings in Android to find out how data is used, turn networking features on and off, share data with another device, and make the phone a mobile hotspot.
Instructions in this article apply to Android versions 8 (also known as Oreo) and up.
Mobile Phone Data Usage
Many phone and data service plans have associated limits and fees. Your Android smartphone tracks this mobile data usage.
:max_bytes(150000):strip_icc()/001-using-mobile-networking-on-android-phones-817469-e39687dbf7cf48be811741d9bbef6eb7.jpg)
Open the Settings app, then tap Network > Mobile data to find options that:
- Switch off mobile data. This prevents the phone from sending and receiving data over a cell connection. It doesn’t prevent the phone from sending and receiving a Wi-Fi connection.
- Limit mobile data usage. This switches off mobile data traffic when a specified usage amount is reached
Bluetooth Settings on Android Phones
Use the Bluetooth feature of your Android phone to connect the phone to wireless devices such as earbuds or noise-canceling headphones. To find the settings to enable and disable Bluetooth and to pair a new device, open the Settings app and tap Network > Bluetooth. To turn Bluetooth on and off, tap the Bluetooth toggle switch.
Keep Bluetooth off when not using it to improve the security of your device.
:max_bytes(150000):strip_icc()/002-using-mobile-networking-on-android-phones-817469-e3c495541aef447f8a99b825927f4707.jpg)
To find other Bluetooth devices within signal range, tap the Rescan icon. Bluetooth devices that are found appear in the list. Tap the name or icon for a device to initiate a pairing request.
NFC Settings on Android Phones
Near Field Communication (NFC) is a radio communication technology that is separate from Bluetooth and Wi-Fi. NFC enables two devices that are close to each other to exchange data using very little power. NFC is sometimes used to make purchases from a mobile phone (known as mobile payments).
:max_bytes(150000):strip_icc()/003-using-mobile-networking-on-android-phones-817469-056d953038604d6dae9486ca5ac3fd12.jpg)
The Android operating system includes a feature called Beam that enables data sharing from apps using an NFC link. To use NFC, go to Settings > Network > NFC and enable Android Beam. To use it, touch two devices together so that the NFC chips are close enough to make a connection.
Positioning the two devices back to back generally works best for an NFC connection. You can use NFC with or without Beam.
Mobile Hotspots and Tethering on Android Phones
Set up your Android phone to share a wireless connection with a local device network. This turns the Android into a personal hotspot (also known as a portable hotspot). Other devices with the network name and password can log into this network and share the internet connection.
Your service provider might include a setting specifically for tethering on your phone, so methods vary. Generally, to find the settings, go to Network > Tethering > Mobile hotspot.
:max_bytes(150000):strip_icc()/004-using-mobile-networking-on-android-phones-817469-edba6a82fe824b438ff6bba884dd1348.jpg)
The Mobile Hotspot menu controls personal hotspot support for Wi-Fi devices. Use this menu to turn the feature on and off, and control the required parameters for a new hotspot. To set up a hotspot, you’ll provide:
- A hotspot network name (Wi-Fi SSID).
- The network security option (WPA2 or other).
- The timeout value, which automatically shuts off the hotspot after the specified number of minutes of inactivity, also a useful security feature.
The Tethering menu allows you to use Bluetooth or USB instead of Wi-Fi for connection sharing.
To avoid unwanted connections and security exposure, turn off these features unless actively being used.
Advanced Mobile Settings on Android Phones
These mobile network settings are less commonly used but are important in certain situations:
Источник


