- JDK отсутствует при создании приложения на основе Xamarin в Visual Studio 2015 г.
- Симптомы
- Причина
- Обходной путь
- Сравнение производительности Xamarin (monodroid) и Java (DalvikVM) на Android устройствах
- Методика проверки
- Реализация
- Результат
- Вывод
- Setting up the Android SDK for Xamarin.Android
- Overview
- Requirements
- SDK Manager
- Android SDK location
- Tools tab
- Platforms tab
- Repository selection
- Requirements
- SDK Manager
- Locations tab
- Tools tab
- Platforms tab
- Repository selection
- Summary
JDK отсутствует при создании приложения на основе Xamarin в Visual Studio 2015 г.
В этой статье помогают решить проблему, из-за которой при создании приложения Xamarin Android или Xamarin.Forms в Microsoft Visual Studio 2015 г. отсутствует набор Java Development Kit (JDK).
Оригинальная версия продукта: Visual Studio 2015 г.
Исходный номер КБ: 4483429
Симптомы
При создании приложения Xamarin Android или Xamarin.Forms в Visual Studio 2015 г. вы можете получить сообщение об ошибке, напоминаемую следующее:
Xamarin.Android для Visual Studio требует Java Development Kit. Установите его или установите путь набора java в меню Tools->Options->Xamarin->Android Параметры.
Например, вы видите диалоговое окно сообщения об ошибке, аналогичное следующему скриншоту:

Причина
Эта проблема возникает из-за того, что Oracle больше не разрешает распространение JDK в Visual Studio (по данным на январь 2019 г.).
Обходной путь
Чтобы решить эту проблему, выполните следующие действия:
- Установите последнюю версию JDK 8, доступную на веб-странице Oracle Java SE 8 Downloads.
- Следуйте инструкциям в сообщении об ошибке, чтобы вручную указать экземпляр Visual Studio на расположение нового JDK.
Мы рекомендуем вам обновить последнюю версию Visual Studio, чтобы не отстать от последних изменений в разработке iOS и Android.
Заявление об отказе от ответственности за сведения о продуктах сторонних производителей
В этой статье упомянуты программные продукты независимых производителей. Корпорация Майкрософт не дает никаких гарантий, подразумеваемых и прочих, относительно производительности и надежности этих продуктов.
Источник
Сравнение производительности Xamarin (monodroid) и Java (DalvikVM) на Android устройствах

Добрый день. Многие интересуются насколько сильно отличается производительность Xamarin на Android или iOS. Вопрос с iOS я пока оставлю открытым, а вот все вопросы по производительности monodroid предлагаю закрыть раз и навсегда.
Зачастую эти вопросы вызваны из-за неправильного понимания как устроен monodroid, мне например задавали вопросы типа «А Xamarin потом пересобирается под JVM?». Это конечно же не так. Важно понимать, что Xamarin выполняется на том же уровне Android где работает виртуальная машина Android Dalvik. Поэтому при сравнении производительности мы на деле имеем сравнение эффективности работы двух виртуальных машин: Mono VM и Dalvik VM.
Методика проверки
Для проверки производительности необходим реализованный на Java и общепризнанный метод, который необходимо будет реализовать на C#. Я решил использовать известный тест производительности LINPACK в первую очередь потому что его исходный код открыт и легко будет реализовать C# версию, а во-вторую — есть уже готовая Android версия LINPACK for Android написанная на Java.
Тест производительности LINPACK это метод оценки производительности путем оценки скорости выполнения операций с плавающей точкой вычислительной системы. Бенчмарк создан Джеком Донгарра (Jack Dongarra) и измеряет как быстро компьютер ищет решение плотной СЛАУ Ax = B размерностью N x N методом LU-декомпозиции. Решение получено методом Гаусса с выделением главного элемента (описание), при котором выполняется 2/3*N 3 + 2*N 2 операций с плавающей точкой. Результат определяется в Floating-point Operations Per Second(MFLOP / s, чаще просто FLOPS). Сам тест производительности был описан в документации к фортрановской библиотеке линейных вычислений LINPACK и с тех пор его вариации используются, например, для составления рейтинга TOP500 суперкомпьютеров.
Реализация
Несмотря на довольно простую задачу я решил реализовывать ее согласно выработанному мною гайдлайну на кроссплатформенную разработку.
На первом шаге строим кроссплатформенное решение: 
Потом согласно шаблону проектирования MVP создаем Presenter и View
Пишем тесты и реализуем Presenter через тест. Для этого я использую NUnit и NSubstitute. Описывать NUnit особого смысла нету, на мой взгляд более удобного фреймворка для тестирования просто нету. NSubstitute это крайне удобный фреймворк для создания заглушек на основании интерфейсов. Фреймворки устанавливаются через NuGet.
В нашем случае сначала создаем Setup метод
И выполняем простой тест, естественно асинхронно
Сторонним ПО я выяснил что производительность моего ПК — около 130 MFLOPS/s, так что его и впишем в ожидаемые значения, добавив погрешность.
Внутри метода у меня создание асинхронной Task и заполнение View. Все просто и понятно
Программа фактически реализована, ни строчки платформозависимого кода пока написано не было. Теперь создаем Android проект:
визуальный конструктор внутри Visual Studio позволит нам быстро и просто накидать необходимое приложение и посмотреть как оно выглядит с разными темами. Правда, так как ни одна из тем не была применена к Activity то на устройстве мы получим вид по умолчанию
Теперь остается только скомпилировать релиз, подписать его приложенным к студии мастером и установить на устройства с помощью консольной утилиты adb.exe
Недавно я приметил, что скорость выполнения кода зависит не только от Debug/Release но и от подключения устройства по USB. Происходит это из-за того что при подключенном телефоне в режиме разработки Android гонит огромные объемы отладочной информации на компьютер, что может повлиять на скорость выполнения операций (а может и не повлиять), особенно если есть конструкции логирования типа Trace. Поэтому отключаем устройства и запускаем тесты.
Результат
У меня два тестовых устройства, HTC Desire с Android 2.3 (Qualcomm QSD8250, 1000 МГц, 512 ОЗУ) и Fly IQ443 с Android 4.0.4 (MediaTek MT6577, 1000 МГц, 512 ОЗУ)
Вот их результаты:
HTC Desire:
 |  |
Fly IQ443:
| |
И красивые графики
Вывод
Результаты теста показывают что работа Mono на Android как минимум сравнима, а иногда и превосходит производительность Dalvik, но в целом они примерно равны. Второй столбец некорректен, т.к. Mono самостоятельно распараллелил тест на два ядра без каких либо действий с моей стороны, полагаю где-то на уровне Task’ов, в то время как для Linpack for Android необходимо явно выбрать мультипоточный тест.
Кстати говоря, этот проект показывает различия в размерах для релизовых сборок. Java версия теста весит всего лишь 280Кб, когда Monodroid версия весит почти 2.3 МБ на один тип процессора (armeabi и armeabi-v7), т.е. в сумме 4.6 МБ, что впрочем в условиях современных сетей не кажется мне особо критичным. Если такой размер apk кажется вам неприемлемым можно отдельно собрать и распространять пакеты для armeabi и armeabi-v7, благо Google Play позволяет загружать разные apk для разных платфом.
Исходный код приложения находится здесь
P.S. Мне бы хотелось собрать статистику по устройствам. Так что если у кого есть Android и 10 минут свободного времени буду очень благодарен если вы измерите производительность вашего устройства с помощью LINPACK for Android и вновь созданной MonoLINPACK и запишите результат сюда (если у вас многоядерный процессор выбирайте сразу Run Multiple Thread в LINPACK for Android)
P.P.S. Аналогичный тест для iOS будет
UPD1 По текущим тестам видно что Mono и Task по умолчанию не использует все ядра на 4-ядерных процессорах. Поэтому результаты между Linpack for Android и MonoLinpack на таких устройствах сильно различаются. В ближайшее время MonoLINPACK будет модифицирован с использование TPL.
Источник
Setting up the Android SDK for Xamarin.Android
Visual Studio includes an Android SDK Manager that you use to download Android SDK tools, platforms, and other components that you need for developing Xamarin.Android apps.
Overview
This guide explains how to use the Xamarin Android SDK Manager in Visual Studio and Visual Studio for Mac.
This guide applies to Visual Studio 2019, Visual Studio 2017, and Visual Studio for Mac.
The Xamarin Android SDK Manager (installed as part of the Mobile development with .NET workload) helps you download the latest Android components that you need for developing your Xamarin.Android app. It replaces Google’s standalone SDK Manager, which has been deprecated.
Requirements
To use the Xamarin Android SDK Manager, you will need the following:
Visual Studio 2019 Community, Professional, or Enterprise.
OR Visual Studio 2017 (Community, Professional, or Enterprise edition). Visual Studio 2017 version 15.7 or later is required.
Visual Studio Tools for Xamarin version 4.10.0 or later (installed as part of the Mobile development with .NET workload).
The Xamarin Android SDK Manager also requires the Java Development Kit (which is automatically installed with Xamarin.Android). There are several JDK alternatives to choose from:
By default, Xamarin.Android uses JDK 8, which is required if you are developing for API level 24 or greater (JDK 8 also supports API levels earlier than 24).
You can continue to use JDK 7 if you are developing specifically for API level 23 or earlier.
If you are using Visual Studio 15.8 Preview 5 or later, you can try using Microsoft’s Mobile OpenJDK Distribution rather than JDK 8.
Xamarin.Android does not support JDK 9.
SDK Manager
To start the SDK Manager in Visual Studio, click Tools > Android > Android SDK Manager:
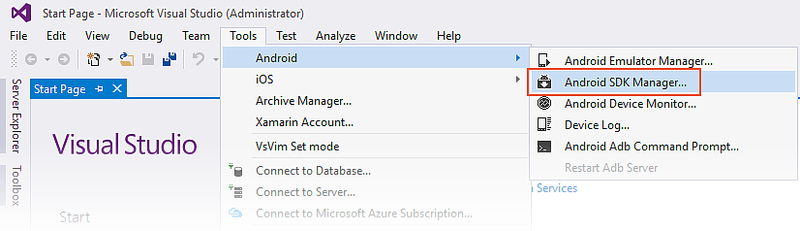
The Android SDK Manager opens in the Android SDKs and Tools screen. This screen has two tabs – Platforms and Tools:
The Android SDKs and Tools screen is described in more detail in the following sections.
Android SDK location
The Android SDK location is configured at the top of the Android SDKs and Tools screen, as seen in the previous screenshot. This location must be configured correctly before the Platforms and Tools tabs will function properly. You may need to set the location of the Android SDK for one or more of the following reasons:
The Android SDK Manager was unable to locate the Android SDK.
You have installed the Android SDK in a alternate (non-default) location.
To set the location of the Android SDK, click the ellipsis (…) button to the far right of Android SDK Location. This opens the Browse For Folder dialog to use for navigating to the location of the Android SDK. In the following screenshot, the Android SDK under Program Files (x86)\Android is being selected:
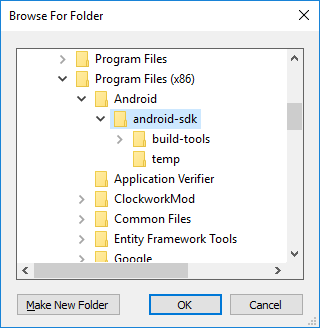
When you click OK, the SDK Manager will manage the Android SDK that is installed at the selected location.
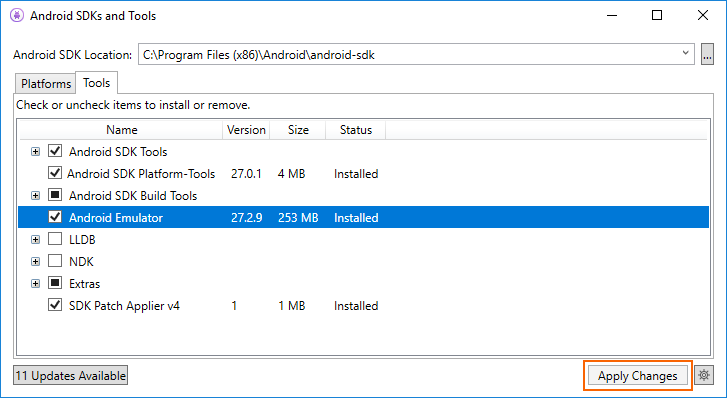
Tools tab
The Tools tab displays a list of tools and extras. Use this tab to install the Android SDK tools, platform tools, and build tools. Also, you can install the Android Emulator, the low-level debugger (LLDB), the NDK, HAXM acceleration, and Google Play libraries.
For example, to download the Google Android Emulator package, click the check mark next to Android Emulator and click the Apply Changes button:
A dialog may be shown with the message, The following package requires that you accept its license terms before installing:
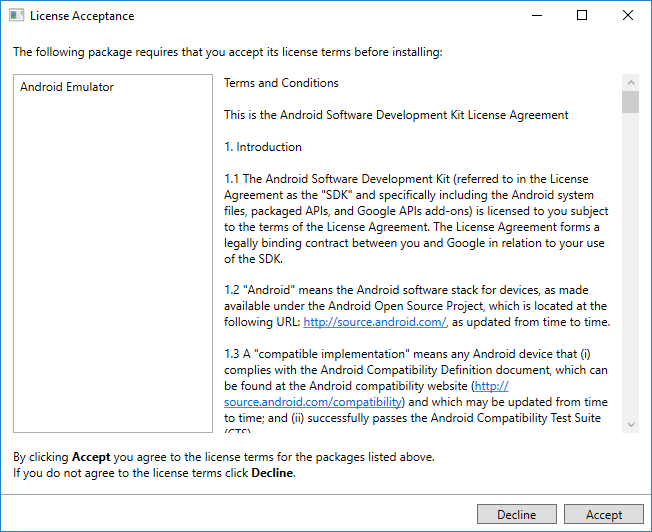
Click Accept if you accept the Terms and Conditions. At the bottom of the window, a progress bar indicates download and installation progress. After the installation completes, the Tools tab will show that the selected tools and extras were installed.
Platforms tab
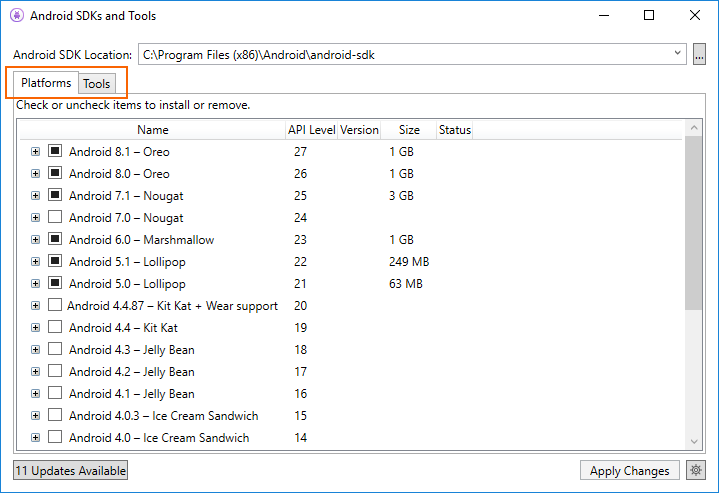
The Platforms tab displays a list of platform SDK versions along with other resources (like system images) for each platform:
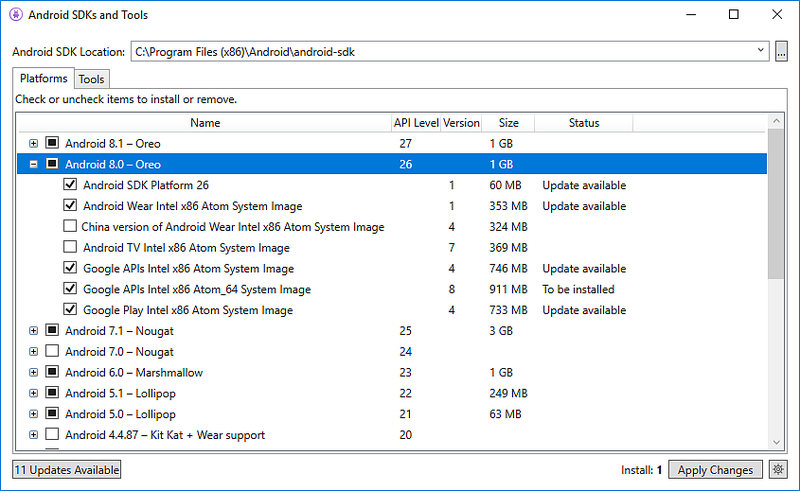
This screen lists the Android version (such as Android 8.0), the code name (Oreo), the API level (such as 26), and the sizes of the components for that platform (such as 1 GB). You use the Platforms tab to install components for the Android API level that you want to target. For more information about Android versions and API levels, see Understanding Android API Levels.
When all components of a platform are installed, a checkmark appears next to the platform name. If not all components of a platform are installed, the box for that platform is filled. You can expand a platform to see its components (and which components are installed) by clicking the + box to the left of the platform. Click — to unexpand the component listing for a platform.
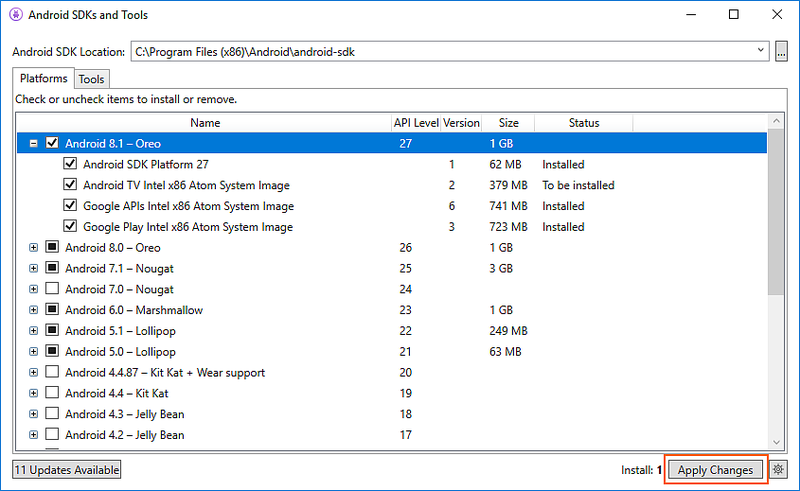
To add another platform to the SDK, click the box next to the platform until the checkmark appears to install all of its components, then click Apply Changes:
To install only specific components, click the box next to the platform once. You can then select any individual components that you need:

Notice that the number of components to install appears next to the Apply Changes button. After you click the Apply Changes button, you will see the License Acceptance screen as shown earlier. Click Accept if you accept the Terms and Conditions. You may see this dialog more than one time when there are multiple components to install. At the bottom of the window, a progress bar will indicate download and installation progress. When the download and installation process completes (this can take many minutes, depending on how many components need to be downloaded), the added components are marked with a checkmark and listed as Installed.
Repository selection
By default, the Android SDK Manager downloads platform components and tools from a Microsoft-managed repository. If you need access to experimental alpha/beta platforms and tools that are not yet available in the Microsoft repository, you can switch the SDK Manager to use Google’s repository. To make this switch, click the gear icon in the lower right-hand corner and select Repository > Google (Unsupported):
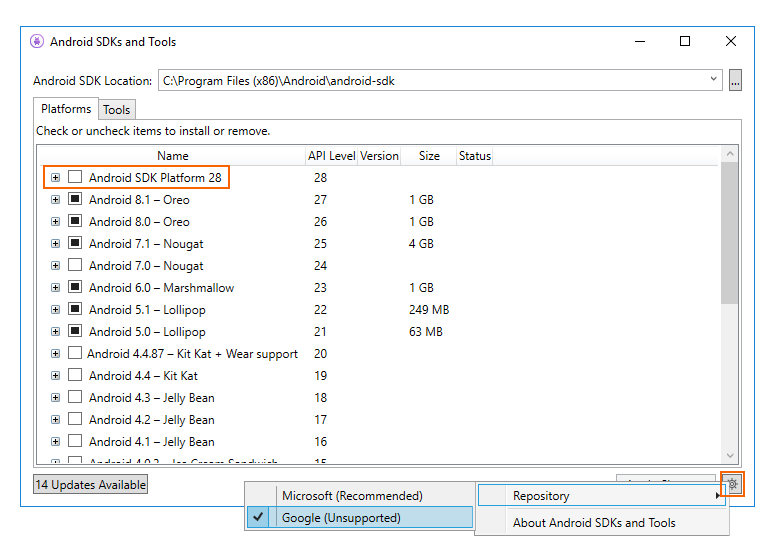
When the Google repository is selected, additional packages may appear in the Platforms tab that were not available previously. (In the above screenshot, Android SDK Platform 28 was added by switching to the Google repository.) Keep in mind that use of the Google repository is unsupported and is therefore not recommended for everyday development.
To switch back to the supported repository of platforms and tools, click Microsoft (Recommended). This restores the list of packages and tools to the default selection.
Requirements
To use the Xamarin Android SDK Manager, you will need the following:
- Visual Studio for Mac 7.5 (or later).
The Xamarin Android SDK Manager also requires the Java Development Kit (which is automatically installed with Xamarin.Android). There are several JDK alternatives to choose from:
By default, Xamarin.Android uses JDK 8, which is required if you are developing for API level 24 or greater (JDK 8 also supports API levels earlier than 24).
You can continue to use JDK 7 if you are developing specifically for API level 23 or earlier.
If you are using Visual Studio for Mac 7.7 or later, you can try using Microsoft’s Mobile OpenJDK Distribution rather than JDK 8.
Xamarin.Android does not support JDK 9.
SDK Manager
To start the SDK Manager in Visual Studio for Mac, click Tools > SDK Manager:

The Android SDK Manager opens in the Preferences window, which contains three tabs, Platforms, Tools, and Locations:
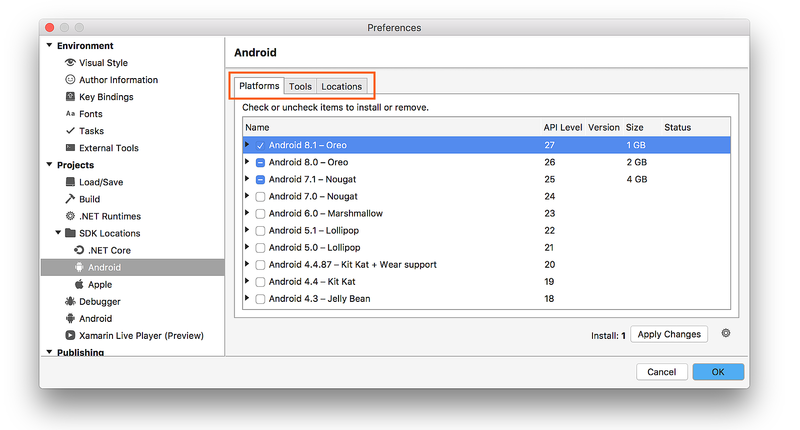
The tabs of the Android SDK Manager are described in the following sections.
Locations tab
The Locations tab has three settings for configuring the locations of the Android SDK, Android NDK, and the Java SDK (JDK). These locations must be configured correctly before the Platforms and Tools tabs will function properly.
When the SDK Manager starts, it automatically determines the path for each installed package and indicates that it was Found by placing a green checkmark icon next to the path:
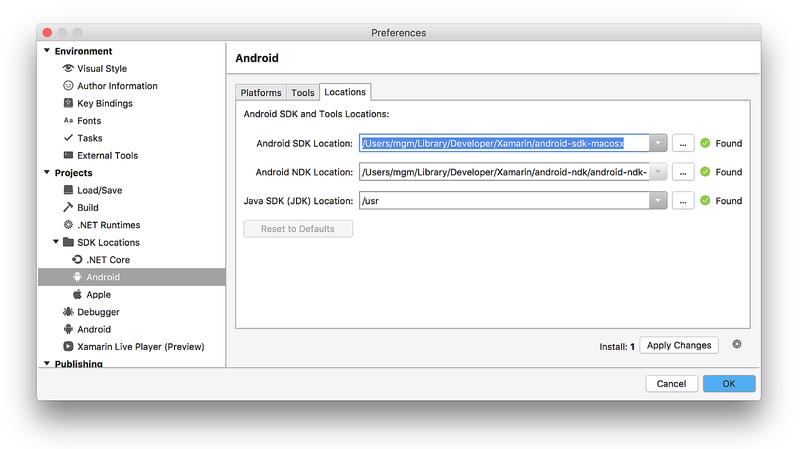
Click the Reset to Defaults button to cause the SDK Manager to look for the SDK, NDK, and JDK at their default locations.
Typically, you use the Locations tab to modify the location of the Android SDK and/or the Java JDK. You do not need to install the NDK to develop Xamarin.Android apps – the NDK is used only when you need to develop parts of your app using native-code languages such as C and C++.
Tools tab
The Tools tab displays a list of tools and extras. Use this tab to install the Android SDK tools, platform tools, and build tools. Also, you can install the Android Emulator, the low-level debugger (LLDB), the NDK, HAXM acceleration, and Google Play libraries.
For example, to download the Google Android Emulator package, click the check mark next to Android Emulator and click the Apply Changes button:
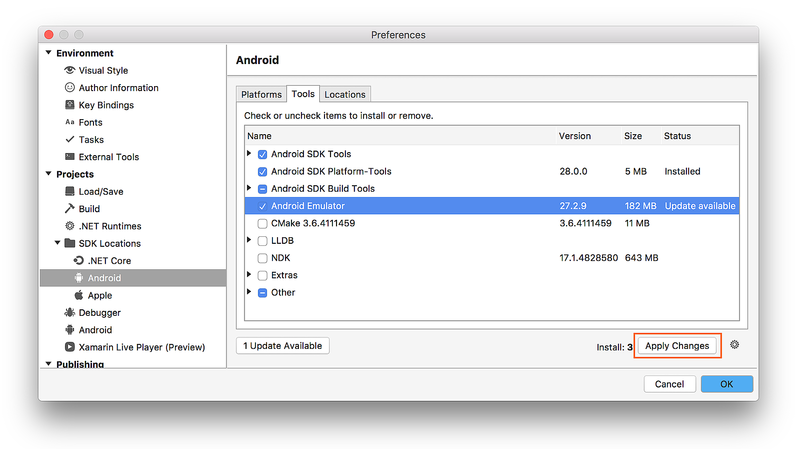
A dialog may be shown with the message, The following package requires that you accept its license terms before installing:
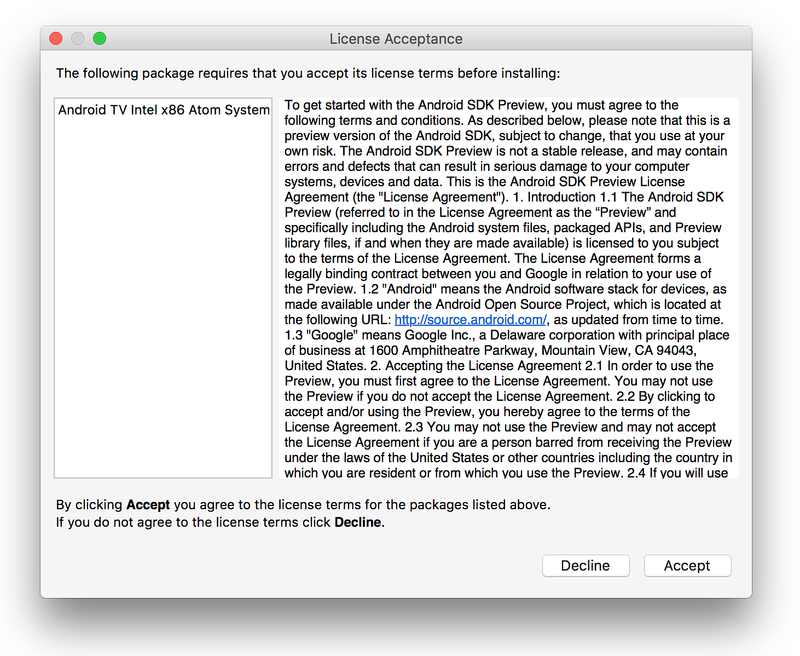
Click Accept if you accept the Terms and Conditions. At the bottom of the window, a progress bar indicates download and installation progress. After the installation completes, the Tools tab will show that the selected tools and extras were installed.
Platforms tab
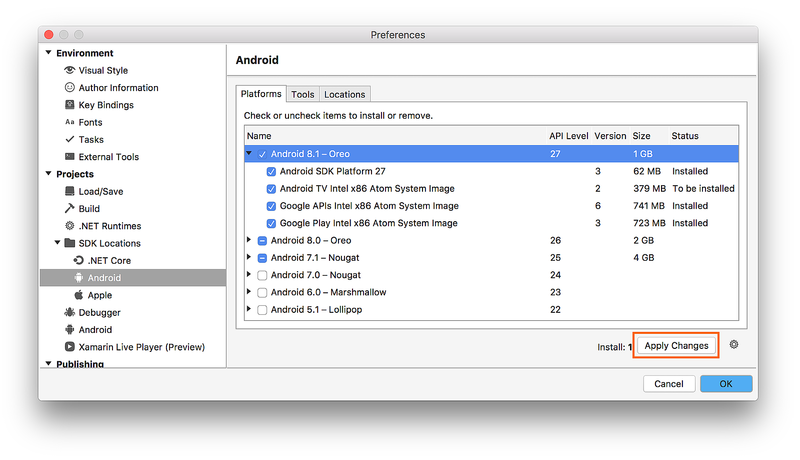
The Platforms tab displays a list of platform SDK versions along with other resources (like system images) for each platform:

This screen lists the Android version (such as Android 8.1), the code name (Oreo), the API level (such as 27), and the sizes of the components for that platform (such as 1 GB). You use the Platforms tab to install components for the Android API level that you want to target. For more information about Android versions and API levels, see Understanding Android API Levels.
When all components of a platform are installed, a checkmark appears next to the platform name. If not all components of a platform are installed, the box for that platform is filled. You can expand a platform to see its components (and which components are installed) by clicking the arrow to the left of the platform. Click down arrow to unexpand the component listing for a platform.
To add another platform to the SDK, click the box next to the platform until the checkmark appears to install all of its components, then click Apply Changes:
To install only some components, click the box next to the platform once. You can then select any individual components that you need:
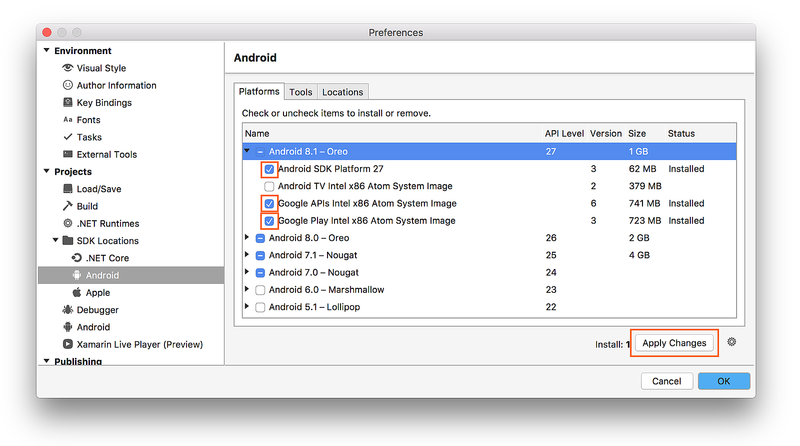
Notice that the number of components to install appears next to the Apply Changes button. After you click the Apply Changes button, you will see the License Acceptance screen as shown earlier. Click Accept if you accept the Terms and Conditions. You may see this dialog more than one time when there are multiple components to install. At the bottom of the window, a progress bar will indicate download and installation progress. When the download and installation process completes (this can take many minutes, depending on how many components need to be downloaded), the added components are marked with a checkmark and listed as Installed.
Repository selection
By default, the Android SDK Manager downloads platform components and tools from a Microsoft-managed repository. If you need access to experimental alpha/beta platforms and tools that are not yet available in the Microsoft repository, you can switch the SDK Manager to use Google’s repository. To make this switch, click the gear icon in the lower right-hand corner and select Repository > Google (Unsupported):
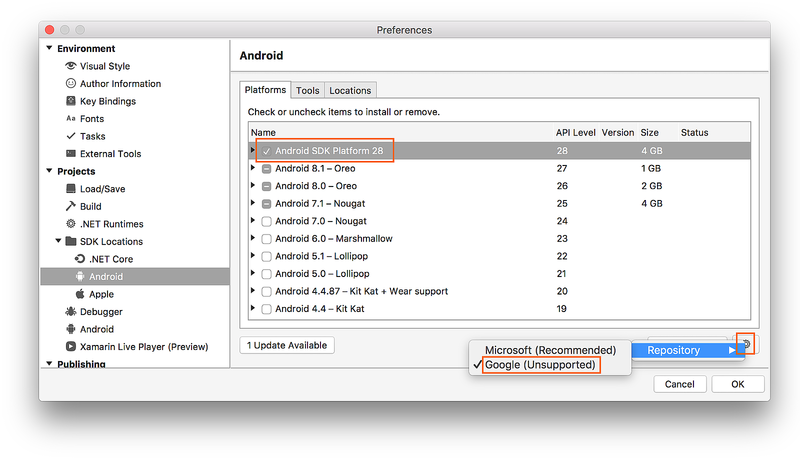
When the Google repository is selected, additional packages may appear in the Platforms tab that were not available previously. (In the above screenshot, Android SDK Platform 28 was added by switching to the Google repository.) Keep in mind that use of the Google repository is unsupported and is therefore not recommended for everyday development.
To switch back to the supported repository of platforms and tools, click Microsoft (Recommended). This restores the list of packages and tools to the default selection.
Summary
This guide explained how to install and use the Xamarin Android SDK Manager tool in Visual Studio and Visual Studio for Mac.
Источник


