Let’s Make One of Those Fancy Scrolling Animations Used on Apple Product Pages

Take your JavaScript to the next level at Frontend Masters.
Apple is well-known for the sleek animations on their product pages. For example, as you scroll down the page products may slide into view, MacBooks fold open and iPhones spin, all while showing off the hardware, demonstrating the software and telling interactive stories of how the products are used.
Just check out this video of the mobile web experience for the iPad Pro:
A lot of the effects that you see there aren’t created in just HTML and CSS. What then, you ask? Well, it can be a little hard to figure out. Even using the browser’s DevTools won’t always reveal the answer, as it often can’t see past a element.
Let’s take an in-depth look at one of these effects to see how it’s made so you can recreate some of these magical effects in our own projects. Specifically, let’s replicate the AirPods Pro product page and the shifting light effect in the hero image.
The basic concept
The idea is to create an animation just like a sequence of images in rapid succession. You know, like a flip book! No complex WebGL scenes or advanced JavaScript libraries are needed.
By synchronizing each frame to the user’s scroll position, we can play the animation as the user scrolls down (or back up) the page.
Start with the markup and styles
The HTML and CSS for this effect is very easy as the magic happens inside the element which we control with JavaScript by giving it an ID.
In CSS, we’ll give our document a height of 100vh and make our 5⨉ taller than that to give ourselves the necessary scroll length to make this work. We’ll also match the background color of the document with the background color of our images.
The last thing we’ll do is position the , center it, and limit the max-width and height so it does not exceed the dimensions of the viewport.
Right now, we are able to scroll down the page (even though the content does not exceed the viewport height) and our stays at the top of the viewport. That’s all the HTML and CSS we need.
Let’s move on to loading the images.
Fetching the correct images
Since we’ll be working with an image sequence (again, like a flip book), we’ll assume the file names are numbered sequentially in ascending order (i.e. 0001.jpg, 0002.jpg, 0003.jpg, etc.) in the same directory.
We’ll write a function that returns the file path with the number of the image file we want, based off of the user’s scroll position.
Since the image number is an integer, we’ll need to turn it in to a string and use padStart(4, ‘0’) to prepend zeros in front of our index until we reach four digits to match our file names. So, for example, passing 1 into this function will return 0001.
That gives us a way to handle image paths. Here’s the first image in the sequence drawn on the element:
As you can see, the first image is on the page. At this point, it’s just a static file. What we want is to update it based on the user’s scroll position. And we don’t merely want to load one image file and then swap it out by loading another image file. We want to draw the images on the and update the drawing with the next image in the sequence (but we’ll get to that in just a bit).
We already made the function to generate the image filepath based on the number we pass into it so what we need to do now is track the user’s scroll position and determine the corresponding image frame for that scroll position.
Connecting images to the user’s scroll progress
To know which number we need to pass (and thus which image to load) in the sequence, we need to calculate the user’s scroll progress. We’ll make an event listener to track that and handle some math to calculate which image to load.
We need to know:
- Where scrolling starts and ends
- The user’s scroll progress (i.e. a percentage of how far the user is down the page)
- The image that corresponds to the user’s scroll progress
We’ll use scrollTop to get the vertical scroll position of the element, which in our case happens to be the top of the document. That will serve as the starting point value. We’ll get the end (or maximum) value by subtracting the window height from the document scroll height. From there, we’ll divide the scrollTop value by the maximum value the user can scroll down, which gives us the user’s scroll progress.
Then we need to turn that scroll progress into an index number that corresponds with the image numbering sequence for us to return the correct image for that position. We can do this by multiplying the progress number by the number of frames (images) we have. We’ll use Math.floor() to round that number down and wrap it in Math.min() with our maximum frame count so it never exceeds the total number of frames.
Updating with the correct image
We now know which image we need to draw as the user’s scroll progress changes. This is where the magic of comes into play. has many cool features for building everything from games and animations to design mockup generators and everything in between!
One of those features is a method called requestAnimationFrame that works with the browser to update in a way we couldn’t do if we were working with straight image files instead. This is why I went with a approach instead of, say, an element or a
requestAnimationFrame will match the browser refresh rate and enable hardware acceleration by using WebGL to render it using the device’s video card or integrated graphics. In other words, we’ll get super smooth transitions between frames — no image flashes!
Let’s call this function in our scroll event listener to swap images as the user scrolls up or down the page. requestAnimationFrame takes a callback argument, so we’ll pass a function that will update the image source and draw the new image on the :
We’re bumping up the frameIndex by 1 because, while the image sequence starts at 0001.jpg, our scroll progress calculation starts actually starts at 0. This ensures that the two values are always aligned.
The callback function we pass to update the image looks like this:
We pass the frameIndex into the function. That sets the image source with the next image in the sequence, which is drawn on our element.
Even better with image preloading
We’re technically done at this point. But, come on, we can do better! For example, scrolling quickly results in a little lag between image frames. That’s because every new image sends off a new network request, requiring a new download.
We should try preloading the images new network requests. That way, each frame is already downloaded, making the transitions that much faster, and the animation that much smoother!
All we’ve gotta do is loop through the entire sequence of images and load ‘em up:
A quick note on performance
While this effect is pretty slick, it’s also a lot of images. 148 to be exact.
No matter much we optimize the images, or how speedy the CDN is that serves them, loading hundreds of images will always result in a bloated page. Let’s say we have multiple instances of this on the same page. We might get performance stats like this:

That might be fine for a high-speed internet connection without tight data caps, but we can’t say the same for users without such luxuries. It’s a tricky balance to strike, but we have to be mindful of everyone’s experience — and how our decisions affect them.
A few things we can do to help strike that balance include:
- Loading a single fallback image instead of the entire image sequence
- Creating sequences that use smaller image files for certain devices
- Allowing the user to enable the sequence, perhaps with a button that starts and stops the sequence
Apple employs the first option. If you load the AirPods Pro page on a mobile device connected to a slow 3G connection and, hey, the performance stats start to look a whole lot better:

Yeah, it’s still a heavy page. But it’s a lot lighter than what we’d get without any performance considerations at all. That’s how Apple is able to get get so many complex sequences onto a single page.
If you are interested in how these image sequences are generated, a good place to start is the Lottie library by AirBnB. The docs take you through the basics of generating animations with After Effects while providing an easy way to include them in projects.
Источник
Apple styled 3D device animation in a webpage

Dec 9, 2019 · 10 min read

Have you visited the Apple’s product website? If yes, you must’ve seen this device animation. I always wondered about this animation! How are they made? Today I’ll unveil the truth behind this.

I’ll keep this article as descriptive as possible so that even a newbie can use these instructions to create animations for their webpages.
Before we start, I would like to show you the basic concept used behind this. It would be good if you follow these steps along with me:-
What did you obser v e? You got it right! It’s an image sequence which gets animated because of a specific event. Here in our example, it will be a scroll event, just like Apple did for their new MacBook Pro 16″.
Before I tell you how I created this, we will see what tools I used.
- Cinema 4D
- Adobe After Effects
- Adobe Media Encoder
- Bodymovin plugin
- Code Editor (I’m using VS code. You can use other code editors like Atom, Sublime text, etc.).
- And a Browser (Chrome or Firefox, any of them will work).
Let’s dig into the process! We’ll go step by step with each application as I listed above. I’ll try my best to introduce you to each one of them, and then explain the process so that even if you are new to these applications, you won’t face any difficulty while using these applications.
Cinema 4D
You must’ve seen a sci-fi or a superhero movie having all those spaceships flying around the city! Crazy, right? Do you know their origin?[not the story of-course] They are made using 3D modelling software like Cinema 4D, Blender, Maya, etc.
Cinema 4D is a 3D modelling software used to create a simulation of a real-world or an imaginary-world object. You can use this software to animate your 3D objects. This software comes with 14 days of free trial. The paid version is available for 59.99$/month.
At least, for now, we have a short period requirement here so we’ll go with the free trial and we are not going to model anything since we have a MacBook Pro 2017 3D model with us.[Grab it from here.]
Open the MacBook Pro 2017.c4d in the Cinema4D.
The interface might seem quite overwhelming for a first timer. I’ll explain the important things we need right now. You’ll see something like this:
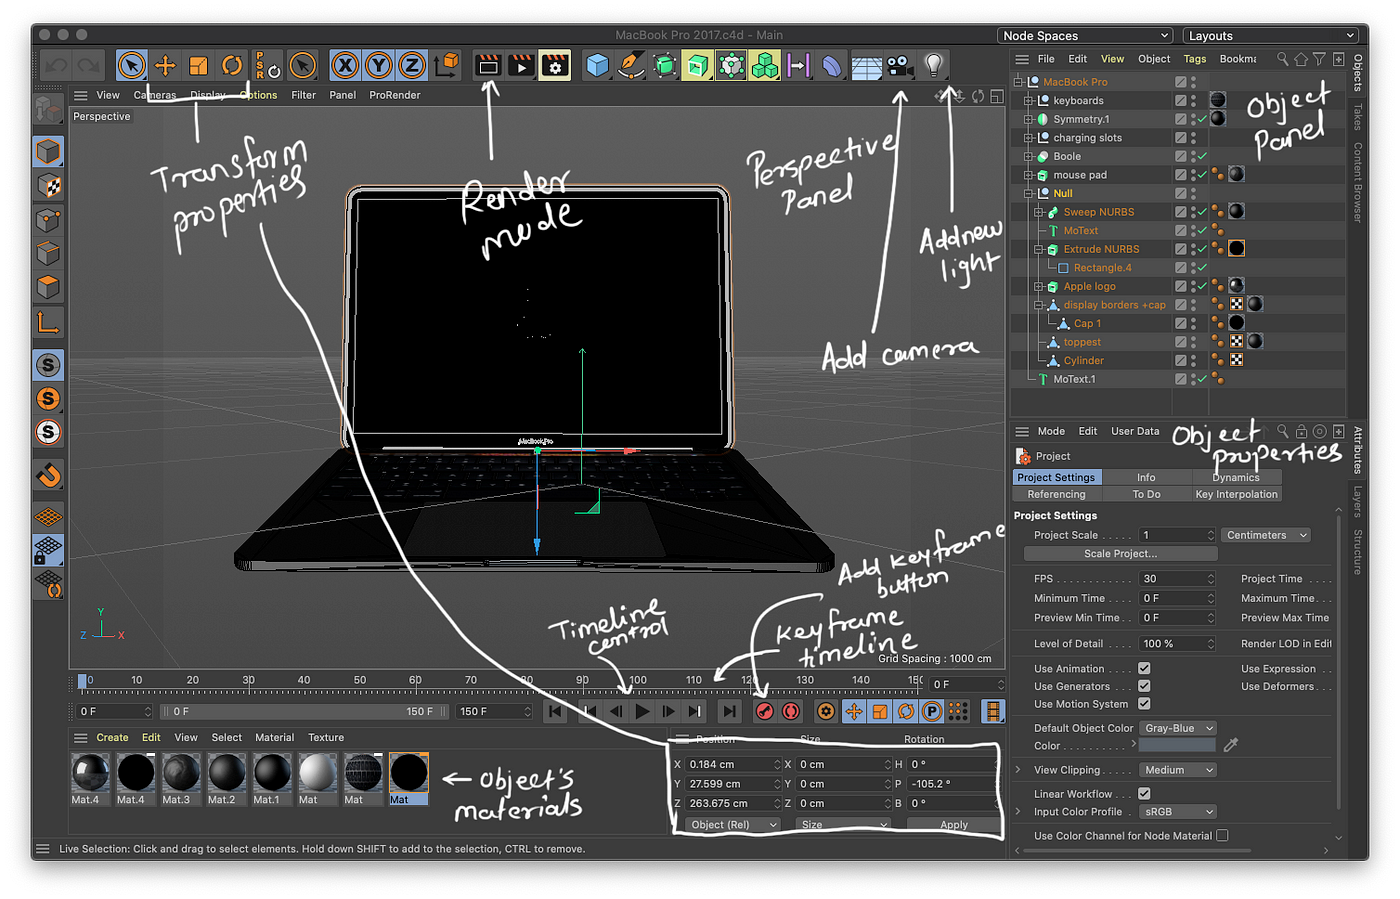
Perspective Panel — used to view and pan the object.
Object Panel — list of the objects from the project.
Object Properties Panel — Configuration of an object.
Toolbar and other buttons
- Transform properties — used to rotate, move or scale an object.
- Render View — used to render the current frame of the scene.
- Camera Button — Creates a new Camera.
- Light Button — Create a new light.
- Timeline — It is a collection of frames
- Timeline controls — Used to play the animation of the scene.
- Keyframe button/Record Active Objects — Used to add a keyframe to the timeline.
In the Object Panel, expand MacBook Pro and select null object. Now drag the timeline pointer to 30th frame of the timeline and click on the create new keyframe button, this will set the object’s properties at 30th frame. Now drag that pointer to the last frame and set the ‘P’ rotation to -90degrees and again add a new keyframe. Now click on the play button to see how the animation looks.
Now click on New Light Object, to create light. You might have to move it to another location as it is generated in the MacBook Object. Now, similar to the previous step, add a keyframe to 30th frame and move the pointer to the last frame. Also, relocate the light to its opposite direction.

Similarly, for camera object, create a new camera object and set the X coordinate to 0 and all other angles to 0degree from transform properties. That’s it. Save the file.
Adobe After Effects
Adobe After Effects, you must be aware of this application. Do you remember the Guardians of the Galaxy(both volumes)? All those space scenes can be created using After Effects. I have created some, head out to my Instagram profile to check them out. It is used to create motion graphics and visual effects. But today we are not going to create any effects for our project. It comes with 7 days of a trial version, with a paid plan starting from $20.99/month. We are again going to use trial version here since we don’t have long term requirement.
After installing it, you need to sign in for Adobe creative cloud.
After opening the application you’ll see a window with create new project button, click on it.
Now Drag and drop ‘c4d’ file that we edited earlier in Cinema4D into the project panel.
Now drag that ‘c4d’ file from project panel to new composition button as shown below. It will create a new Composition for our project.

Now it will open effects panel automatically for c4d file, under the Effects Control->Renderer Settings, set Renderer as Standard(Final) since we are using space grey version, our MacBook won’t be visible in dark background. We need to create a solid layer for that. Right-click on composition panel -> New -> New Solid Layer, set its color to white and make sure it is below the MacBook layer so that MacBook will be visible.
That’s it, now click on the timeline in After Effects which is beside the composition panel and hit the space bar, it will start rendering and playing the footage.
If you feel something is not right, something is missing then you can always open c4d fie in Cinema 4D and edit it as per your wish. Save it, and all the changes will be reflected in After Effects immediately.
After modification, save after effects file. Now we’ll create the image sequence using Media Encoder.
Adobe Media Encoder
Even I am new to this one as I am using it for the first time. As far as I know, this software is used to convert media files into other media files and specific formats such as Blu-ray, JPEG and many more.
After installing it, you need to sign in for Adobe creative cloud.
While you are still in the Adobe After Effects, Go to File->Export->Add to Adobe Media Encoder Queue.
It will take you to Adobe Media Encoder, Set the format to JPEG also set the destination folder as shown in the image.
Now click on the play button. It will start creating an image sequence from the composition frame by frame. It’s worthwhile to checkout the image sequence generated by the encoder.

BodyMovin Plugin
Its a free plugin for the After Effects, it can be used to export the JSON file that will be used by ‘bodymovin.js’ player to play the animation using SVG/canvas. It also has support for Lottie animation, by using Lottie player you can run these Bodymovin animations in iOS and Android.
Let’s see how JSON is exported through the sequence of JPEGs.
Open a new project in Adobe After Effects, Now drag and drop all the images from the folder into the After Effects project panel.
Now select all these images and drag it onto a new composition icon, just like we did it for c4d file, but this time it will be for image sequence. It will prompt for new composition configuration, select ‘Create’ as a Single Composition and ‘Still Duration’ should be set to 00:00:00:01 (i.e. an image will last for a single frame) and select the ‘Sequence Layers’ option and ‘Overlap’ option needs to be deselected as shown in the image below:

Click on the timeline and hit space bar to see the animation.
Alright! Now got to Window->Extensions->Bodymovin
A pop up will open for configuring your JSON file. Now select the animation by clicking on the radio button under ‘Selected’ column as shown below.
Click on settings icon under Settings column. Scroll a little bit, click on Assets, under Assets, enable the compression option and set the compression ratio as per requirement. I’ll be fine with 80% compression ratio(Greater the number
High Quality Image Sequence JSON) and then select the option ‘Include in JSON’, it will include the compressed images in the JSON file.
Click on Save button. Click on Render button to start the operation. Now sit back and relax! It will take a minute or two. The JSON file will vary in size from around 1mb to 6mb depending on the various factors such as compression ratio, number of frames, etc.
Code Editor

We need a code editor to write code for controlling the animation using JavaScript. I am considering that you must be familiar to some code editors that are available in the market. I’ll be using VS Code. It’s my favorite code editor. We’ll go step by step HTML -> CSS -> JavaScript. I won’t explain the basics because that’s not the motive of this tutorial. I’m considering that you have some knowledge about the front end. If not, no worries! You can head out to freecodecamp.org and learn some basics on your own. Don’t worry its easy!
Create a div with an id ‘animation’ in the body tag.

Set position of the div having the id animation to ‘fixed’ and top and left to 0.

Get window height and multiply it by 4 (you can choose any value depending on how much you want your webpage to scroll).

Create an object for animation data and load it into a variable
- The ‘container’ key contains the id of the container in which animation is going to play
- The ‘renderer’ key can be SVG or canvas
- The ‘loop’ key should be set to false to avoid animation loop
- The ‘autoplay’ key should be false since animation will be played on scroll
- The ‘path’ will be the JSON file which was exported by Bodymovin plugin or else you can store json into a variable and use it instead of path (here I used a sample Lottie animation JSON file from Lottie website).

Add a scroll event to the window and call a function.
- The frame number is calculated according to the scrollbar’s position of the window.
- The animObject.goToAndStop(frame, true) method will go to that particular frame while animating the image sequence.

Finally, we are at the end! Phewww! The Process was too long. It is complicated to implement if you don’t know how to use design tools. It took me a whole day to manage the c4d file. Once you get your model with perfect lighting and texture, the process becomes fast. I’ll show you what I’ve created.
Result
Open the HTML file in your preferred browser.
*Drumroll in the background*
Now we will talk about the advantages and the disadvantages of the process.
- Advantages
- No doubt it looks super cool.
- You can use this process for other motion graphics animation, icon animations, etc. Head out to Lottie to check out the documentation of bodymovin.js. You can use various animations made by Lottie community (some are paid).
- Disadvantages
- Time-consuming for sure
- If you are unaware of Cinema 4D, After Effects then probably it’ll be harder for you to create this kind of animations(At least basic knowledge is needed).
- You might need a good system to render c4d in after effects. My MacBook Air took around 2–3 minutes to render 6 seconds of composition with full resolution.
References:
While surfing YouTube I found this amazing tutorial from Webflow. You’ll see the same process as I’ve told you here, but there are two major differences. First, I’ve used a MacBook model whereas, in the video, they created a basic phone model with volume keys. The second difference is that they used their Webflow app to create scroll animation without writing code.
Источник


